|
With Project Jelly Roll approaching, I decided to take a look at my Jelly Roll-friendly patterns to figure out what I am going to work on and perhaps share some ideas. One of my Jelly Roll patterns is Definite Plus. 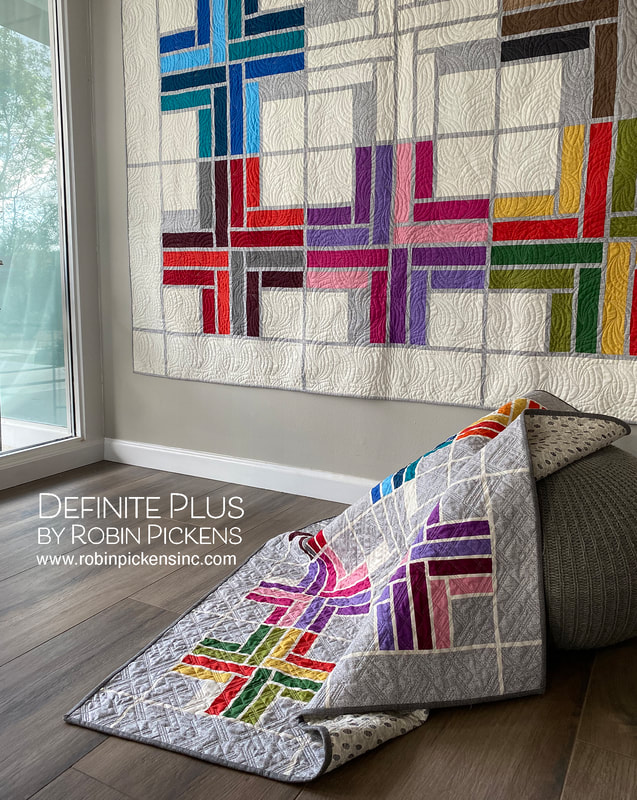 My original Definite Plus quilt is made in Thatched basics. I loved playing with the color families and having a "ghost block" image in the center of just sashings and background. And I made this in both the large size on cream and the small size (using a Honey Bun or 1 1/2" strips) on Heather. 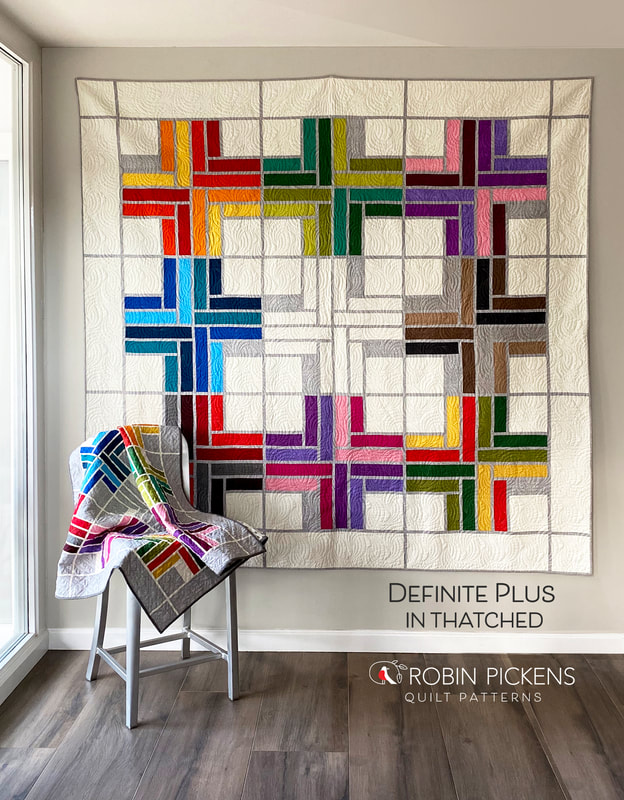 I wanted to see what this would look like made up in a Jelly Roll of print fabrics from a collection. I decided to make one that had no outer borders and no ghost block for the center. Full quarter log cabin blocks without an accent. If you make the large size without the outer border, it goes from being an 82" square quilt to 69 x 69", which makes a lovely large lap or can fit on a twin bed as a nice extra quilt. 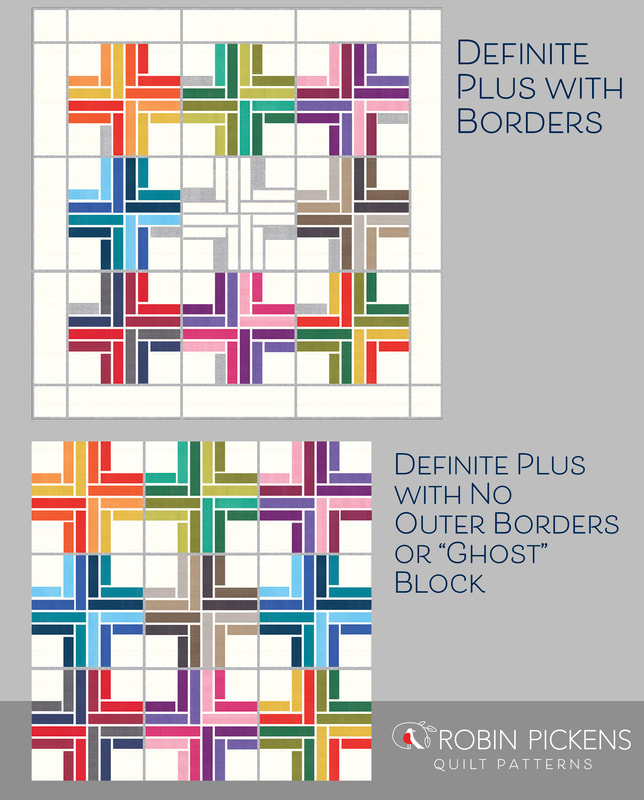 How does this impact yardage and cutting? I have only made it this way in the Large size, so I don't have the specifications for the Small at this point. For Large quilt with no outer border and no ghosted center block or accent rectangles: Sashing: 1 2/3 Yards for sashing instead of 2 1/8 Yards. When you are cutting, you will cut a total of (56) WOF strips. (4) of those will be cut to 34 3/4" and joined end to end to make the long sashings horizontally between the rows. Instead of (44) 6 1/2 x 1" pieces, you will need (36). Background: You need 1 1/4 Yards for background instead of 3 Yards. You will only be cutting the centers of the Quarter Log Cabin blocks and need (36) of them. 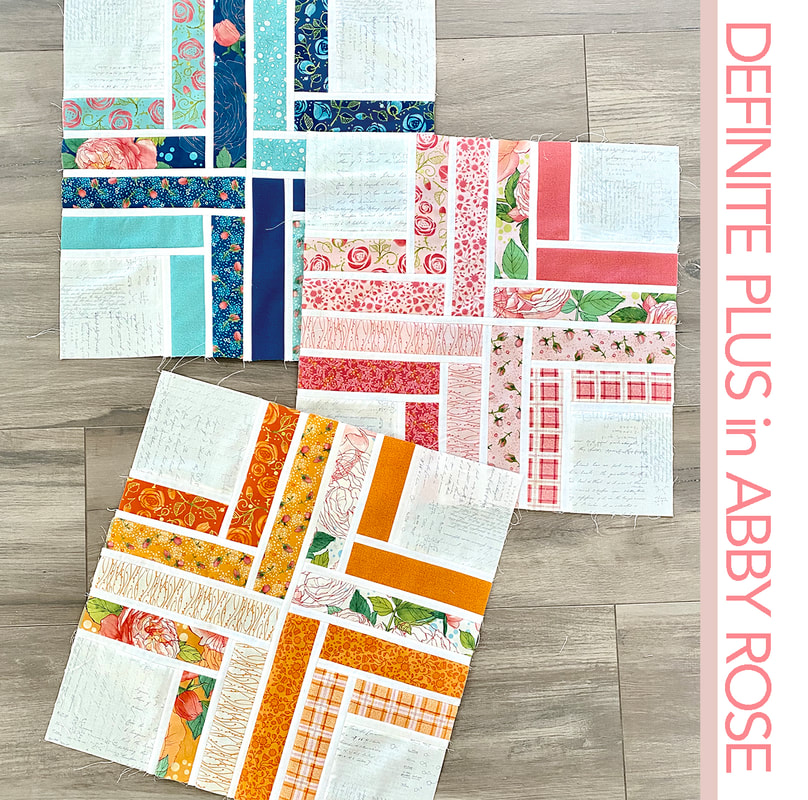 For my print version, I decided to use Abby Rose for my strips. I made all my centers with Zen Chic Modern Paper for a pretty, romantic feel. My sashings are Moda Bella Off White 200. I still kept my groupings of 4 that make a plus sign in color families. 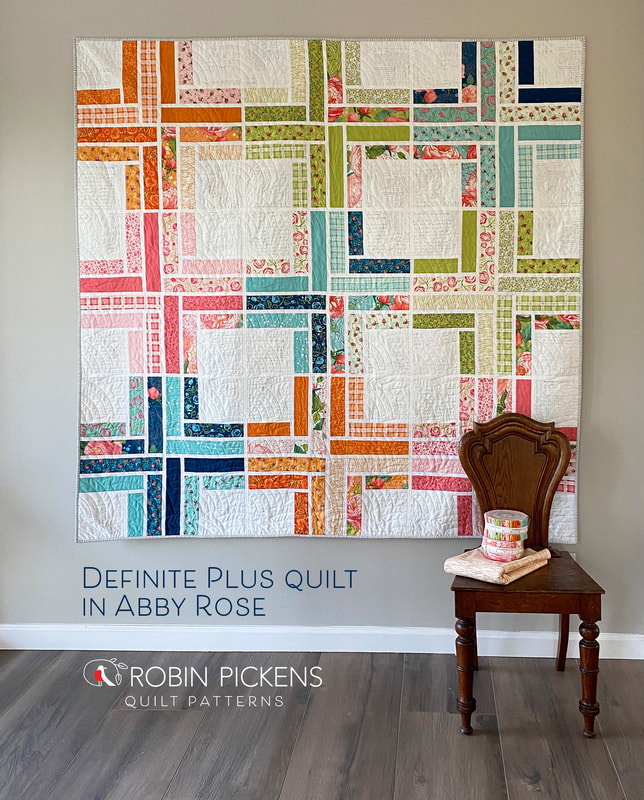 I like seeing the contrast of prints vs a more solid look for this quilt. I am very excited to try it again with upcoming lines and try other versions of background and sashing colors.  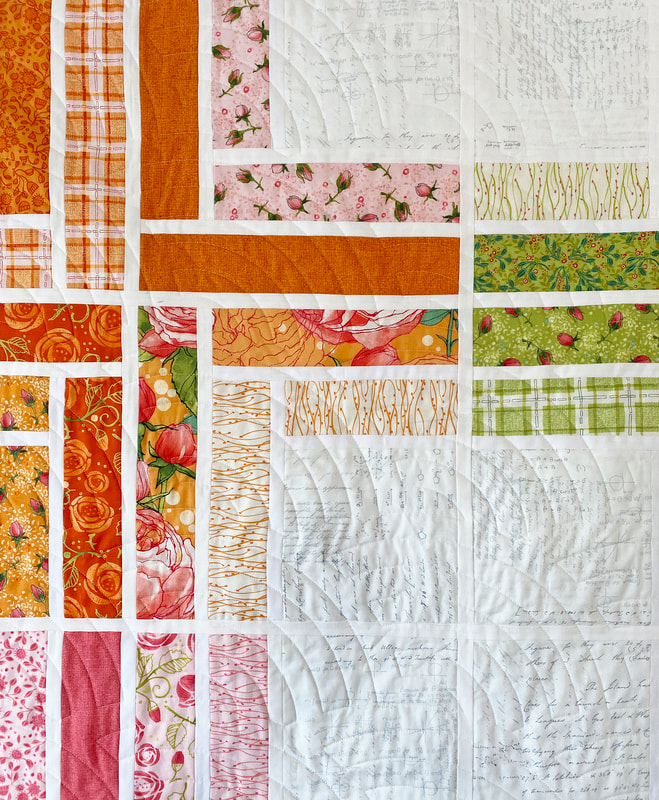 And just one more idea, since I'm playing around with it...what if the placement of colors were more improvisational and the background squares also had some pops of color? I decided to take a look in the suggestion of my Hygge Happy color theme direction (with Washed Linen, Toast, Cocoa, Sugar Rose, etc). What do you think? Playful or too random? 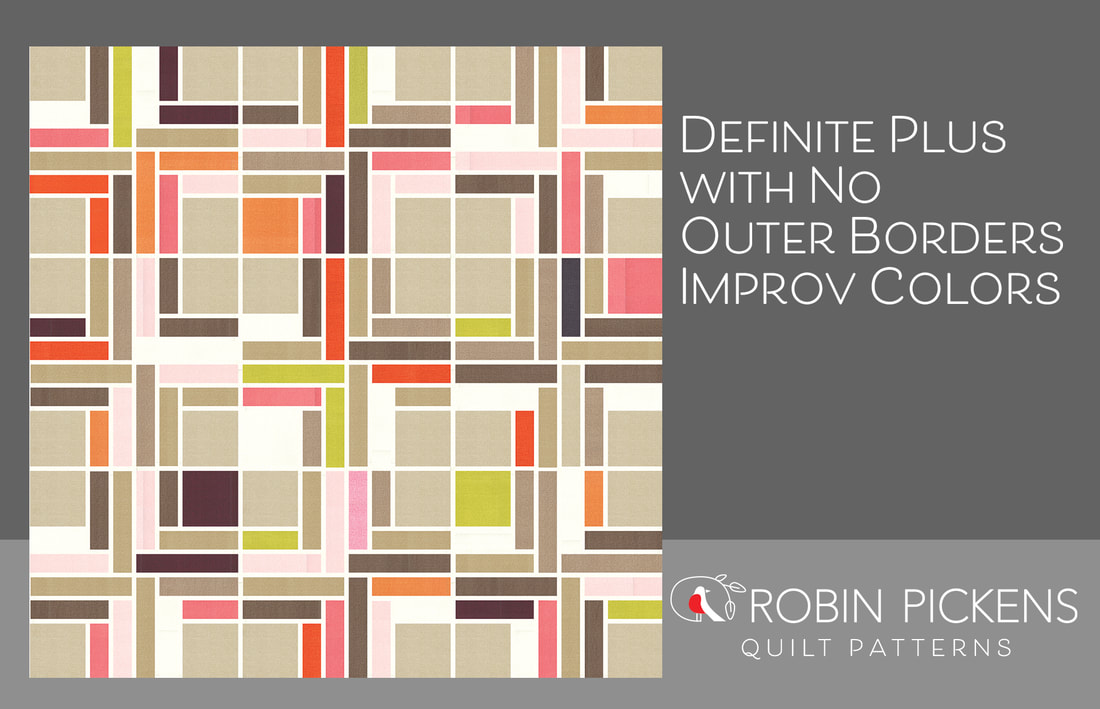 Looking for more Jelly Roll-friendly quilt patterns? Hop on over to my shop and check out Showering Stars, Ring Around the Posies, Equalizer, and Blockstep. And please join in the fun on September 18th 2021 as we sew those Jelly Rolls! 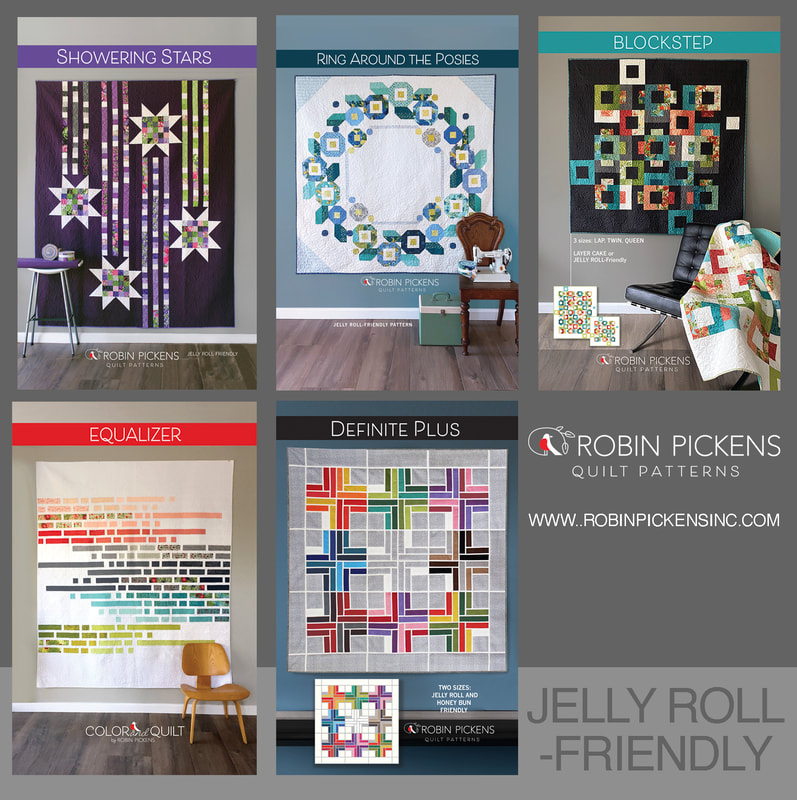
2 Comments
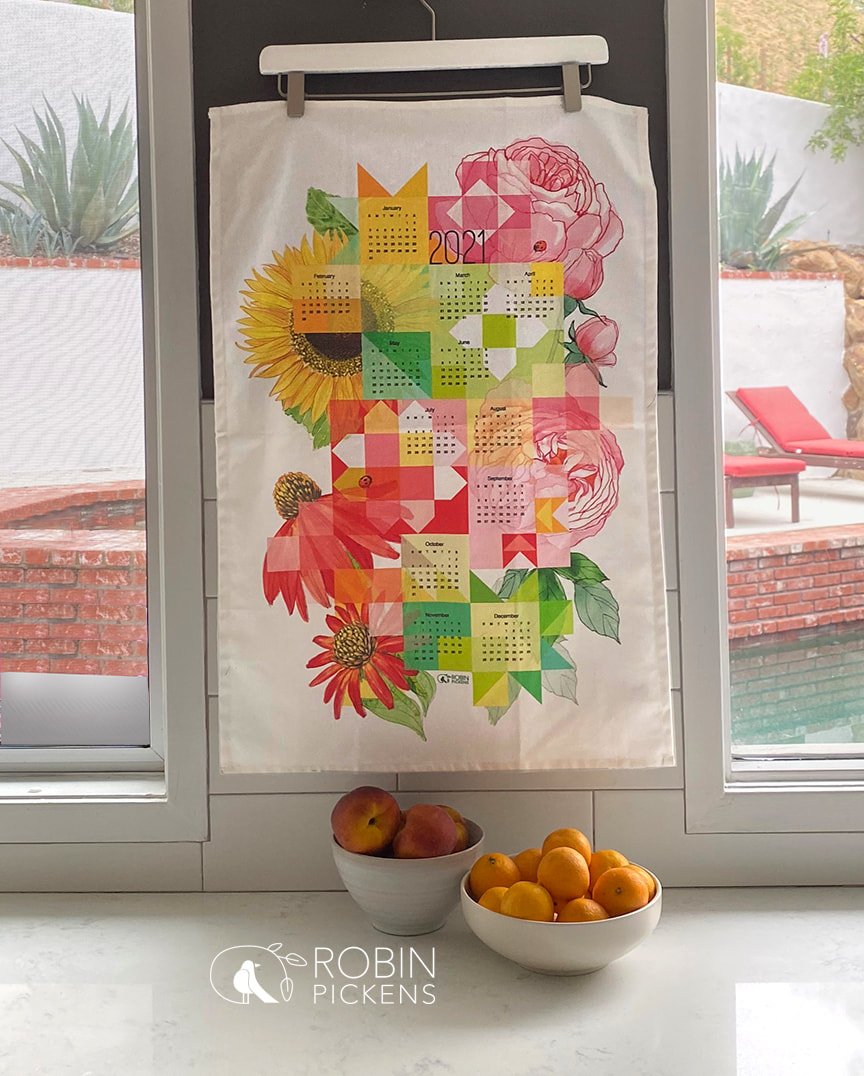 I'm looking forward to 2021 and hanging this colorful calendar tea towel in my kitchen! This design is exclusive to Moda Fabrics and will be sold through quilt shops. I've used colorful quilt block motifs mixed with some of my florals from Abby Rose, Painted Meadow and Solana. A couple of the ladybugs from Solana are bringing some good luck into the day too. 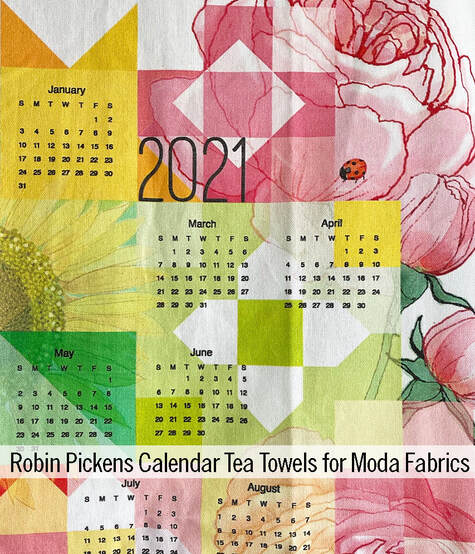 I have heard some people say they will add a calendar tea towel to a back of a quilt to mark the month and year the quilt was made. I think that is such a fun idea! I like to just collect them as a memento from each year and vary the designs. I also hang them for some time in the kitchen from a skirt hanger and I can then switch them out easily. 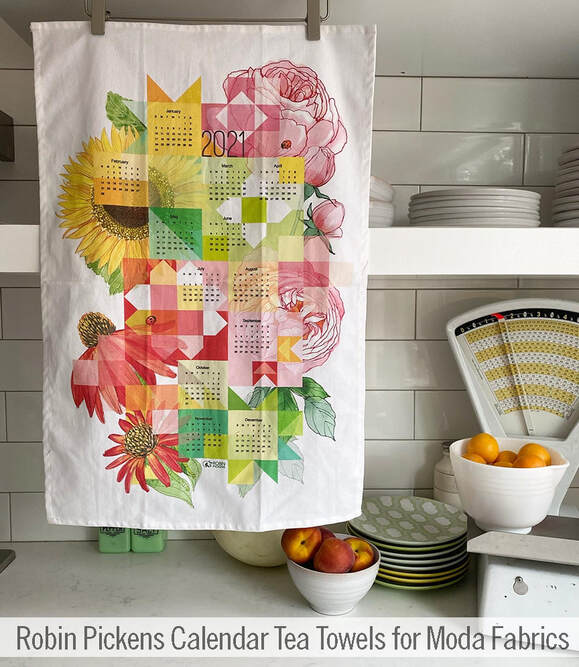 If you are interested in getting one of these, let your local quilt shop know you want them to order some. Along with this tea towel (which will be shipped to shops in November), Moda is also making some tote products! They have the same floral and quilt design but instead of a calendar they say SEW HAPPY. I was so excited to see the samples and did this video that shows them more on my youtube channel. And this fun fast one to get a feel for HOW MUCH fits into this large project tote! The totes have fun red handles and the regular sized tote and large project one have inside zippered pockets to hold those little things that so easily get lost. Or you can pop a zipper pouch inside the tote that holds rotary cutter, scissors, threads, etc. The zipper pouch has a nice strap handle to the side so you can loop it over your wrist. Another lovely feature in the large project tote is a pocket that runs along the width of the tote on the back side. It has a center seam so it doesn't flop open and its a great spot for some of your rulers, books, and patterns. 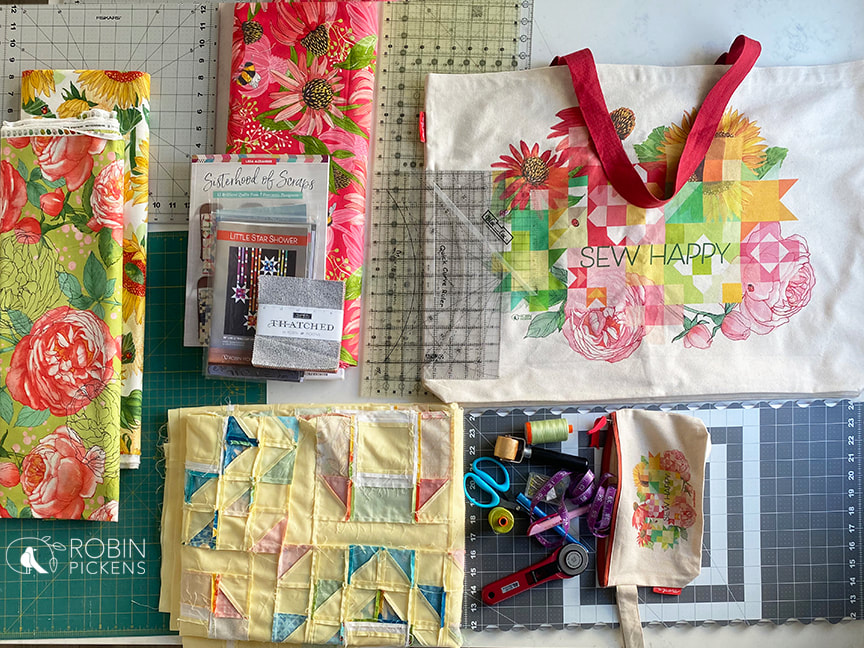 This is an example of the types of things I have if I'm taking a class or workshop for quilting, including fabric (did I mention it fits whole bolts of fabric?), cutting mats, rulers, sewing notions, rotating mats, and patterns and quilt blocks or tops. I am forever fighting the long rulers and mats and trying to keep them from sliding out of my arms and piles of stuff as I travel from car to class. I like to have my 24" long rulers and a mat that is at least that wide as well. All this stuff fits in the tote! Of if I'm going to see a longarm quilter, I have my quilt top, quilt back and possibly batting. Or my big embroidery/quilting hoop. The totes and zipper pouches will be shipping to shops in December. Wouldn't this be a great gift for a sewing friend? I'm making up my list (and sorry Mom, you now know one thing you'll be getting for Christmas!) Want to see more videos with fabrics and quilts and fun stuff for sewing? Pop on over to my youtube channel! https://www.youtube.com/c/robinpickens Happy Moda Blockheads day! This weeks cheery block is at Vanessa Goertzen's blog: With a name like Lucky Penny, how could I not think of coppery orange colors? Maybe mixed with grays from other change with it? Silver and copper...gray and orange...time for color play! 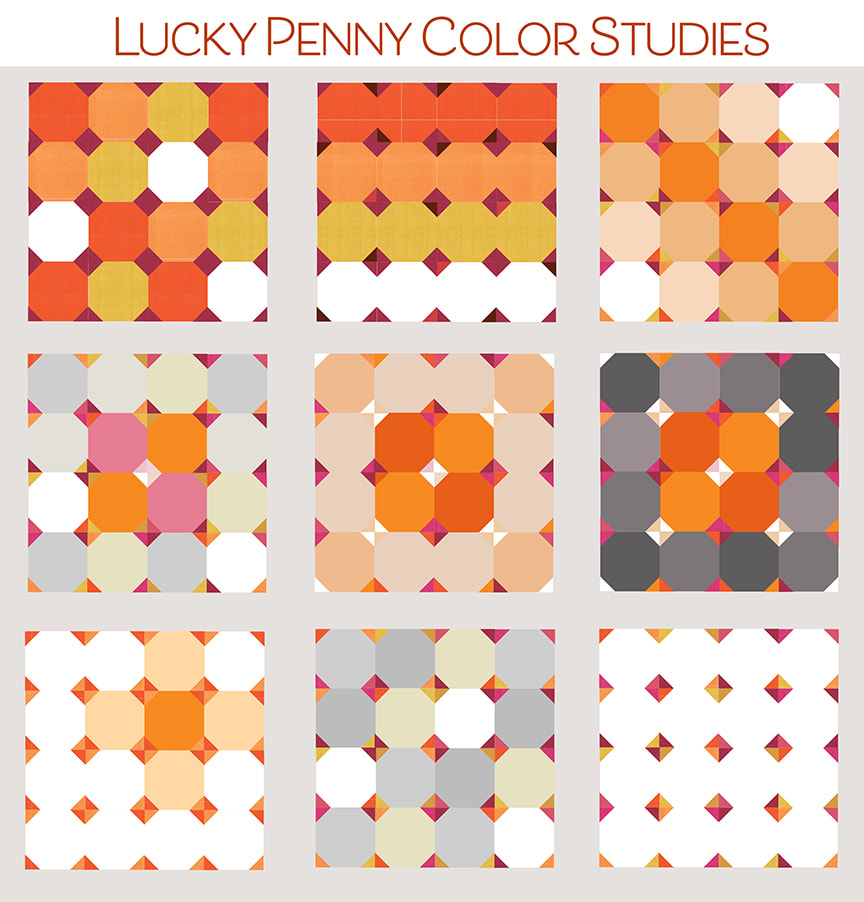 This block is just FUN like gumballs in bright colors! The little stitch and flip corners make friendly curved pieces that can play with random color in spotty placement or lining up the balls in rows or playing with the balls in formation on an angle. I started with all the same color stitch and flip corners and started to introduce other colors to give those corners their own sparkly personality. In the second row I looked at the center stitch and flip unit being light/white while the other corners were darker colors. Combined with the colors of the snowball blocks in the center 4 pieces it really calls attention to that center spot. It is also interesting to carry those light corners out as little bows out to the corners. I kept the middle and right second row images completely symmetrical and tried the outer ring of pieces in light or dark shades. I n the bottom row the image on the left shows using all the same repeating stitch and flip color pairs with mostly white snowball blocks. I've emphasized one block in there with a soft color surrounding it. The other two in the last row could be done in all white or in low volume fabrics with the color coming mostly from the stitch and flip corners. I love how the last one really becomes a composition about the little diamonds and you hardly see the snowballs. 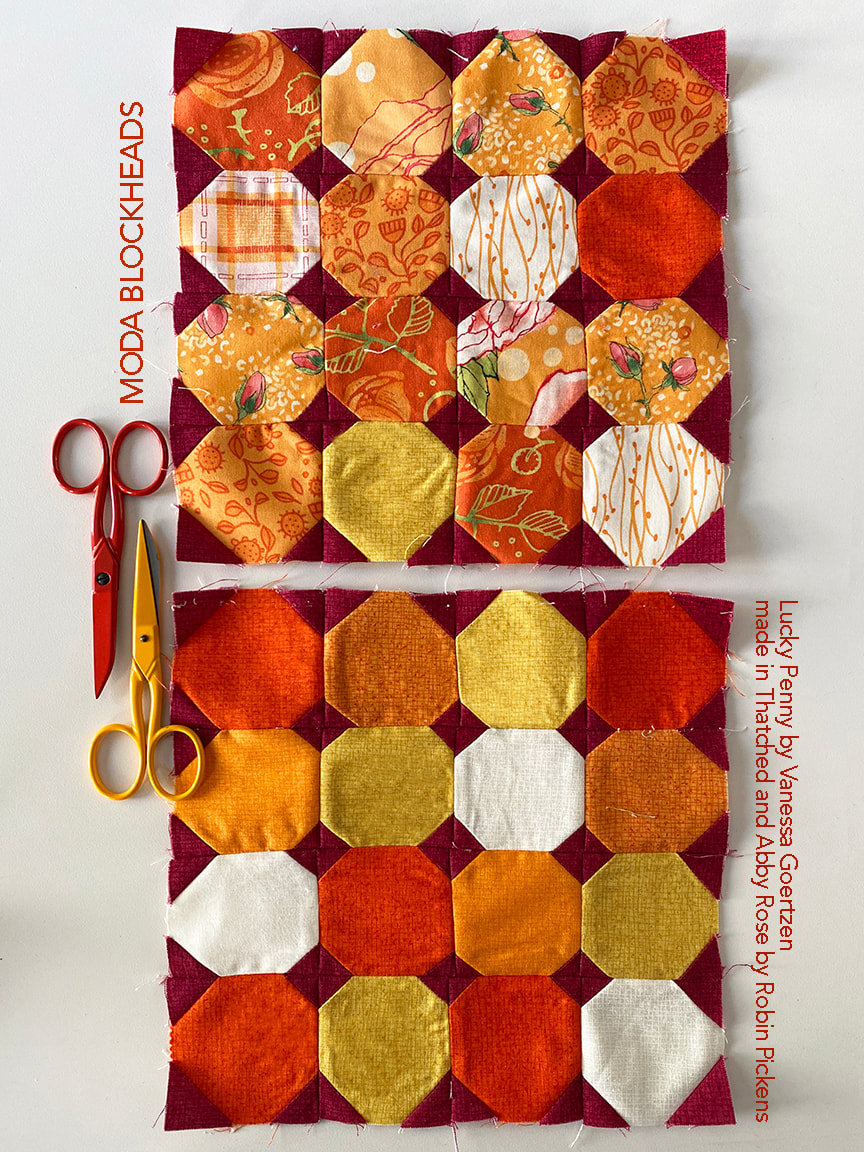 For my own blocks, I liked the colors arranged in a random way and felt that had a playful energy. I used the orange fabrics from Abby Rose to make my scrappy block, using Burgundy from Thatched to make the dark corners that really make the orange prints pop. 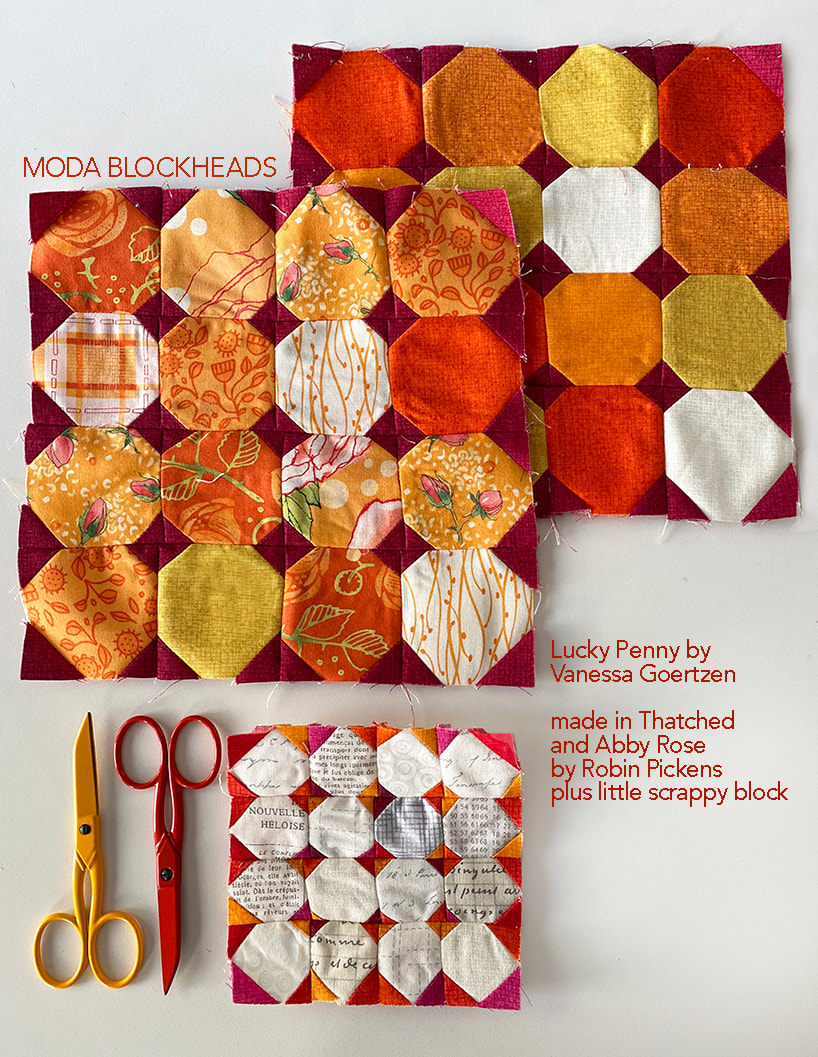 But I was also interested in making the low volume version of the block and decided to make a 4" block with my playful colors in the stitch and flip corners. 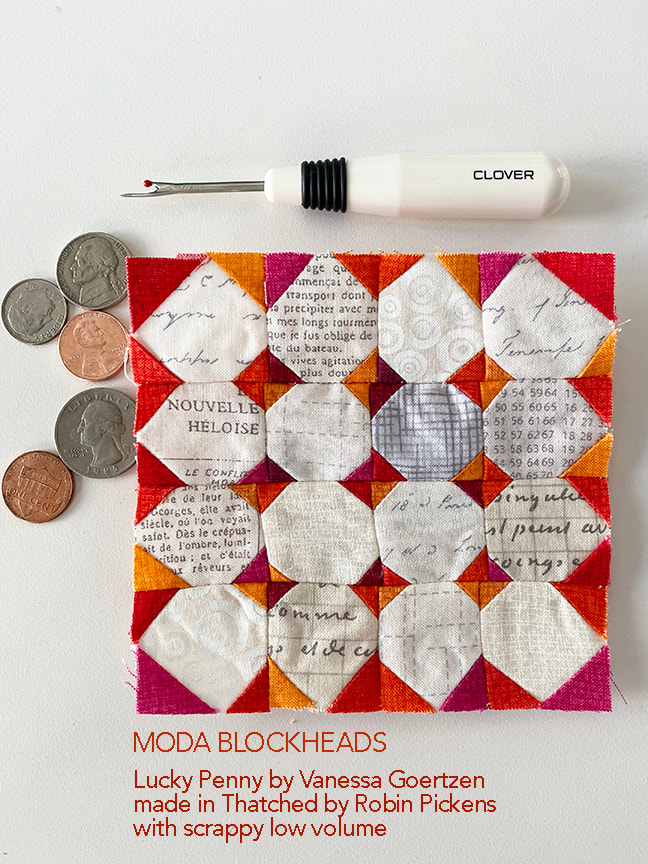 I'm not exactly the most accurate and patient when it comes to making a 4" block with lots of little pieces. I think my block should be renamed "Wonky Penny"! The seam ripper is there because I did rip out my rows and resewed them...believe it or not, this is the improved one! I decided I was just fine with the imperfections on this one and I kind of like the personality it has. Those small blocks sure are cute! 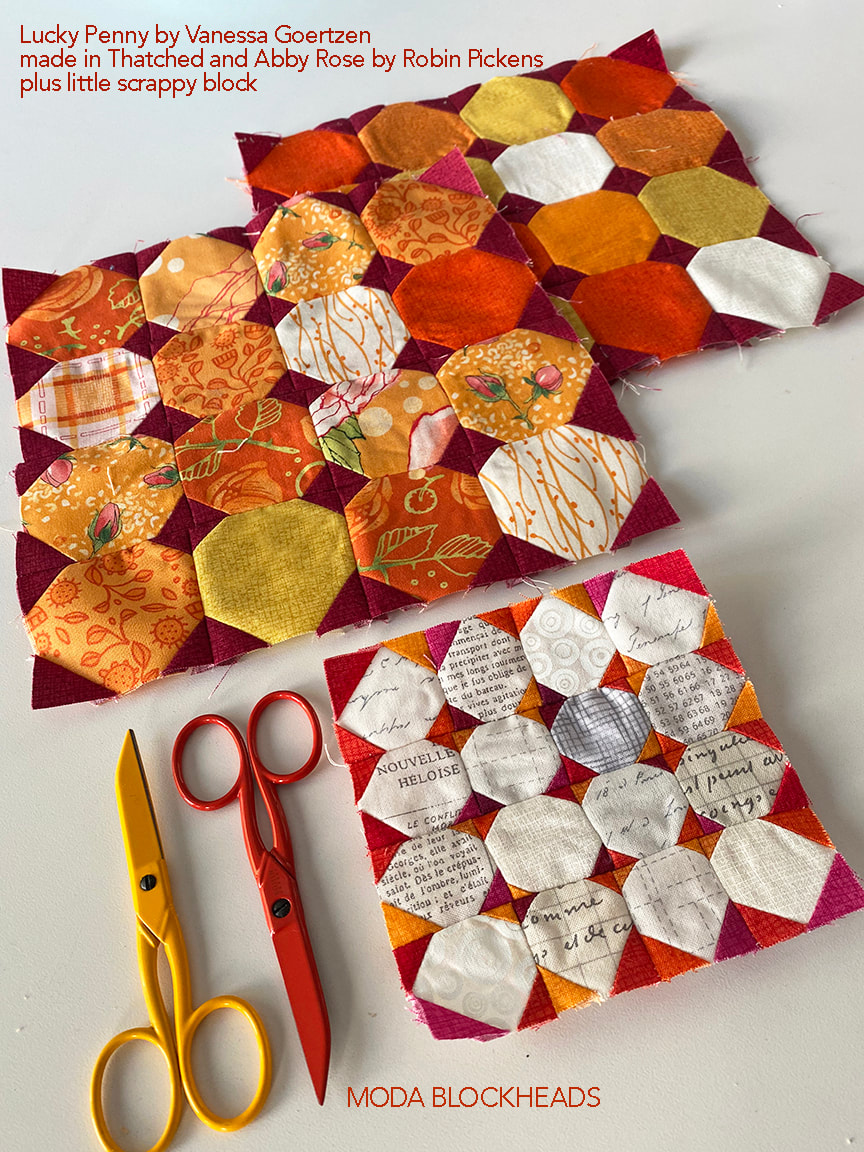 If you want to refer back to other color studies for Moda Blockheads I've made a page that shows an overview of them. The "COLOR STUDIES" is up in the navigation bar at the top. On the page you can click on an image to be taken to that blog post I'll update it and add the new color studies as I do them. 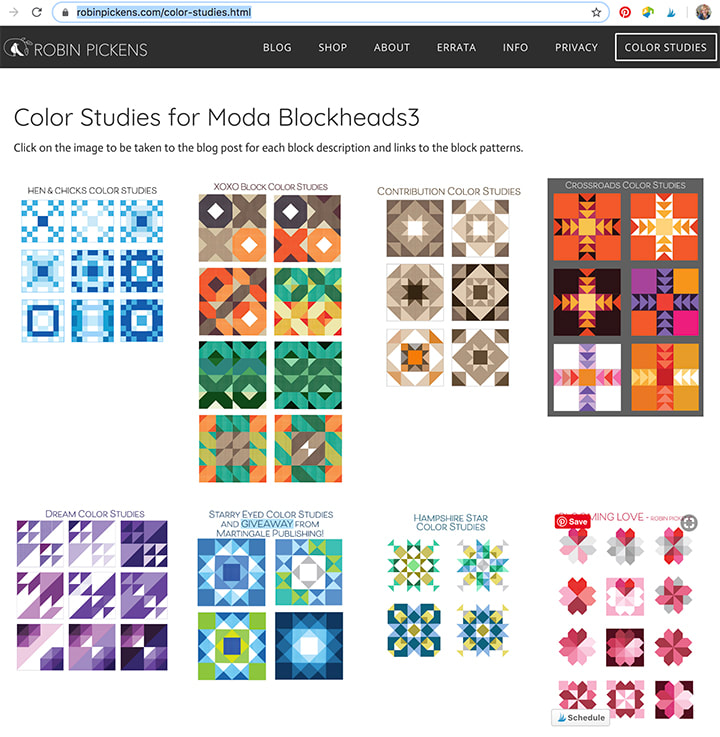 Hope you have lots of fun with your Lucky Penny block! Be sure to check out the other Moda designers!
6.17– Vanessa Goertzen 6.24 – Stacy Iest Hsu 7.1 – Robin Pickens 7.8 – Janet Clare 7.15 – Jen Kingwell 7.22 – Joanna Figueroa 7.29 – Corey Yoder 8.5 – Sherri McConnell 8.12 – Betsy Chutchian 8.19 – Jan Patek 8.26 – Brigitte Heitland 9.2 – Lisa Bongean 9.9 – Lissa Alexander 9.16 – Laurie Simpson I love envisioning past patterns in new fabric lines and since Abby Rose is in shops now, let's play with those cabbage roses!  This light blue in Abby Rose is Thatched Seafoam and I just love the softness and warmer tone of that pretty blue! I wanted to see that as the larger side borders with a cream to highlight the fringe thin sashings. A good choice for the cream is Thatched cream 26 or Bella Solids Porcelain.  Here is the cream as the main background with the Abby Rose/Thatched Greenery 124 as the sashings. We have blenders in the Thatched texture with new collections and they don't all automatically become new basics in Thatched. But if a color is different enough and popular, it's a good chance that it will. Greenery is not as yellowy as charteuse, although it is close. Its pretty and soft, like the other Abby Rose colors. 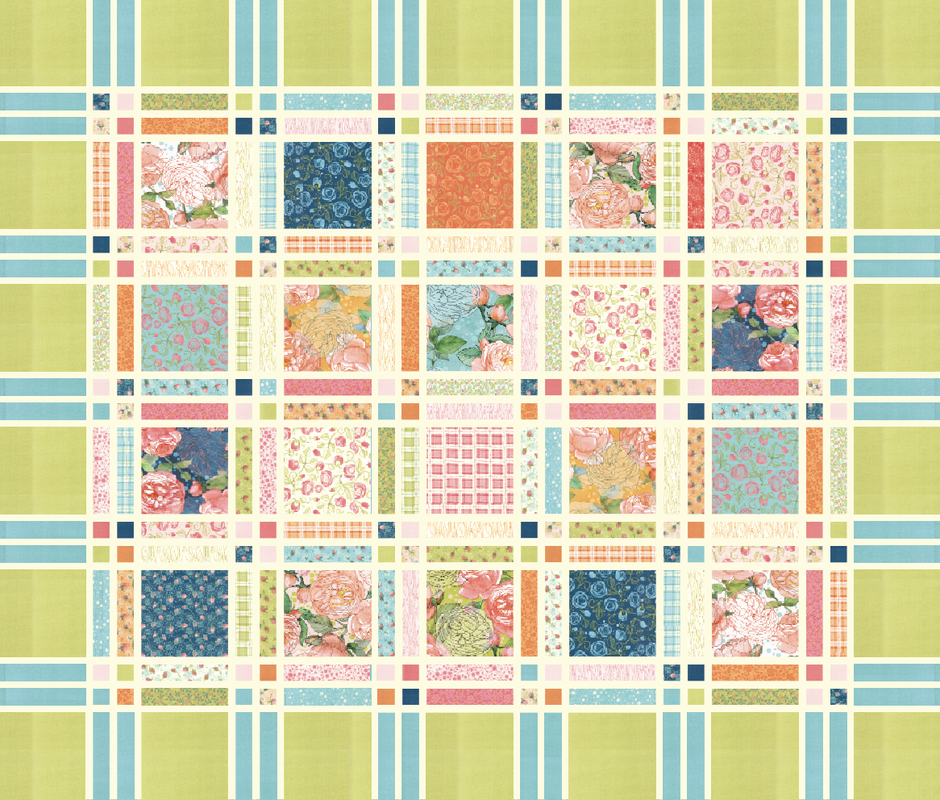 If you were making a king sized quilt, I would assume doubling the twin size. This mockup shows the Greenery as the large border block with the seafoam as the rectangles in the borders. I like the idea of mixing two colors for the borders! You could even go completely scrappy with the borders and have it be an extension of the prints in the body of the quilt. 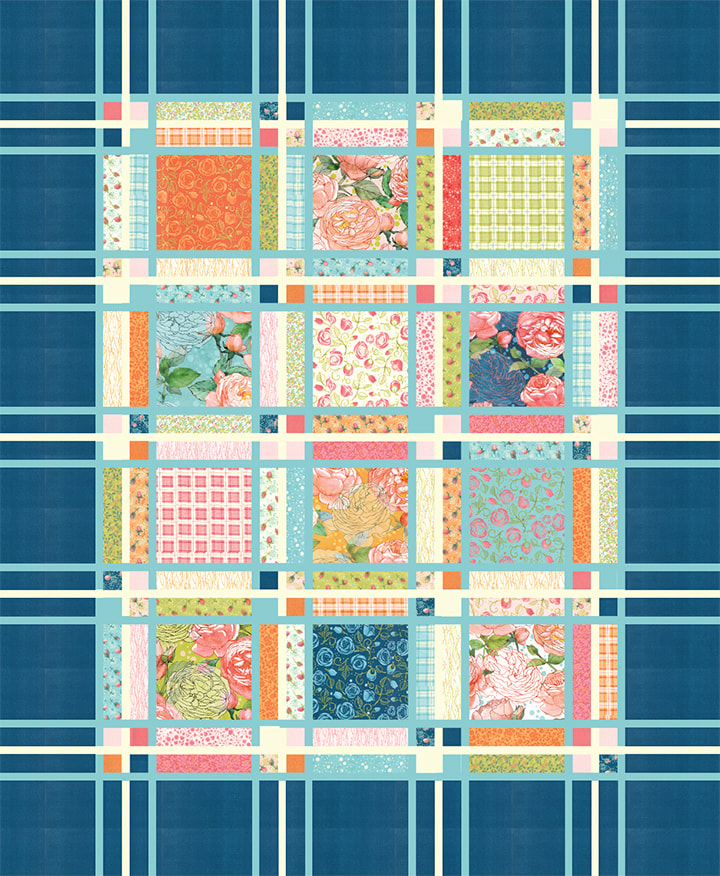 This last image uses the darker, Night 89 Thatched from Abby Rose. It is the same as 89 Marine. I have been so fascinated by Marine, Navy and Burgundy Thatched lately as deep, rich tones. They are so full of depth and personality! Notice on this image that the thin sashings are done in Seafoam Thatched for the two outer pieces, and cream for the inside piece in every group of three. Or you could go from light to dark in three steps to get a more gradated ramp. Lots of possibilities. I just love the drama of the darker border color!
I think Fringe is also a good pattern to play with those large blocks as crazy quilt piecing, string piecing, embroidery panels...lots of options! I hope "seeing" the possibilities with Abby Rose is helpful here! Happy sewing everyone! Happy Blockheads Wednesday! I squeezed a few flying geese in here or there while I was doing other sewing this week. I love the balance and movement in this Crossroads block from Betsy Chutchian. You can get the pattern by visiting her blog here: 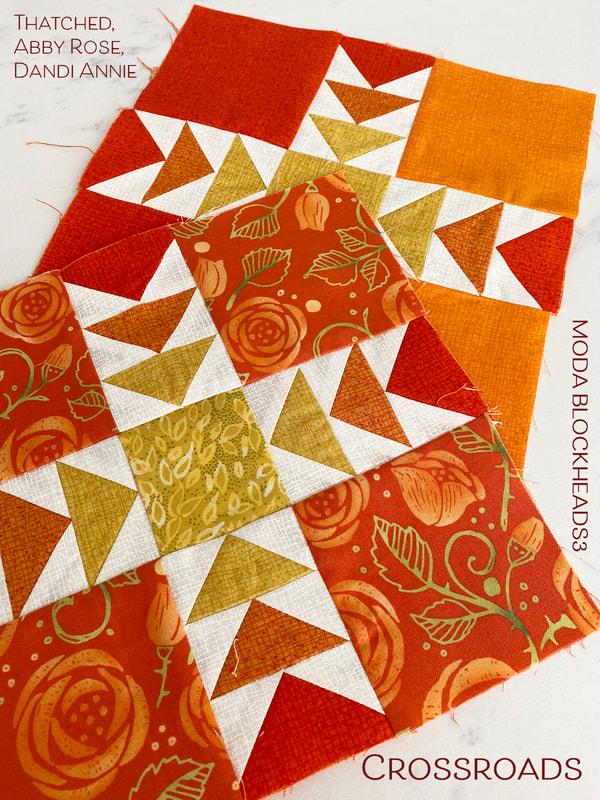 This week I am playing with ORANGES and it is such a lively color. Orange and purple, orange and green, orange and yellow, orange and pink...these are all ways I love to see orange pair up with other colors. I've used a mix of Abby Rose and Dandi Annie and Thatched on my mixed print block. Before I show more pictures of those, would you like to see some COLOR PLAY with this block design?  I liked the idea of the flying geese changing color as they moved closer to the square in the center. The top two image have darker geese on the outer perimeter with colors getting lighter as they march towards the center. The one on the left also mimics the dark to light movement with the triangles in the corners of the geese units as well, with a very dark background moving to a dark to medium pinks for the geese backgrounds. On the row right under that, its fun to see how the large corner blocks all becoming that same dark background makes the outer geese look like horns blowing out in all four directions. My next one was just color play to see the blocks in all different colors. Then on the bottom row I tried mixed colors within the geese, keeping my rows in a more pinky horizontal row and more purple vertical row, with a pop of orange for the center. The white large squares keeps all the focus on those flying geese rows. The very last image feels like 3 vertical columns with orange, red and gold reading in a stronger vertically banded composition. 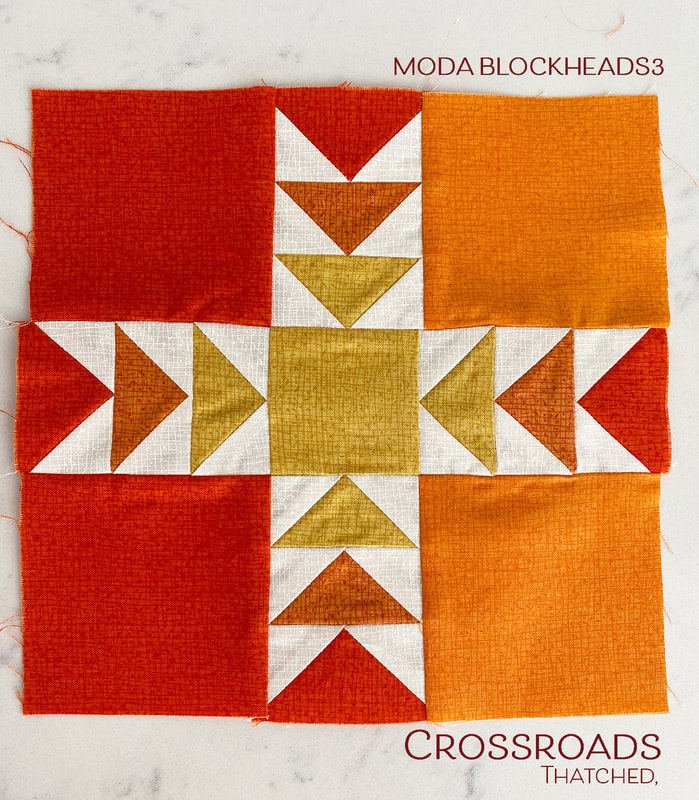 Since my overall quilt plan is to go from darker blocks on the left to lighter blocks on the right, I thought I would borrrow from this last color study idea. My Thatched-only block has the Tangerine color to the left large squares and I'm envisioning the light movement by making my right squares the lighter Apricot color. I think I'm going to have to fix that seam on the left or replace that upper left block to give myself a better seam allowance when I join these together. But that is for another day... 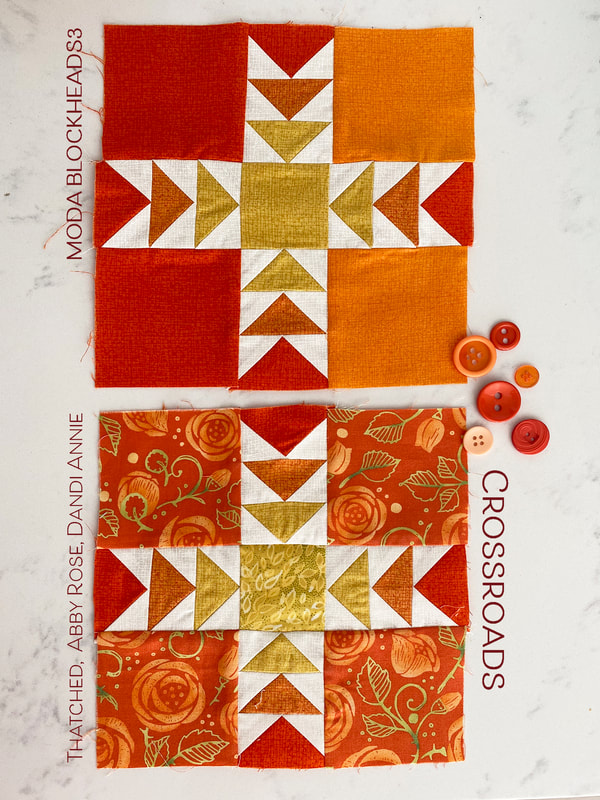 I also used the idea of the dark perimeter geese moving into the lighter/more yellow colors as we get to the center. I feel like it is pointing to the sunshine! 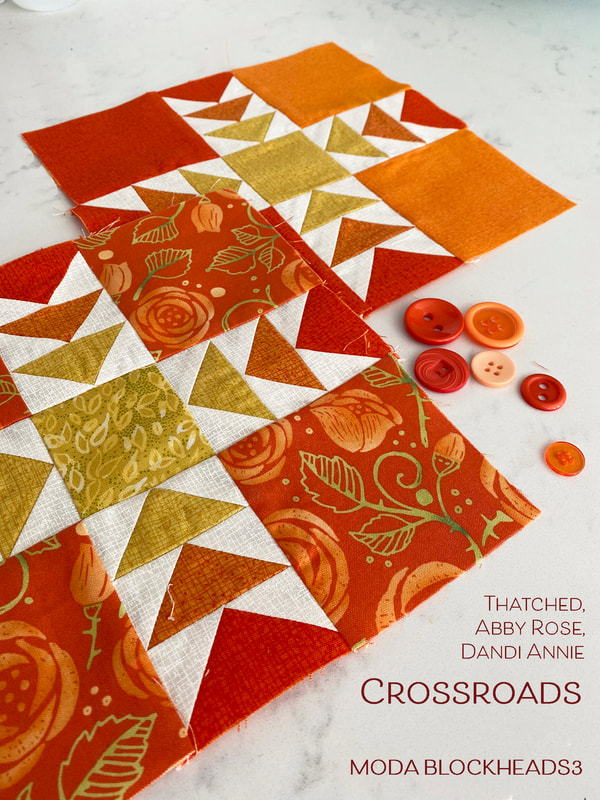 Visit the other Blockheads designers to see their blocks this week! Corey Yoder - https://corianderquilts.com/ Sherri McConnell - https://www.aquiltinglife.com/ Betsy Chutchian - http://betsysbestquiltsandmore.blogspot.com/ Jan Patek - http://janpatek.blogspot.com/ Brigitte Heitland - https://www.brigitteheitland.de/blog Lisa Bongean - https://lisabongean.com/ Lissa Alexander - http://modalissa.com/ Laurie Simpson - http://minickandsimpson.blogspot.com/ Vanessa Goertzen - https://lellaboutique.blogspot.com/ Stacy Iest Hsu - https://www.stacyiesthsu.com/blog/ Robin Pickens - https://www.robinpickens.com/ Janet Clare - http://janetclare.co.uk/blog/ Jen Kingwell - www.jenkingwelldesigns.com/blog Joanna Figueroa - https://blog.figtreeandcompany.com/ 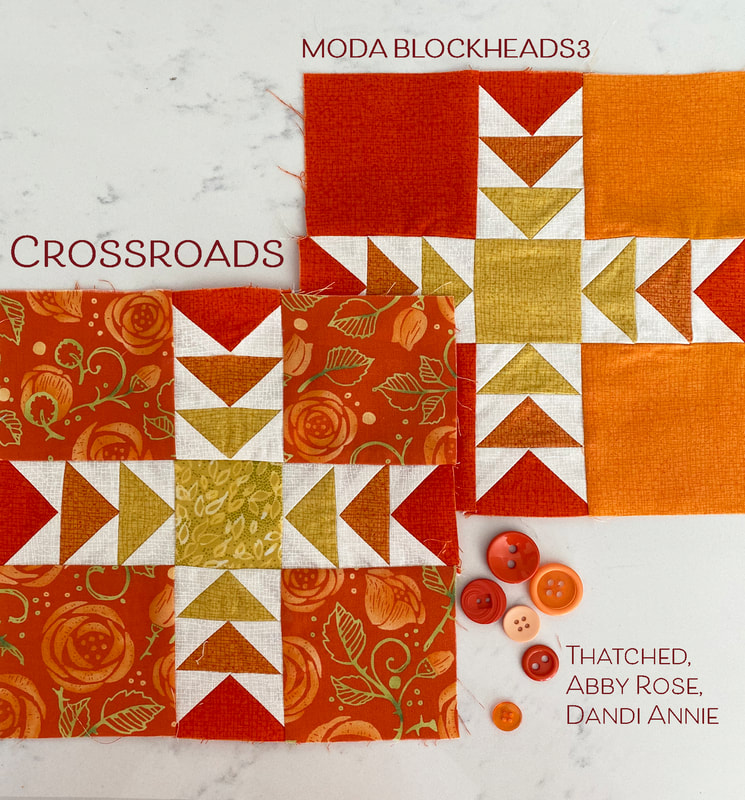 On another note, I'll be sharing a new fabric line coming in a few weeks! I'm busy sewing and so excited to share so I hope you check back in. Till next week, happy sewing everyone!
Robin 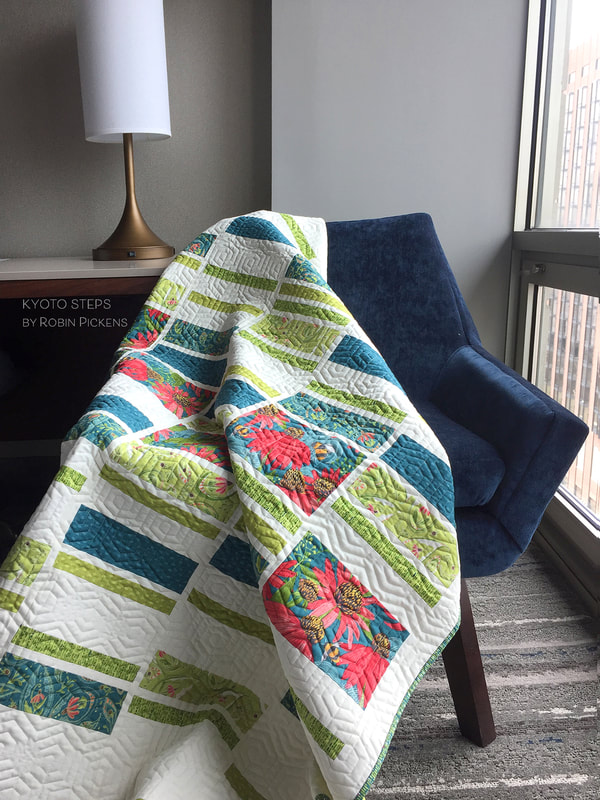 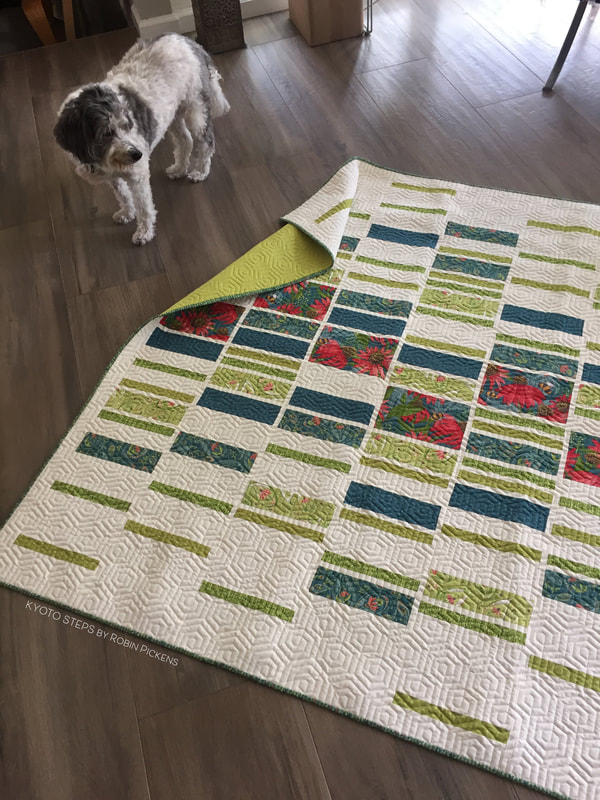 Kyoto Steps quilt pattern was launched with Painted Meadow fabric and we were just cutting some more kits in the studio last week. My kits do use the coneflowers and bees in the Painted Meadow fabrics and are available in both Twin and Lap size in the red and blue/green colorways. I did a little video to show my Kyoto Steps quilts on my youtube channel. I hope you will check out other videos on my channel! 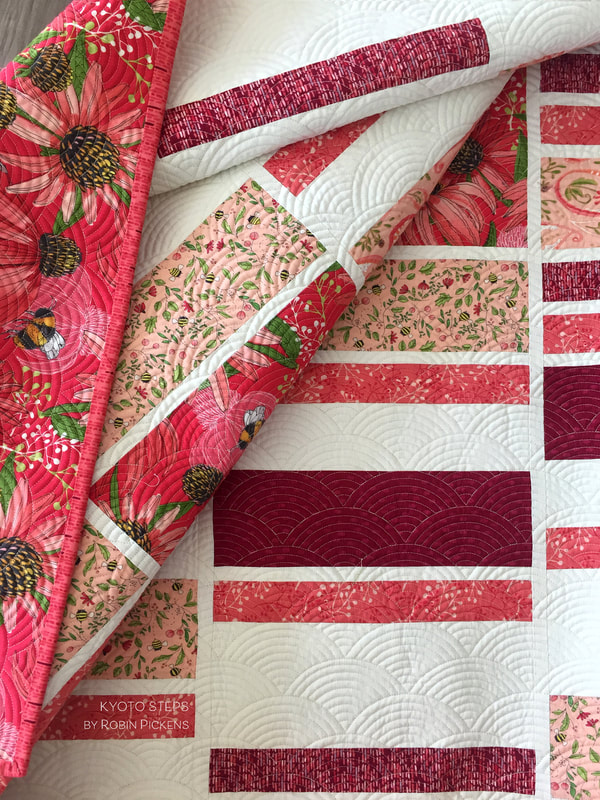 Since Abby Rose just shipped to shops recently, I thought this would be a great time to show how this quilt could look in Abby Rose! The quilt needs 1/2 yard cuts in 6 fabrics (plus background fabric) for the twin size, 1/3 yard cuts plus background for lap size, and if you are making a full/queen you would have a mixture of 3/4 and 2/3 yard cuts plus background fabric. I enjoy mixing groups of 6 fabrics to see the different looks in romantic roses!  I've included information under each image to list the Abby Rose fabrics used in the mockup. I've listed the name, color and SKU number in case you want to order fabric from your local shops. The first mockups play with orange and pink and pink and green colors. Pretty, springy quilts in light and sweet colors. 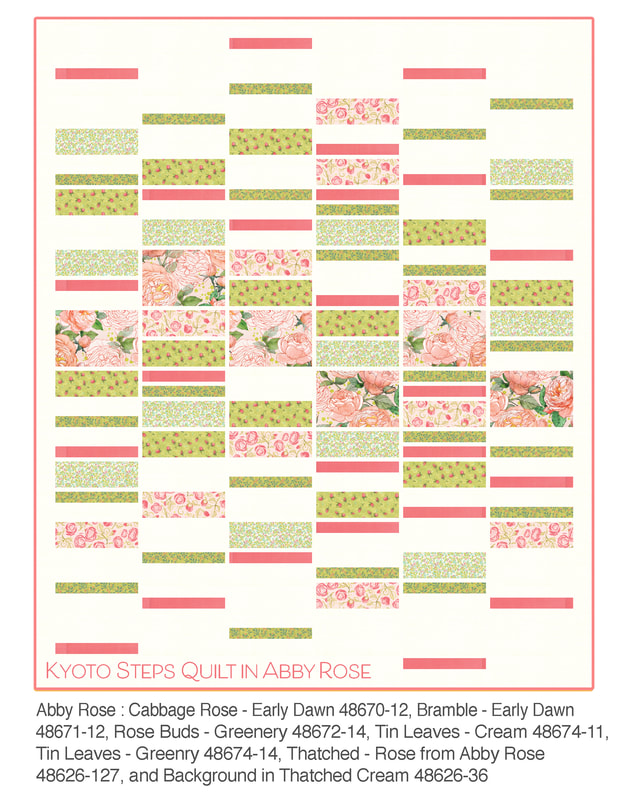 How would it look to use a background with more color and with dark shades? I tried Thatched in Cranberry and Burgundy to offset a pink and orange mix and I love the deeper feeling of these. 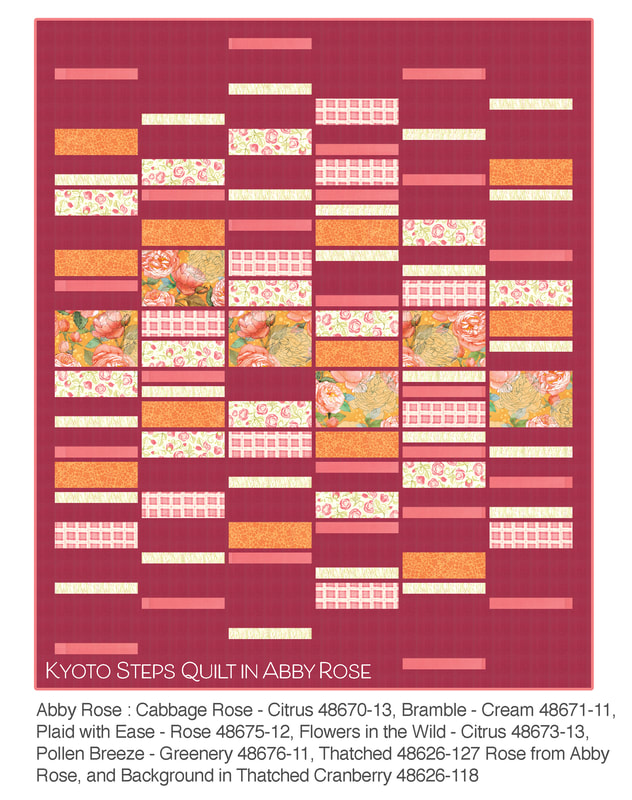 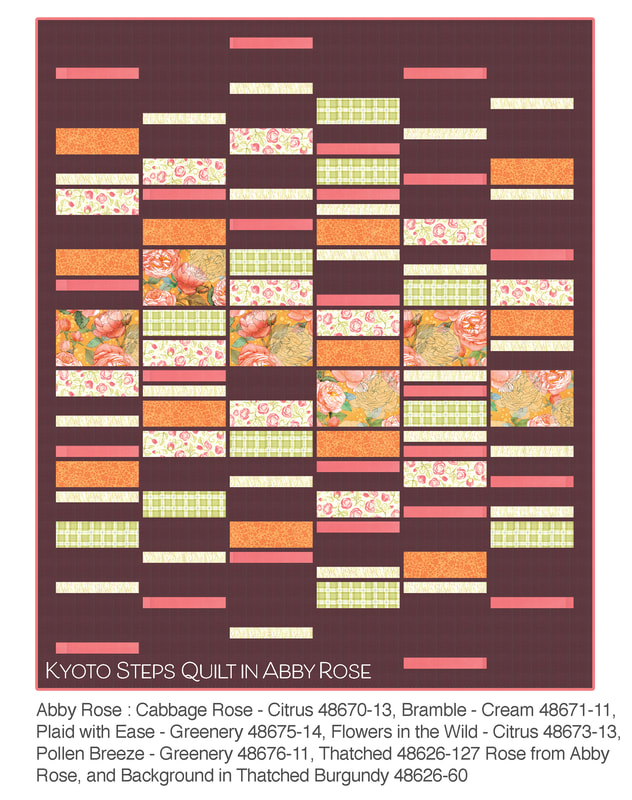 Greens and Blues? Abby Rose has a soft seafoam blue that mixes nicely with the fresh green. The darker blue is called Night in Abby Rose and is the same Thatched color as Marine 89. I like the crisp feeling of this darker blue against the cream background. I also like using the lighter seafoam blues with Night as a background. 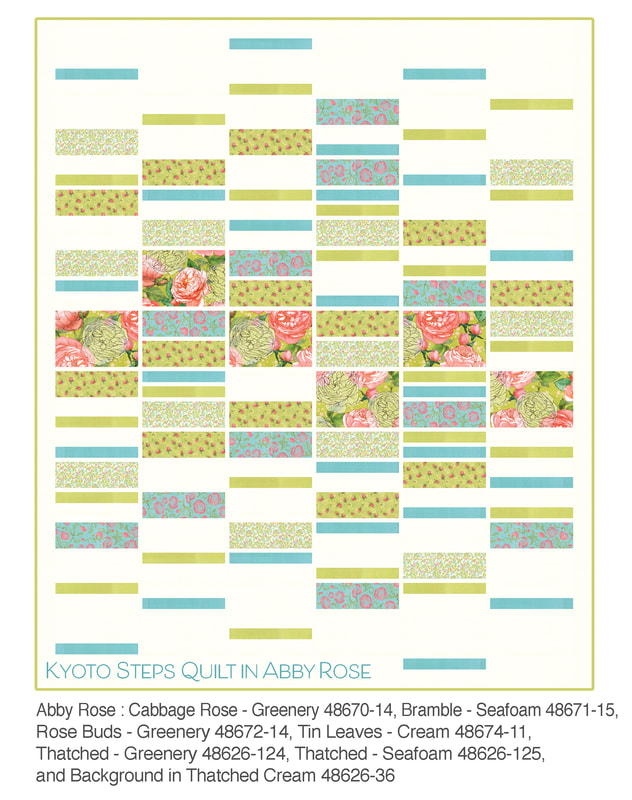 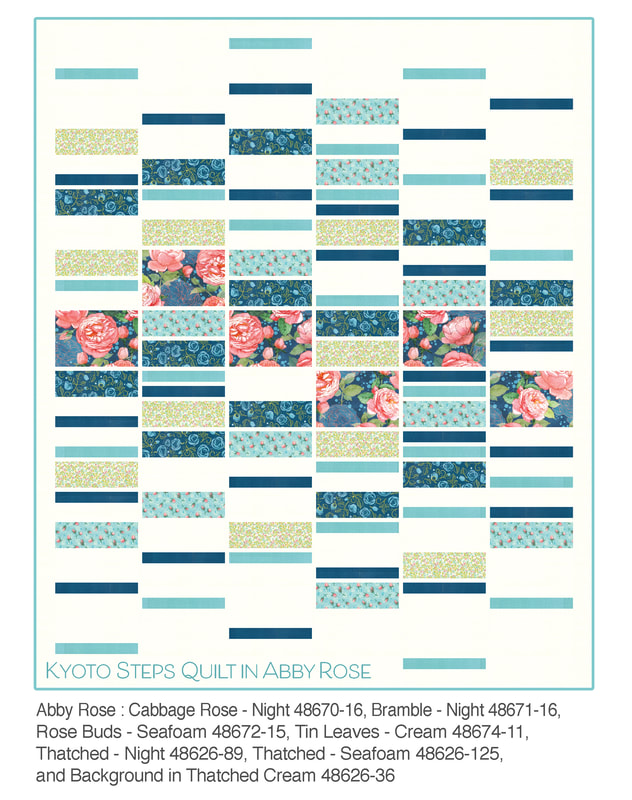  If you are looking for kits using Painted Meadow, visit my shop at www.robinpickensinc.com. You can also see more details of the Painted Meadow quilts on my youtube channel. For Abby Rose, check with your local quilt shops and have a great time sewing!   Hello and happy Wednesday! I hope you are all having a good time sewing with Moda Blockheads. I know for me, the sewing has been a really therapeutic time of my day with all that is going on. The hum of the machine, the focus on creating something, the calming energy of sewing and quilting...these have been a needed thing lately. Therefore I am especially happy to be providing a NEW BLOCK this week! UPDATE: I apologize that we've had an issue with connecting with the server for the pattern. Its back up now! Click the link in the gray box to get it from Moda. OR I've uploaded a PDF directly to my site and that is the BLUE "DOWNLOAD FILE" directly below this paragraph. I'm sorry for any problems you've had with getting the pattern (and keep reading for some color ideas):
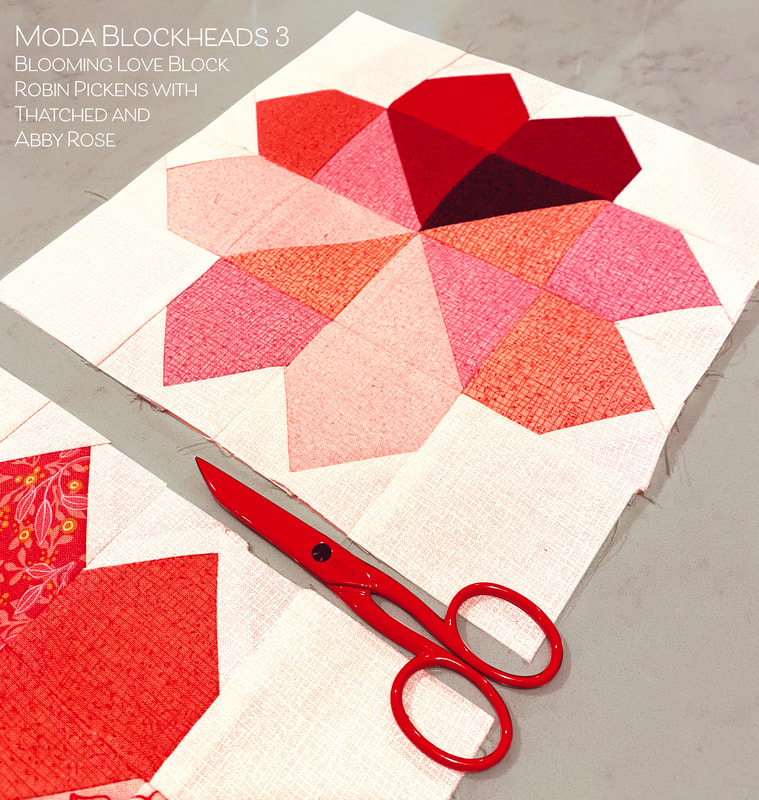 Meet BLOOMING LOVE. This block can be done in so many ways. We just had Saint Patrick's Day and couldn't you see this as a four leaf clover? Or a simple pinwheel? This block was born from my Picket quilt and the 18" block I designed "Full Bloom." I had a great time using the simple stitch and flip corners to make the picket fence or pointed ends to the sections. More info about stitch and flip is below. But for now, lets talk about how you can play with the block. 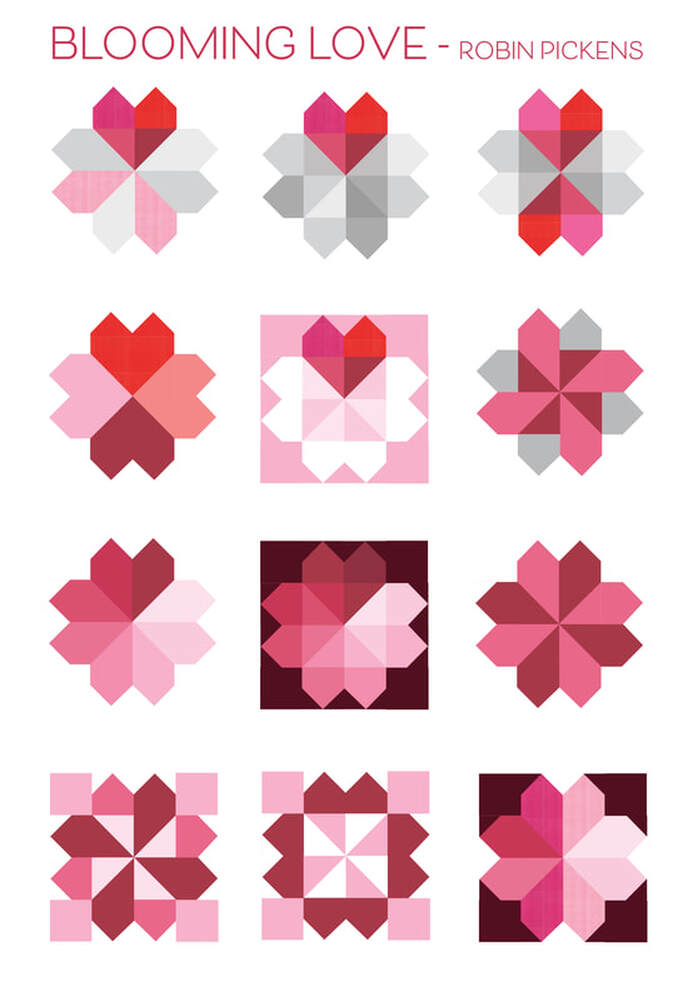 Half square triangles point to the center of the block with stitch and flip pointed ends extending from each one. A square is in each corner. These are some studies of how the block could look with different color play. For my block I was sewing I wanted to separate one section with a darker red to emphasize the heart within the pieces. I enjoy how it can look like both a flower and a heart, thus the name Blooming Love. Or what if you had two hearts, reflecting each other? In my mind, I originally thought of the pieces showing slight variations of color, either in scrappy mixes or light and dark hues. In the second row above, the 4 hearts meet at their points. Or, If you keep one side of the heart as a solid color and break the other side into two colors, and repeat and rotate that arrangement, it makes a pinwheel. The first two images on the third row show a gradation of colors that move around a wheel from light to dark. This could be really fun to try with some ombre fabrics. In fact, I'm updating this post to add some new pictures of one that I DID try with Ombre Confetti just today (Wednesday)! I made this one in the smaller, 6" size and used Thatched Burgundy for the background. On the last row you can see how it looks if you play with the corner blocks too or create some optical illusion with white center sides and dark corners. 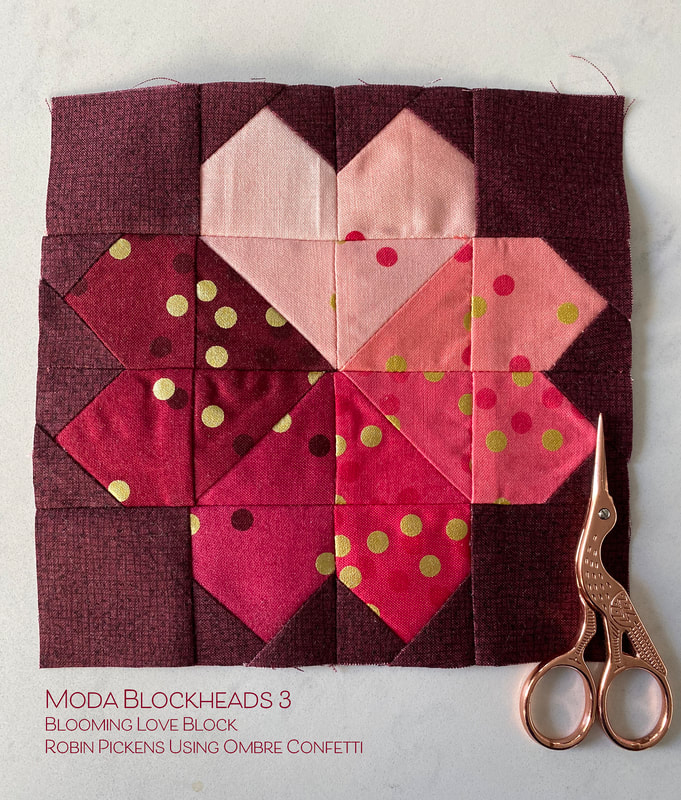  Once you have decided what you are doing with your arrangement, its time to get started on those pieces... 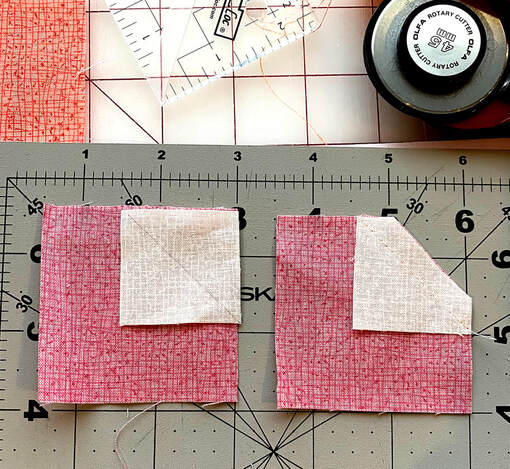 If you haven't made stitch and flip blocks before, its pretty easy. A smaller square is added on a corner (right sides together) with a line drawn corner to corner, diagonally. Sew on that line. I sometimes just do a finger-press to crease the line into the fabric vs drawing it. After sewing, trim the corner off. I like to save those corners if they are big enough to use as half square triangles on other projects. If I'm saving them I will sew an additional seam 1/2" away from the first one (parallel the first seam), and then cut the corner off, leaving me with my little extra HSTs, already sewn. Since I'm making the 8" blocks for this project, the small stitch and flip corners are too little for me to make those extra blocks. I just throw the cut corners away or put them into my fabric cuttings that get donated for pet beds. 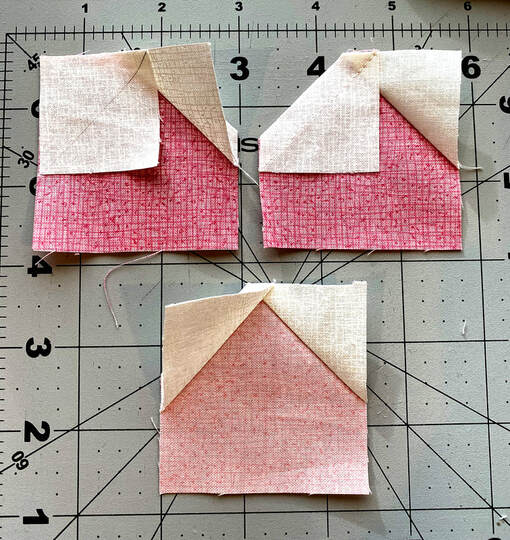 After cutting the corner off, make sure you press the flipped corner open before adding the other corner, just as you would when making flying geese. I've forgotten and had to rip out the top part before. 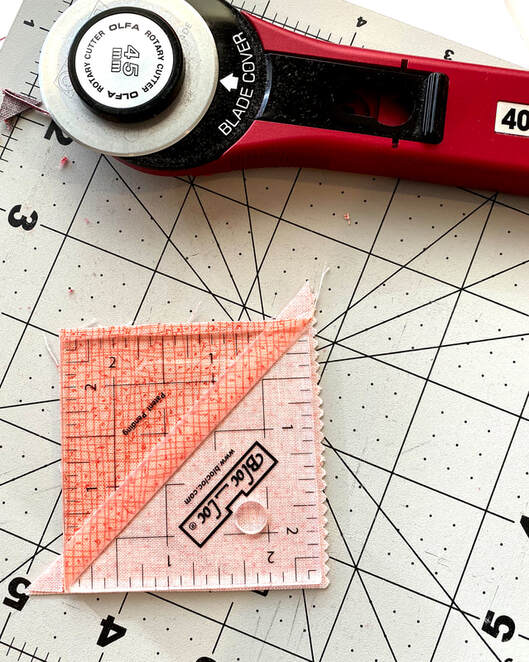 For the half square triangles in the center part of this block (the D pieces on the instructions) I increase the measurement 1/8th of an inch over what the directions say so my blocks are a little bigger when I make them, then I trim up my blocks. I like to use Bloc-Loc rulers to trim my half square triangles. I press the seam of my half square triangle to the dark side. Then the Bloc-Loc ruler ridge nestles up to the seam when you have the logo on the light side of the fabric. The ridge in the ruler helps it stay in place and aligned for you to trim the block.  You also might need to trim up corners on the stitch and flip pieces. Any ruler works fine for this. After trimming all the pieces up you can join into rows, then join the rows and TA DA...your Blooming Love block is ready to share some cheer! 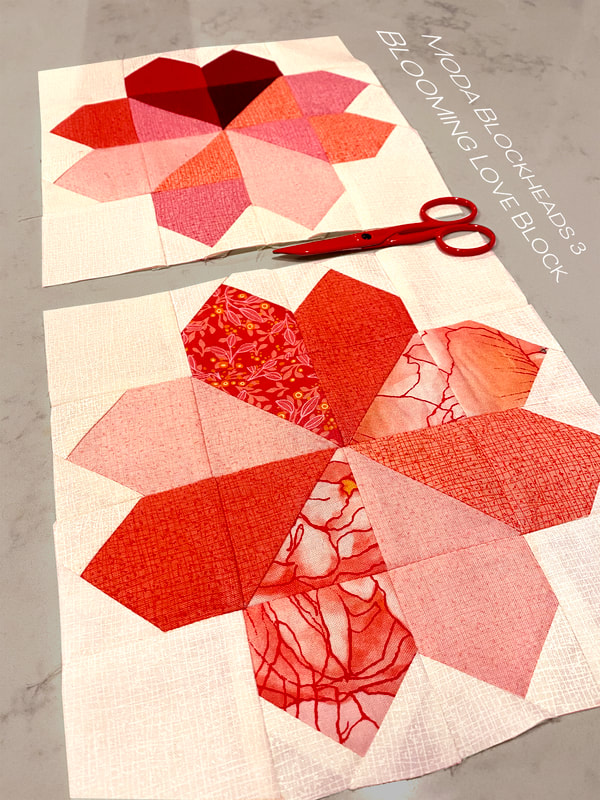 If you've been following me these weeks, you have seen I've been making my blocks in both all Thatched fabrics for a more modern, solid look, and in Thatched mixed with scrappier mixes of fabrics. I've used fabrics from Abby Rose on this one to bring in my pink tones. 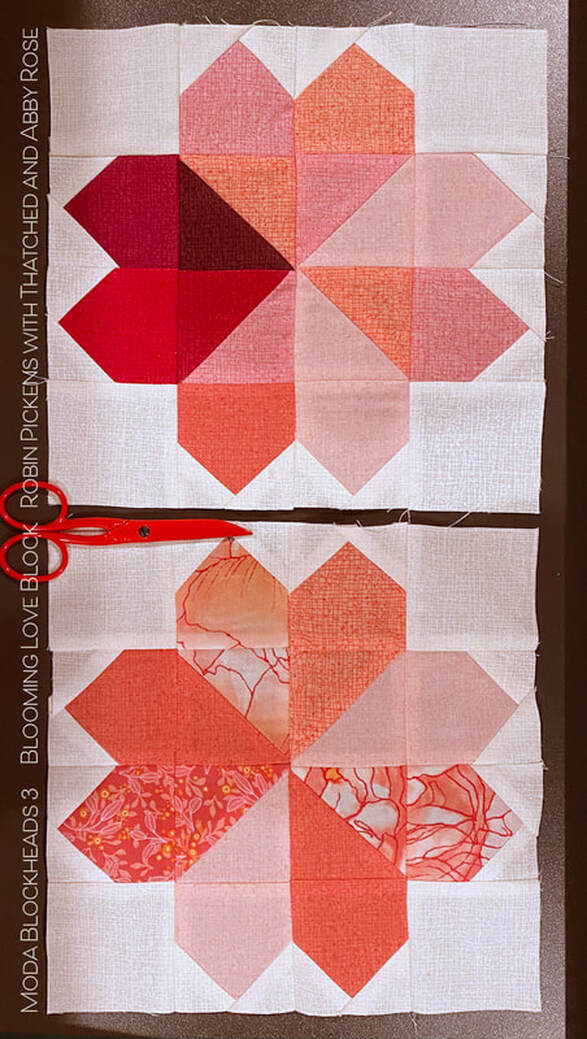 Here is the Picket quilt that was my original inspiration! It was lots of fun to design! 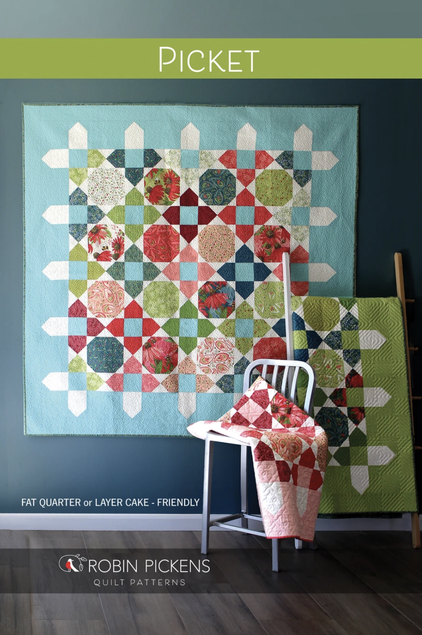 Thanks so much for the community and the energy of sewing along! I hope you have a great time with this block! Visit the other Moda designers to see their approach to this block:
Corey Yoder - https://corianderquilts.com/ Sherri McConnell - https://www.aquiltinglife.com/ Betsy Chutchian - http://betsysbestquiltsandmore.blogspot.com/ Jan Patek - http://janpatek.blogspot.com/ Brigitte Heitland - https://www.brigitteheitland.de/blog Lisa Bongean - https://lisabongean.com/ Lissa Alexander - http://modalissa.com/ Laurie Simpson - http://minickandsimpson.blogspot.com/ Vanessa Goertzen - https://lellaboutique.blogspot.com/ Stacy Iest Hsu - https://www.stacyiesthsu.com/blog/ (Me) Robin Pickens - https://www.robinpickens.com/ Janet Clare - http://janetclare.co.uk/blog/ Jen Kingwell - www.jenkingwelldesigns.com/blog Joanna Figueroa - https://blog.figtreeandcompany.com/ Thanks so much and happy sewing! Robin The Taos pattern by Vannesa Goertzen can be found on her blog at https://lellaboutique.blogspot.com/ It is a fun mix of half square triangles and blocks, with a nice patchwork center that can emphasize the structure or provide a strong chained diagonal through the block. 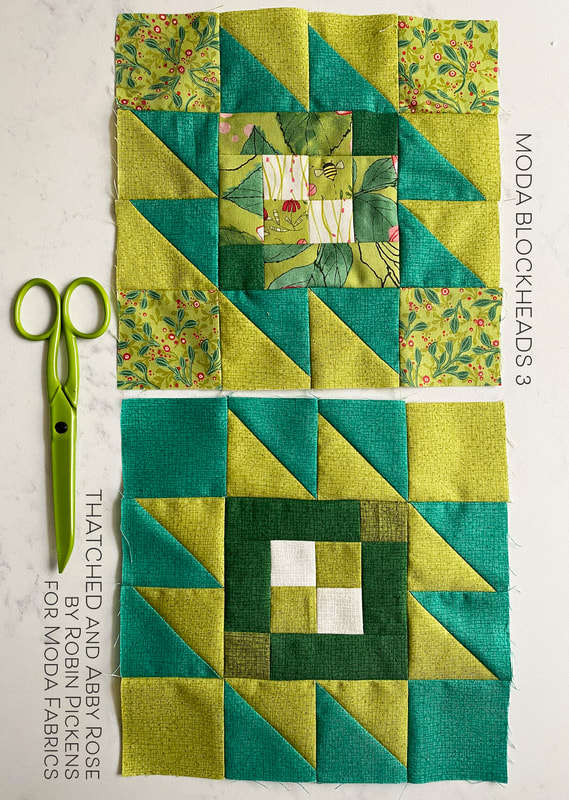 Instead of using all squares in the center, I decided to eliminate a few seams and use some rectangles in the square perimeter within the center. That is one of the things I like about this design. You can do a diagonal line of squares going through the center or play with the lights and darks to make other shapes within the patchwork. I decided I wanted a dark green Pine Thatched square to really emphasize that center. 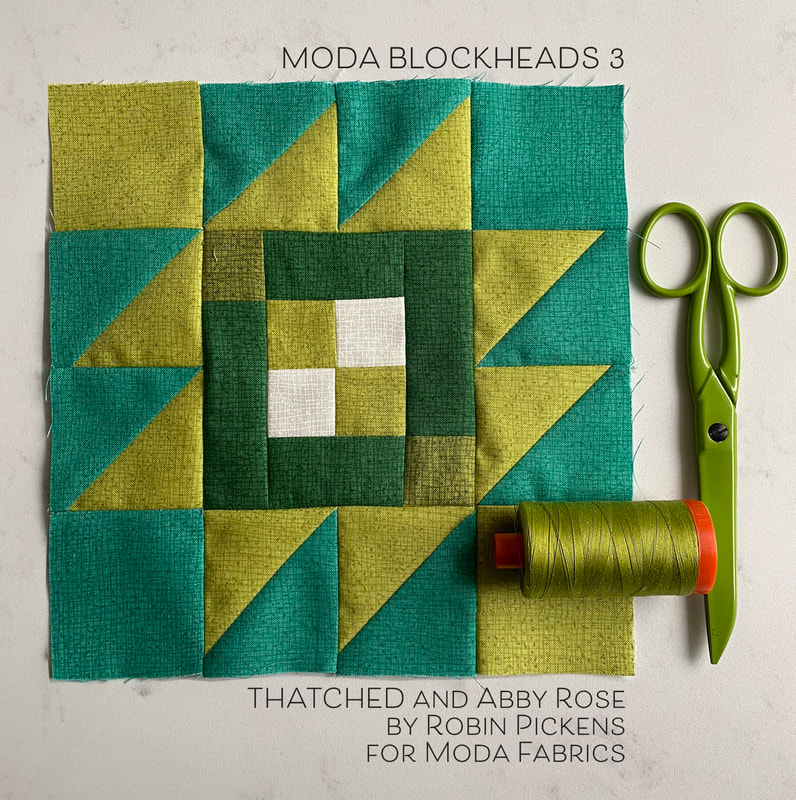 Don't you love that green Aurifil thread? I love that color of green! It is Aurifil's Light Leaf Green #1147 in Mako 50 weight. And it blends so well with my scrappy/Abby Rose version of the block. I've combined Thatched Chartreuse and Peacock with a small Pine corner square on the inner perimeter with Abby Rose fabrics in green. I think if I were choosing fabrics again, I might select something that separates that inner square perimeter more. I used some of the leaves from the roses and the colors are good but I'd like it to have a little more consistency to the overall print. However, I'm very happy with the "tin leaves" on the outer corner and having my little simple bee friend from Painted Meadow on the most center squares. 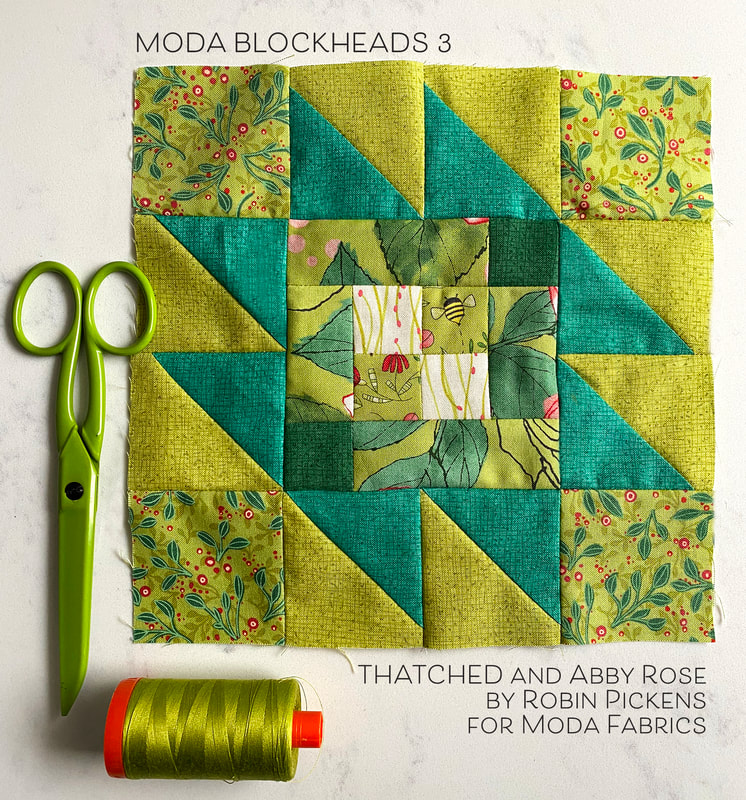 I think its interesting to notice how the block looks different with the darker green to the inside of the half square triangles vs the outside (like the all-Thatched version). 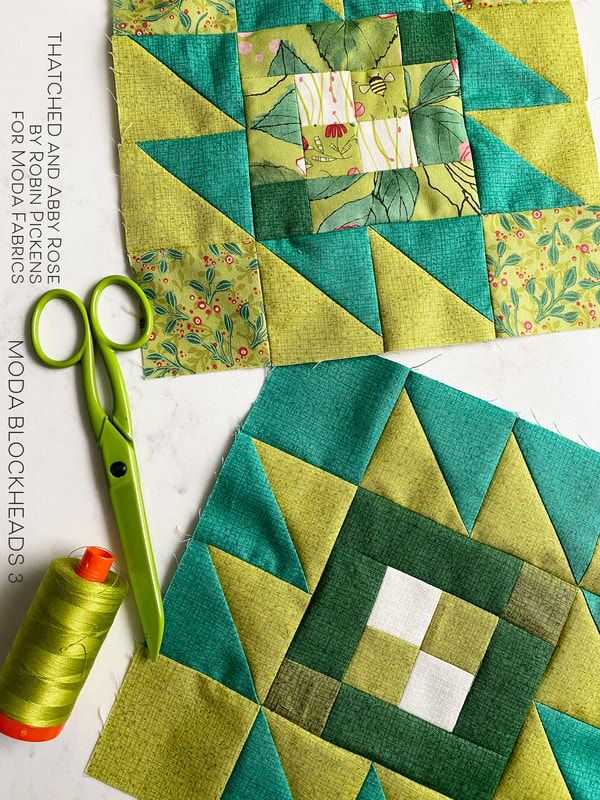 I hope you are having fun with this Taos block and doing your own experimenting with the blocks, squares and half square triangles! Follow along on facebook and with the other Blockhead designers:
1.15 - Corey Yoder - https://corianderquilts.com/ 1.22 - Sherri McConnell - https://www.aquiltinglife.com/ 1.29 - Betsy Chutchian - http://betsysbestquiltsandmore.blogspot.com/ 2.5 - Jan Patek - http://janpatek.blogspot.com/ 2.12 - Brigitte Heitland - https://www.brigitteheitland.de/blog 2.19 - Lisa Bongean - https://lisabongean.com/ 2.26 - Lissa Alexander - http://modalissa.com/ 3.4 - Laurie Simpson - http://minickandsimpson.blogspot.com/ 3.11 - Vanessa Goertzen - https://lellaboutique.blogspot.com/ 3.18 - Stacy Iest Hsu - https://www.stacyiesthsu.com/blog/ 3.25 - Robin Pickens - https://www.robinpickens.com/ 4.1 - Janet Clare - http://janetclare.co.uk/blog/ 4.8 - Jen Kingwell - www.jenkingwelldesigns.com/blog 4.15 - Joanna Figueroa - https://blog.figtreeandcompany.com/ Happy Wednesday and Moda Blockheads day!! Laurie Simpson gave us the pattern to a lovely 9 Patch block this week! Check out Laurie's blog post for the pattern or check back with the facebook group on Friday for the pattern. http://minickandsimpson.blogspot.com/2020/03/blockheads-3-week-8.html 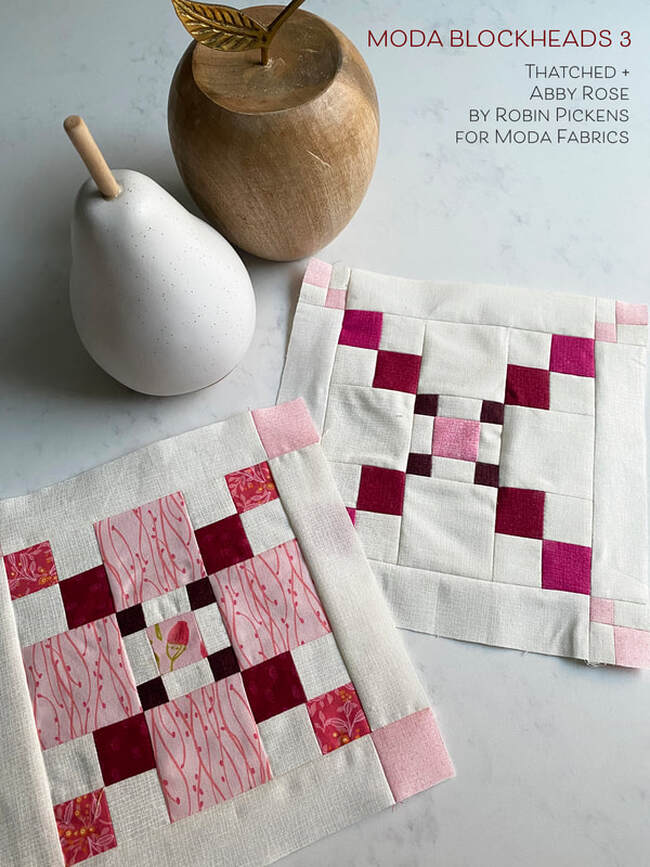 Since the original pattern was for a 6" or 12" block I made an alteration so mine would fit with my other 8" blocks. For the Abby Rose scrappy version of my block, I made the nine patch in the 6" size and then added a 1" border around the block (1 1/2" cut pieces to make 1" finished size when sewn with other blocks). I wanted to continue the look for the darker squares creating an "x" shape so I finished the corners on the outside border with pink squares. If you want to add a border like this, I used the 6" Nine Patch block and added (4) 1 1/2" squares in each corner with (4) 1 1/2" x 6 1/2" rectangles, with one to each side of the block. 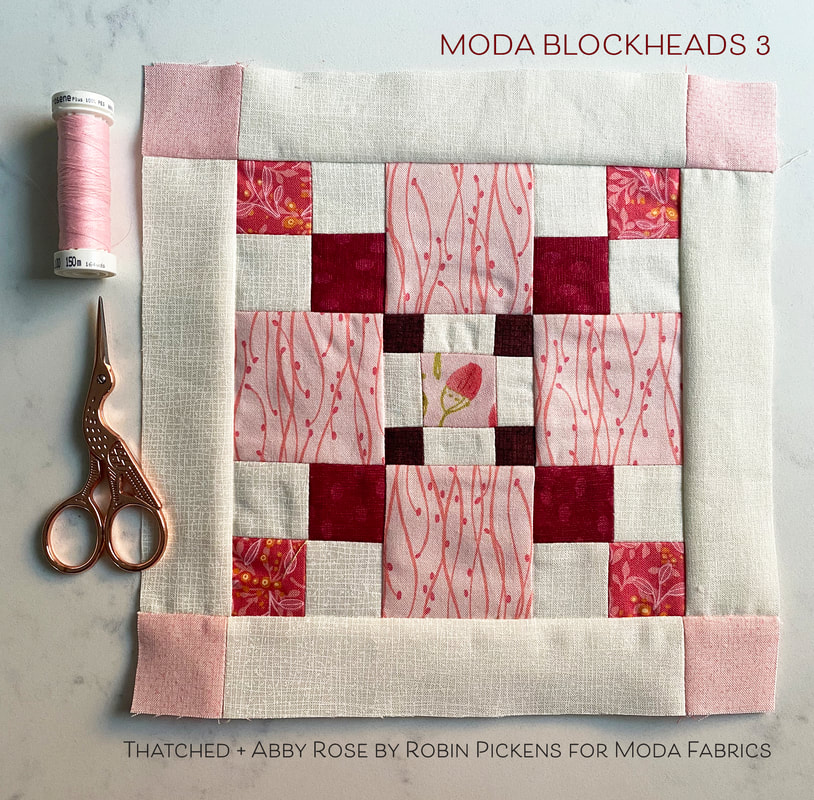 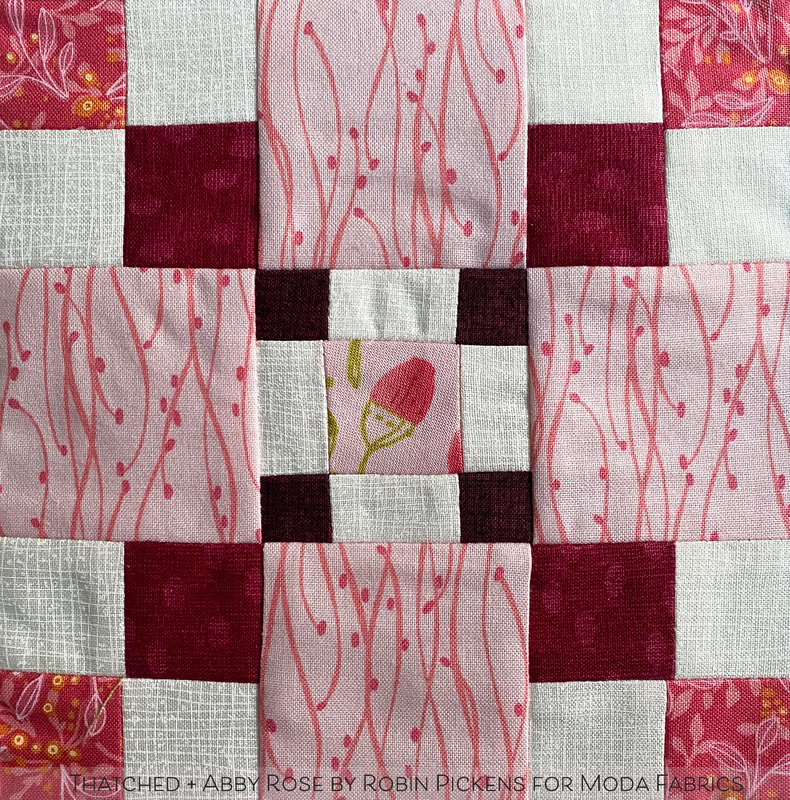 I love putting the little rose bud in the center of this tiny block. The little leaves, curving lines and rose bud are all from my Abby Rose collection which should be shipping the middle of this month!! The burgundy oval squares are from my Painted Meadow collection. 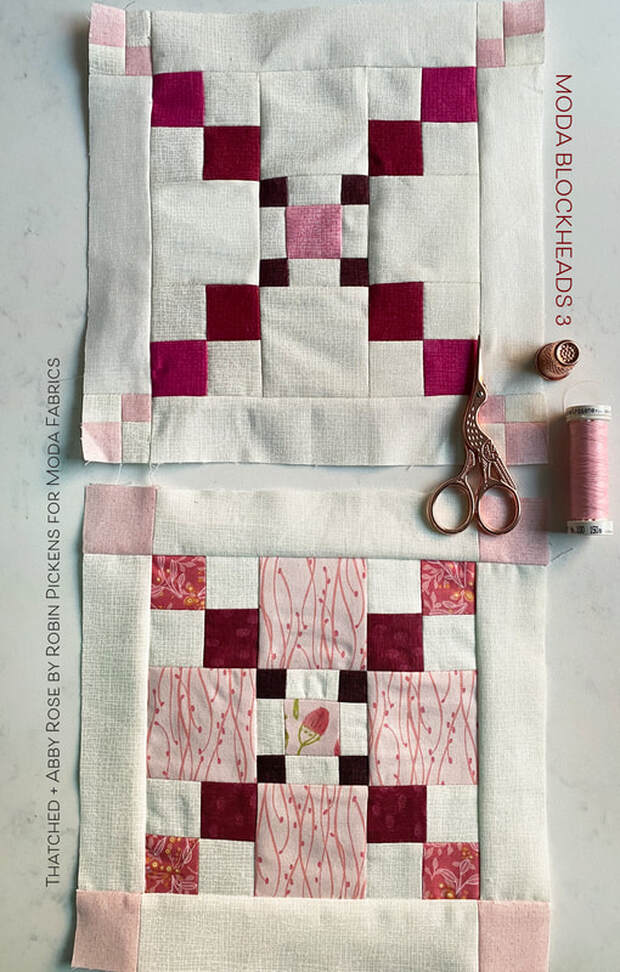 For the all-Thatched version I made the corners with tiny blocks, the same size as the 4 squares surrounding the center piece. For each of my four outer corners, I assembled (4) 1" squares so they will be 1/2" finished size. I used the same 1 1/2" x 6 1/2" rectangles I specified above for the outer sides. I like how the little outer squares will mimic those inner squares. They seem so cute! I showed the scale with the thimble below for these squares in the center. 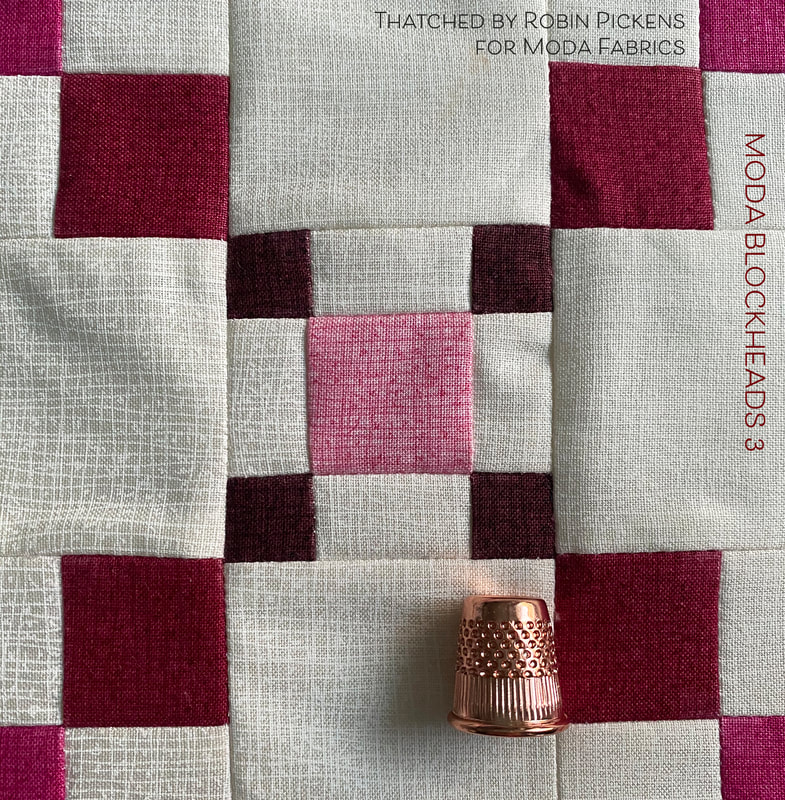 I like to see how the simple block made up with just Thatched looks compared to the one with the Abby Rose fabrics. The Abby Rose material with soft flowing curved lines added into the top, bottom and side squares makes a subtle plus sign within the block. I'm feeling some rosy love for this block this week! 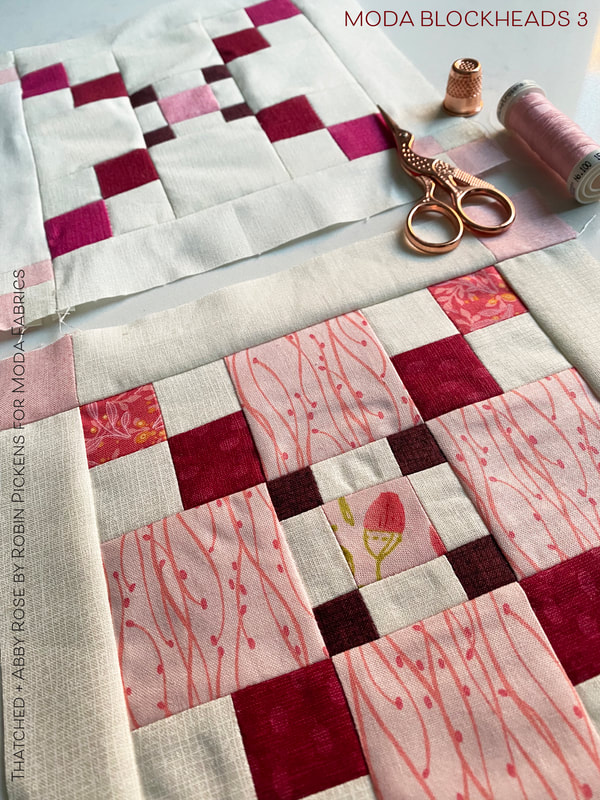 Can you believe we are on block 8 already so that means we are two months in! Follow along on facebook and with the other Blockhead designers: 1.15 - Corey Yoder - https://corianderquilts.com/ 1.22 - Sherri McConnell - https://www.aquiltinglife.com/ 1.29 - Betsy Chutchian - http://betsysbestquiltsandmore.blogspot.com/ 2.5 - Jan Patek - http://janpatek.blogspot.com/ 2.12 - Brigitte Heitland - https://www.brigitteheitland.de/blog 2.19 - Lisa Bongean - https://lisabongean.com/ 2.26 - Lissa Alexander - http://modalissa.com/ 3.4 - Laurie Simpson - http://minickandsimpson.blogspot.com/ 3.11 - Vanessa Goertzen - https://lellaboutique.blogspot.com/ 3.18 - Stacy Iest Hsu - https://www.stacyiesthsu.com/blog/ 3.25 - Robin Pickens - https://www.robinpickens.com/ 4.1 - Janet Clare - http://janetclare.co.uk/blog/ 4.8 - Jen Kingwell - www.jenkingwelldesigns.com/blog 4.15 - Joanna Figueroa - https://blog.figtreeandcompany.com/ 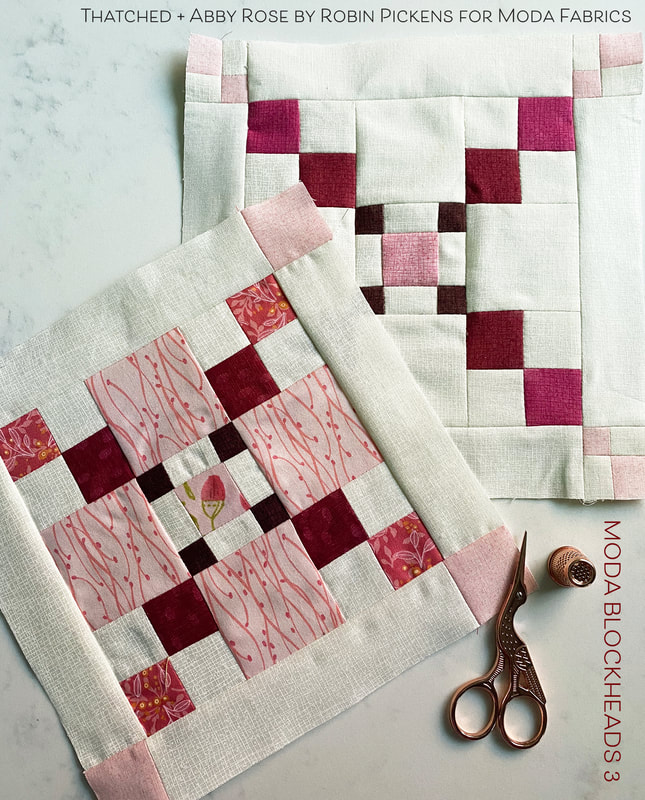 Do you have a feeling of ZEST or a ZESTFUL approach to life? What is zest? I found this in Wikipedia, with Zest described in positive psychology: "Zest is a positive trait reflecting a person's approach to life with anticipation, energy, enthusiasm and excitement." (Peterson, C.; Park, N.; Hall, N.; Seligman, M. E. P. (2009). "Zest and work". Journal of Organizational Behavior. 30 (2): 161–172). That sounds pretty great to me! 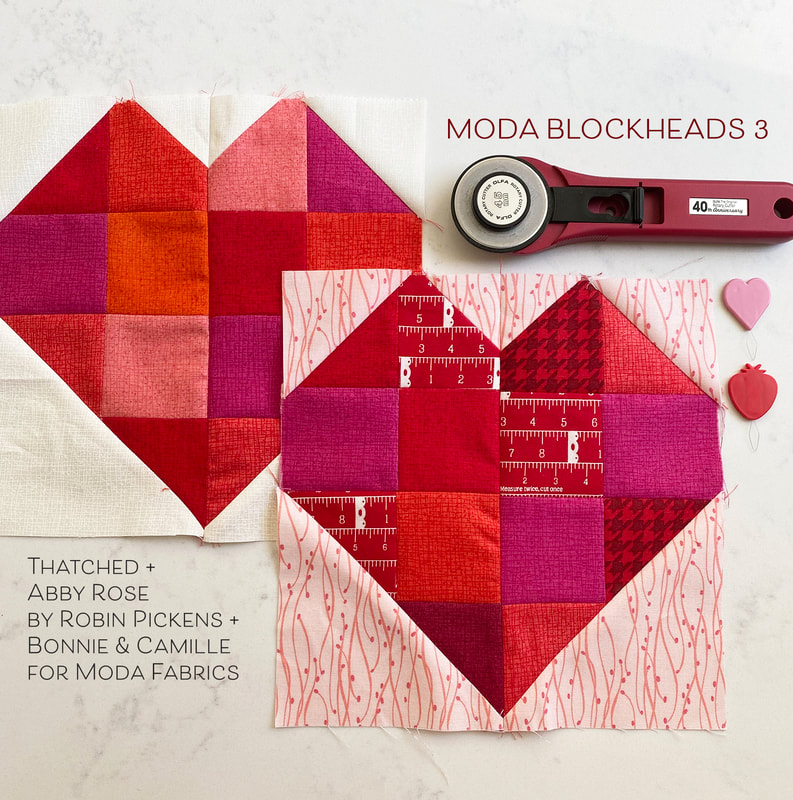 How perfect to have a heart to describe this feeling of excitement, energy and positive attitude! I liked the simplicity of this block and thought it would be perfect to add a little patchwork mix of colors into the shape. With Thatched basics I used crimson, fuschia, tangerine, rose and one of the pinks from Abby Rose in 2 1/2" squares (2" finished size). I made the patchwork sides, then added the stitch and flip corners, then joined them together. 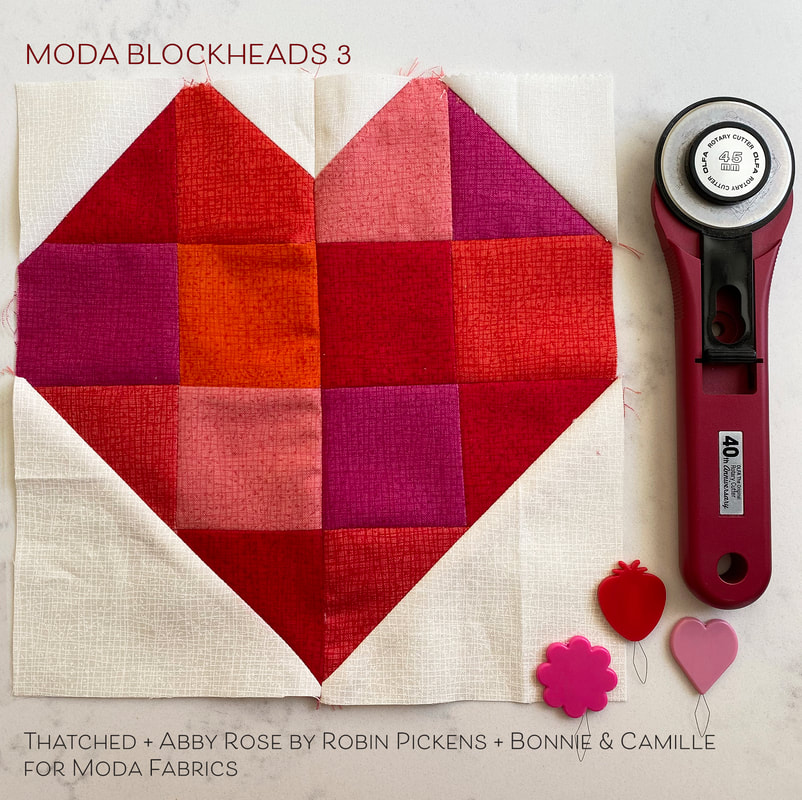 The scrappy version has the same Thatched crimson, fuschia, and rose fabrics plus cranberry. I wanted one of the darker shades to offset the dark red in the houndstooth check. And I loved putting in some of this Bonnie and Camille measuring tape fabric. What a fun way to "measure my love" of sewing! The curving lines in the background corner pieces is one of the coordinates of Abby Rose.  Between Brigitte's (zen chic) LOVE block and this ZEST heart, I'm really feeling the the warmth of good feelings lately! 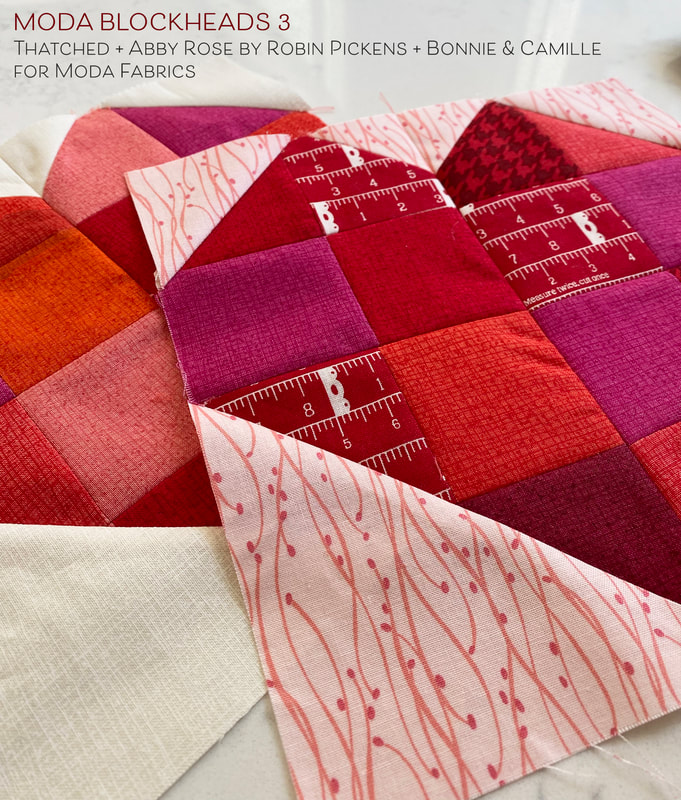 You can get the pattern from Lissa Alexander at http://modalissa.com/2020/02/blockheads-zest.html/ . She also has some sweet pictures of little combinations of the block plus plans for a heart within a heart block. Its precious! Oh, yes, also Lissa is doing a giveaway on her blog so check it out!
Visit other Moda Blockheads designers for their take on this week's block! 1.15 - Corey Yoder - https://corianderquilts.com/ 1.22 - Sherri McConnell - https://www.aquiltinglife.com/ 1.29 - Betsy Chutchian - http://betsysbestquiltsandmore.blogspot.com/ 2.5 - Jan Patek - http://janpatek.blogspot.com/ 2.12 - Brigitte Heitland - https://www.brigitteheitland.de/blog 2.19 - Lisa Bongean - https://lisabongean.com/ 2.26 - Lissa Alexander - http://modalissa.com/ 3.4 - Laurie Simpson - http://minickandsimpson.blogspot.com/ 3.11 - Vanessa Goertzen - https://lellaboutique.blogspot.com/ 3.18 - Stacy Iest Hsu - https://www.stacyiesthsu.com/blog/ 3.25 - Robin Pickens - https://www.robinpickens.com/ 4.1 - Janet Clare - http://janetclare.co.uk/blog/ 4.8 - Jen Kingwell - www.jenkingwelldesigns.com/blog 4.15 - Joanna Figueroa - https://blog.figtreeandcompany.com/ |

About ROBINDesigner of colorful florals for Moda fabrics. Modern to transitional quilt designer. Illustrator, sewist, crafter. I am proud to be a designer for Moda Fabrics!


Shop Robin's Designs
 I am an affiliate for Fat Quarter Shop and may earn a small commission through my links. Thank you for your support!

Check the March 6, 2017 Episode!
Categories
All
Archives
February 2024
© Robin Pickens Inc. All rights reserved. No images may be reproduced without permission.
|
||||||
 RSS Feed

