|
I revisited my pattern "FRINGE" with Dandi Duo. The original Fringe pattern was released with Dandi Annie for it felt fitting to give it an update with my dandelions, Version 2. Fringe uses a Layer Cake of 10" squares and a background fabric and sashing fabric.  I made minimal changes to the quilt pattern but did eliminate the asymmetrical layout option that was in the first pattern and now included the specs and instructions to make the large square. There is also an option for a smaller 53 1/2" square lap size. 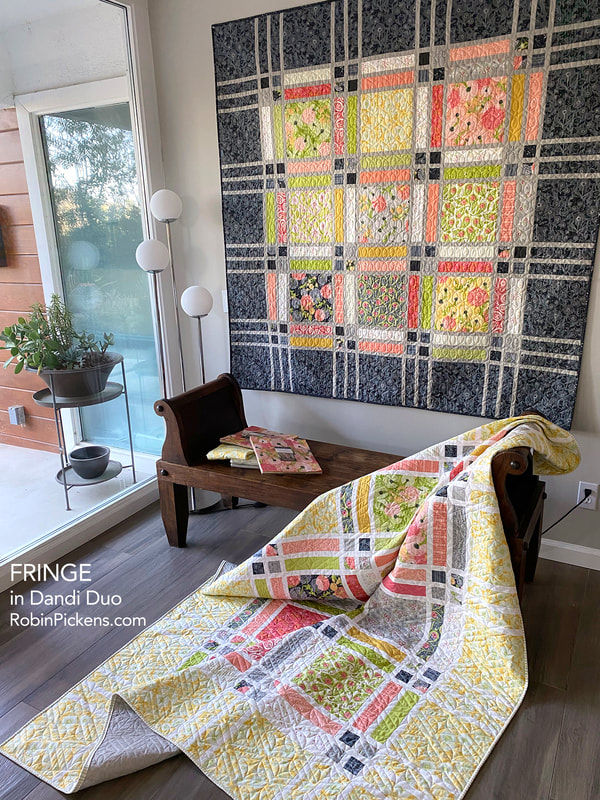 I've made Fringe in two colorways, both using a Layer Cake for the centers and different fabric for thin sashings and borders. The twin size (on wall below) has the Maize Dandi Toile for borders with Thatched Blizzard sashings. The large square size (on wall above) has the Graphite Dandi Toile for borders with Gray Thatched sashing. 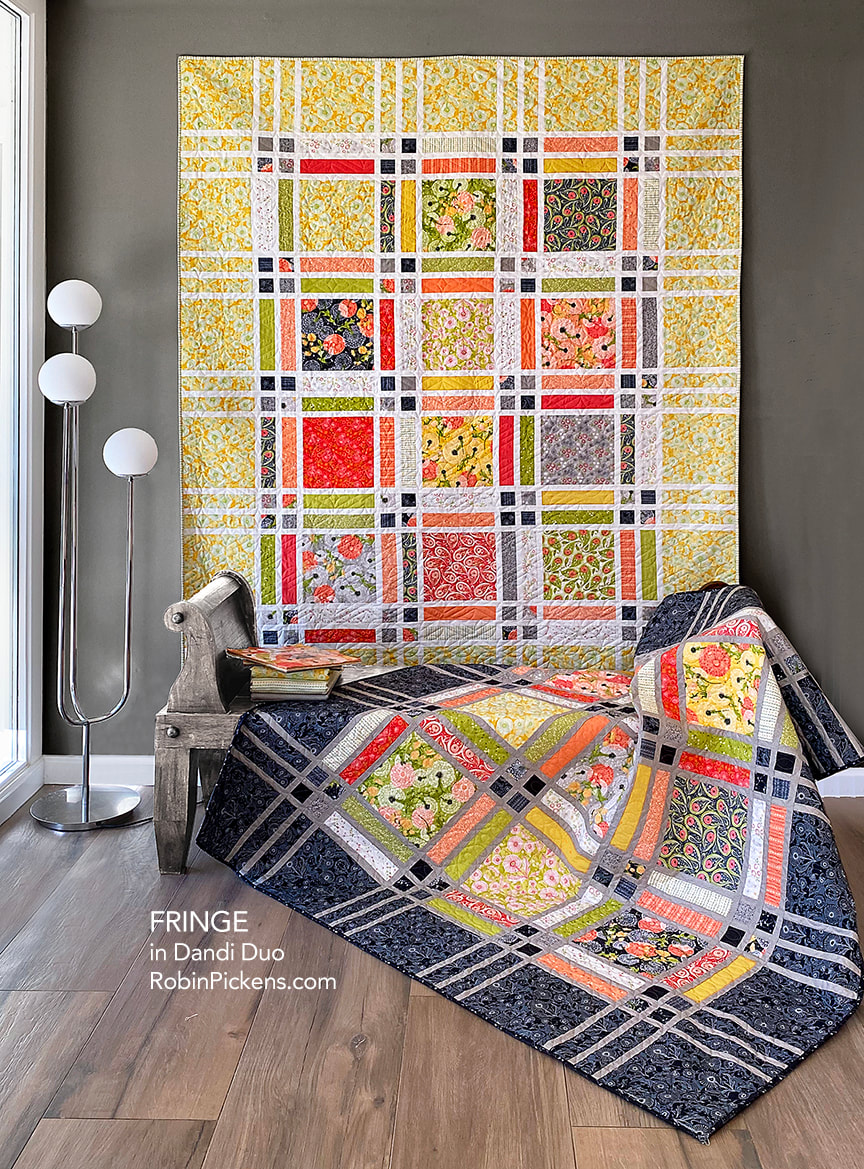 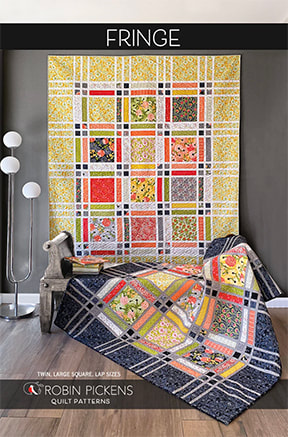 You can find the Fringe pattern in both print and pdf versions at RobinPickensINC.com. My etsy shop only has pdfs, so print versions for US and Canada mailing can be found at my online shop powered by shopify (www.robinpickensINC.com). click here: FRINGE PATTERN Other than the main dandelion print, I think the Dandi Toile, in the borders and especially this dark Graphite version) are my favorite print from this group. I love the 2 shades of background and linear drawings of the simplified dandelions. 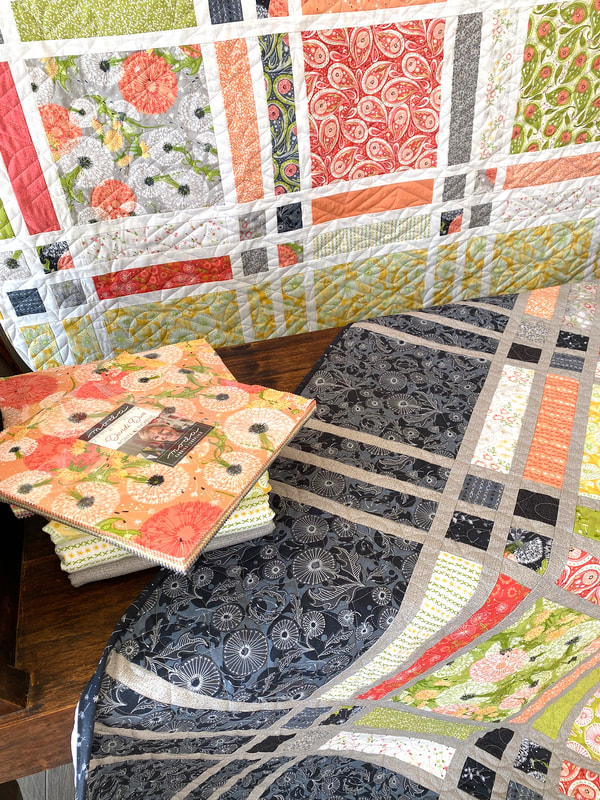 I also like how the "Cross Stitch Stripe" makes a lovely striped binding, as shown on the yellow version. 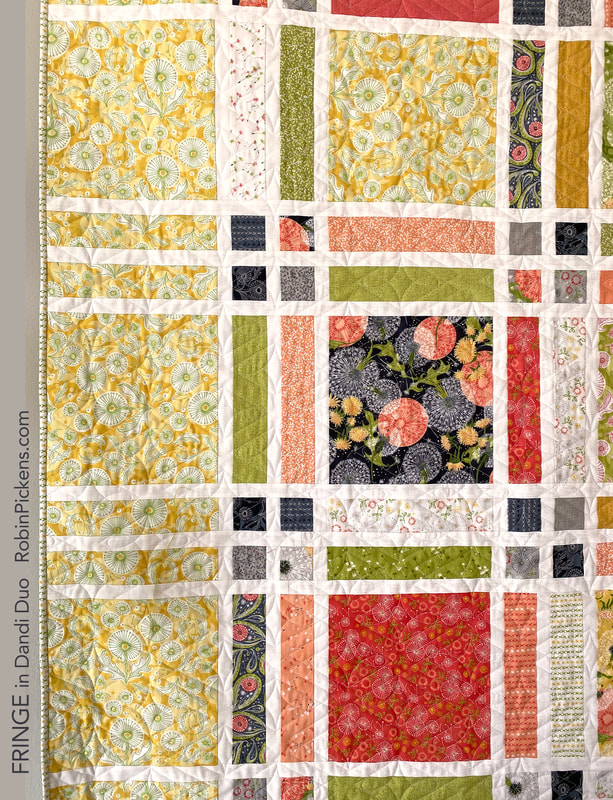 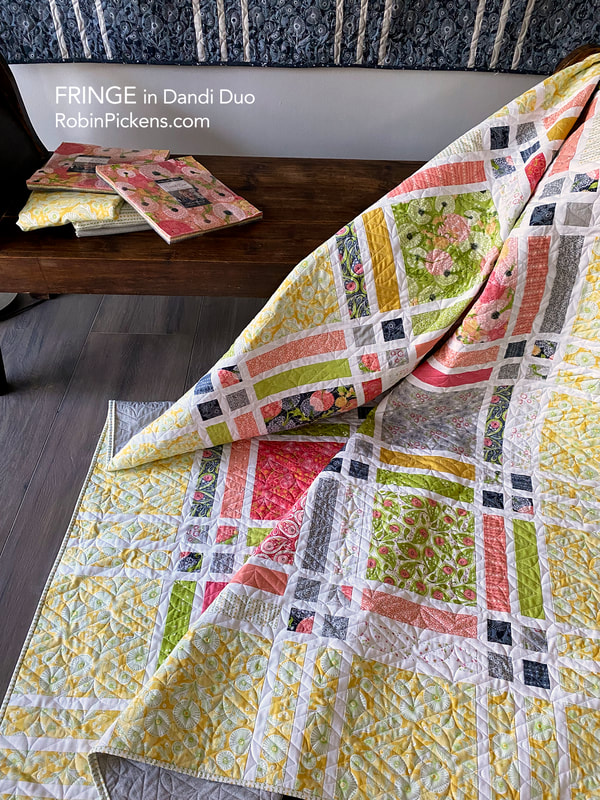 This is from the pattern back, showing the dimensions of the three sizes: 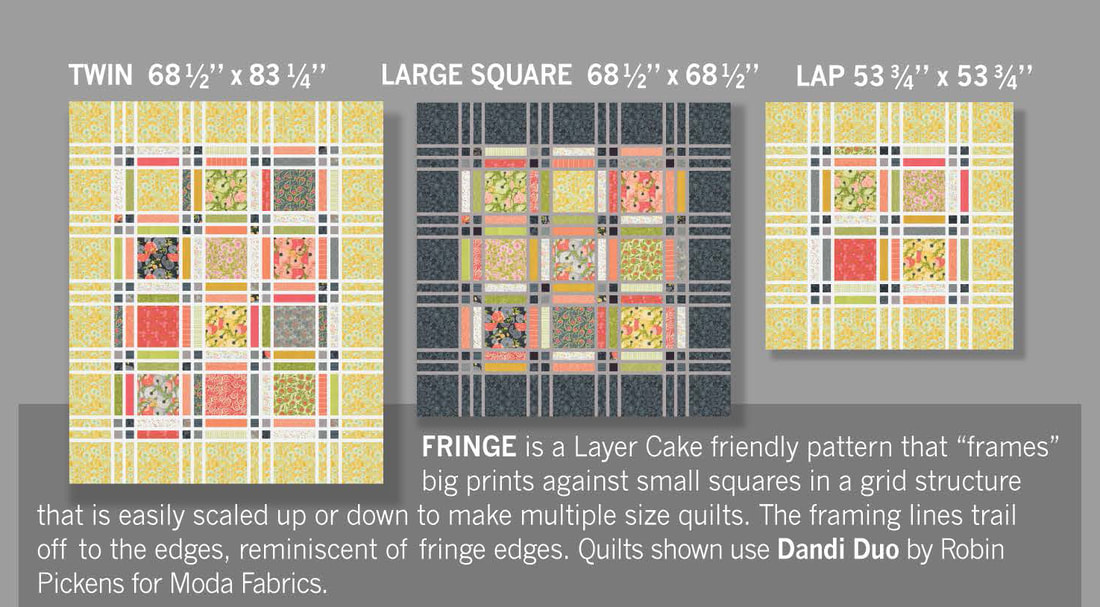  Keep reading on to see another "revamp" with Sliding Shoji Screens for Dandi Duo! 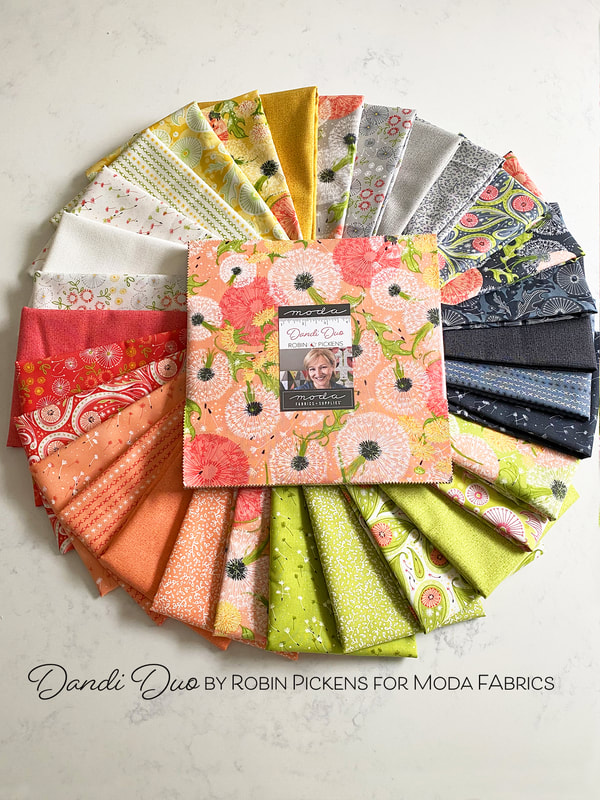
0 Comments
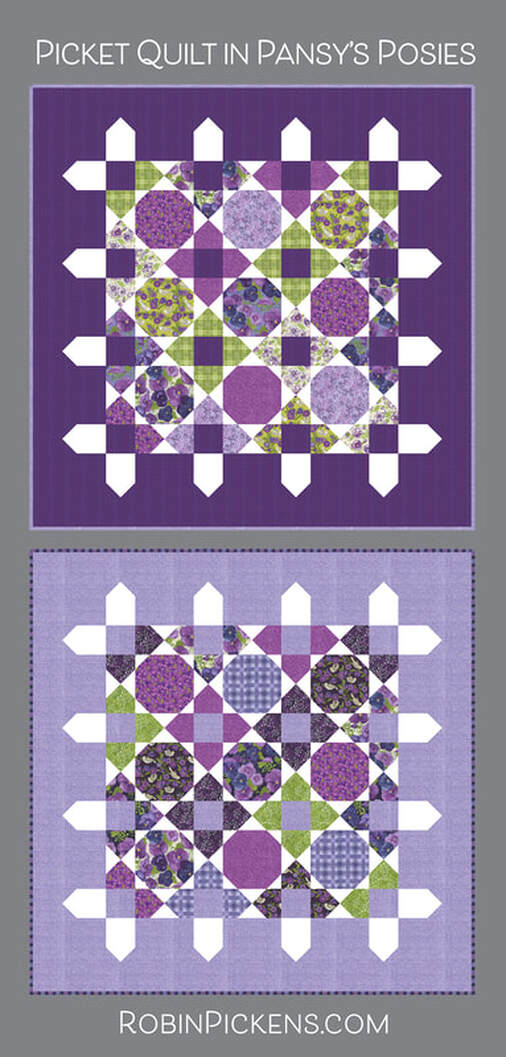 Just a little pattern play with Pansy's Posies today. Picket with the picket fence and colored borders is a good pattern to show off those purple and green colors. I've mocked up the 60 x 60" lap size with a mix of 8 fat quarters. The purple ones use Thatched Pansy 160 for the dark background and the Dotty Thatched Lavender 48715-213 for the light one. 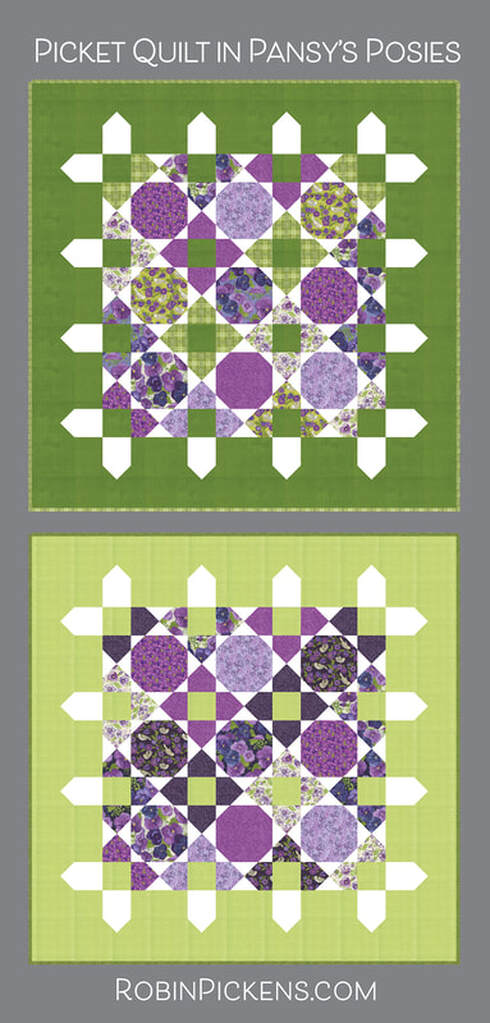 I love greens for a background for the pansies. My top darker green is Thatched 197 Grass and the lower, lighter one is Thatched Meadow 134. Chartreuse is also a good green to pair with this group. In general, when I have a darker background color, I tend to pair prints with it that are lighter and for a light background I look for the darker prints so there is a good amount of contrast in the quilt top.
Picket can also be made with a layer cake of a collection in both the smaller lap or larger 72" square size. If you want to make the larger size with fat quarters, you will need 13 of them. 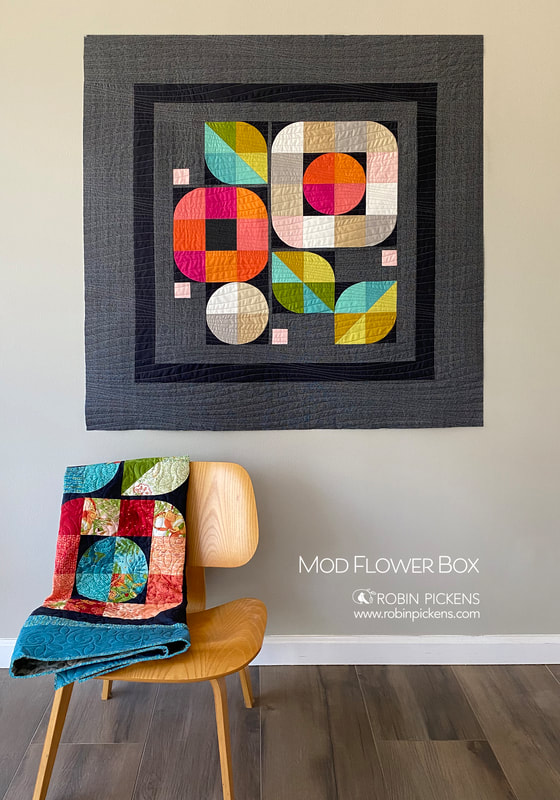 I am often a "transitional" quilter (or you could call it modern traditionalism)- relating to sewing between traditional quilters and modern quilters. I love to make more traditional quilts, but I also enjoy how modern quilts can allow you to express your creativity in a different way! For some people, modern design can be a bit intimidating. They may only know of more improvisational modern quilting and not have comfort with improv. However, modern quilting doesn't have to be difficult or intimidating. You also don't have to use a complicated pattern to get that modern look. To help you embrace the modern quilter that is within you, I am sharing one of my easy modern quilt patterns which creates a stunning quilt with tools that you have on hand and no matter what fabric you choose to use! 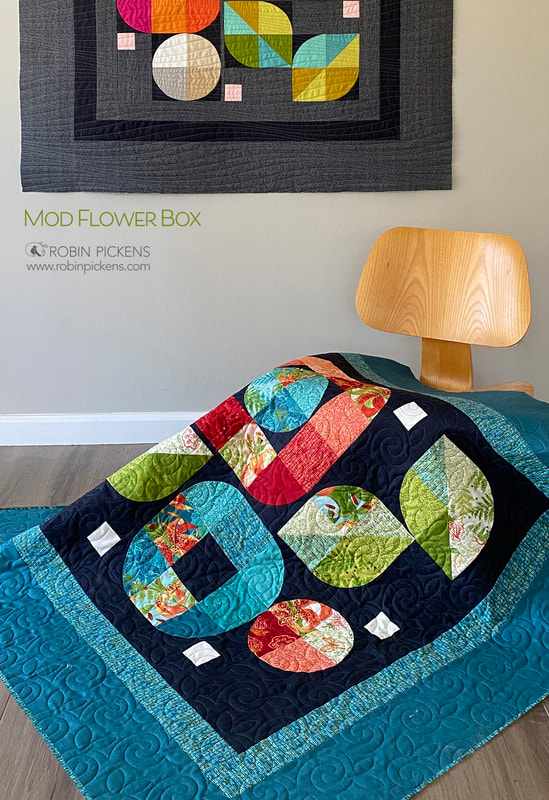 I enjoy a modern quilt design that is not overly complicated. In fact, I often feel a simpler, pared down design will have a more modern feel. I wanted to come up with a modern quilt that would allow you to easily create with fabrics you may have on hand, utilizing scraps, yardage, or even precuts (and precuts as small as a 5" square Charm Pack). I combined curves and squares into striking modern blooms in this geometric garden. This is Mod Flower Box, ready to bloom upon your wall! I'm showing two versions of this modern quilt in these photos. You can see how it still has a striking composition whether done in all solid fabrics or a combination of prints. This version on the chair is made with Carolina Lilies. This collection is scheduled to ship to shops in November 2021 and features spotted lilies, paisley prints, vines and ferns. Rich teal and green colors mix with spicy reds and peach tones reminiscent of my Painted Meadow collection. I chose to keep the background a dark soft black so there is high contrast with the colors and they really pop! I like to see the different ways that light and dark colors change up a quilt (keep reading for a lighter version below). 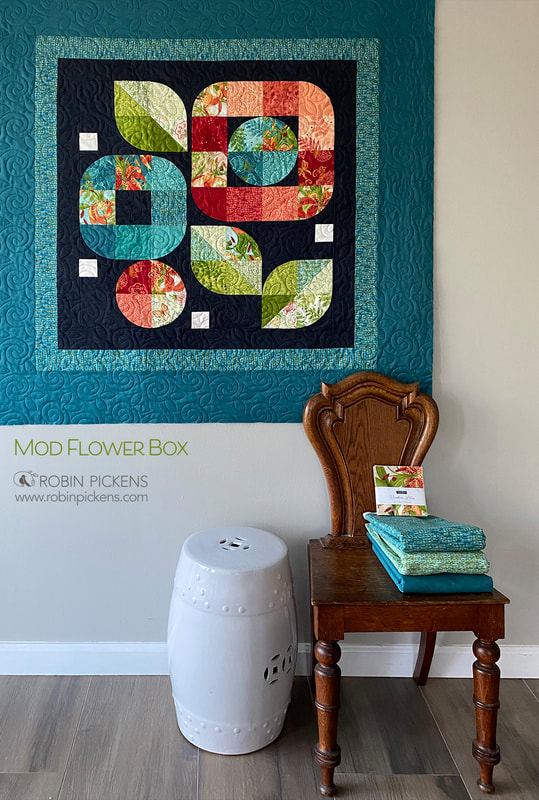 The wall/lap quilt in Carolina Lilies uses Thatched Soft Black 152 for the background and borders in Thatched Lagoon 199 (the teal color) and Dashed lines 48705-21 in Teal. The flowers and leaves are made from one Charm Pack of 5" squares. You can also use a Layer Cake of 10" precut squares and cut them in half both, horizontally and vertically.  Another option for making this quilt is using Fat Eighths. My favorite version of this modern quilt is the one that looks like solid fabrics. It is actually using Thatched basics for the fabric. I've paired a use of bold colors with this subtle textured fabric to make the hues really stand out in a dramatic way. With the floral groupings all in the center, the outer borders create balance with a more expansive negative space that can be good for specific border quilting or just a breathing space and strong framing device. To get the look of these graphic areas of solid color, I've used a mix of 14 Fat Eighths, with 9 for flowers and 5 for leaves. For this version, I wanted to emphasize the corners and really play with the spaces left from the curved blocks by "boxing in" the flowers. That is where the name Mod Flower BOX comes in (plus the extra outer border). 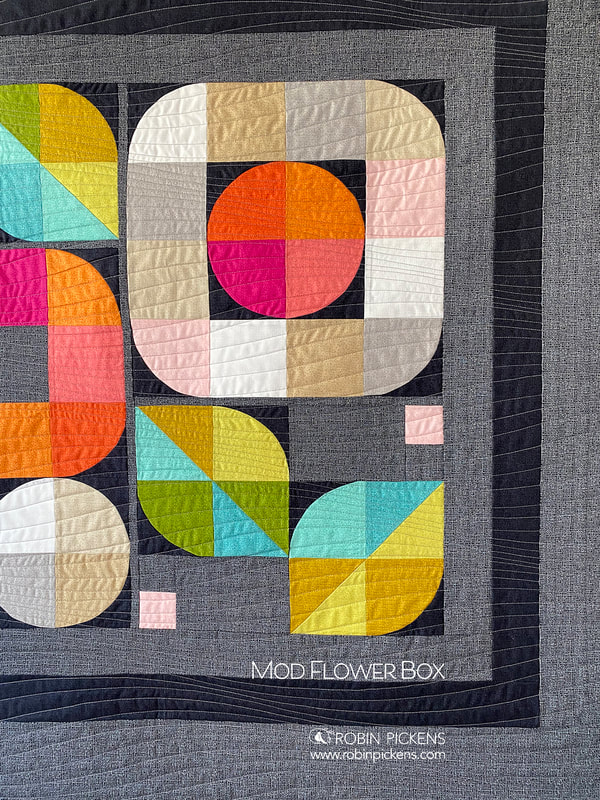 The background is made with Thatched Chalkboard Scribbles 187 with curves and inner border using Soft Black 152. The flower and leaf blocks use a mixture of Blizzard 150, Washed Linen 158, Toast 156, Gray 85, Early Dawn 122, Sugar Rose 127, Citrus 123, Clementine 138, Fuchsia 62, Green Curry 177, Sunlit 142, Grass 197, Dewdrop 143 and Brook 198. 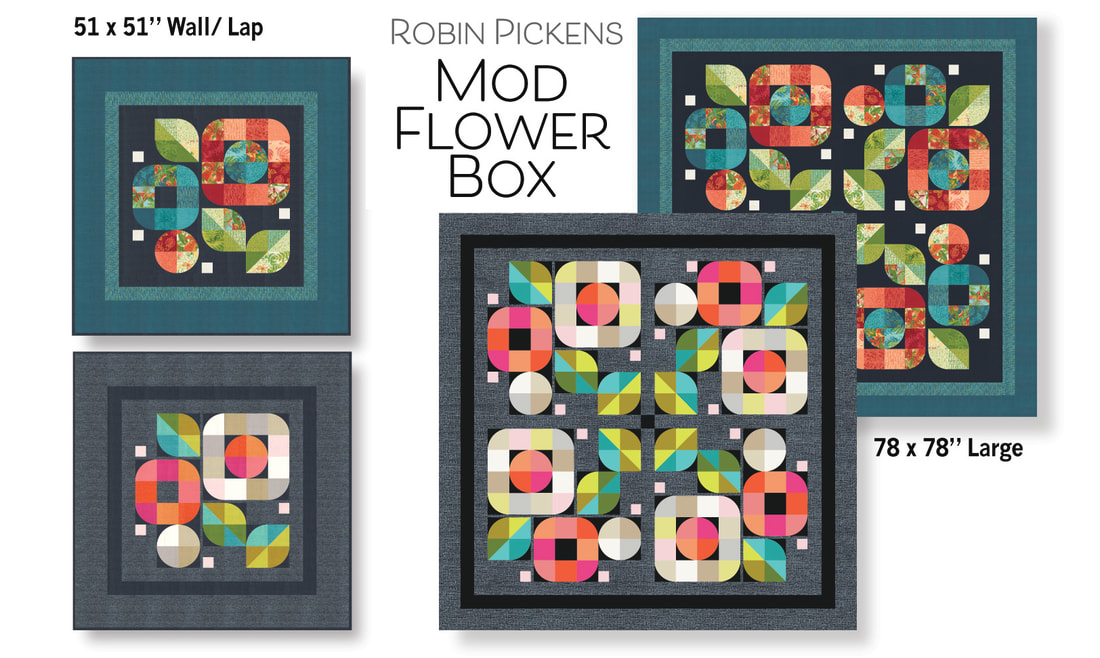 There are two different sizes of Mod Flower Box. The wall/lap size is 51" square with borders. If you choose to not have borders for a smaller wall quilt, the inner part is 34 x 34". The large quilt sized 78" square, uses 4 units of the rotated Mod Flower Boxes. Depending on which quilt size you choose, the Mod Flower Box pattern can be made with a Charm Pack or Fat Eighths for the wall/lap size or with a Layer Cake (or 4 Charm Packs) or Fat Quarters for the large size. 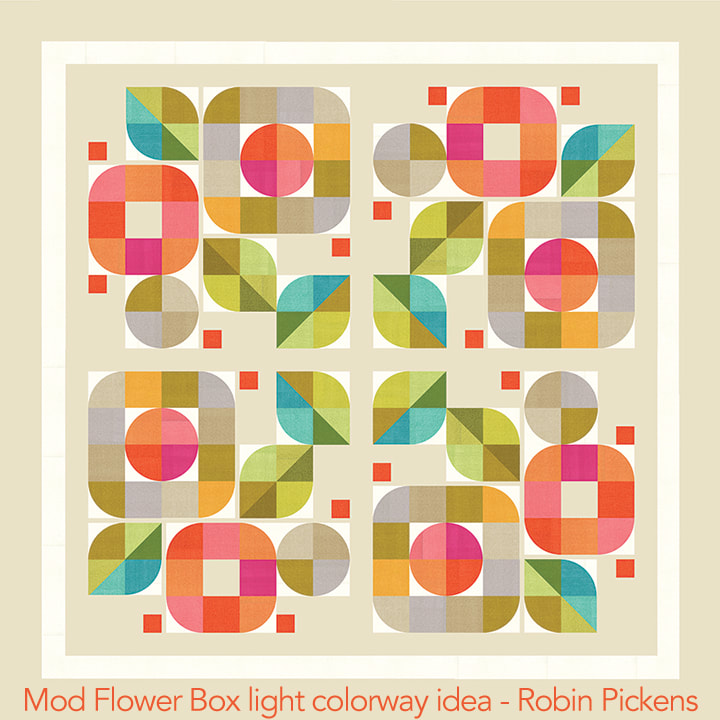 I am planning on starting this lighter color version of Mod Flower Box, probably with a Washed Linen background or maybe Sandcastle 157 flipped to the backside and accent corners for curves in Blizzard 150. Speaking of colorways, this is actually one of my favorite things about this quilt design! You could create your own quilt top in almost any color scheme! For instance, you could use solid colors, different styles of fabric within a particular color palette, ombre fabrics, or simply your favorite colors. Color always gives me a new way to look at modern quilt designs. Needless to say, the color choices you have are absolutely endless!  I've made lots of quilts with curved corners and I DO include a paper template you can work from in the pattern (or pattern downloads if you buy the pdf file version). I do prefer to use a specialty ruler for doing curves and know of a number of them. I usually go to my trusty Creative Grids Circle Savvy Ruler since it has every size I want and I know I will get a really good result cutting with these! I note which slots in the pattern if you have this ruler too. 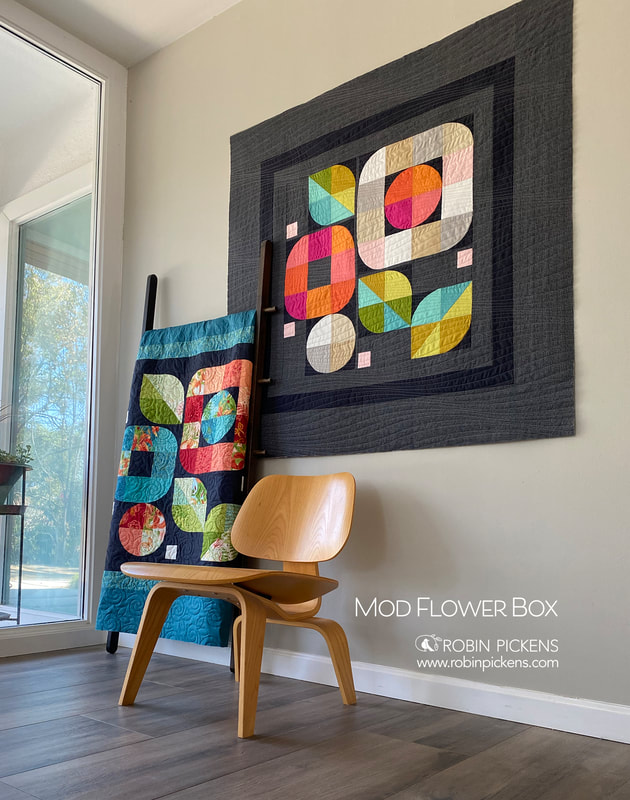 Since we are talking about curved corners, many beginner quilters stay away from modern quilts due to ''sewing curves''. I took this fact into consideration, so if you are new to curves, this is a great pattern to try since it only uses quarter circles vs half or full circles! Quarter circle curves are not very hard and I'd suggest making a practice quilt block or two first and then go for it! I love the look of curved blocks- so soft and curvy and gentle. They are a fun thing to experiment, plus, it will make you more confident in your quilting skills! 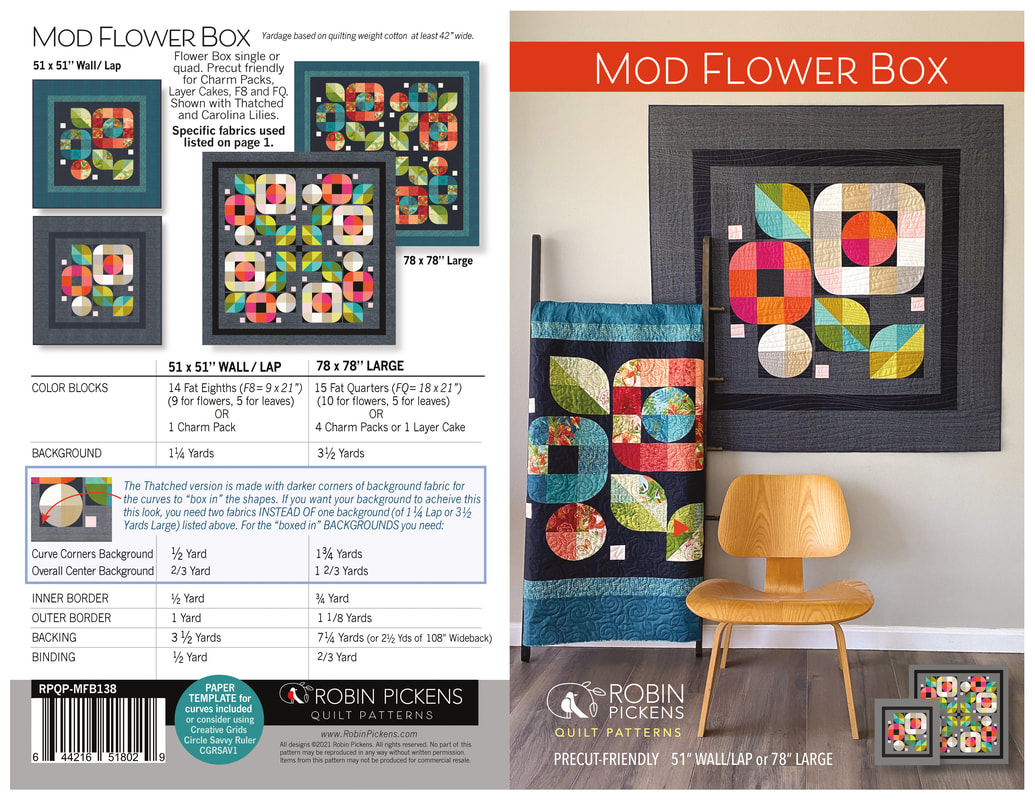 So, if you are ready to take a break from traditional quilts and want to create your very first modern style quilt, then the Mod Flower Box is a great place to start! Above I have included additional information on quilting materials and specifications. However, since this is only a blog post, I highly recommend that you check out my shop to learn more about this fun quilt pattern! If you are interested in the pattern, it is up in my shop at RobinPickensInc.com! 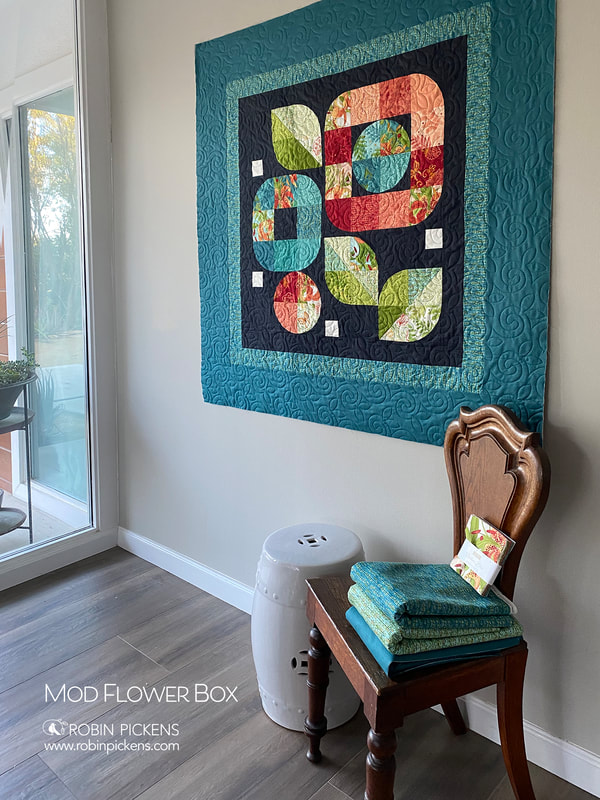  Fair and Square has a special place in my heart because it was in the first group of patterns I designed. I've learned a lot since then and ended up completely rewriting the instructions. This quilt continues to be a learning experience for me! 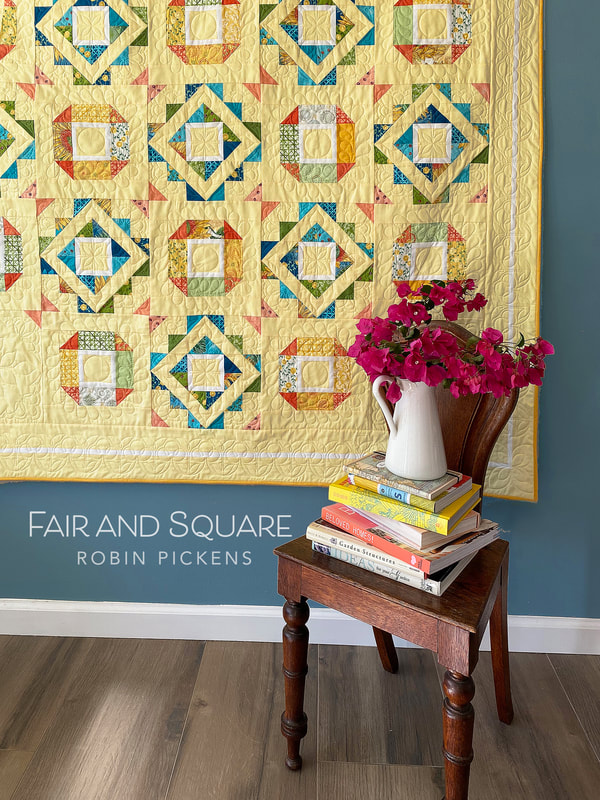 I made a revision to the design from the original quilt. I wanted to show this quilt with a soft, buttery yellow background to go with my big bright sunflowers. Sometimes with a pale color mixed with prints needs a little more defining contrast. I loved how a thin white border gave a little additional crispness to the block centers. I decided to carry that thin white sashing around the border to define the space. 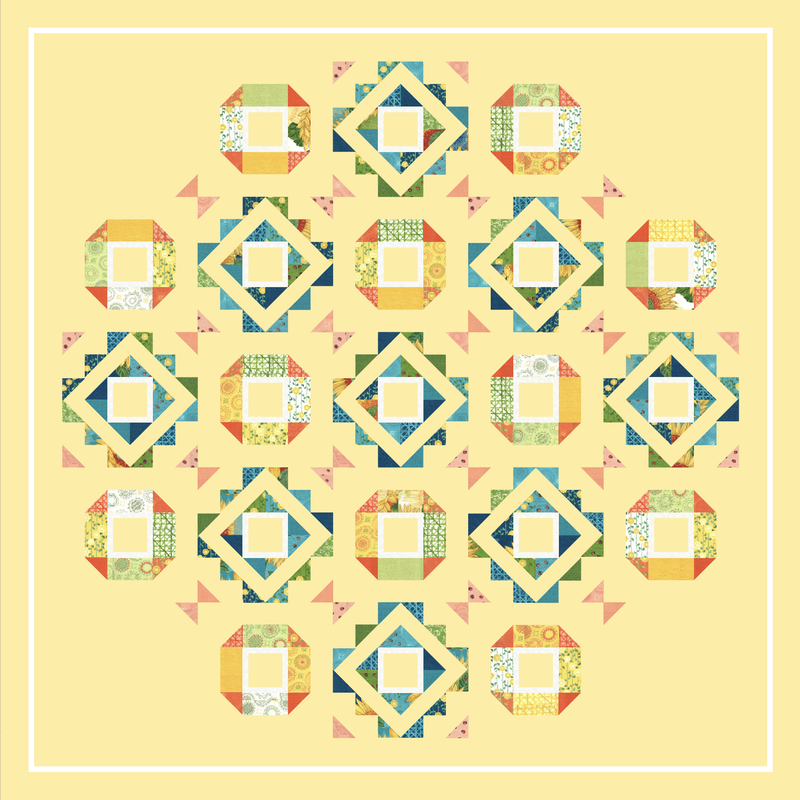 The first time I made this quilt I thought the process of making half square triangles went on FOREVER! Now I just enjoy seeing those big blocks come together from a fun mix of little triangles. This quilt can be a fun way to use up some of your extra half square triangles (I save all my extras for scrappy projects) or pieces at least 3" square. Yup, got a lot of those. This pattern specifies a layer cake but can also be made with scrappy pieces approximately 3 x 5" with background fabric added. 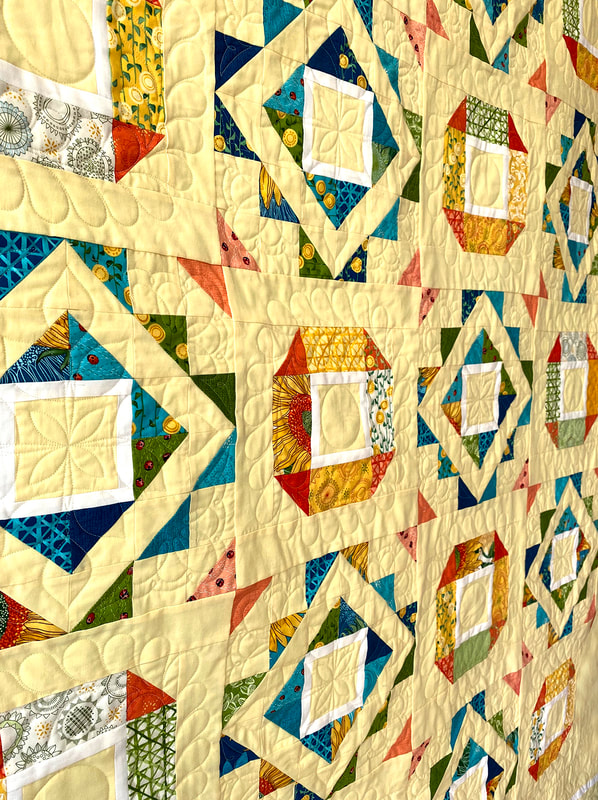 Part of my learning experience this time on the quilt was doing the longarm quilting. My system is computerized and I put the sewing designs into the individual blocks vs going with a continual pantograph that is edge to edge. I did a different border design and two designs rotating between the two types of block styles. Aligning the design, staying centered, working out what looked right with the blocks...I did numerous tests on scraps first. I can say I have SO much respect for the amazing longarm quilters out there that I see doing incredible custom work. It's not easy and requires patience and expertise, even when its guided by the computer. I'm glad I pushed myself to try this. It's not perfect, but I think I gave up the quest for perfection a long time ago! I quite enjoy seeing the areas that have mistakes because it records learning and improving for me. 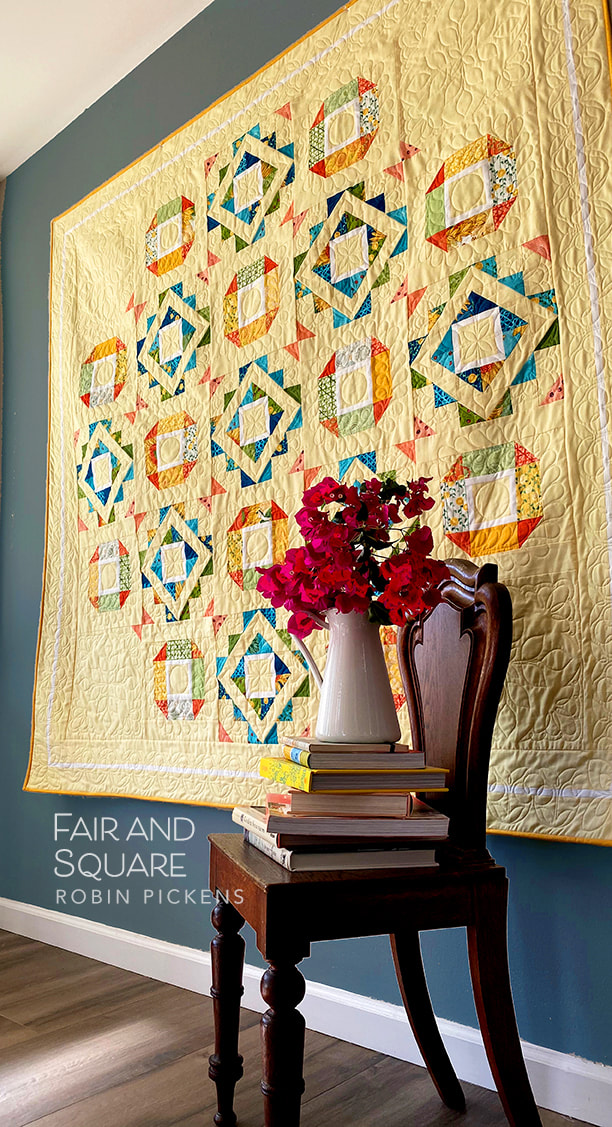 The back of this quilt has the print from Solana of little ladybugs. I just couldn't wait to try this on a backing since it is such a fun little print and I love ladybugs! They seem like good luck and fond wishes coming from busy little bright ladies. This print is great for a backing since the ladybugs have little dashed lines of curvy walking paths in a subtle texture in the background so its very forgiving if you make mistakes while quilting. Yes, I know that from personal experience. 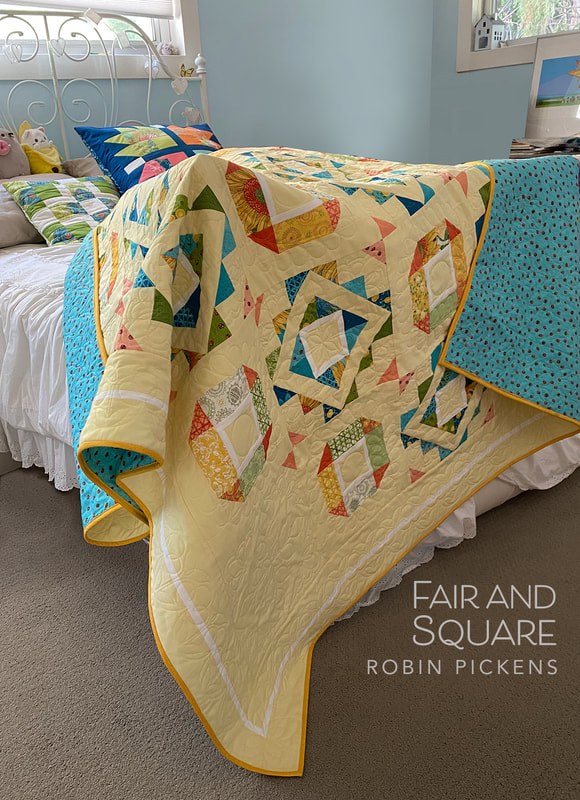 In case you were wondering what yellow this is, its Moda Bella Solids Baby Yellow 31. I paired it with Bella White Bleached 98. This is the original Fair and Square quilt I made with Poppy Mae, my first Moda Fabrics line. It was quilted by Gina Siembieda. 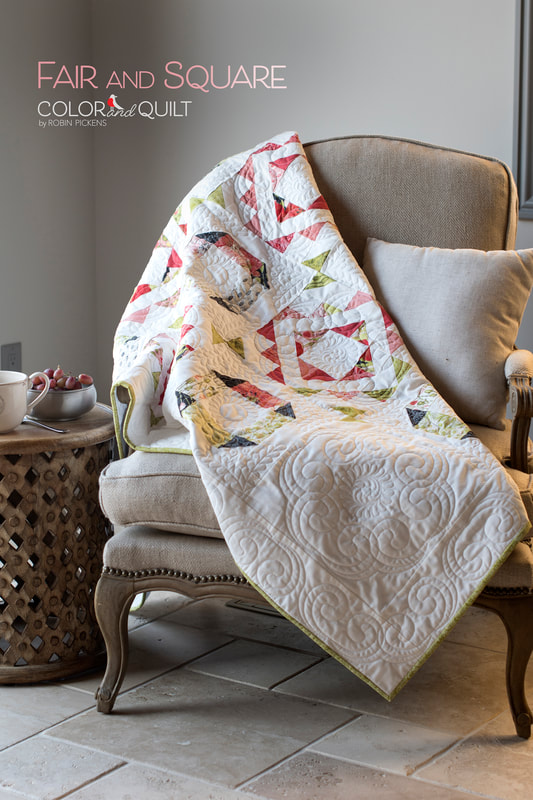 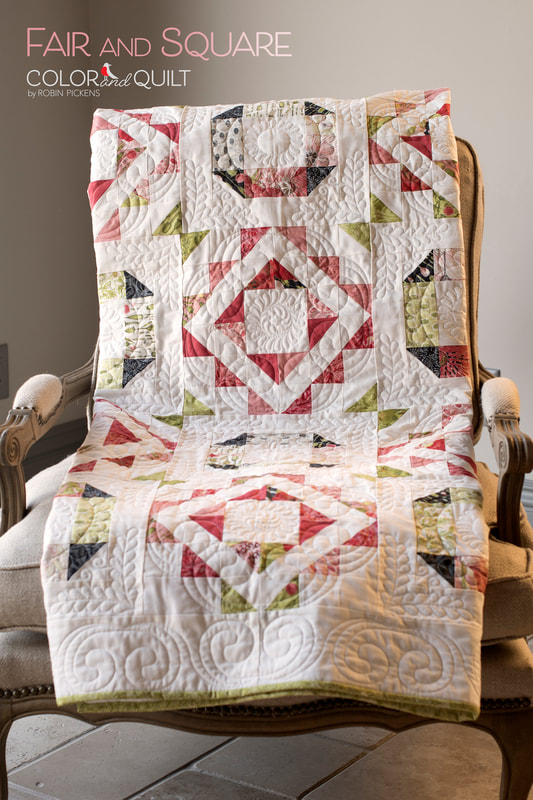 If you want to check out other quilts made with Solana, visit these posts: https://www.robinpickens.com/blog/simple-solstice-on-a-sunny-day https://www.robinpickens.com/blog/solana-patterns-here-comes-backslash or visit my shop! Have a sunny, happy sewing day!  I love envisioning past patterns in new fabric lines and since Abby Rose is in shops now, let's play with those cabbage roses!  This light blue in Abby Rose is Thatched Seafoam and I just love the softness and warmer tone of that pretty blue! I wanted to see that as the larger side borders with a cream to highlight the fringe thin sashings. A good choice for the cream is Thatched cream 26 or Bella Solids Porcelain.  Here is the cream as the main background with the Abby Rose/Thatched Greenery 124 as the sashings. We have blenders in the Thatched texture with new collections and they don't all automatically become new basics in Thatched. But if a color is different enough and popular, it's a good chance that it will. Greenery is not as yellowy as charteuse, although it is close. Its pretty and soft, like the other Abby Rose colors.  If you were making a king sized quilt, I would assume doubling the twin size. This mockup shows the Greenery as the large border block with the seafoam as the rectangles in the borders. I like the idea of mixing two colors for the borders! You could even go completely scrappy with the borders and have it be an extension of the prints in the body of the quilt.  This last image uses the darker, Night 89 Thatched from Abby Rose. It is the same as 89 Marine. I have been so fascinated by Marine, Navy and Burgundy Thatched lately as deep, rich tones. They are so full of depth and personality! Notice on this image that the thin sashings are done in Seafoam Thatched for the two outer pieces, and cream for the inside piece in every group of three. Or you could go from light to dark in three steps to get a more gradated ramp. Lots of possibilities. I just love the drama of the darker border color!
I think Fringe is also a good pattern to play with those large blocks as crazy quilt piecing, string piecing, embroidery panels...lots of options! I hope "seeing" the possibilities with Abby Rose is helpful here! Happy sewing everyone! I've had a number of requests for showing Painted Meadow fabric in my Joy and Delight quilt design. I love the ease of the computer to try out a few things so lets have some color and print fun! I designed Joy and Delight with my Christmas collection, Splendid. I showed it with the blocks alternating two prints OR in a version with the large block centers using a Layer Cake for a scrappier look. With this exercise in color play, I'm staying with the scrappy Layer Cake assortment.  I'm starting with some of my favorites (I think) because I really enjoy how soft and pretty these can look in this more pastel palette. The above quilt shows the snowflakes in the borders in pink. So now I can feel free to call them sparkle bursts instead of snowflakes. They have a sparkly decorative feeling. Of course you can make this quilt without the border sparkles but I think they do add a layer of twinkle (or pixie dust??) to make those borders feel special. Below is a more close up view to see the softness of the sparkle bursts in a light color. Also the framing around the blocks is shown in pink (below) vs light green (above). 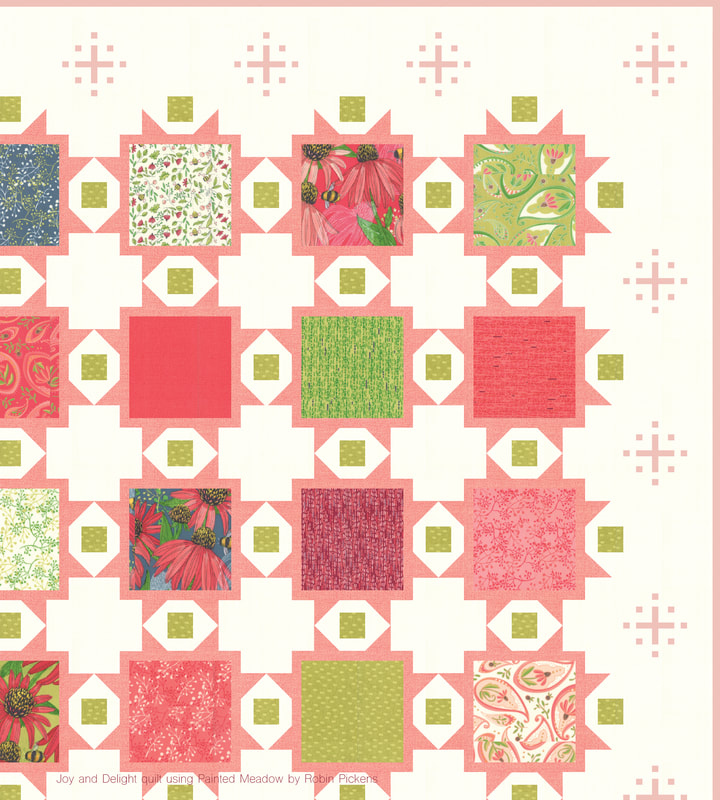 A little more exploration of pinks...lighter to the deeper pink. With the lighter pink background I used dark pink framing and border sparkles. When using a darker frame around the blocks, I like to switch the small squares in between to a light color for more contrast and the color sparkle of the white accents (see, more sparkle!). With the dark pink I went back to the pop of the cream frames but made my border sparkles even darker red.  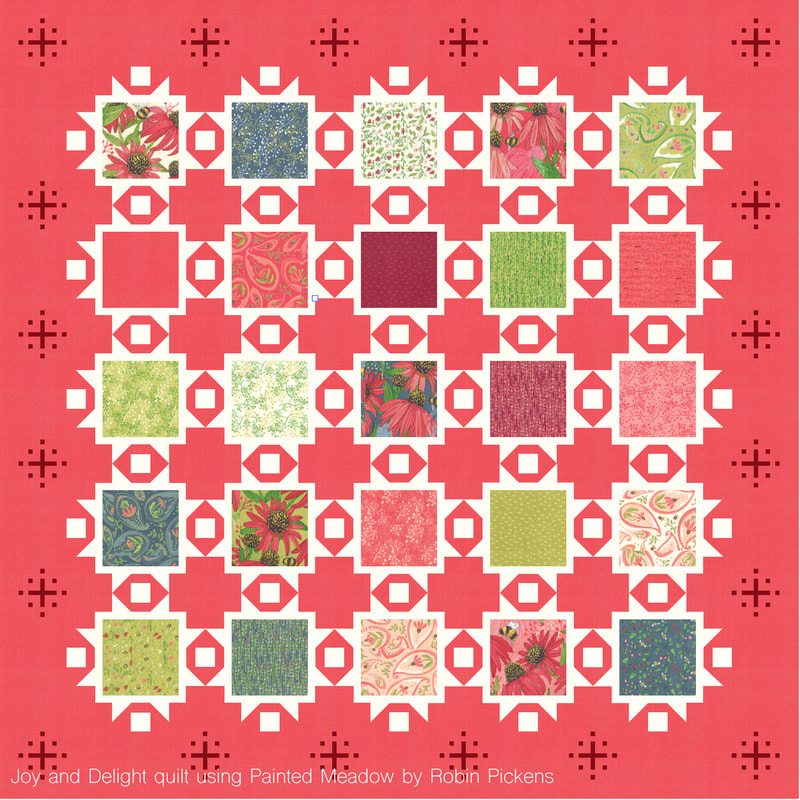 I enjoy the more dramatic tealish blues of Painted Meadow and thought it would be fun to see some blue stories. A deep midnight blue frames the squares in this first one.  And on this version I wanted to add a soft khaki or light tan for the frames. I think the addition of the neutral natural light tan gives this an entirely different feeling and is a nice compliment to all the color in the blocks. There is something so restful and calm about this color combination. 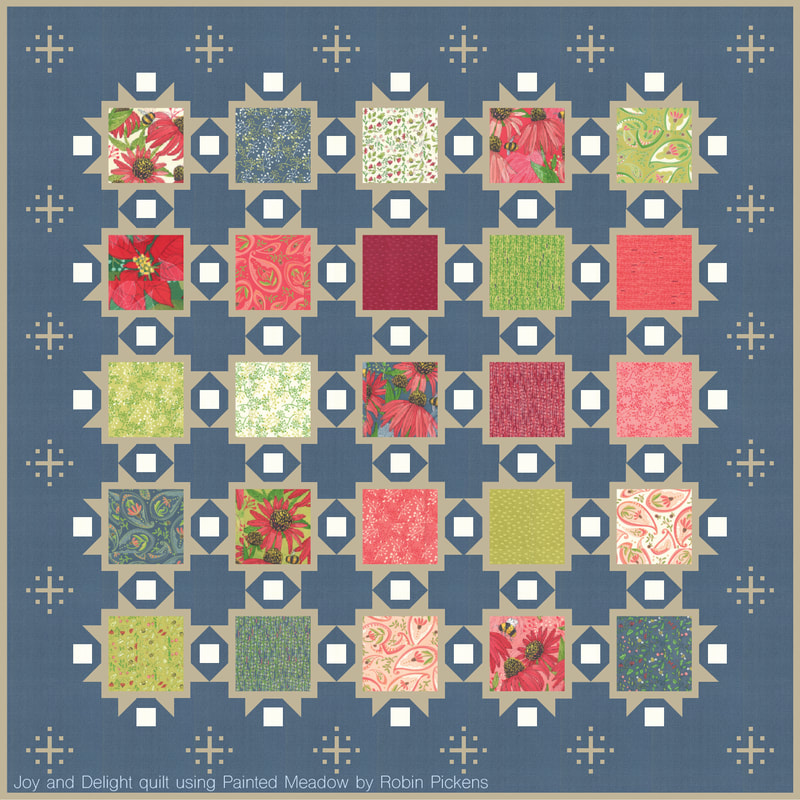 Hope you enjoyed a little color play with Painted Meadow and this helps in visualizing quilt plans! If you are interested in Joy and Delight, it is shown in Splendid in my shop. Happy sewing!  Sometimes I just like to sew. You know, the hum of the machine. The forward motion and progress. Adding piece after piece in a rythmic order and just getting into my zen place of calm at seeing rows of color and pattern coming together. KYOTO STEPS takes me to this zen place. 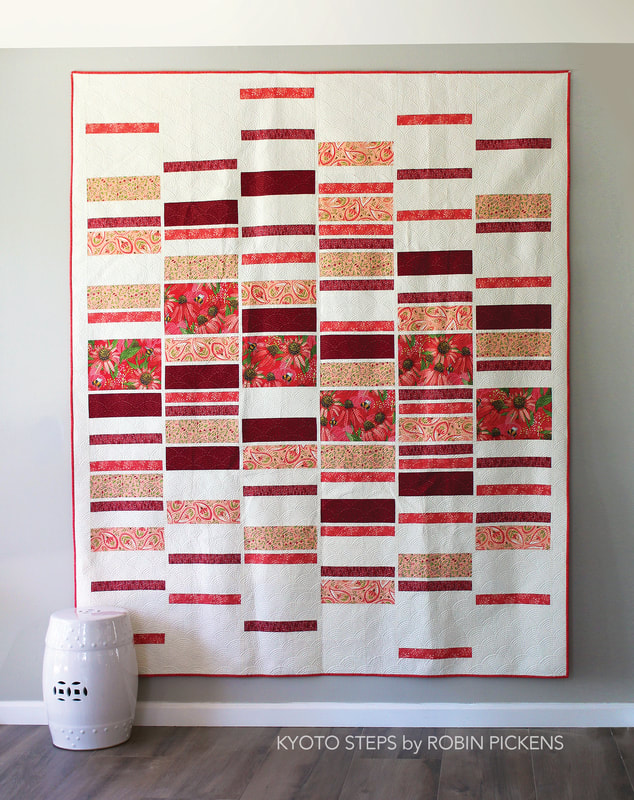 This quilt is easy to make- a logical cutting scheme and straight sewing- but still has a richness of activity and proportions. It is designed to allow some large prints to have a bigger block (yes, my common theme to show off my large florals) that are more centrally located. Then think of the other blocks as steps that skip and hop away from the center in light and dark. 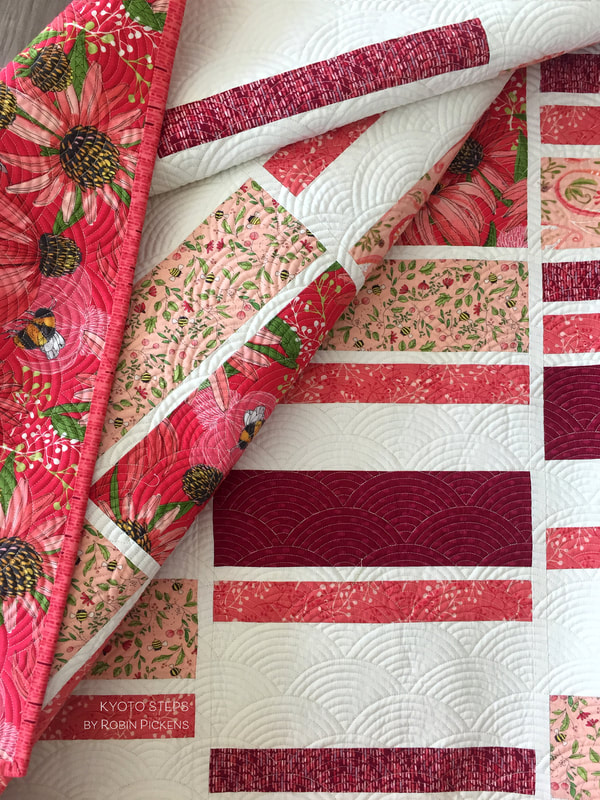 I just love the quilting on this one. I want to rub my hands over it and feel the texture of those fans! Marion Bott (@bottmarion on IG) did a fantastic job with adding the perfect layer of textural dimension to this quilt. The fabric here is from my Painted Meadow collection (shipping October 2019) and I made sure some of my fat bumble bees made it into the large blocks. I also put the large pink print with big Coneflowers on the back of the quilt so there would be lots of drama and excitement when you turned it over. 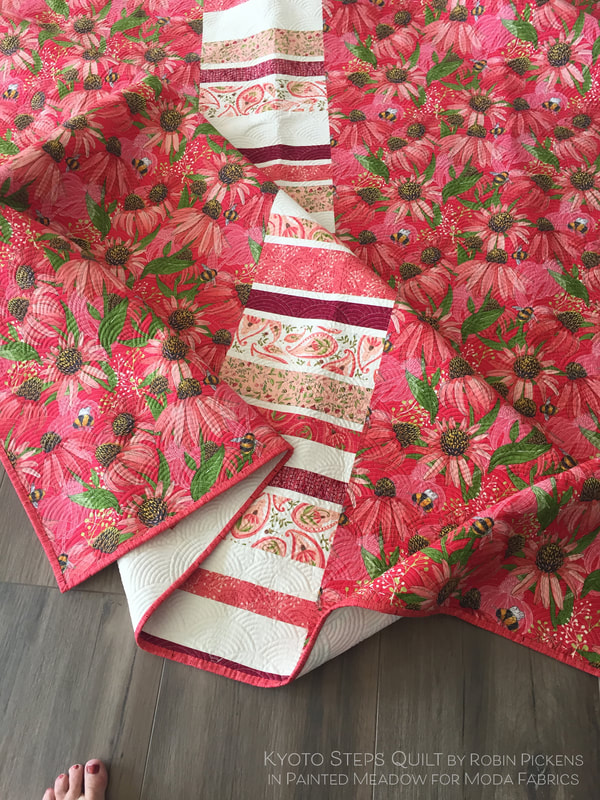 I must admit I really don't like making quilt backs. And I REALLY don't like trying to match a print on a seam when making a back. I'd much rather add a panel down the middle so I don't have to see an unmatched print and use some extra pieces of fabric I have. In this case I made another row of rectangles from leftovers from the quilt top and ran it down the center. I think its stays in the style and spirit of the quilt front and gives a fun interest to the back. 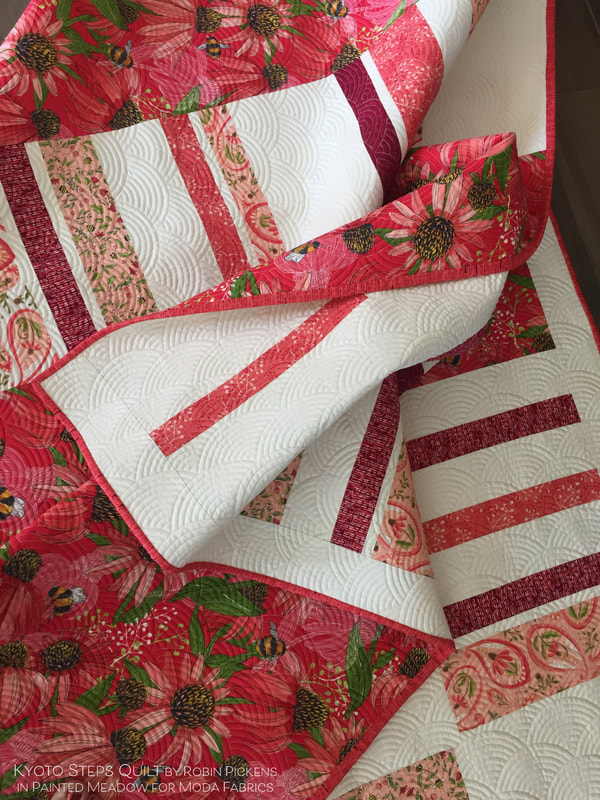 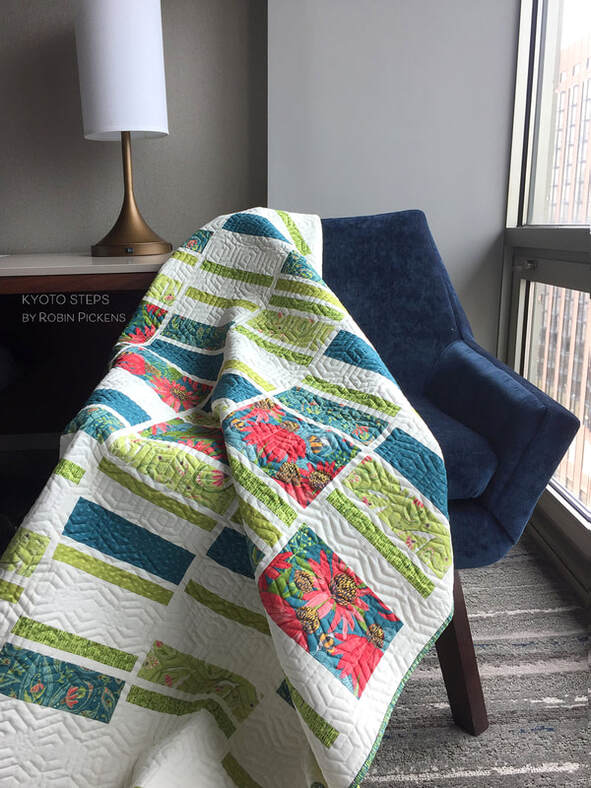 Kyoto Steps looks serene in these teal and green colors. This is a scaled down version of the quilt with slightly smaller rectangles. This lap version still gives plenty of room for a big print to shine while playing with those rhythmic rectangles. Sally Corona (@coronaquiltworks on IG) quilted this one in fabulous hexies. Quite a perfect shape with this chair! 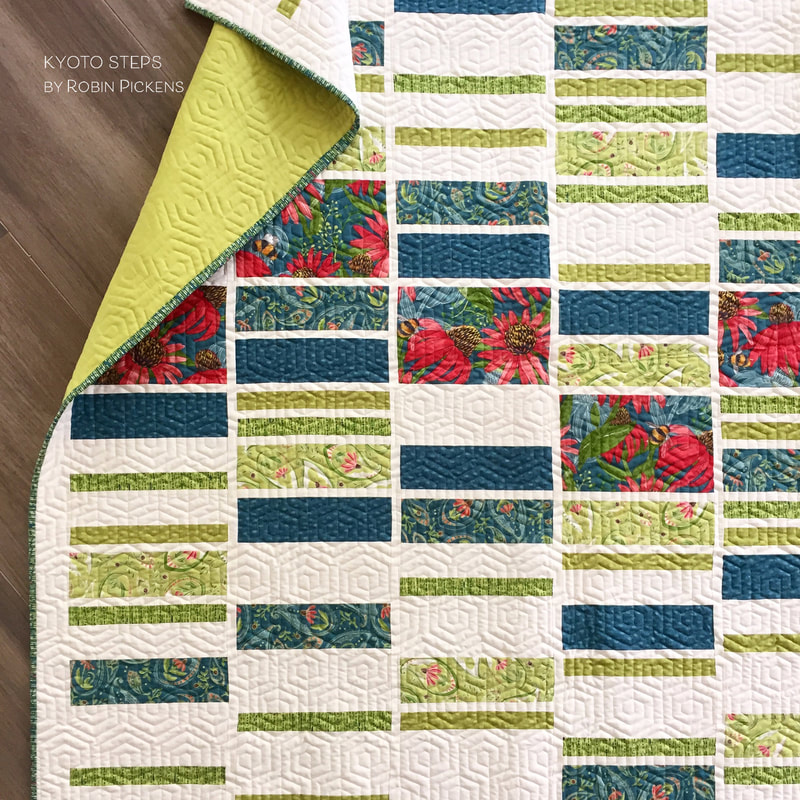 For this quilt I chose a Moda Bella Solid for the backing- I believe it is Pistachio. I wanted to keep it serene and calm but with a pop of color! I like the way the painted lines coordinate print in the Painted Meadow collection make a good binding with subtle stripes of teal, green, deep red or saturated pink color families. 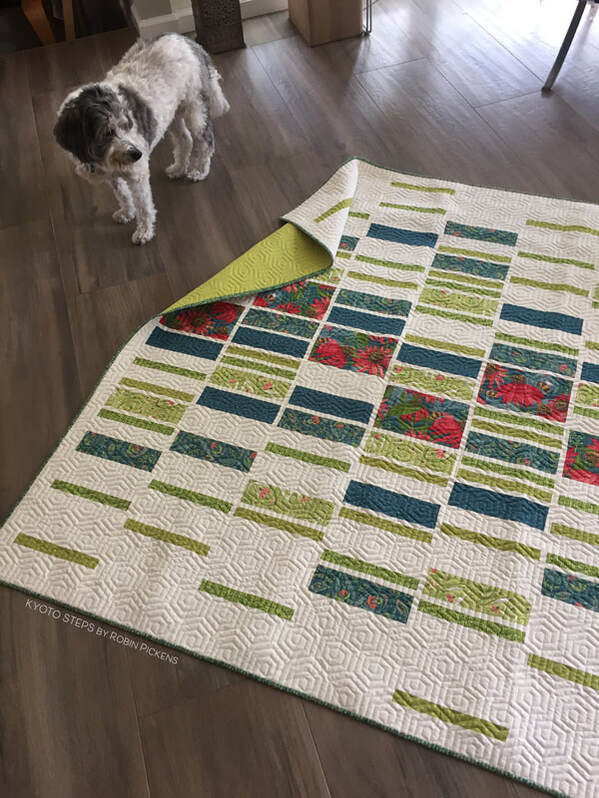 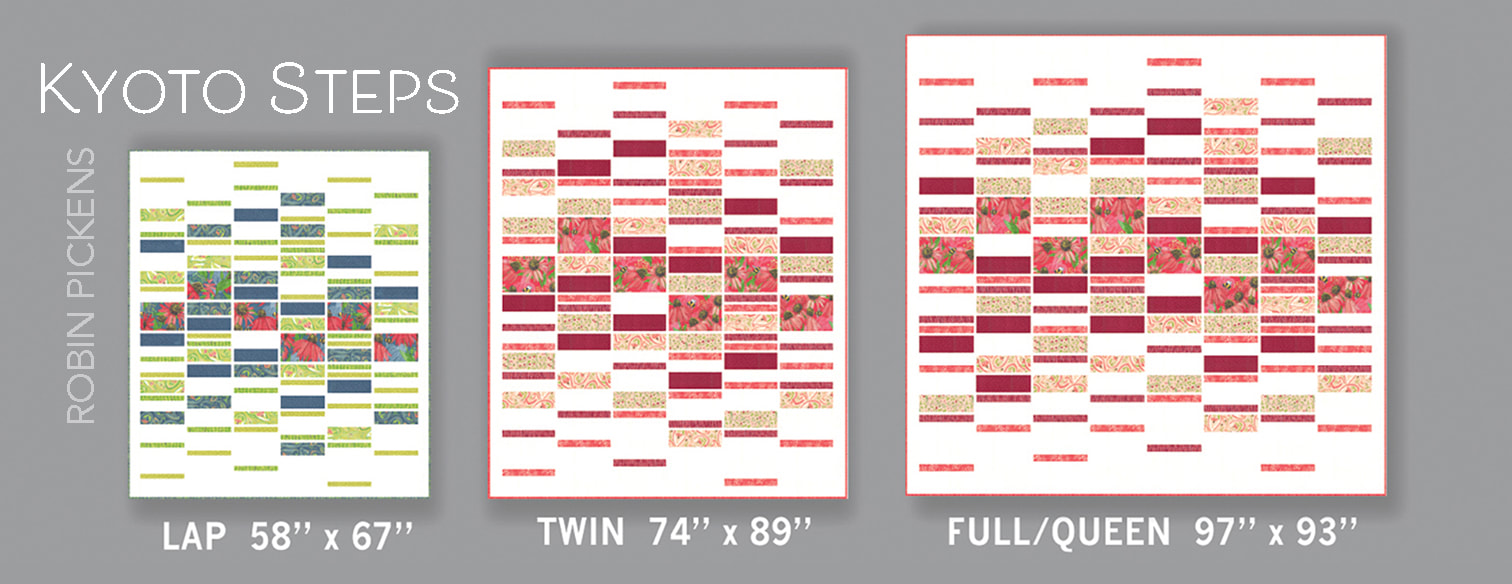 KYOTO STEPS is written for three sizes- Lap 58" x 67", Twin 74" x 89", and Full/Queen 97" x 93". The placement of the rectangles is diagrammed out to make it easy to replicate this spacing of blocks. The quilt is made with 6 half-yard cuts plus background if you are making the Twin, mostly 1/3 yard cuts for the Lap (but get 1/2 yard if your main print is directional like mine is) and a mix of 2/3 and 3/4 cuts for the Full/Queen (also adding background yardage to the Lap and Full/Queen). If you want to make this in a scrappier way, you can use mixes of Fat Quarters for your pieces. If you are using a Layer Cake, the scaled down size of the Lap will work for those 10" pieces. This quilt is suitable for more beginning quilters.  You can find KYOTO STEPS along with other patterns from the Painted Meadow release at my shop and the patterns are shipping to local quilt shops with the fabric collections!
The original inspiration for this quilt was a caned back to a chair I saw at a yard sale. I thought it would be fun to replicate that woven look with center octagons in fabric. As I was laying it out, the design was becoming a bit too busy and challenging. It needed simplification so the lines did not compete with the prints on the fabrics and so I wouldn't tear my hair out! My happy ending place was this center part of Picket, with white triangle corners meeting each other, suggesting the continuation of line and an almost mosaic-like feel. 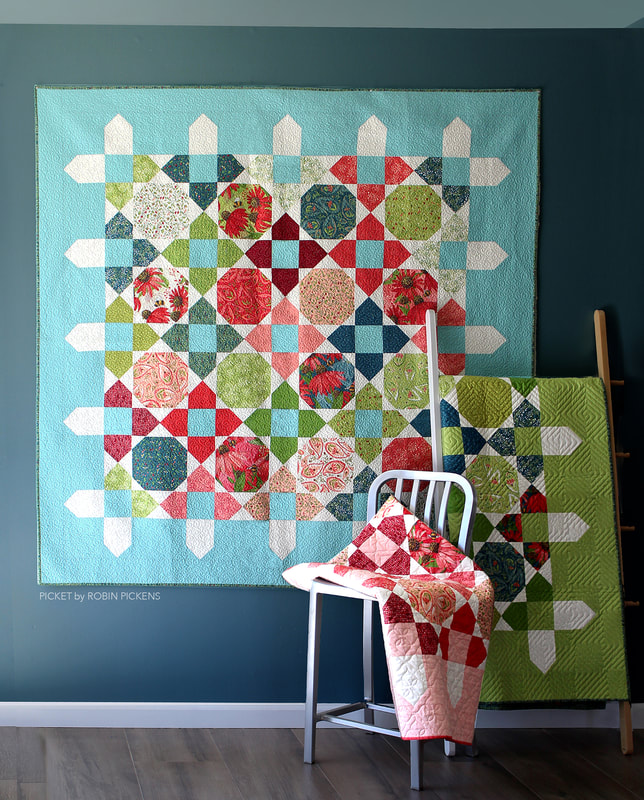 As I was playing with the shapes, I loved how the triangles played together and with some of my diagrams, the flying geese ends started to make their own statement. By lengthening the strips, they suggested picket fence posts (but not too long to be overly literal). The pop of white against a colorful border gave that additional chance to set the mood with color. 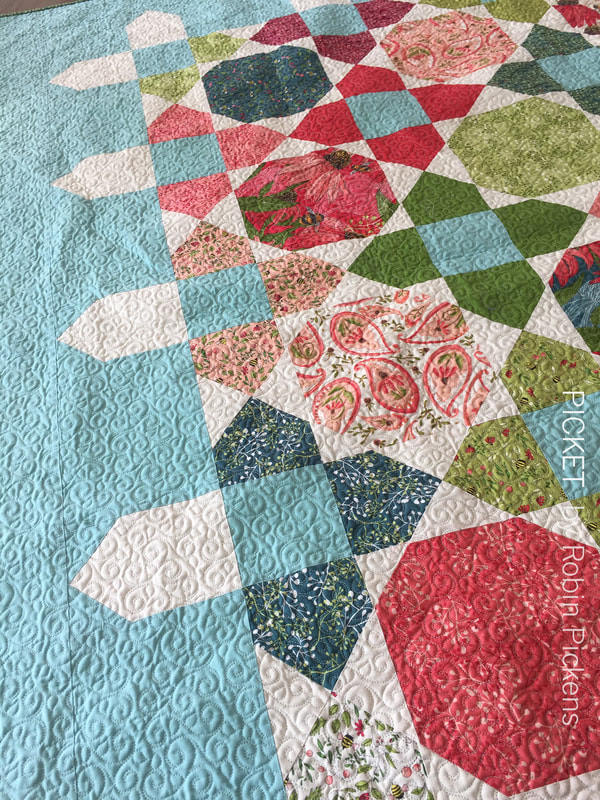 Picket is designed to be made with either a layer cake (or any mix of fun scrappy 10" blocks of fabric) OR with fat quarters. I like using the fat quarters to get a good mix of fabrics but still have repeating prints and to select my fabrics to tell a color story. The two lap quilts here have color themes of pink/coral/red and blue/green/teal. They have such a different feeling based on the warmth or coolness of the fabric colors. 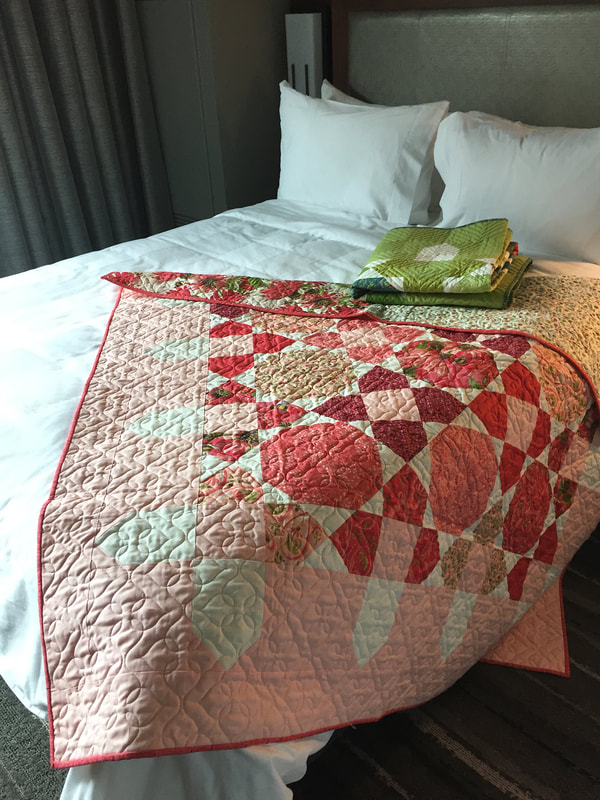 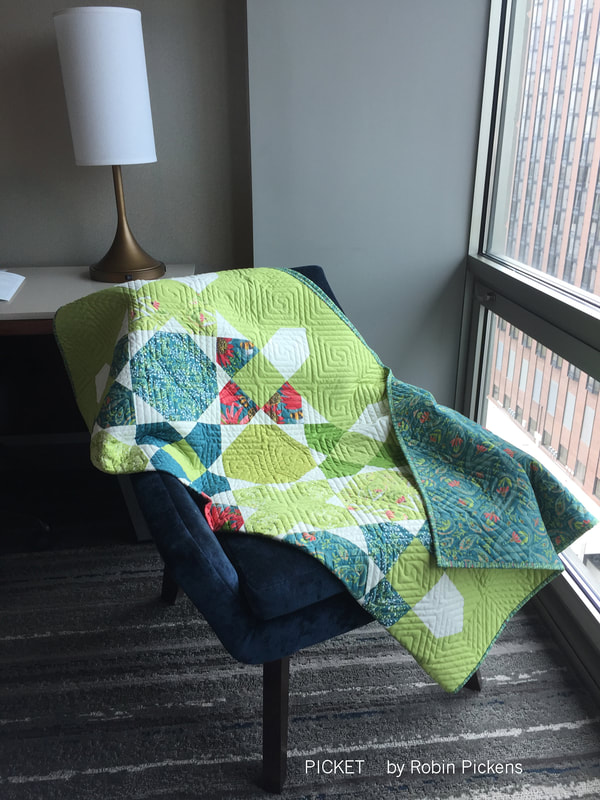 For the layer cake version of Picket, I auditioned quite a few colors for the border and centers of the X blocks but I kept coming back to this Moda Bella Solids Spray color. There is something so fresh about it and I loved how it popped with the teals and greens and reds. 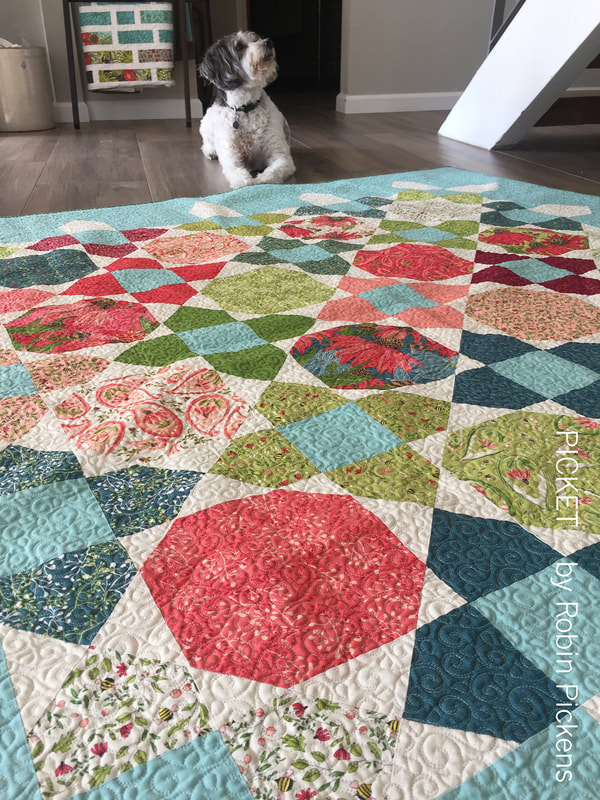 The quilt is made up of Snowball and X blocks, set on point. It's really pretty fast to make once you get in the groove of the blocks. I make up all the Xs, all the snowballs, then play with arranging them. Then at the end, I get to enjoy my colorful garden all surrounded by my picket fence. 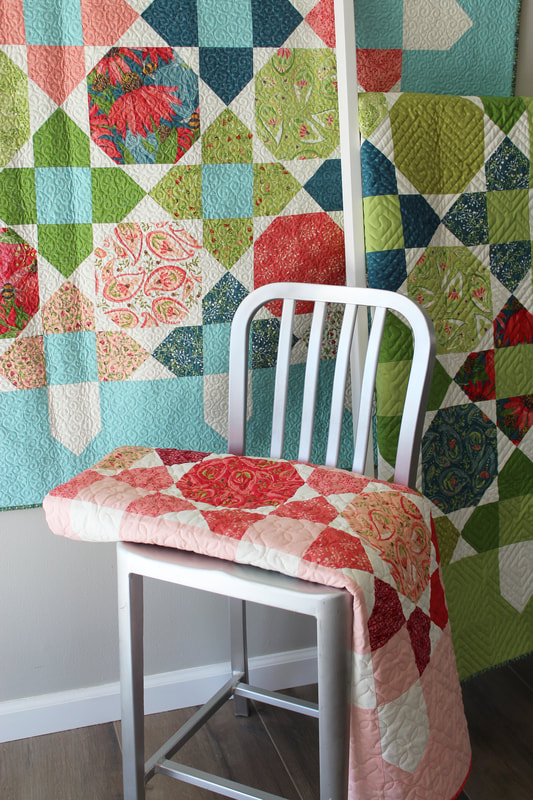 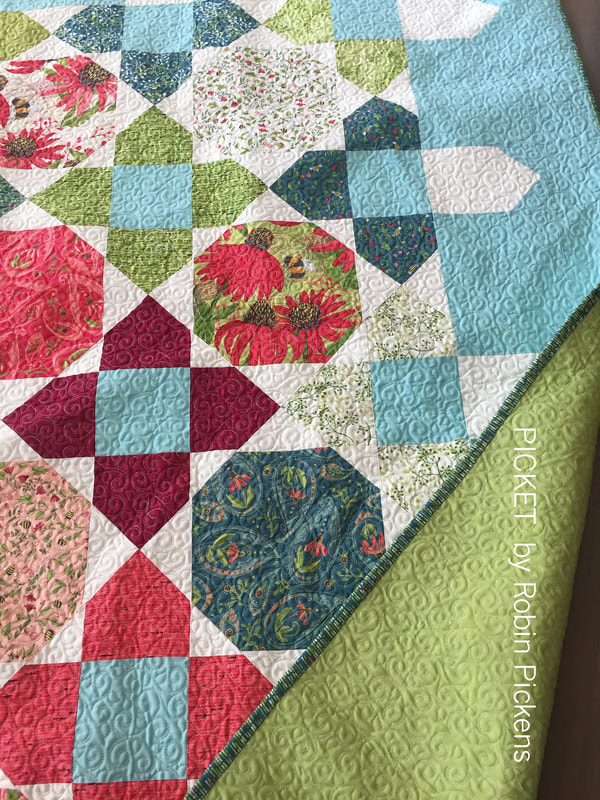 I'm so happy to have had a lot of helpers on these! The large quilt was pieced by Susan Vaughan @thefeltedpear and was longarmed by Marion Bott @bottmarion. The lap quilts were pieced by Danica Willig @danicawilligdesigns and longarmed by Sally Corona @coronaquiltworks. Check out more patterns made with Painted Meadow (and yes, Painted Meadow is shipping to shops in October 2019 from MODA FABRICS!) at my shop! 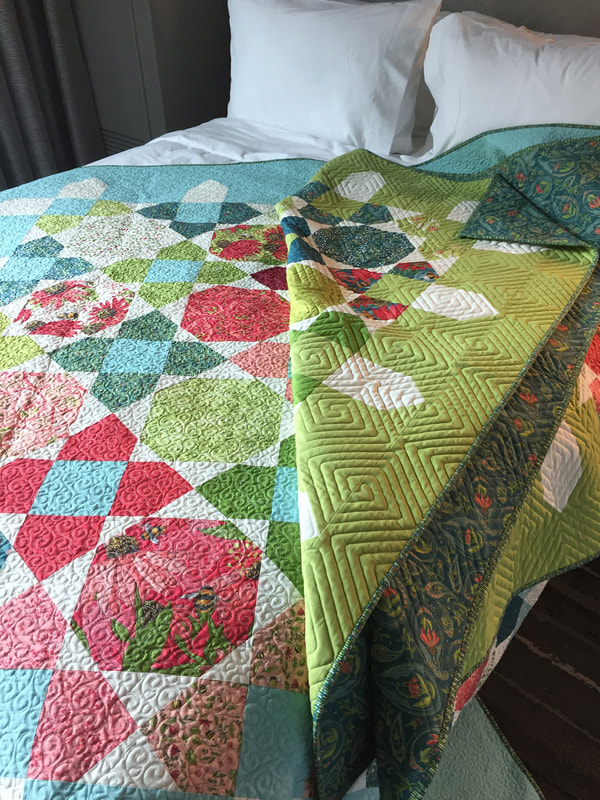 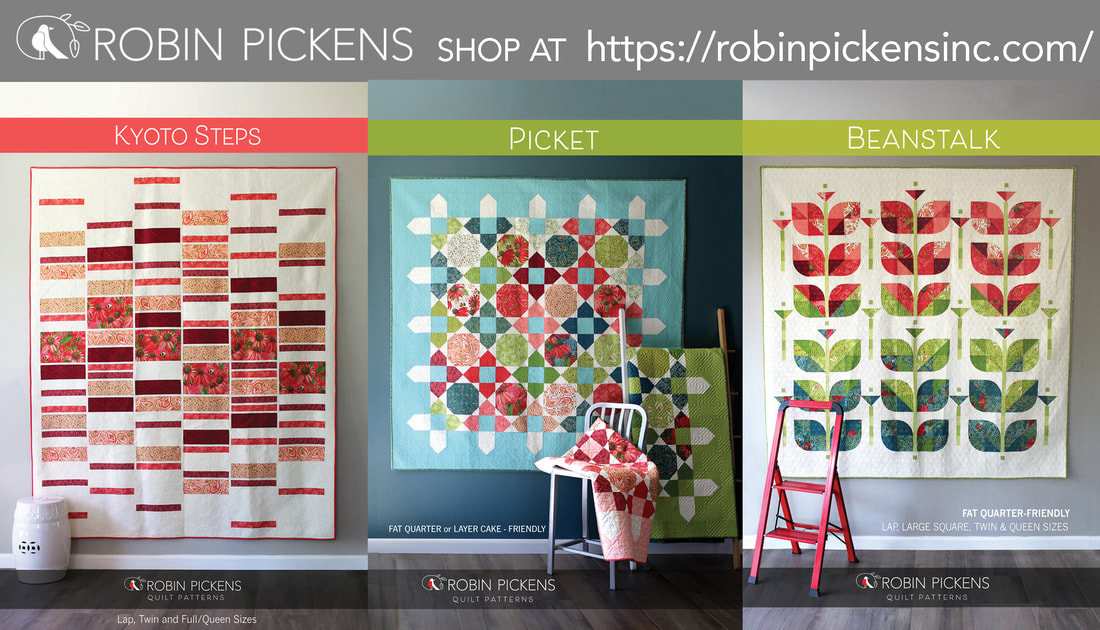 Joy and Delight is a new pattern I designed with my Splendid Christmas line for Moda Fabrics. I wanted a quilt that showed off the fun mix of fabrics in a layer cake with decorative frameworks for the blocks. But I also quickly decided it was also a good format for alternating blocks of two fabrics- as shown below- my mistletoe greenery and poinsettias which pop nicely against the saturated red texture in the Splendid fabric line. 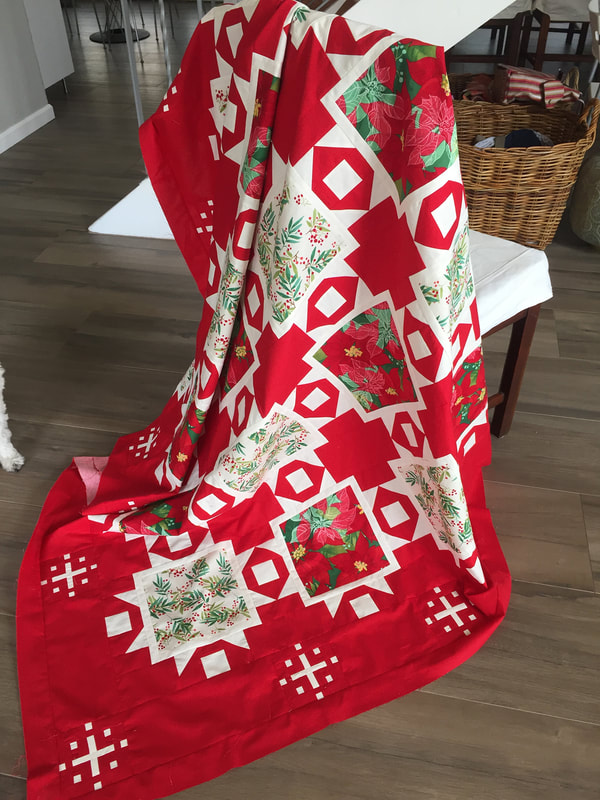 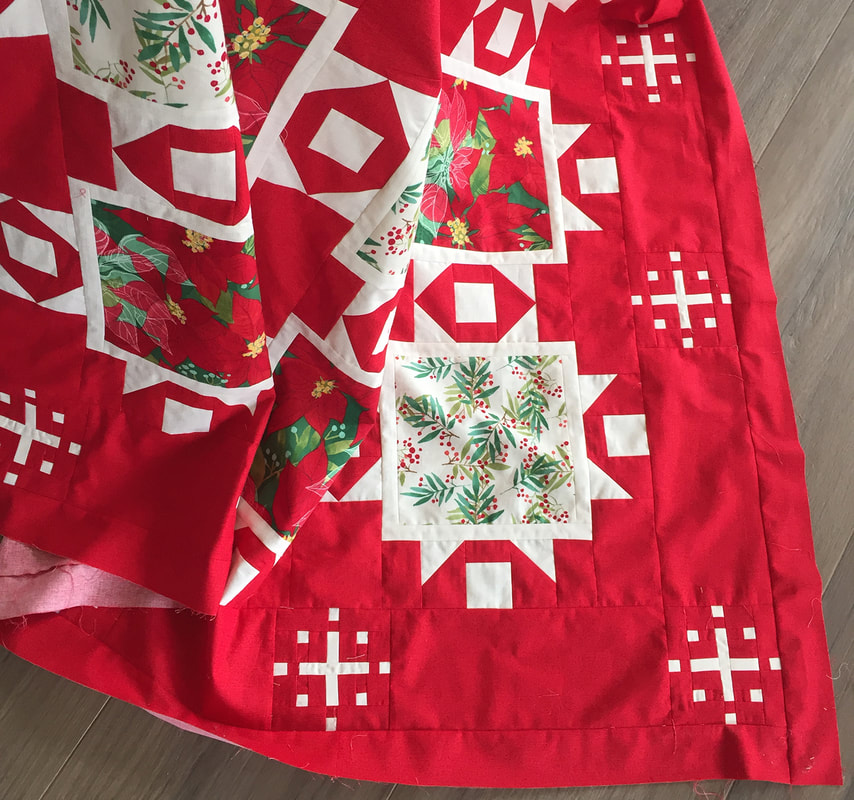 For an extra pop of wintery fun I decided to have graphic snowflakes surround the outer border. Afterwards I thought this could even be fun for 4th of July in reference to fireworks! The snowflakes are made with subcutting joined strips so they actually go together rather efficiently. There is something really satisfying about making a big pile of snowflake blocks!  I found the Stripology ruler from Creative Grids was a handy tool for making lots of smaller cuts in an efficient way!  And here are blocks with flying geese and framing in progress. 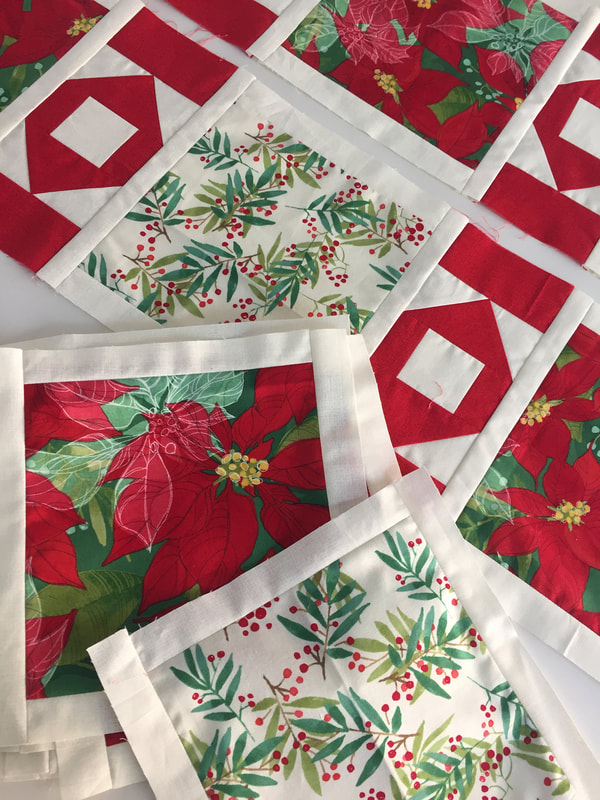 This is a scrappier looking version of the quilt- the original concept using the mix of a layer cake. On this one the framing around the squares is in two colors- red and green for Christmas- and the snowflakes are in a more olivey green. This is next up on my list to make! 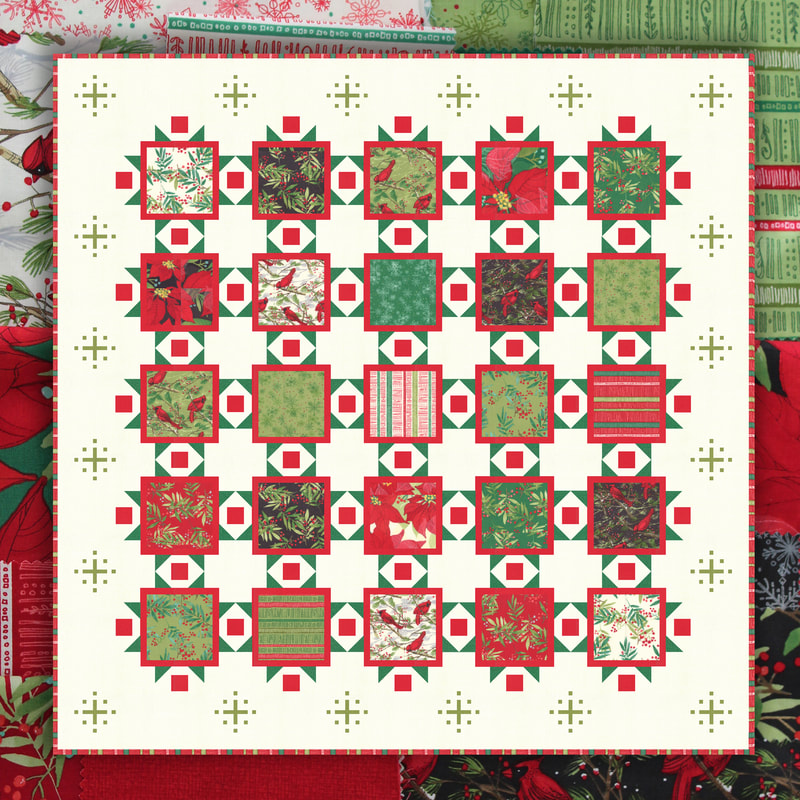 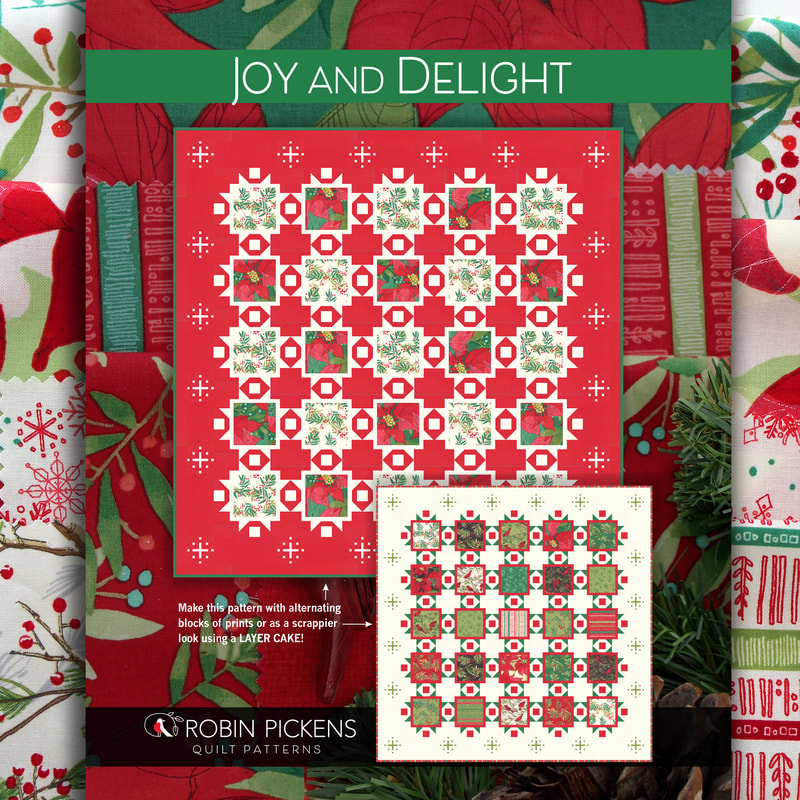 Check out Joy and Delight along with the other three new patterns to go with Splendid in my shopify shop. Lets get some Christmas projects going!! 
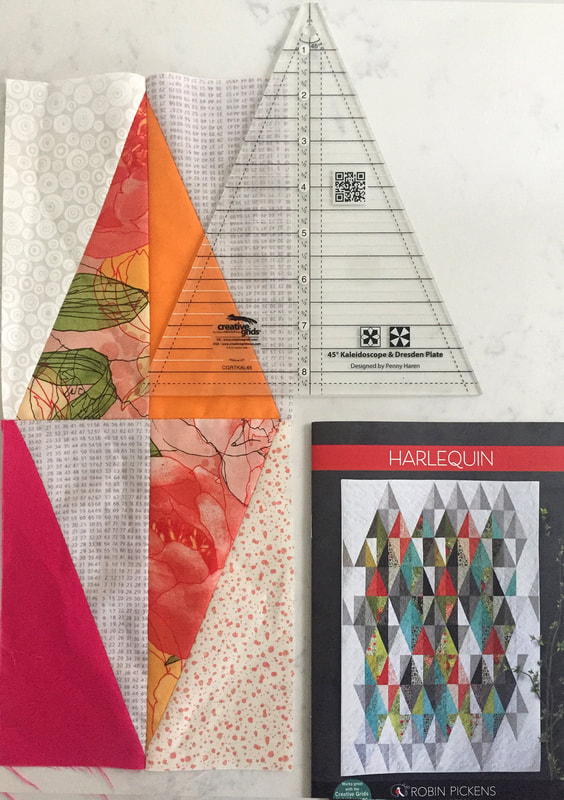
Harlequin is a quilt pattern I designed that uses Half Rectangle Triangles and I get quite a few questions about which ruler I recommend for it. The pattern does come with a paper template so you can make your own plastic template for cutting out the shapes. However, it is easier with a specialty ruler!
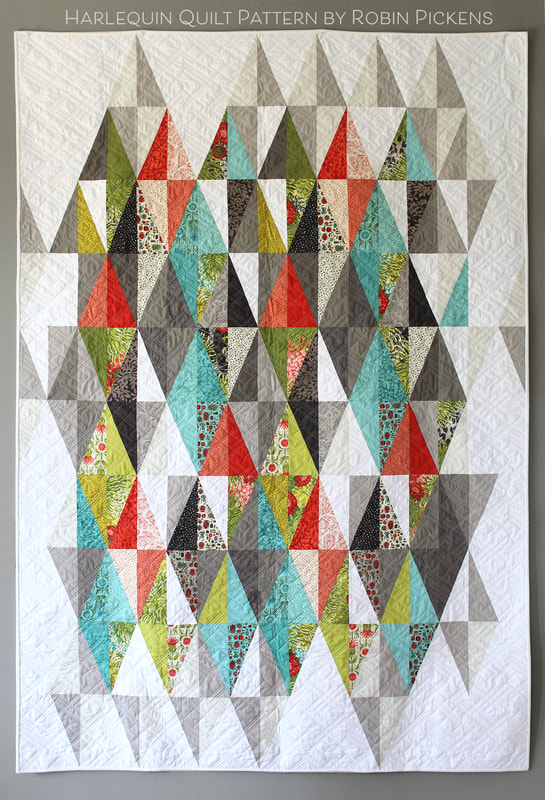
I love this quilt because it symbolizes collaboration and community to me. I had it pieced by Terry Bowman because she is more accurate and more experienced than I am and before Quilt Market we have a LOT of sewing to do in a small amount of time. So luckily for me, Terry was willing to help me out. We met at the Quilt Emporium and Lisa, the owner, also came to the rescue by getting her Bernina out of her car so we could sew up some samples in the back classroom. Lisa saw us figuring out the rectangle size that would make sense and she brought over the solution...the Creative Grids Kaleidoscope Triangle Ruler. It was a great moment of brainstorming and solutions coming together and that is a lot of what is so exciting about sharing the experience of sewing and quilting with others! Quilters are often collaborators in creative ways.
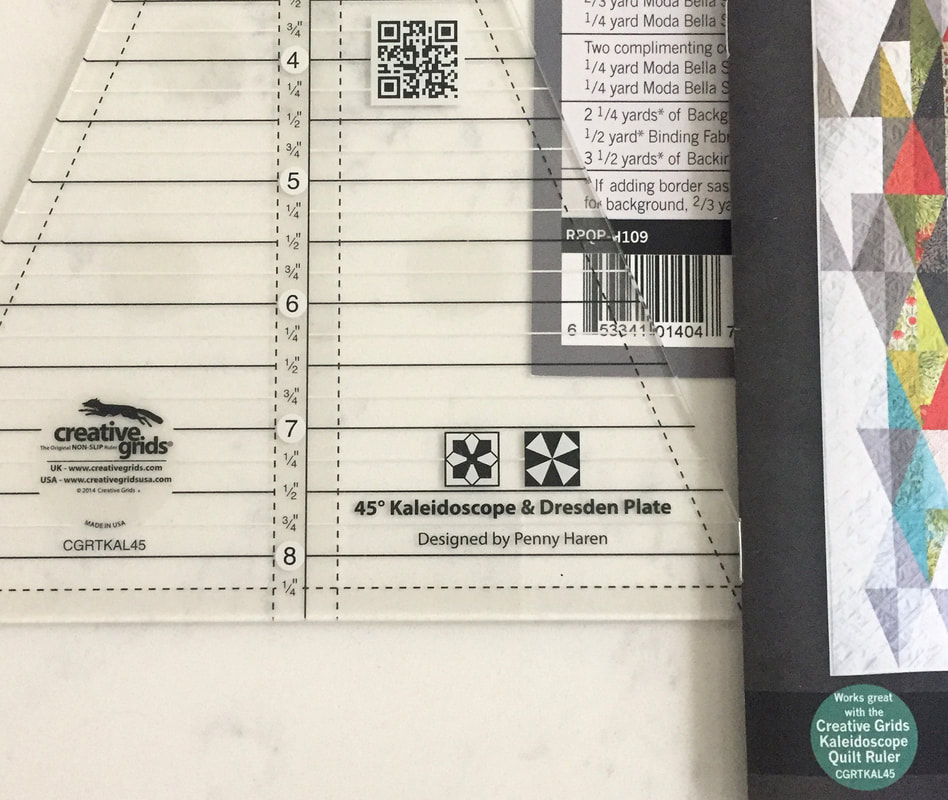
The ruler is the actual height of the pieces you cut for this quilt so it really works with the pattern well. Thank you Penny Haren for designing this lovely tool! Just like other Creative Grids rulers it has some circles of texture on the back to help hold fabric without slipping too.
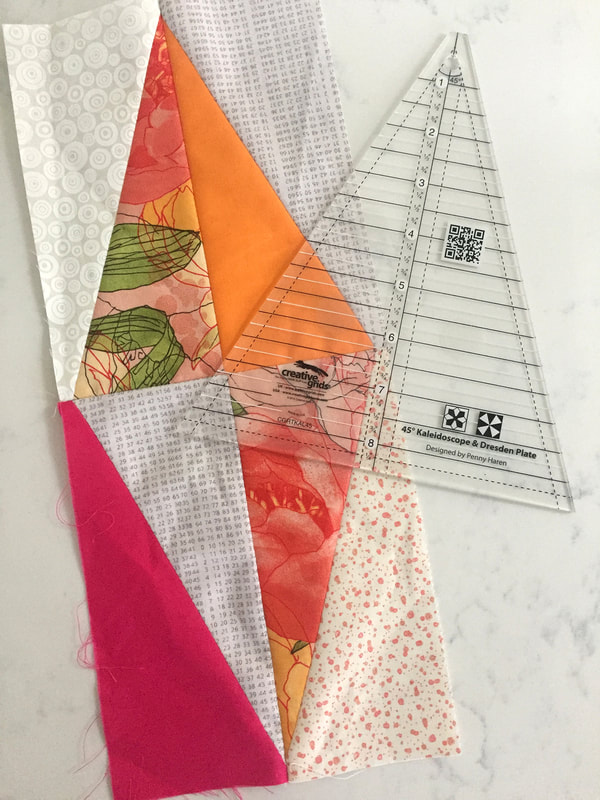
Any time you are making a block that is new to you or different in trimming, etc, I suggest you make a sample block first. Some of my first samples are with my Blushing Peonies left over scraps and I am hoping to go back and make a nice springy version with pinks and oranges in my "spare time." You know how that goes... I did make this block first and make mistakes on the trimming and had to start a new one. So I'm serious when I recommend making a sample and measuring your block size end result before progressing on a pattern. It can make a big difference! Half Rectangle Triangles need to be trimmed up in a particular way so you have correct seam allowance to maintain your triangle points.
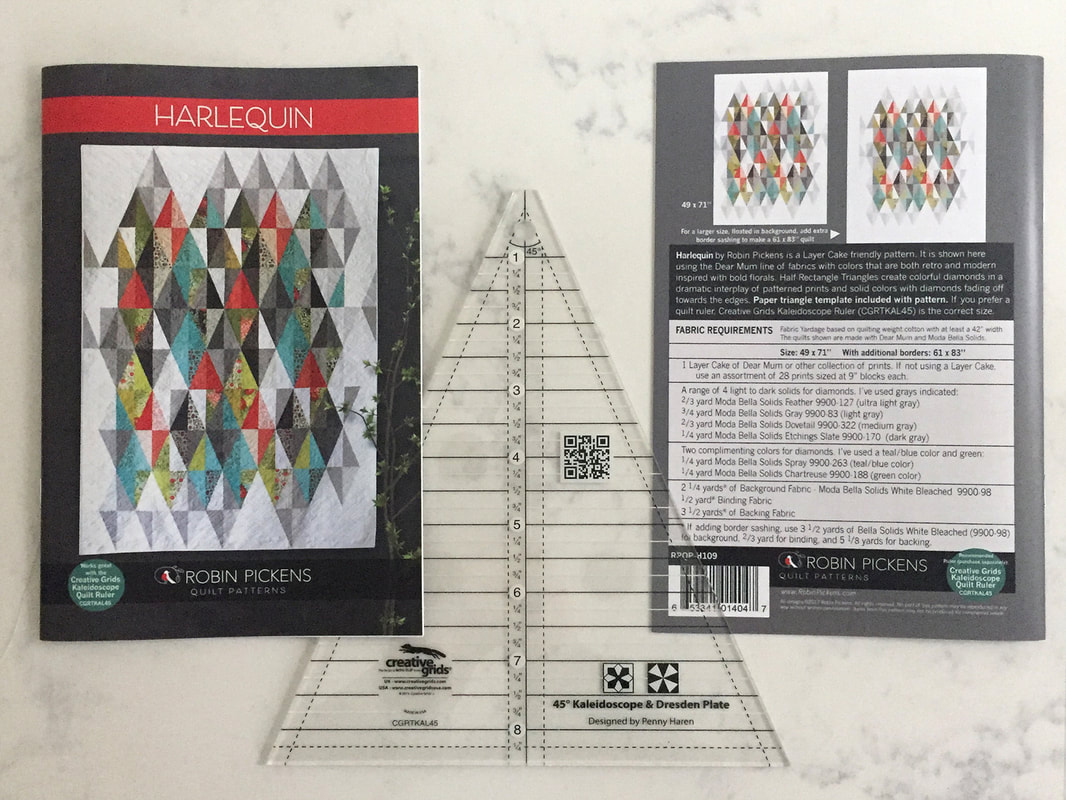
Check out the Harlequin pattern at my shopify store!
Please note, links for products to other sellers may go to an affiliate program.
|

About ROBINDesigner of colorful florals for Moda fabrics. Modern to transitional quilt designer. Illustrator, sewist, crafter. I am proud to be a designer for Moda Fabrics!


Shop Robin's Designs
 I am an affiliate for Fat Quarter Shop and may earn a small commission through my links. Thank you for your support!

Check the March 6, 2017 Episode!
Categories
All
Archives
February 2024
© Robin Pickens Inc. All rights reserved. No images may be reproduced without permission.
|
 RSS Feed

