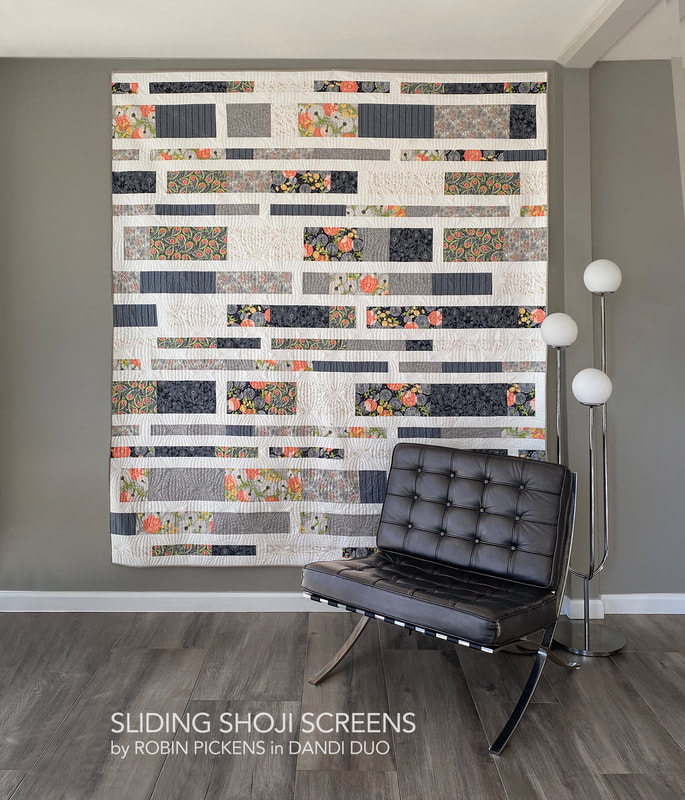
 Another quilt to go with the Dandi Duo group is Sliding Shoji Screens. This quilt is revised from an earlier version. It was one of the first patterns I had created and was released with my first collection for Moda, Poppy Mae. Since then I've learned a lot! 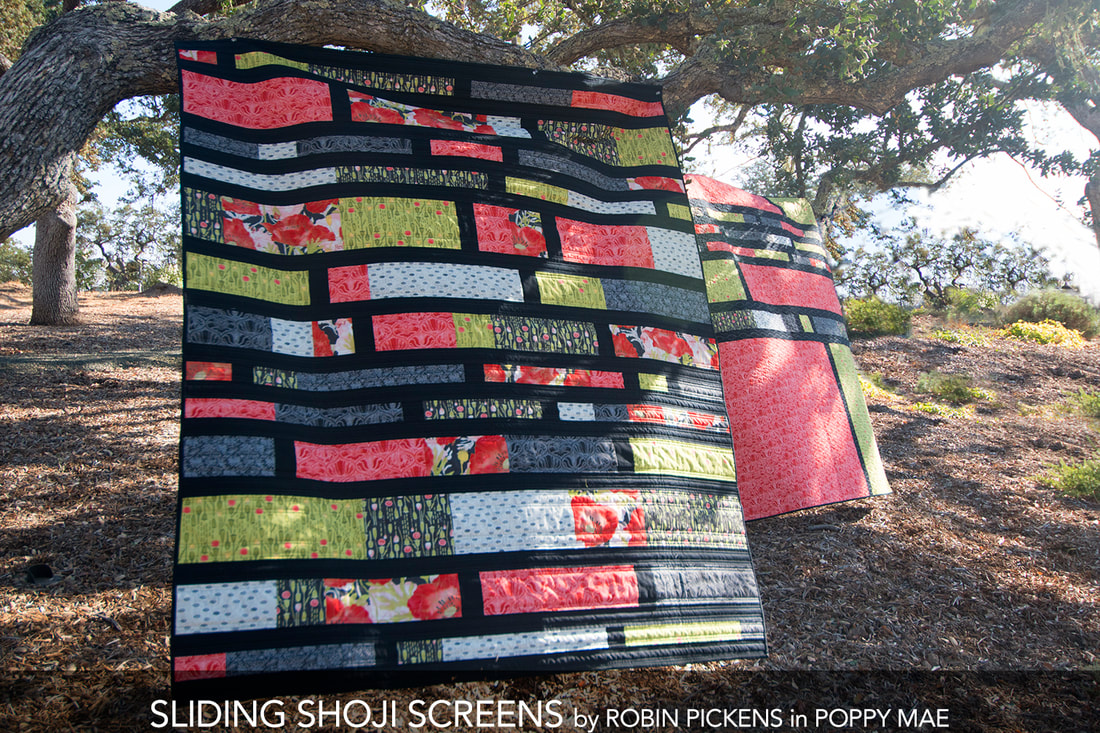 Some revision were in order and I also wanted to give more sizes. I have eliminated the companion piece made with leftover strips and have changed the cutting directions to fit better within 40" width of fabric (vs 42" so allowing for shrinkage of prewashed fabric). There are three sizes. Lap 63 1/2 x 74 1/2", Full/Double 80 1/2 x 90 1/2" and Queen 96 1/2 x 90 1/2". The lap is actually the closest to what the original Sliding Shoji Screens sizing was. 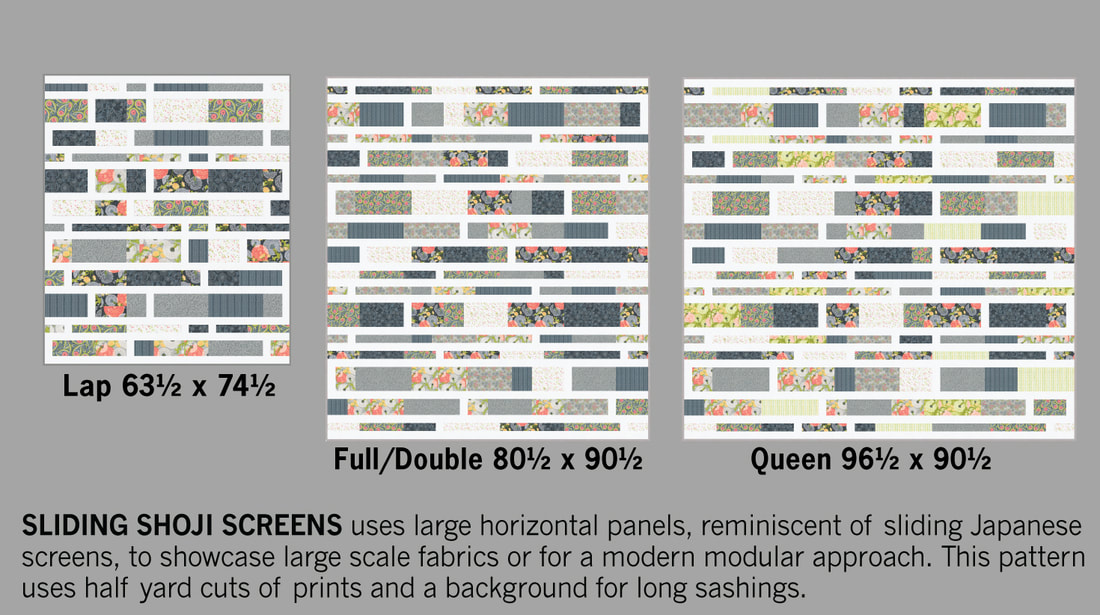 I love the crisp white sashings with the soft grays. For the queen size I've added in the cross stitch stripe and dandelions on green. I enjoyed making this sample in the Full/Double size and for a larger bed, I will place it with the stripes running vertically if I need that wider size. 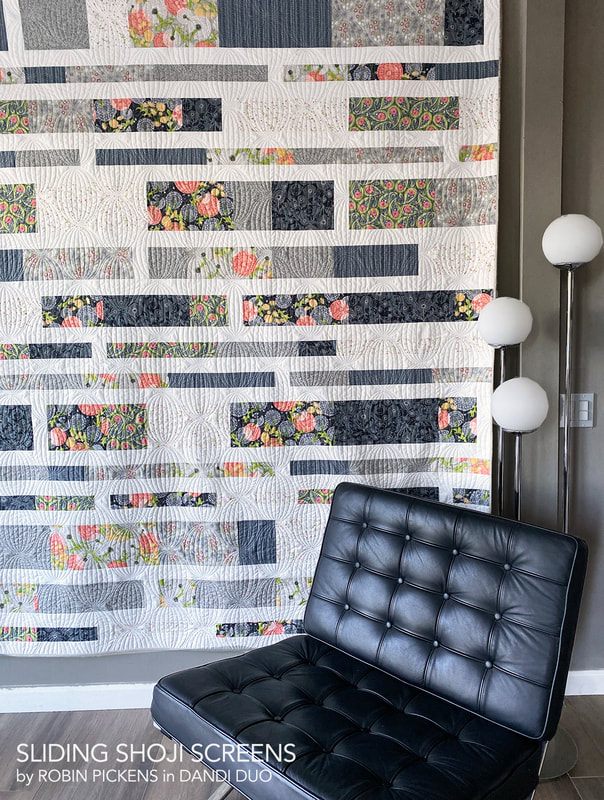 The pantograph I used when quilting this is Rondelle by Jessica Schick. I got it from Urban Elementz online shop. I placed the ovals perpendicular to the horizontal stripes of the quilt. 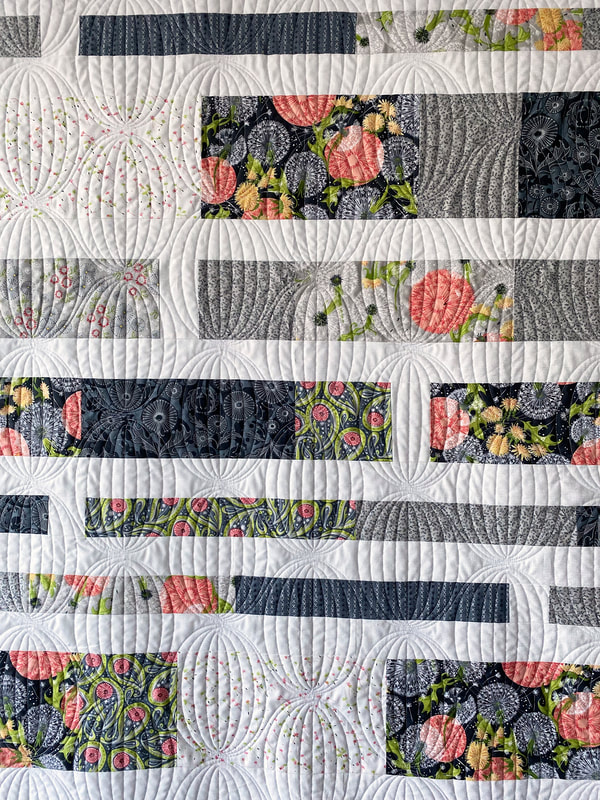 The fabrics used on this Gray/White version is listed below, plus another colorway that is a springy palette. 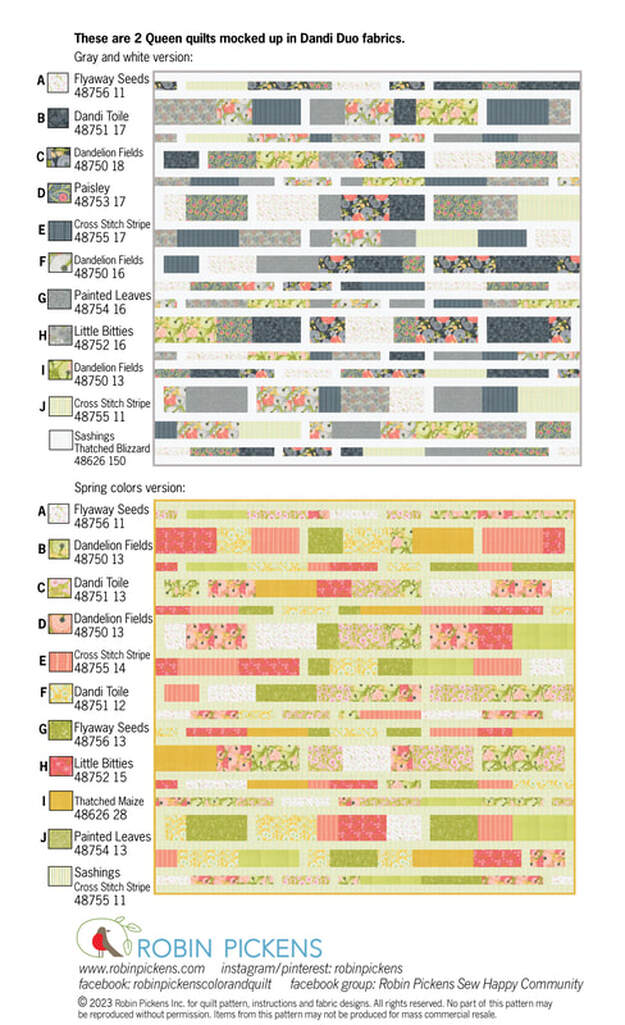 I think the cross stitch stripe would be a very fun sashing to run through the whole quilt. 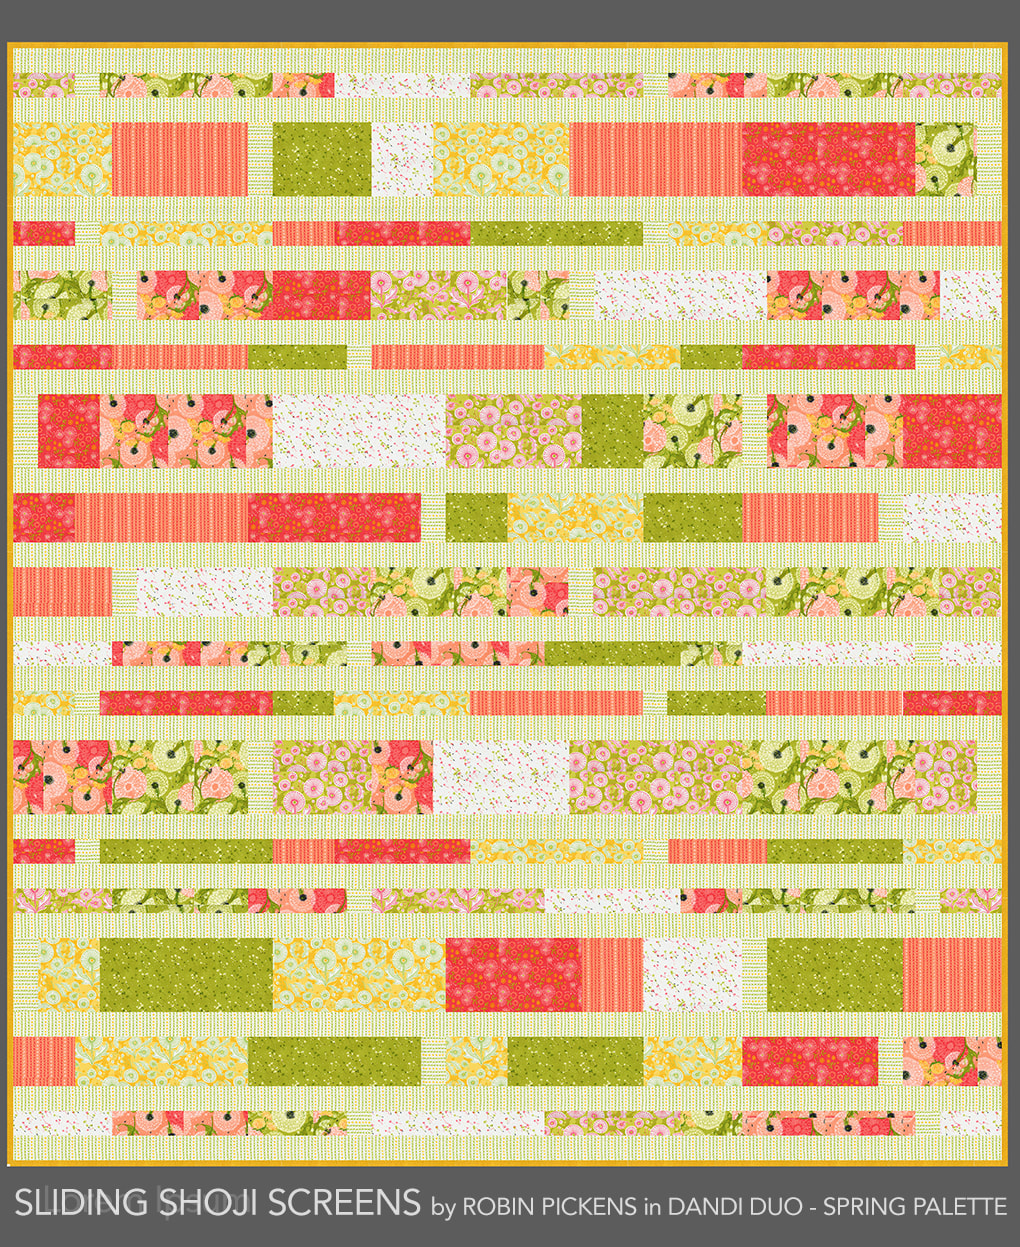 The original inspiration for Sliding Shoji Screens came from the desire to have larger panels to showcase bigger prints/fabric designs. There is a shifting balance between the larger rows and thinner rows and little moments of sashing separating within the bands. 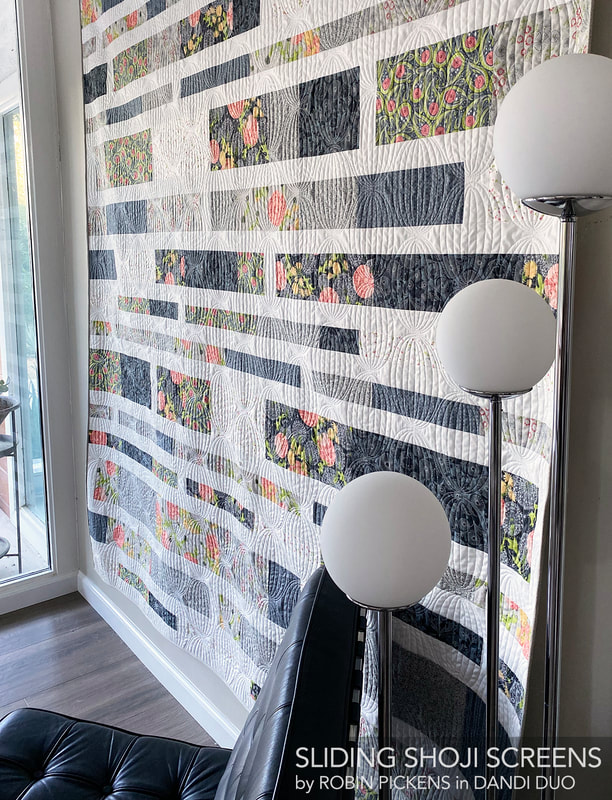  Sliding Shoji Screens uses HALF YARDS of prints. Lap needs (7) fabrics in half yard cuts plus 2 yards of sashing fabric. Full/Double needs (8) fabrics in half yard cuts plus 3 yards of sashing fabric. Queen needs (10) fabrics in half yard cuts plus 3 1/2 yards of sashing fabric. You can find the pattern at RobinPickensINC.com SLIDING SHOJI SCREENS Still two more patterns to share for Dandi Duo...Partial Eclipse and Posies Table Runner and Placemats! 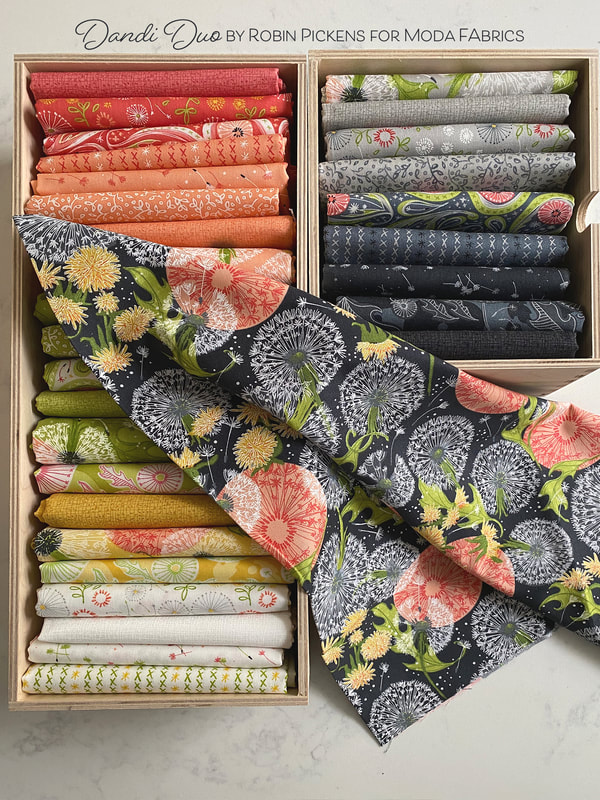 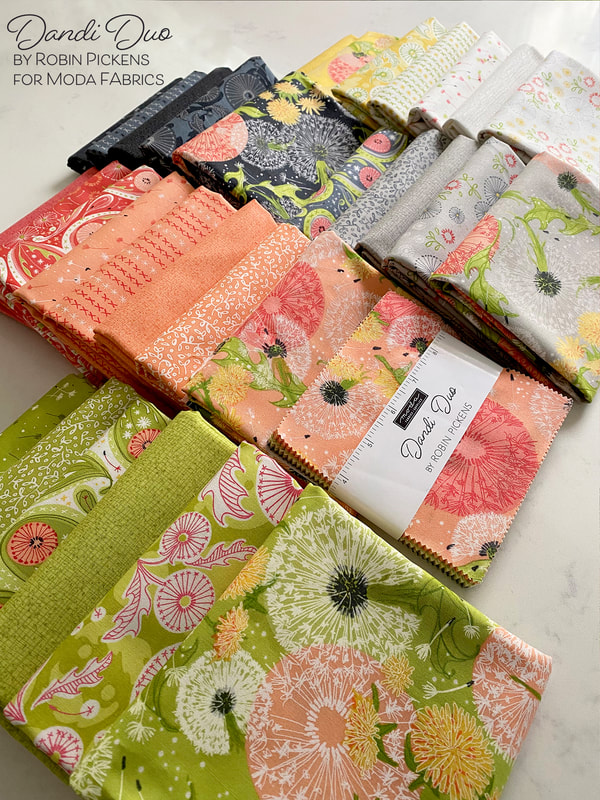
0 Comments
I revisited my pattern "FRINGE" with Dandi Duo. The original Fringe pattern was released with Dandi Annie for it felt fitting to give it an update with my dandelions, Version 2. Fringe uses a Layer Cake of 10" squares and a background fabric and sashing fabric.  I made minimal changes to the quilt pattern but did eliminate the asymmetrical layout option that was in the first pattern and now included the specs and instructions to make the large square. There is also an option for a smaller 53 1/2" square lap size. 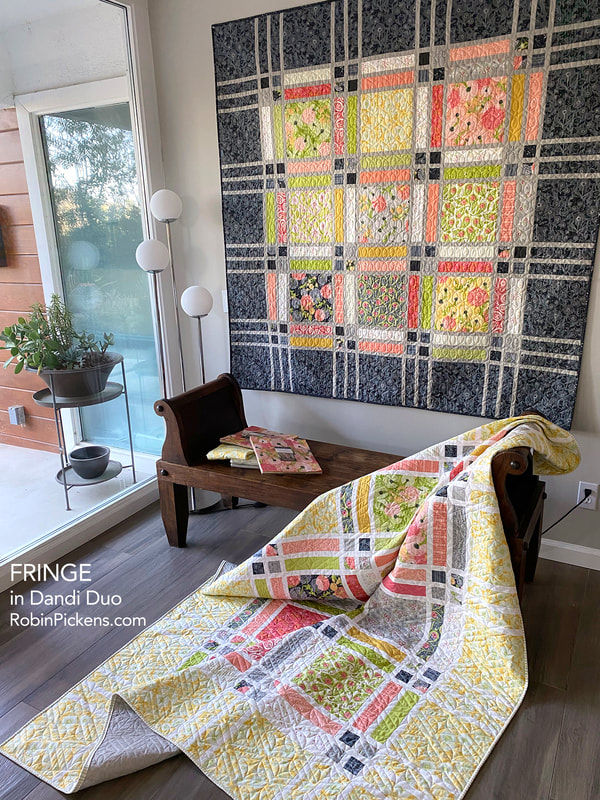 I've made Fringe in two colorways, both using a Layer Cake for the centers and different fabric for thin sashings and borders. The twin size (on wall below) has the Maize Dandi Toile for borders with Thatched Blizzard sashings. The large square size (on wall above) has the Graphite Dandi Toile for borders with Gray Thatched sashing. 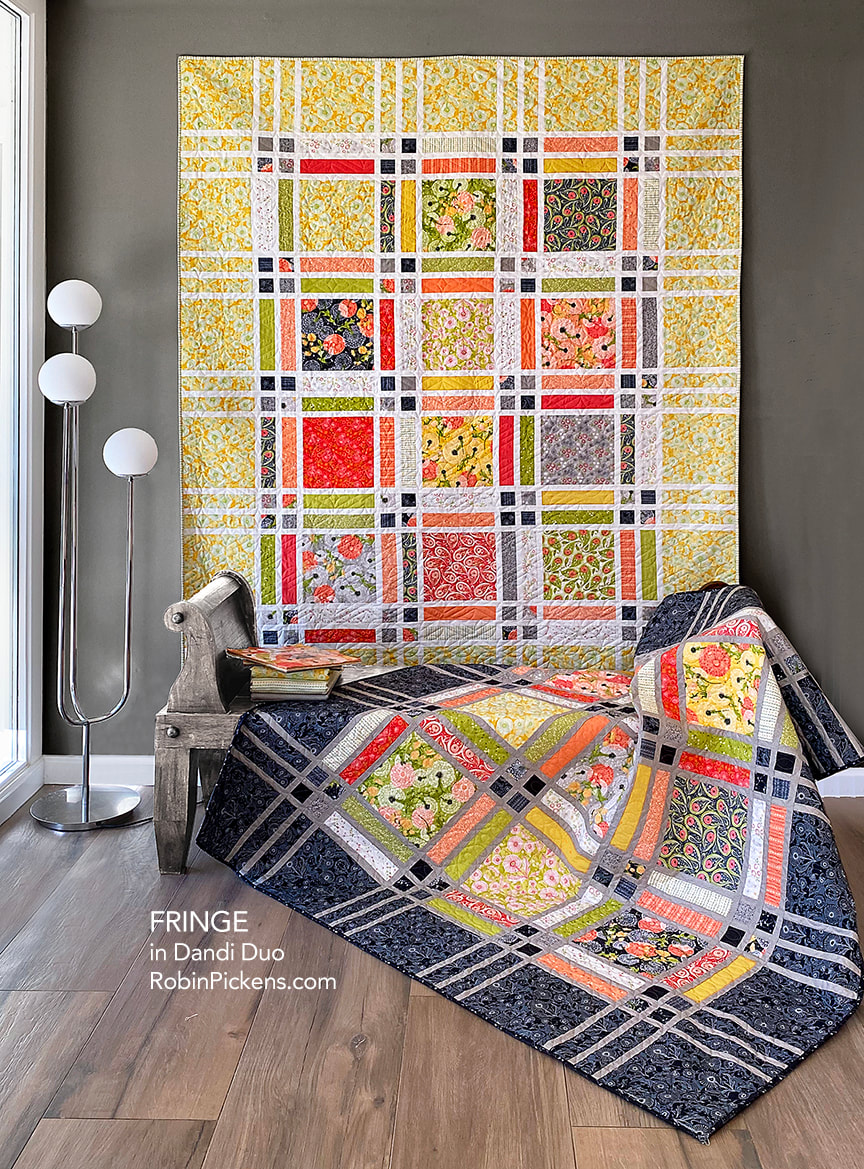 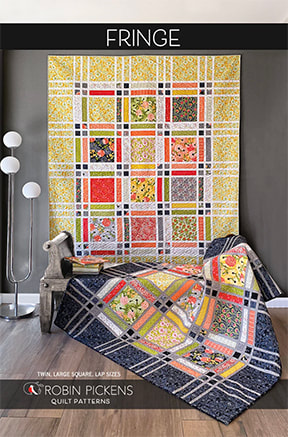 You can find the Fringe pattern in both print and pdf versions at RobinPickensINC.com. My etsy shop only has pdfs, so print versions for US and Canada mailing can be found at my online shop powered by shopify (www.robinpickensINC.com). click here: FRINGE PATTERN Other than the main dandelion print, I think the Dandi Toile, in the borders and especially this dark Graphite version) are my favorite print from this group. I love the 2 shades of background and linear drawings of the simplified dandelions. 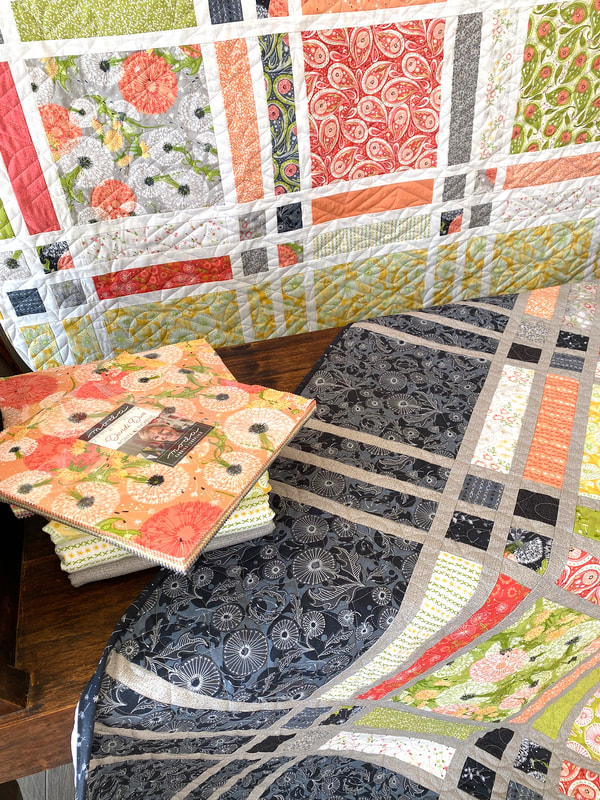 I also like how the "Cross Stitch Stripe" makes a lovely striped binding, as shown on the yellow version. 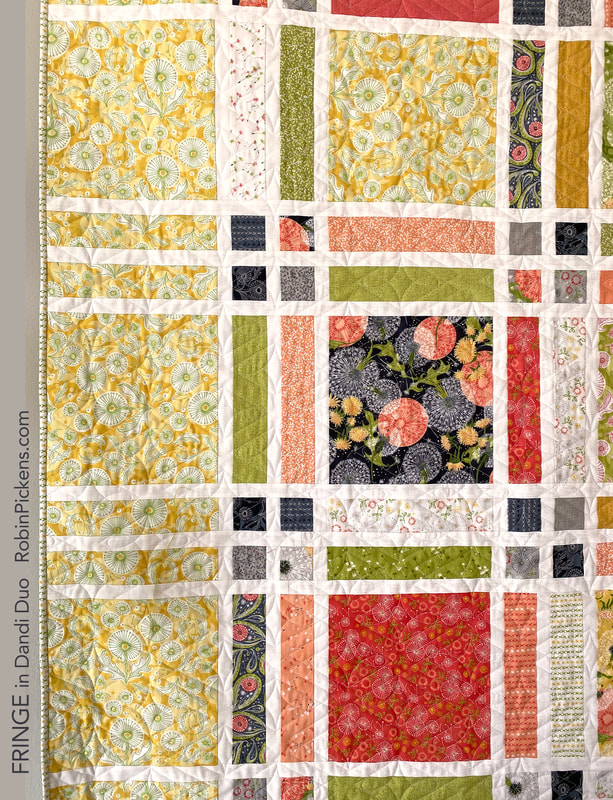 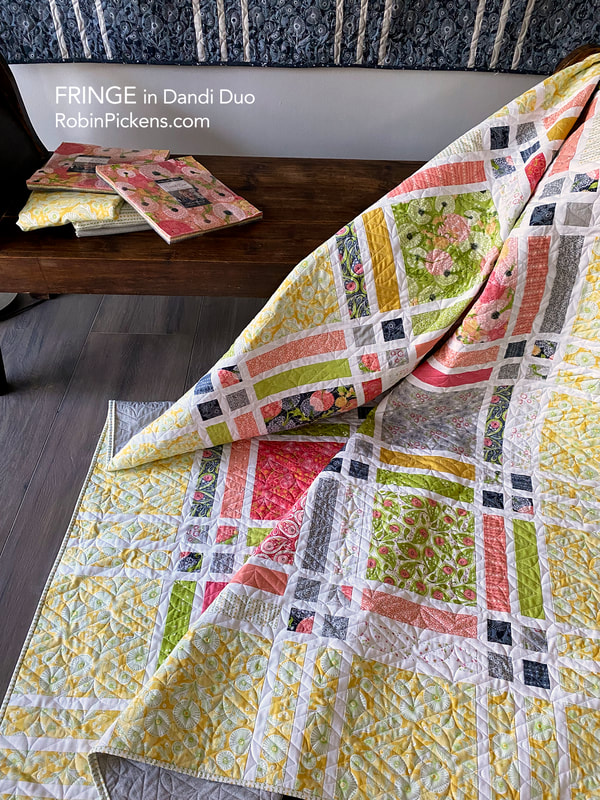 This is from the pattern back, showing the dimensions of the three sizes: 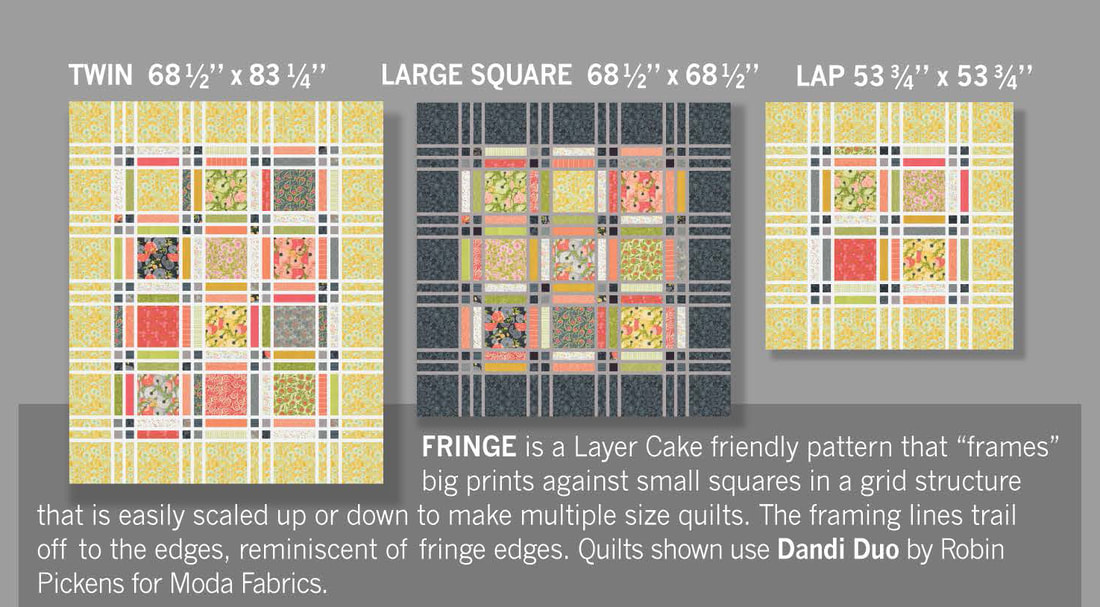  Keep reading on to see another "revamp" with Sliding Shoji Screens for Dandi Duo! 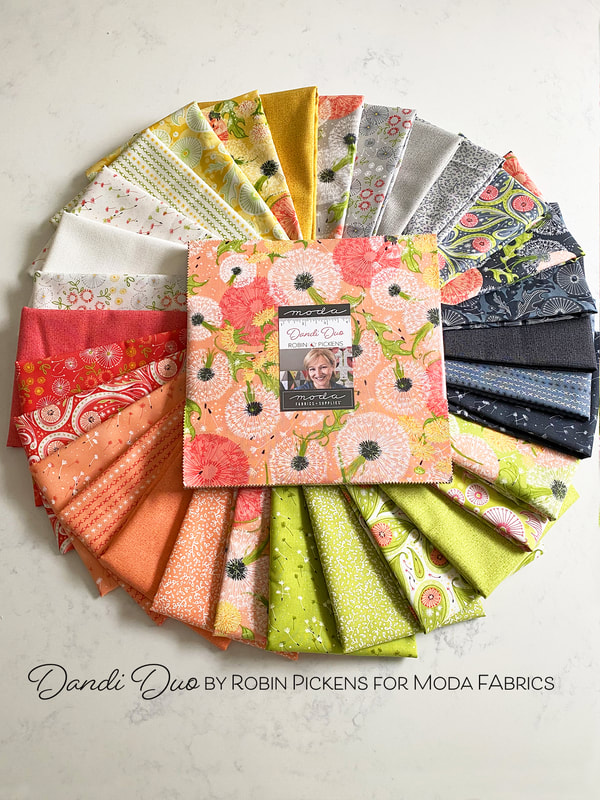 Back when I did the Splendid Christmas line I created a wall quilt called Cardinal's Christmas Wreath. It was the first bird quilt I did and started my love of making bird blocks! I've now sized the bird to various different sizes and still have fun making my flying friends. I also started thinking about this bird being for different seasons and not just Christmas. The first ideas for Fall started like this, with the idea of a Fall wreath: 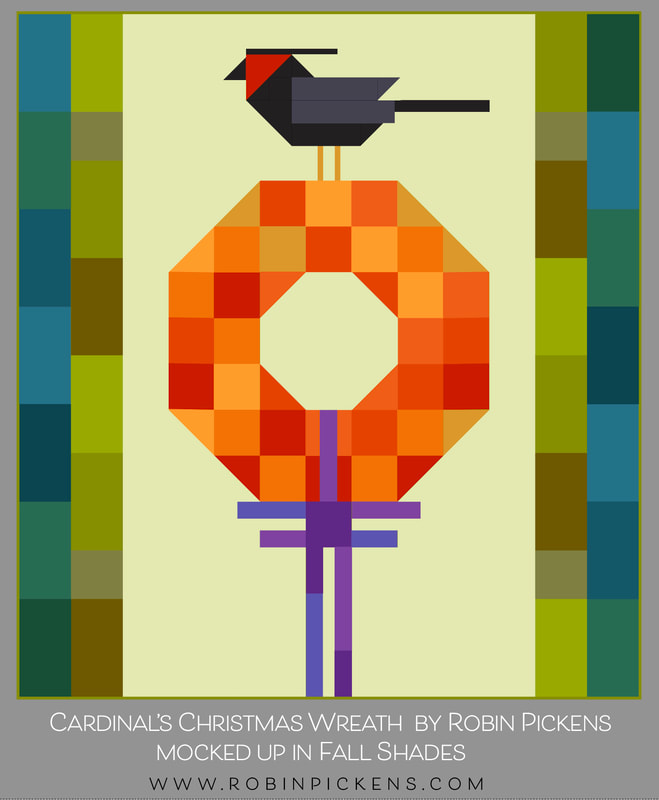 And then I thought about dropping out the bow and also experimented with a black background with a green bird. What if I filled in the wreath so it was more like a pumpkin? 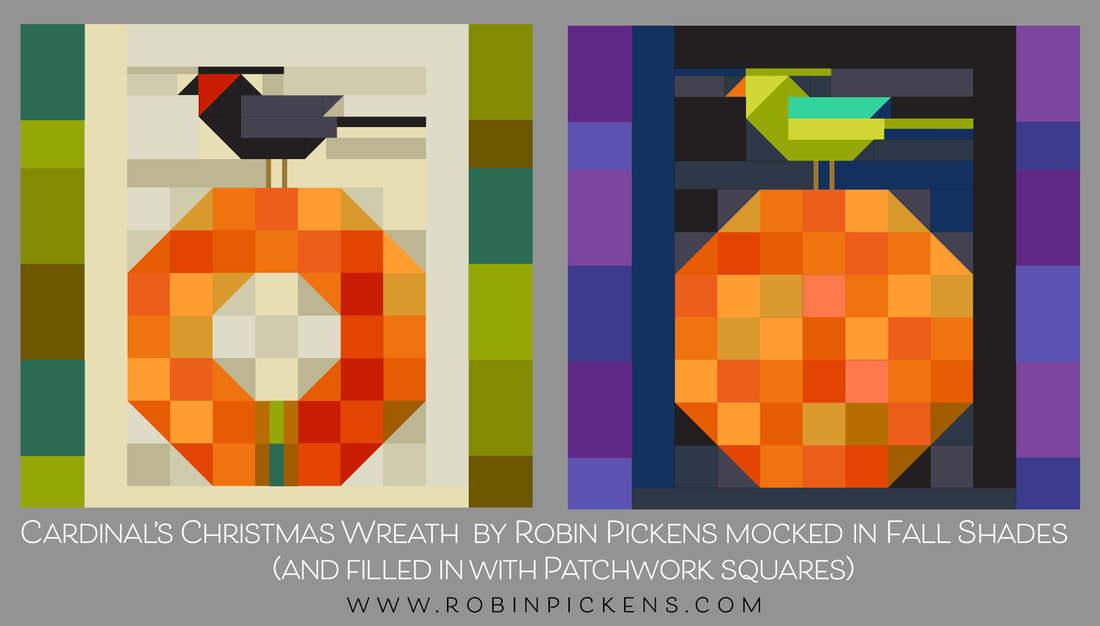 I took this idea (the one on cream) on retreat with me to play with along with some scraps of Thatched fabrics I had. The pattern "Cardinal's Christmas Wreath" has two sizes, a 54 x 60" large and 45 x 47" medium size wall. I have made the larger one for Christmas and decided to do the smaller size for this autumn one. 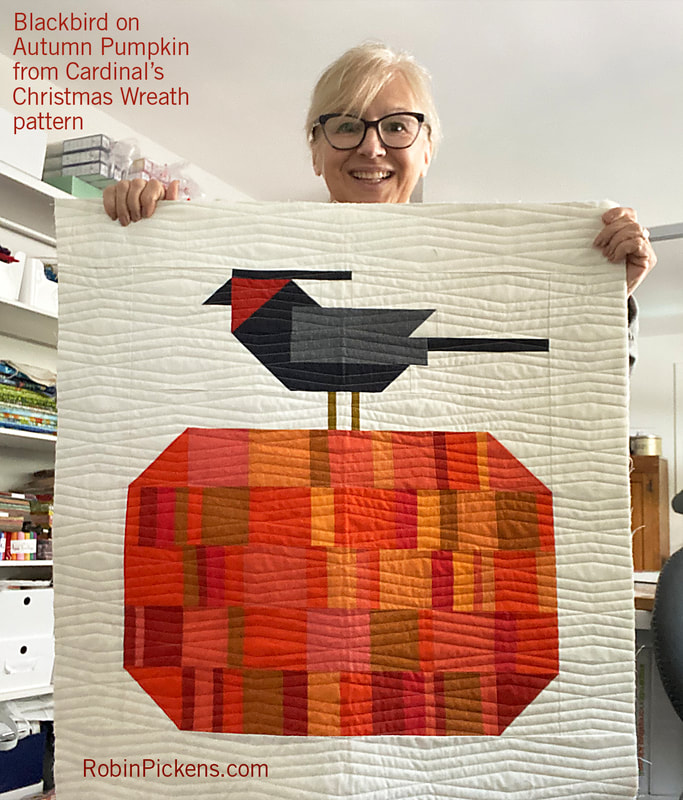 This really was a fun, smaller sized project to do AND I used all scraps. I did make some other changes as I experimented and made rows. First off, I dropped the borders on the sides. My finished quilt is 30" across and I thought that was a good size for a wall space. I also liked how the pumpkin looked more squat and horizontal so I kept the size height of the rows but just used less of them. And my corners for the pumpkin use one half square triangle at the ends, vs on two rows for a more angled corner. What does this look like as a diagram for better understanding? This is the structure and it follows the bird pieces and construction as written in the pattern. 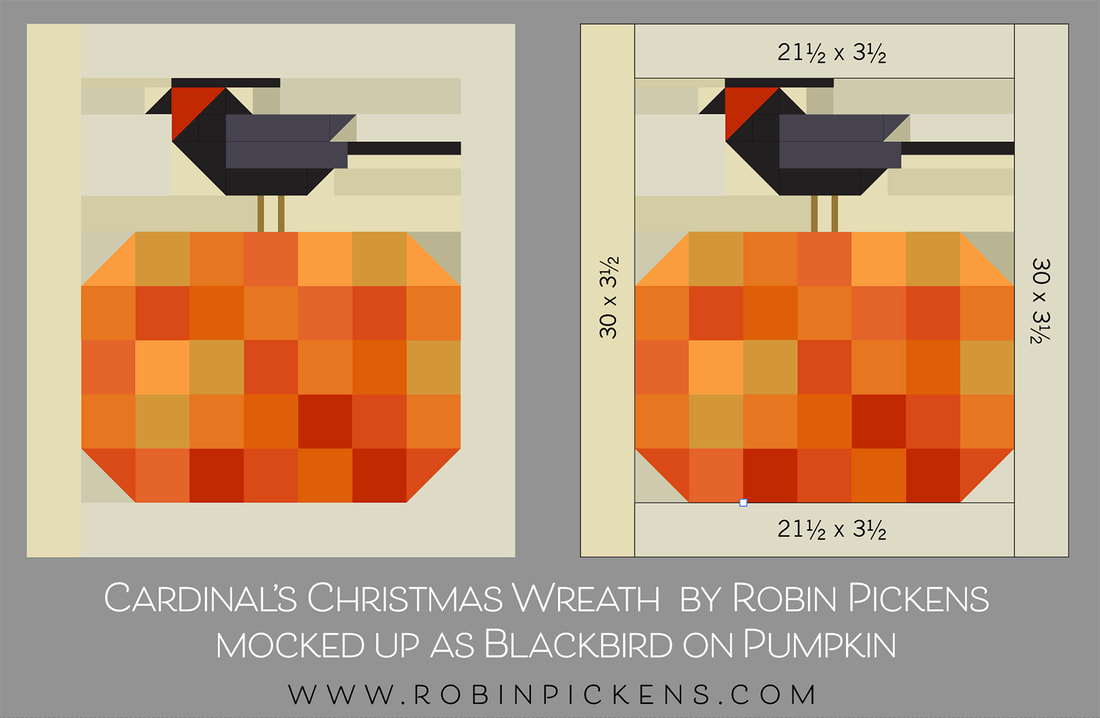 Again, I'm using the smaller size in the pattern (numbers in red in the pattern). The pumpkin would be filled in all the way across with no opening for a wreath. There are 2 LESS rows of blocks for the pumpkin body. only the top and bottom rows have a half square triangle at the very ends for rounding off the shape (vs two rows). I have still constructed my bird with the 21.5" piece on top as is called for in the pattern. But I'm using an extra one on the bottom and using 30" x 3.5" strips on the sides. This means there are a number of background pieces you would NOT need to cut (if you are not doing this as a fall wreath). This would need 3/4 of a yard of background fabric (vs a full yard). Instead of the list on page 3 for Background, you would cut this list: 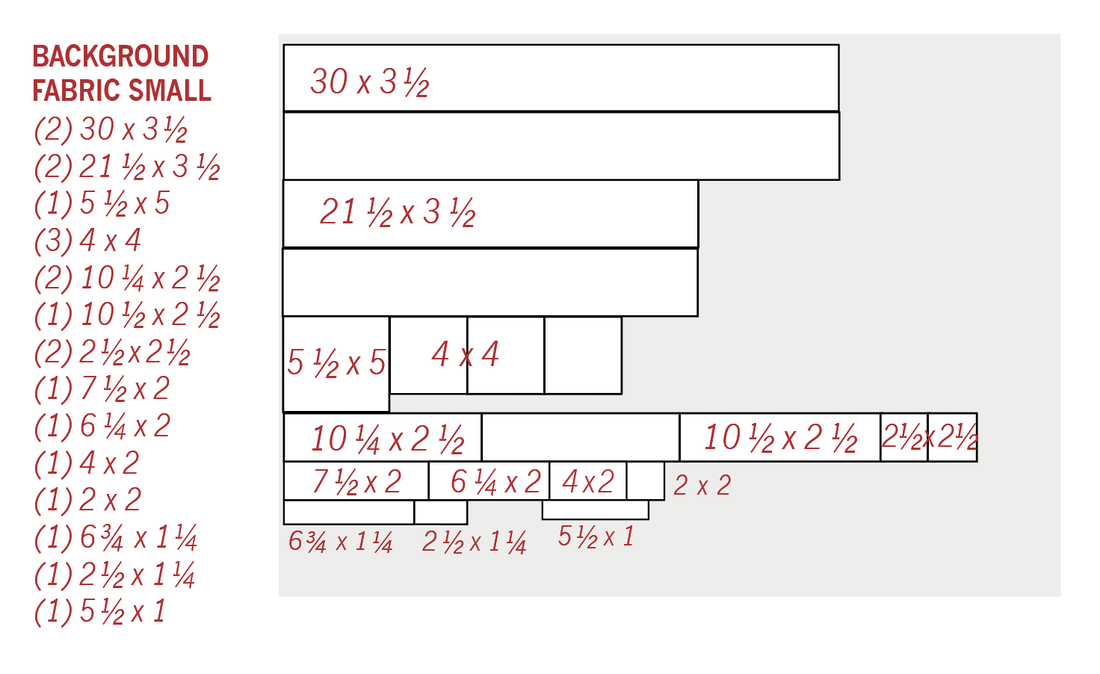 Of the (3) 4 x 4" pieces, (2) of them are for corners and one is for the bird's chest. I have taken out the pieces for the bow and wreath insides, wreath bigger corners and adjusted for the new size of surround with the background. On page 1 the green fabrics shown are for the wreath. If you are making a filled in pumpkin that is more squat but made from all squares, cut: (2) 4" x 4" for corner HST (31) 3.5" x 3.5" squares in a mixture of oranges/fall fabrics. Page 2 shows pieces in red fabric and charcoal fabric for cutting the birds. Flip the colors so you are cutting the BIRD BODY from black and the (1) 4 x 4 from bird's mask color (mine is Smoked Paprika). Do not cut the bow pieces unless you are making as a Fall wreath version. It is up to you if you use the borders. If you do not want the border, skip cutting those from bottom half of page 2. I did not use all squares on my pumpkin. I made my quilt with a more improv approach using my scraps. I cut them all around 1", 1.5", 2", 2.5" and 3.5" in width while keeping them all 3.5" high. I made strips and trimmed to the 21.5" length. The Thatched colors I used were Tangerine, Clementine, Apricot, Citrus, Masala Spice, Rose, Pink Grapefruit, and Smoked Paprika. 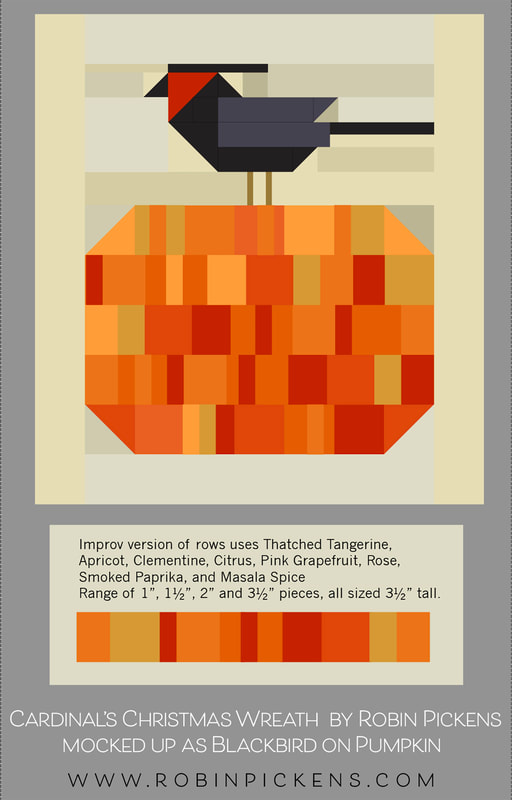 These notes have not been to an editor and I'm trying to have them be as accurate as possible. I did notice the pattern does not say on page 7 that the background piece between the bird's legs is the 2.5" x 1.25" piece (and that is 2.5" as written in the list and not the 2.75" shown on the diagram). I've got Cardinal's Christmas Wreath on sale currently for half price. I hope you like this Fall version! I think it could be cute to add a green wool leaf to the top of the pumpkin! The pantograph I used for longarming is RICH GIRL (extended width) by Longarm League. I used it in the default size I believe. Happy Fall! Check out the pattern at RobinPickensInc.com!
It's finally here! Carolina Lilies has made it through the supply chain obstacle course and arrived in quilt shops! Yay! I'm so ready to do some more sewing with those peach, ruby, green, aqua and teal colors. What to do? Well, my dear Mother asked me what I would recommend if she wanted to make Criss Cross Kisses in Carolina Lilies. So of course I had to mock it up! 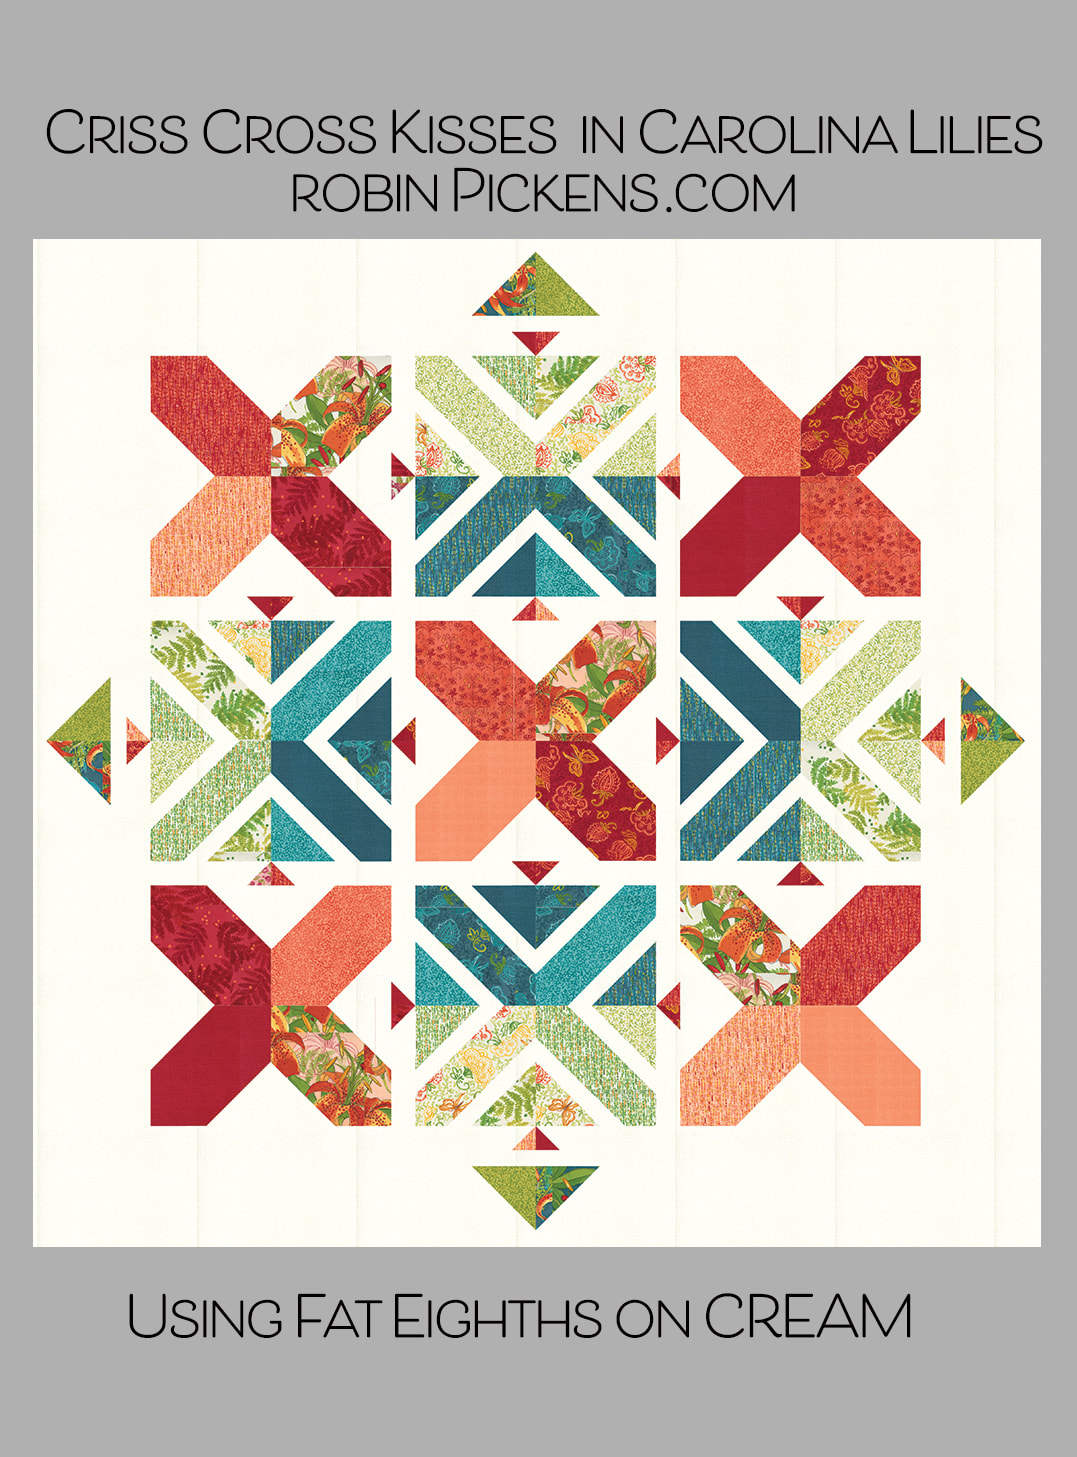 I've mocked these up in the 63 1/2" lap size quilt. These first ideas use Fat Eighths of fabric. Carolina Lilies has a sweet little print of tiny vines in a white on cream which would be lovely as the background. But the Thatched Cream is a great match too. I've kept the idea of the red Xs and doing a split light and dark outline X with the inside halves in teals and the outsides in the lighter green/cream colorways.  The fabrics I've used here in the Fat Eighths are the Carolina Lilies main prints 48700-11, 14, 21, Boho Blooms 48701-11, 12, 21, Ferns 48702-11, 12, Little Drawings 48703-13, Vines 48704-11, 13, 17, 20, Dashed 48705-11, 12, 14, 21, Thatched 48626-191, 193, 199. I also think this looks nice on a dark background and using Thatched Soft Black would be very dramatic. The same colors are in the top image on dark. The bottom image uses more greens and aquas from the collection with only a red interior and outer triangles. 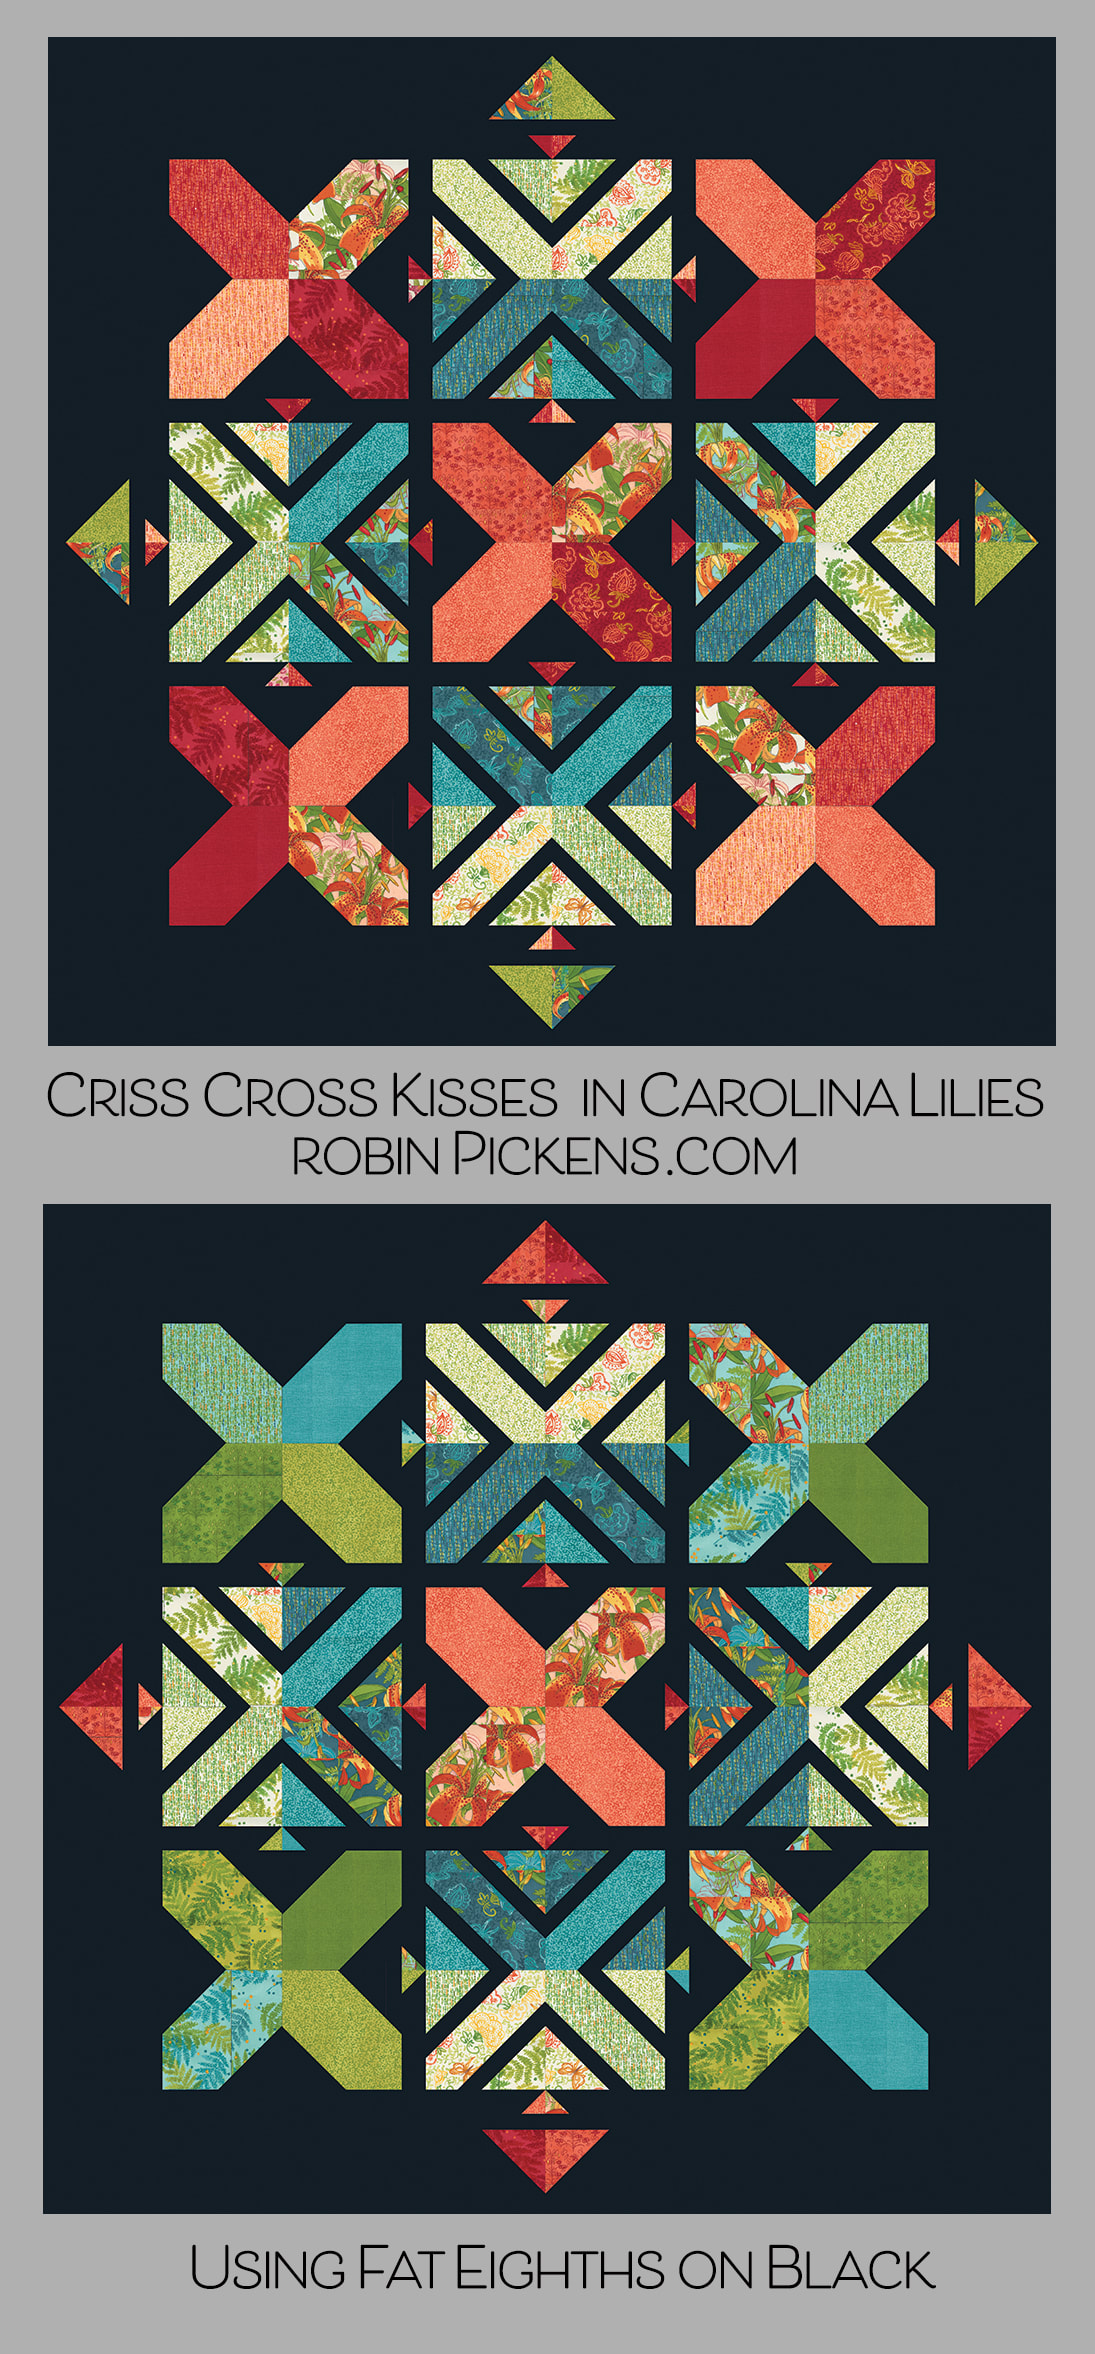 But what if you are using a Layer Cake? The mix of fabrics is a little more varied and there are not as many reds to do all red Xs. But it still looks great with a scrappier red/green/aqua look. On the bottom of the Layer Cake mockups I flipped the teal and red families so the solid Xs are green/teal and the surrounding outline Xs are reds. Subtle differences but fun to see. 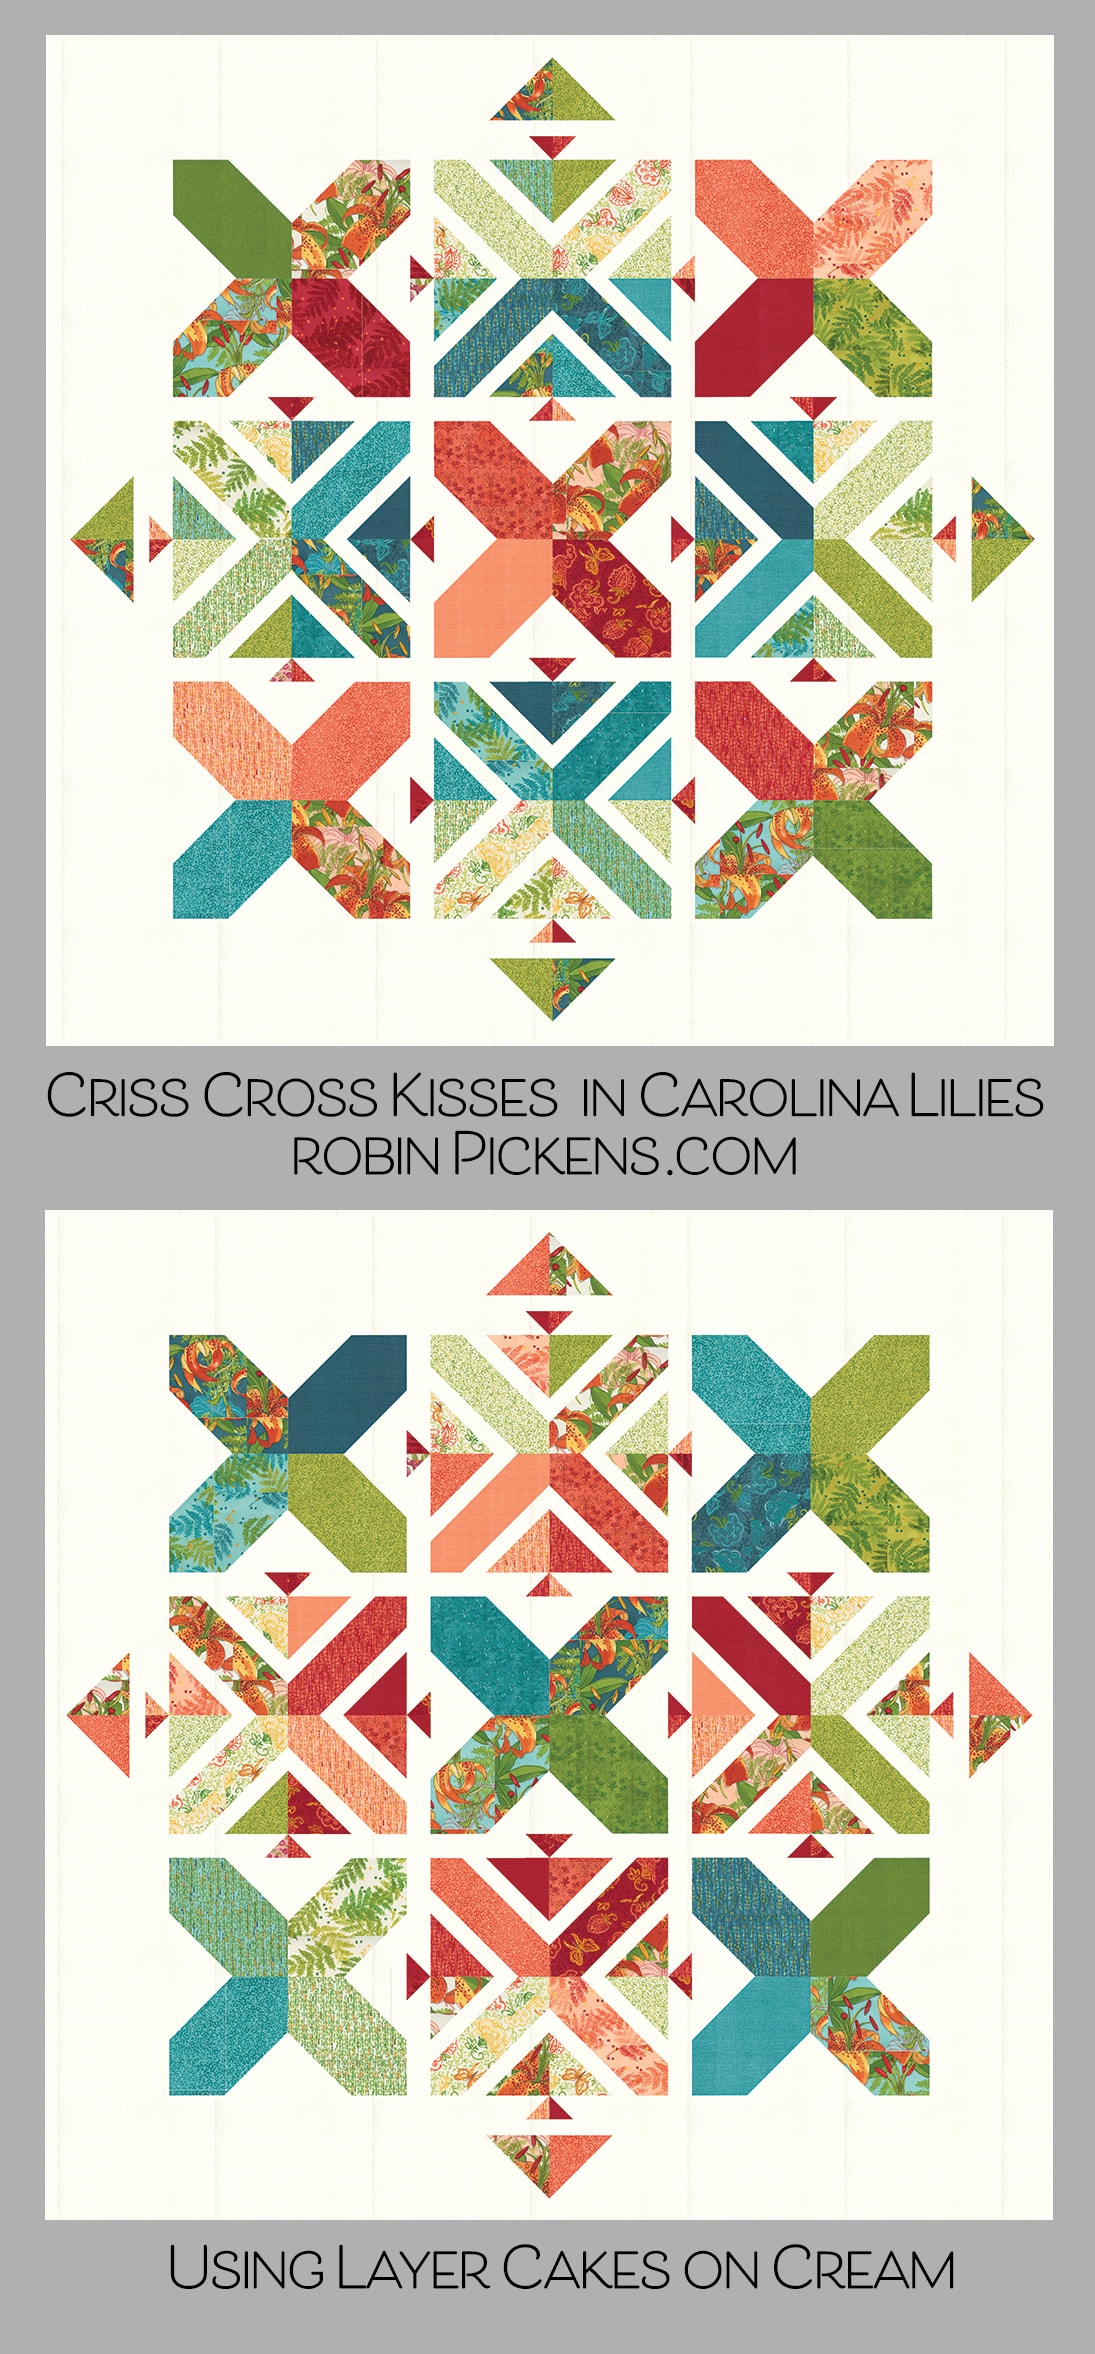 What IF we tried a background color that is unexpected? Here is Thatched Green Curry 177 and it gives this such an interesting vibe! Colors and their combinations give such strong personalities to quilts. 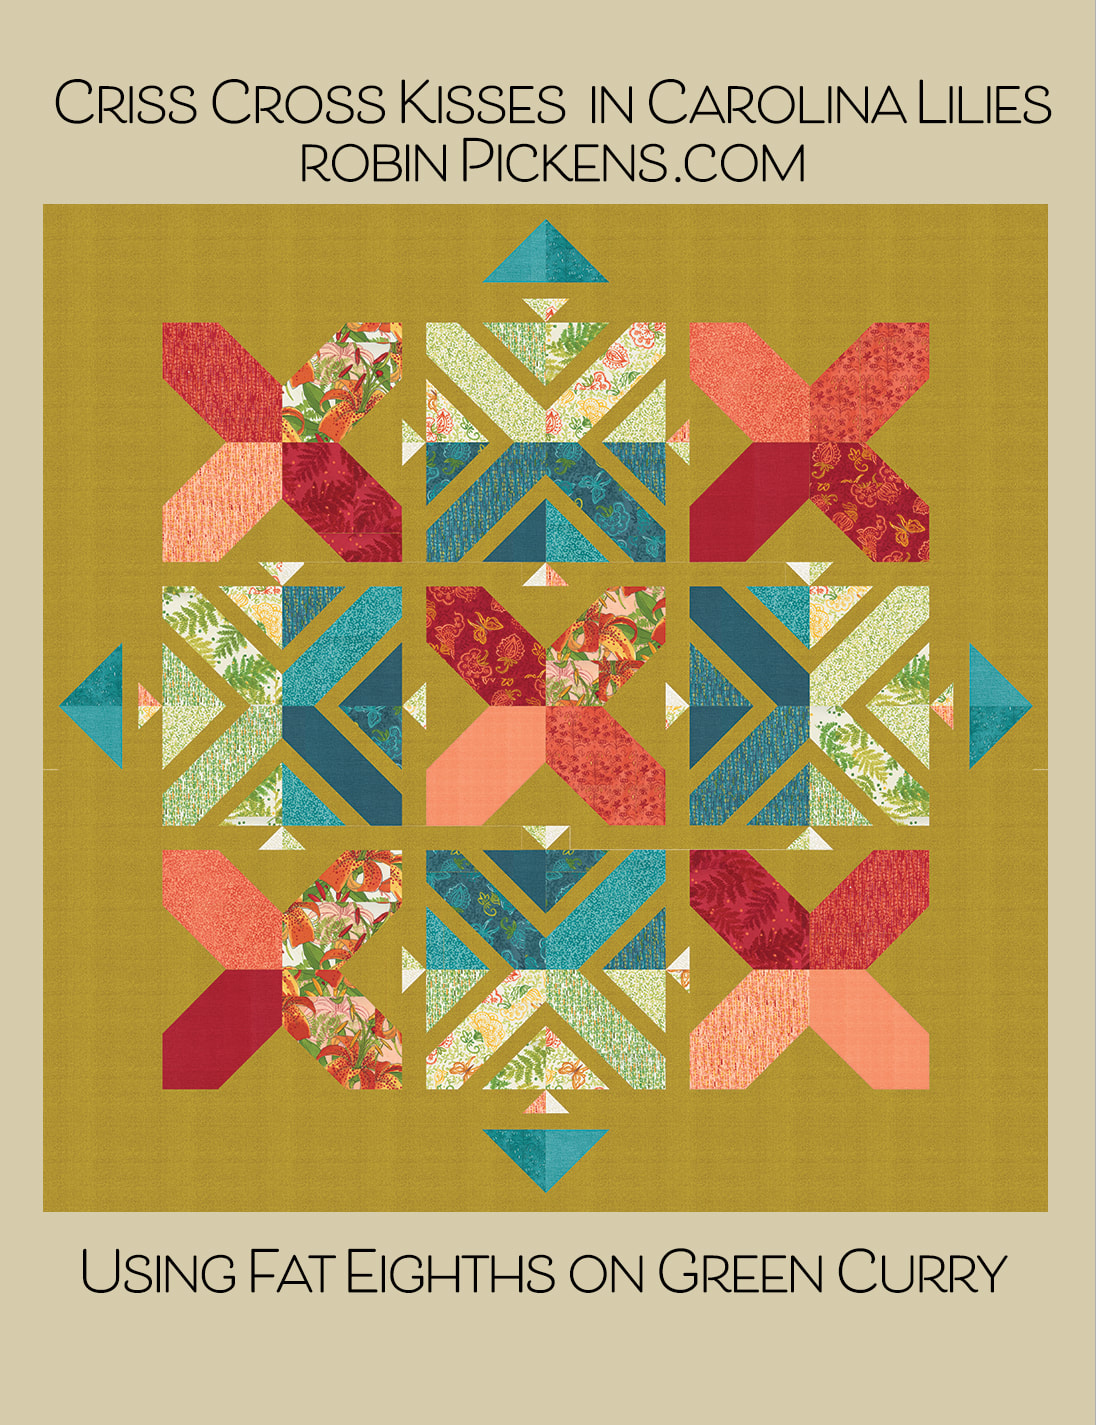 Have fun exploring Criss Cross Kisses with a new fabric grouping! Check your local quilt shop and happy sewing! Criss Cross Kisses Quilt pattern can also be found at my online shop RobinPickensInc.com  I had not shared my new quilts yet on this blog that I designed for Tulip Tango! The rush of November swirled into the holidays so quickly and with deadlines for fabric lines and calendar artwork added in, I somehow overlooked that. So it is the New Year and time to get back to some more sharing! 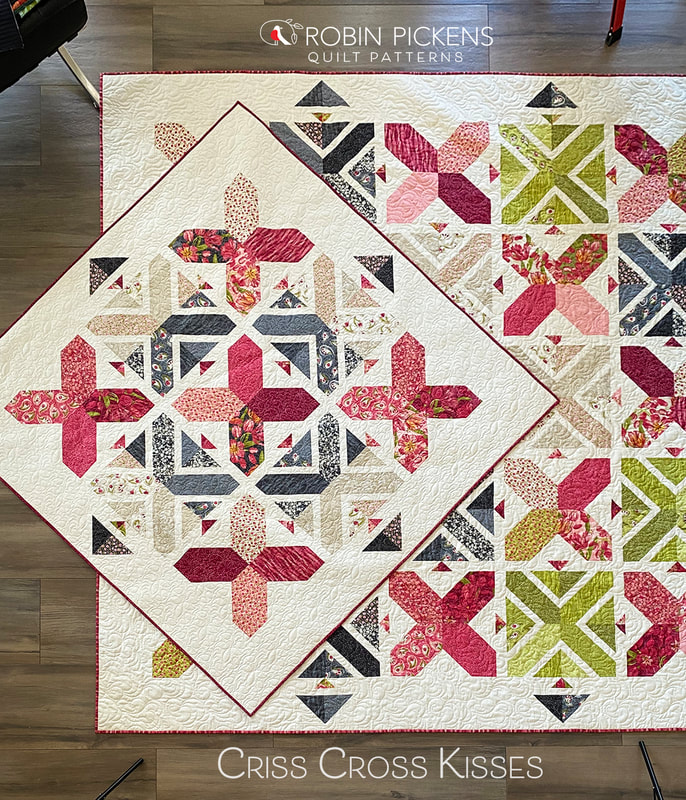 The Xs on this quilt make me think of cross stitch and a criss cross motion. And x's and o's make me think of hugs and kisses. So Criss Cross Kisses it is! This quilt is a fun play of both solid and "outlined" Xs with a variety of fabrics making up each X. 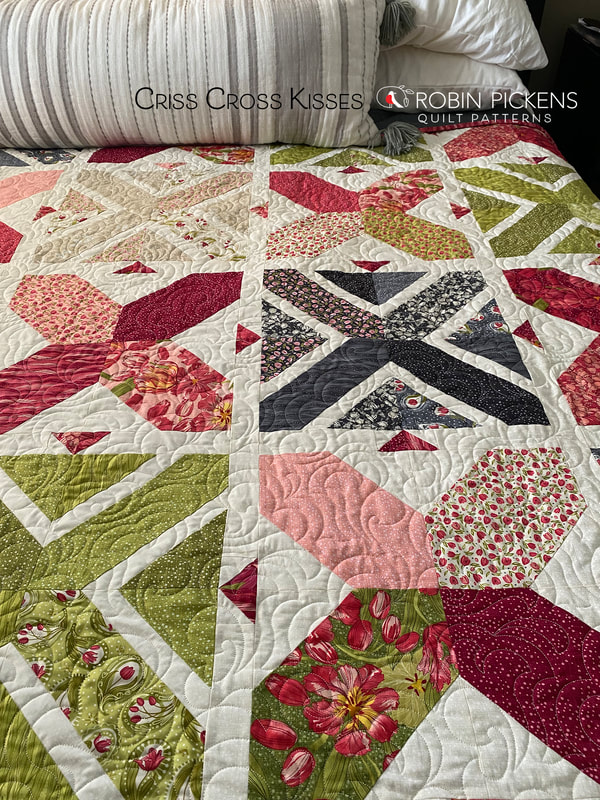 There are a lot of opportunities to play with the groupings of color or light and dark with these blocks. I liked separating the Outlined Xs below into cream/linen and gray halves. I then wanted the grays all grouped around the center X. I kept all my Xs in the Red/Pink families. By grouping light and dark halves, you create interesting shapes (like a chunky plus sign) within the overall layout. 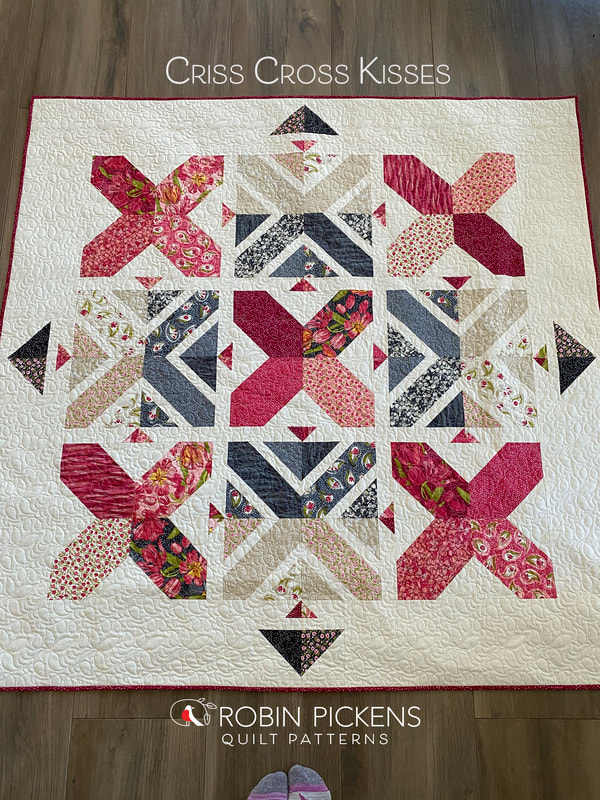 In contrast, the Queen bed sized (and it is shown here on a king so you can see it can also work on that size mattress) is made with more random placement of colors. But again, I kept Xs within a color family each for this one. 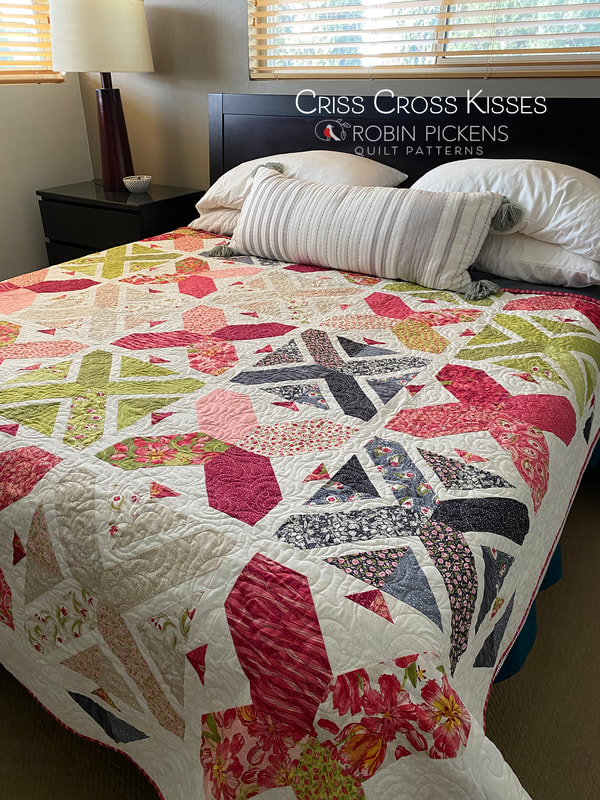 This quilt can use Fat Eights (for lap) or Fat Quarters (for Queen) of fabric to make the pieces or you can use a Layer Cake(s). I used the Fat Eighths/Fat Quarters instead of Layer Cakes so I could group my colors specifically (the Layer Cakes will give you a slightly scrappier look). On the lap sized quilt (which is 63 1/2" square) you need 20 F8. I used 10 in red fabrics, 4 in linen fabrics, 4 in gray fabrics, then another 2 from the gray family for the outer border triangles. On the queen sized quilt you need 27 Fat Quarters and I selected 13 red, and a mixture of black, linen and green for the other 14 for the outline Xs and border triangles. If you use a Layer Cake, one will work for the lap and two are needed for the Queen. You can even use Fat Sixteenths on these- double the number of F8 or 4x the number of FQ to do so. 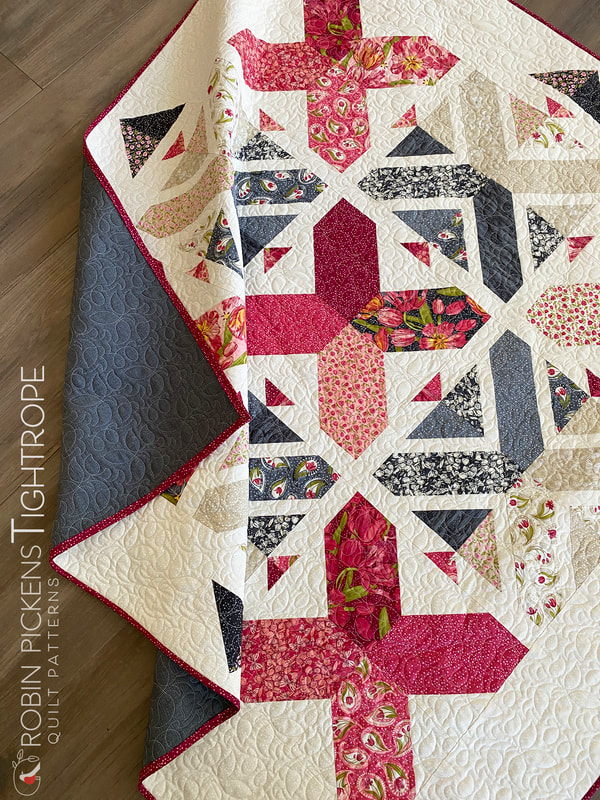 For this pattern you are using stitch and flip corners on those outline Xs and reusing parts for the corner backgrounds. Similarly, the big sold Xs cut those corners off but I didn't want them wasted. I challenged myself to think of ways of integrating the leftover corners that were cut off. That is how the little arrow heads that play in the sashings work their way into this quilt. They give more direction and size contrast within the quilt while adding little pops of those big X colors throughout in little ways. 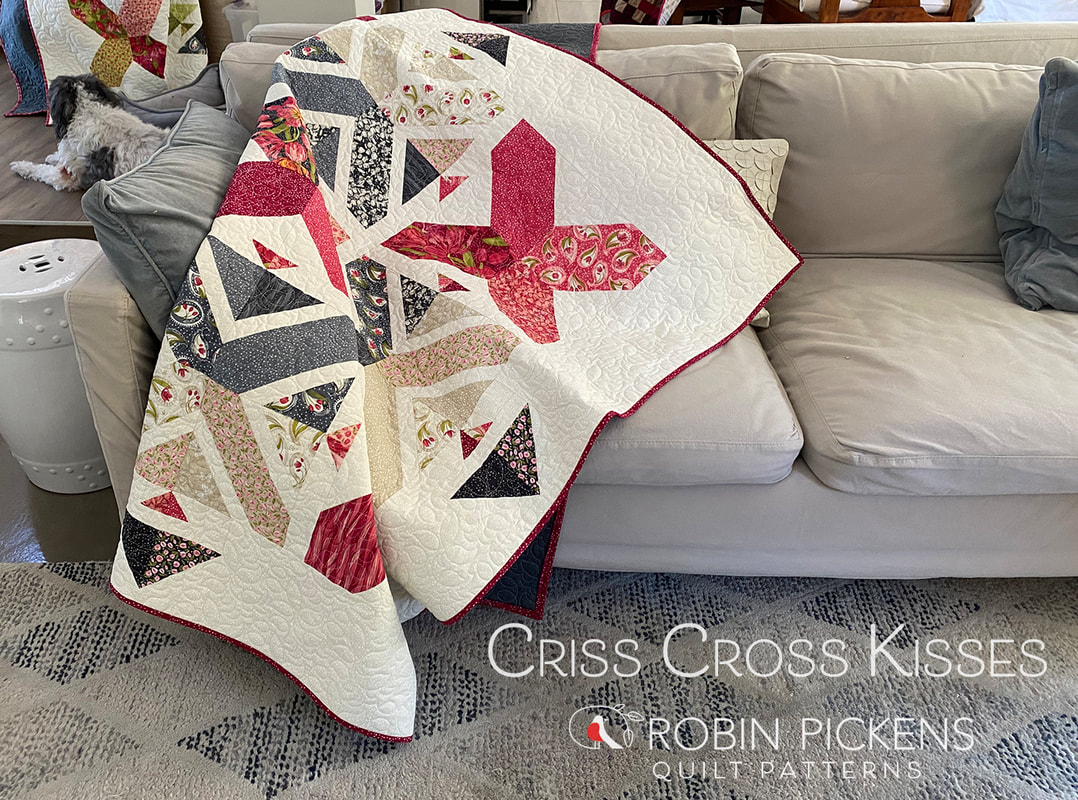 With the strong diagonal directions of the pieces, I thought the border including arrow heads of a larger size was a nice balance. On the lap quilt, it reminds me of a compass of North, South, East and West. 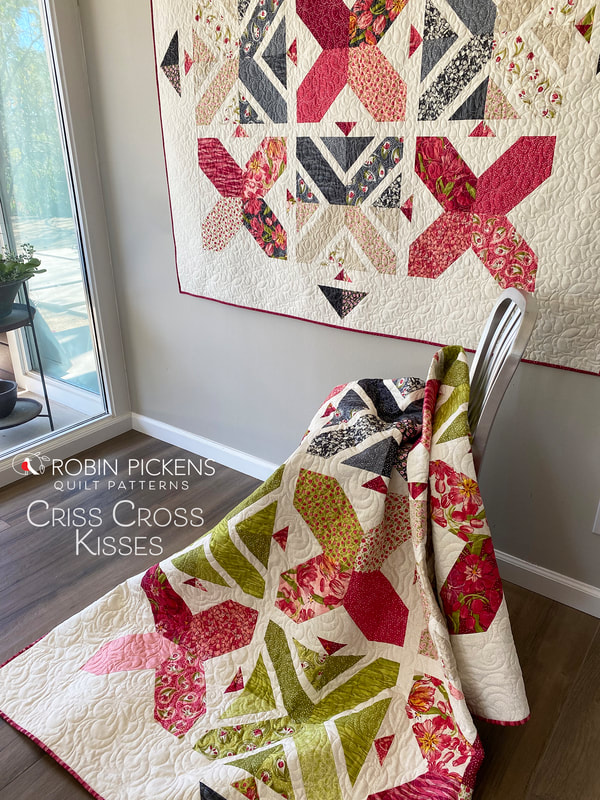 This pattern design idea was actually started back when I first designed my Dear Mum patterns. It has been rumbling around in my head for awhile and I'm happy to see it finally come to life. Sometimes things need to develop over time and this is one of them. The lap quilt was pieced by Susan Strumpf and the queen by me. I longarmed both and used the Leafarama pantograph by Keryn Emmerson and Whirlwind by Wildflower Quilting/Karen Farnsworth. 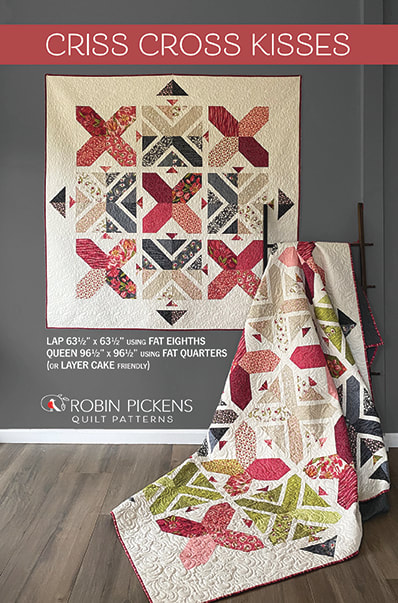 Criss Cross Kisses is up in the shop in digital pdfs and printed patterns. Tulip Tango fabric should arrive in shops in approximately May 2022. Check the next blog post if you are interested in seeing it mocked up in Carolina Lilies (thanks Mom for your special request for that!) Fair and Square has a special place in my heart because it was in the first group of patterns I designed. I've learned a lot since then and ended up completely rewriting the instructions. This quilt continues to be a learning experience for me! 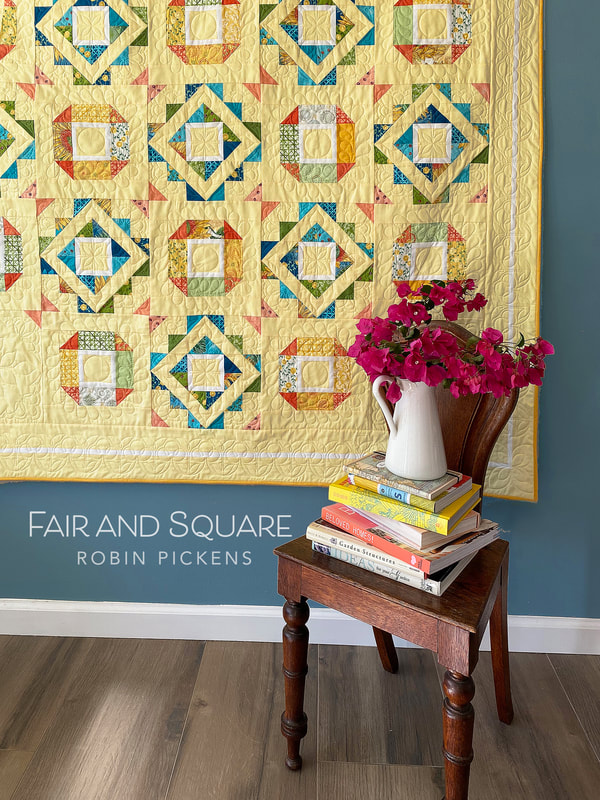 I made a revision to the design from the original quilt. I wanted to show this quilt with a soft, buttery yellow background to go with my big bright sunflowers. Sometimes with a pale color mixed with prints needs a little more defining contrast. I loved how a thin white border gave a little additional crispness to the block centers. I decided to carry that thin white sashing around the border to define the space. 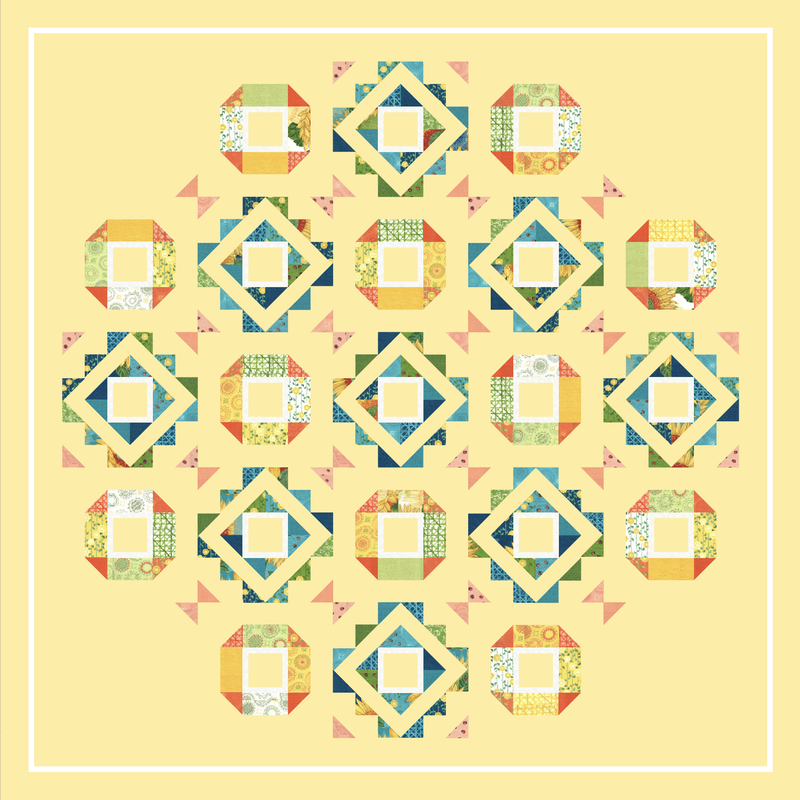 The first time I made this quilt I thought the process of making half square triangles went on FOREVER! Now I just enjoy seeing those big blocks come together from a fun mix of little triangles. This quilt can be a fun way to use up some of your extra half square triangles (I save all my extras for scrappy projects) or pieces at least 3" square. Yup, got a lot of those. This pattern specifies a layer cake but can also be made with scrappy pieces approximately 3 x 5" with background fabric added. 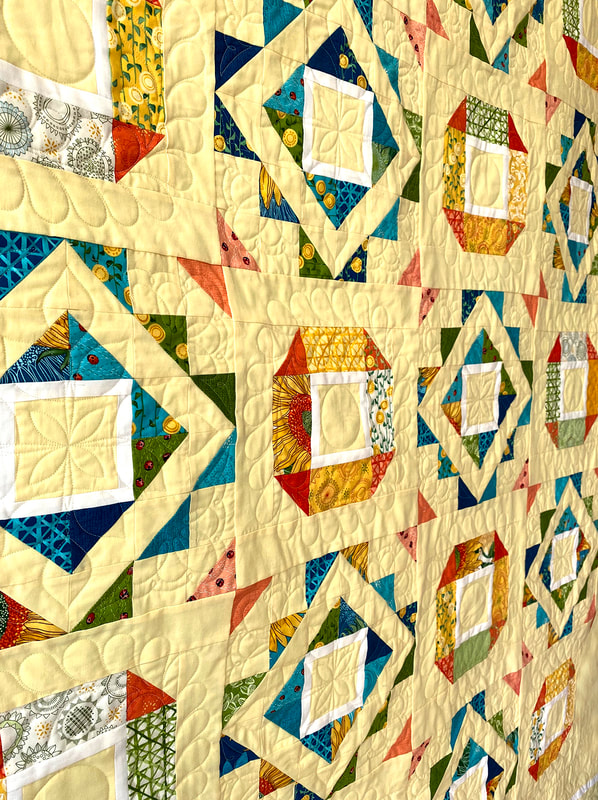 Part of my learning experience this time on the quilt was doing the longarm quilting. My system is computerized and I put the sewing designs into the individual blocks vs going with a continual pantograph that is edge to edge. I did a different border design and two designs rotating between the two types of block styles. Aligning the design, staying centered, working out what looked right with the blocks...I did numerous tests on scraps first. I can say I have SO much respect for the amazing longarm quilters out there that I see doing incredible custom work. It's not easy and requires patience and expertise, even when its guided by the computer. I'm glad I pushed myself to try this. It's not perfect, but I think I gave up the quest for perfection a long time ago! I quite enjoy seeing the areas that have mistakes because it records learning and improving for me. 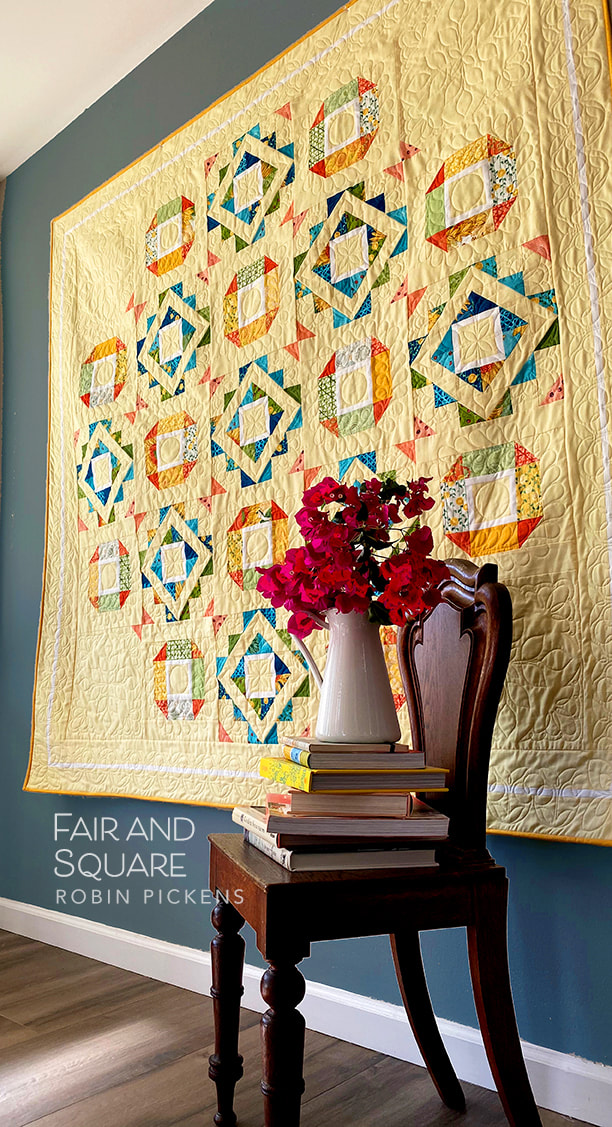 The back of this quilt has the print from Solana of little ladybugs. I just couldn't wait to try this on a backing since it is such a fun little print and I love ladybugs! They seem like good luck and fond wishes coming from busy little bright ladies. This print is great for a backing since the ladybugs have little dashed lines of curvy walking paths in a subtle texture in the background so its very forgiving if you make mistakes while quilting. Yes, I know that from personal experience. 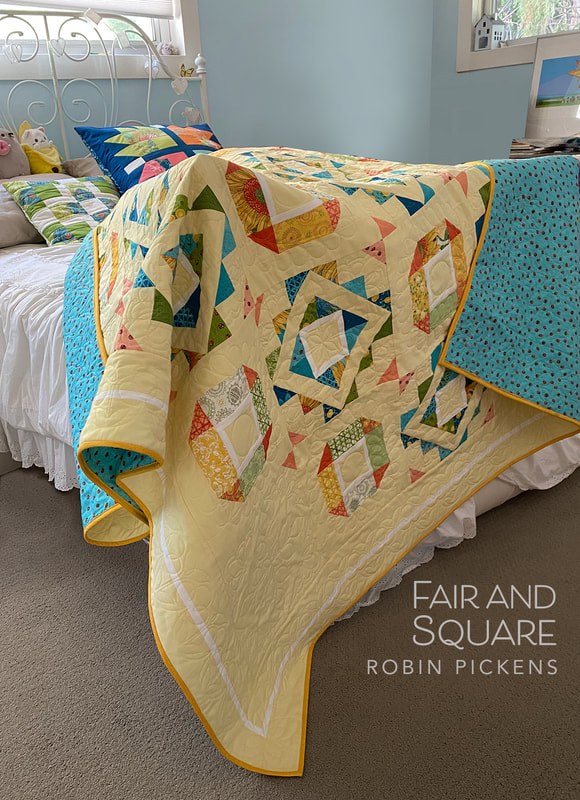 In case you were wondering what yellow this is, its Moda Bella Solids Baby Yellow 31. I paired it with Bella White Bleached 98. This is the original Fair and Square quilt I made with Poppy Mae, my first Moda Fabrics line. It was quilted by Gina Siembieda. 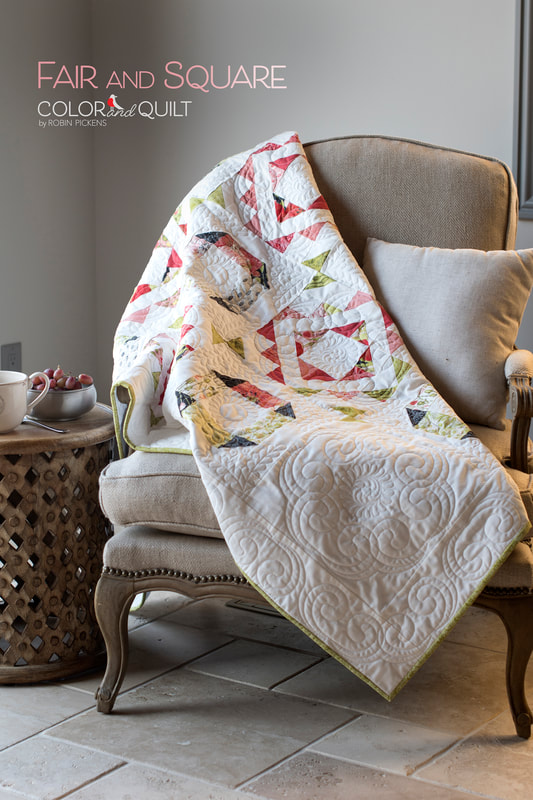 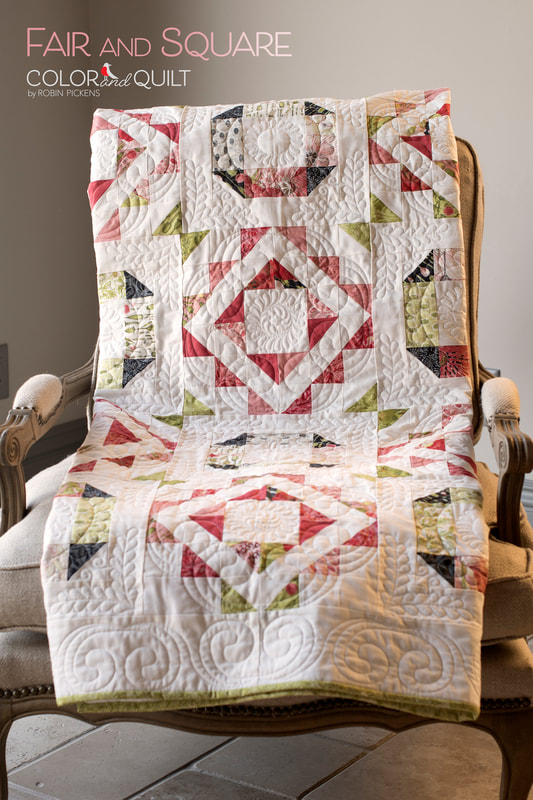 If you want to check out other quilts made with Solana, visit these posts: https://www.robinpickens.com/blog/simple-solstice-on-a-sunny-day https://www.robinpickens.com/blog/solana-patterns-here-comes-backslash or visit my shop! Have a sunny, happy sewing day!  The other new pattern I've released to go with the Solana fabric group is Simple Solstice. This quilt can be done with a Layer Cake or Charm Pack for a small or large quilt! I love the cheery sunshines in sunflower Solana warmth. 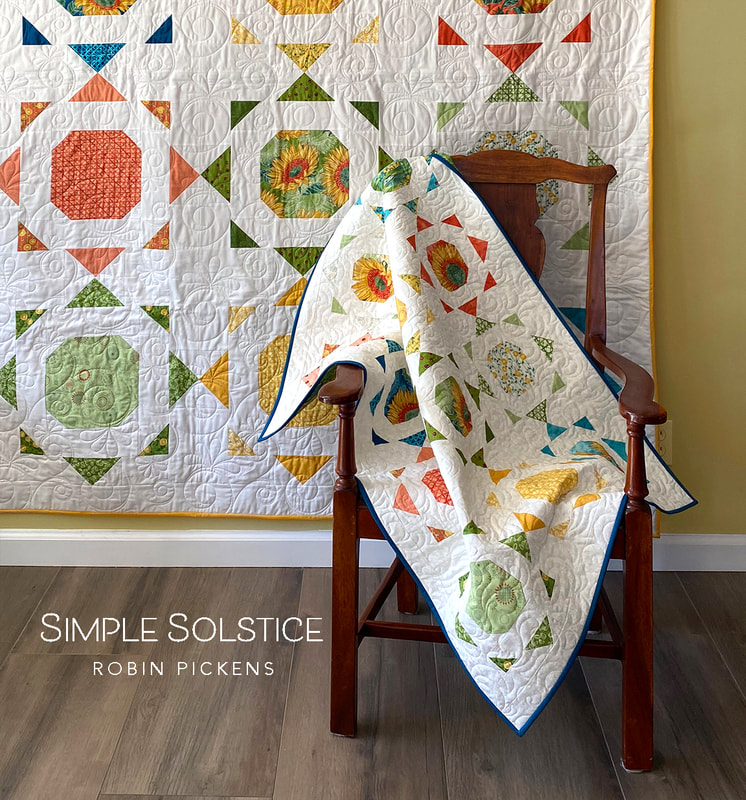 The original plan was just the larger quilt, but when I tried blocks in the smaller, Charm Pack, size, I fell in love with the scale of the sunshines. It makes a lovely wall quilt or baby quilt and can have another row nicely added to make it a square. 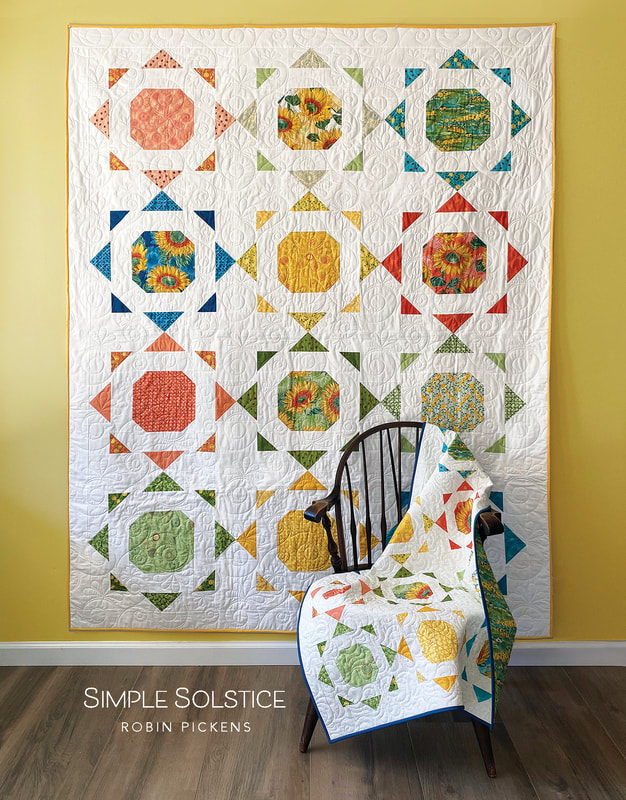 This quilt pattern uses a mix of stitch and flip corners to make snowball blocks, with rays from half square triangles and flying geese. Because the HST and flying geese are spaced apart, there is minimal corner and point matching to do, so this is really a very forgiving quilt if you don't like having to match lots of points and seams exactly. 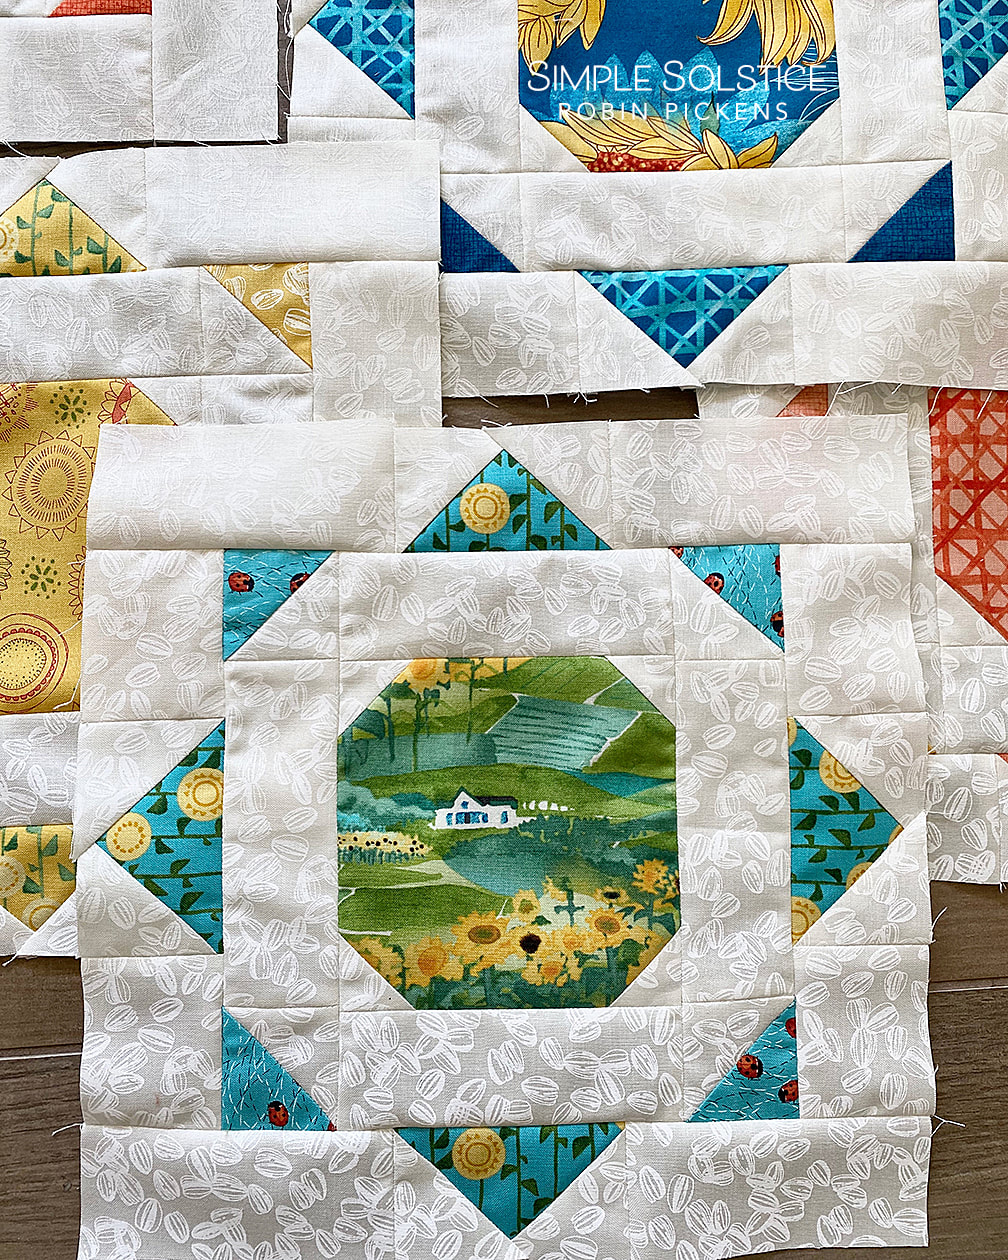 I also like the combination of using the scenic print from Solana for the back of the quilt against the white of the front background fabric. For the small version I used the white on white print of the sunflower seeds and it gives the quilt a slightly lacy feel. 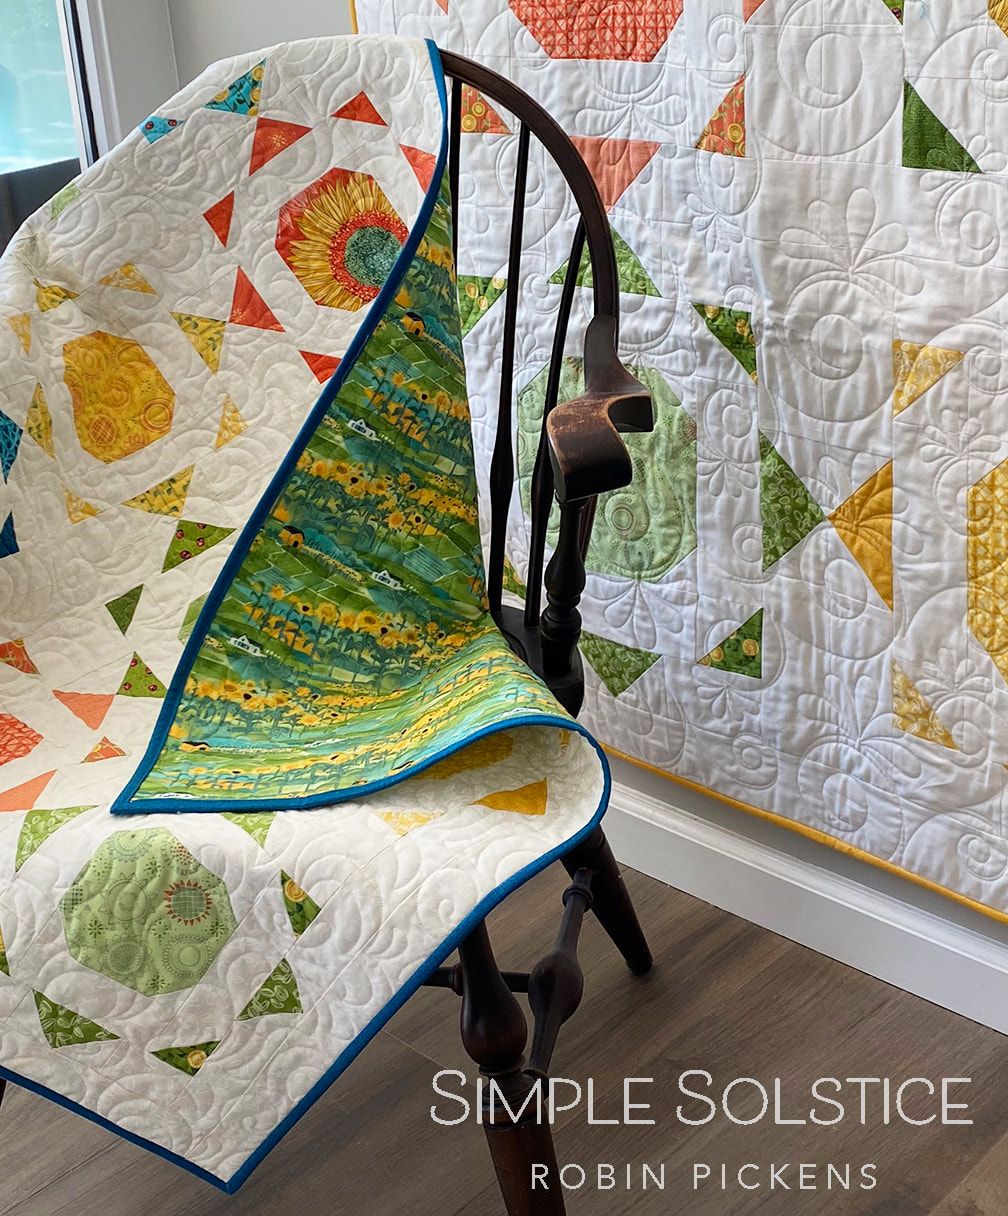 Fun fact: this Windsor chair was my Grandmother's. It has traveled with me from home to home and almost always lives in the corner of my bedroom or a guest bedroom. There is something comforting about having a quilt draped over the arm of this chair and I love the smooth wood of the well worn chair arms. 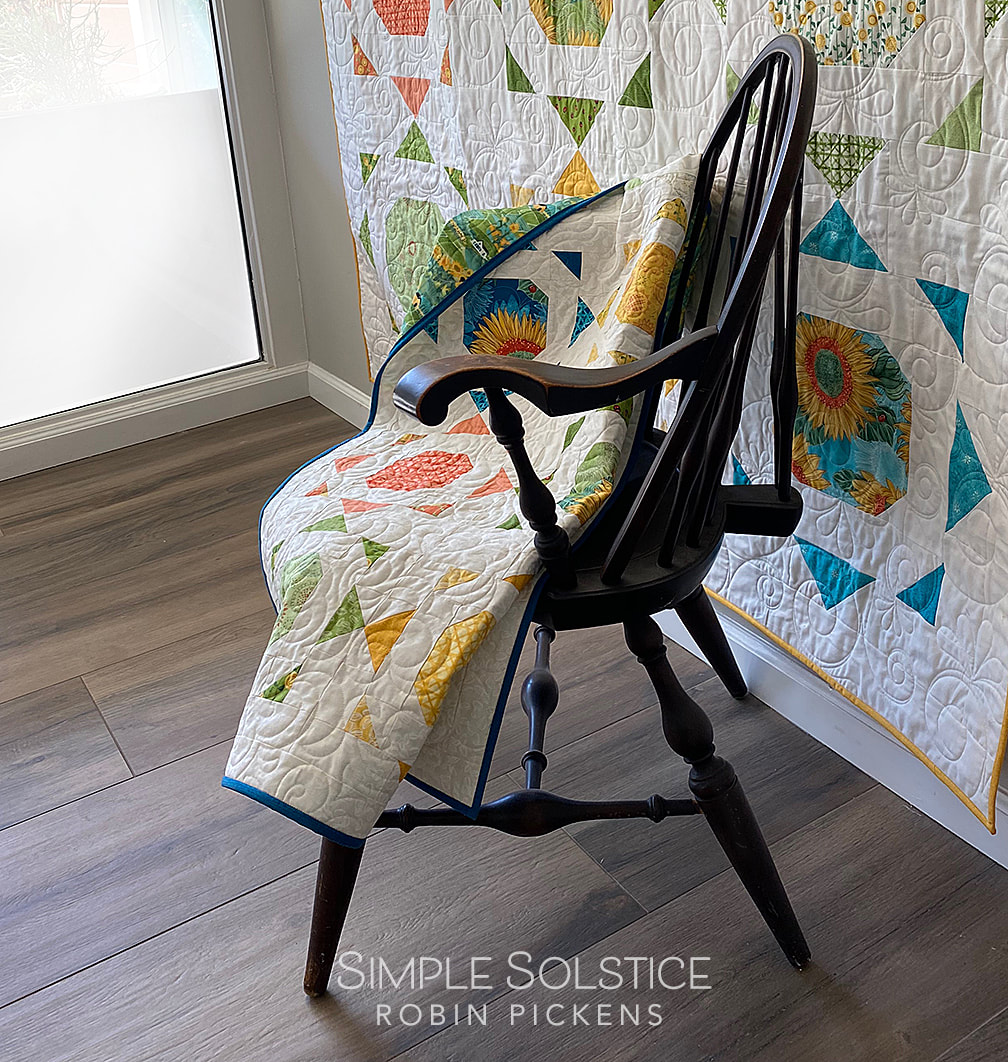 My little visitor friend seems to like these quilt blocks quite a lot. On two separate visits, she claimed them as the place she needed to sit. She knows what she likes! 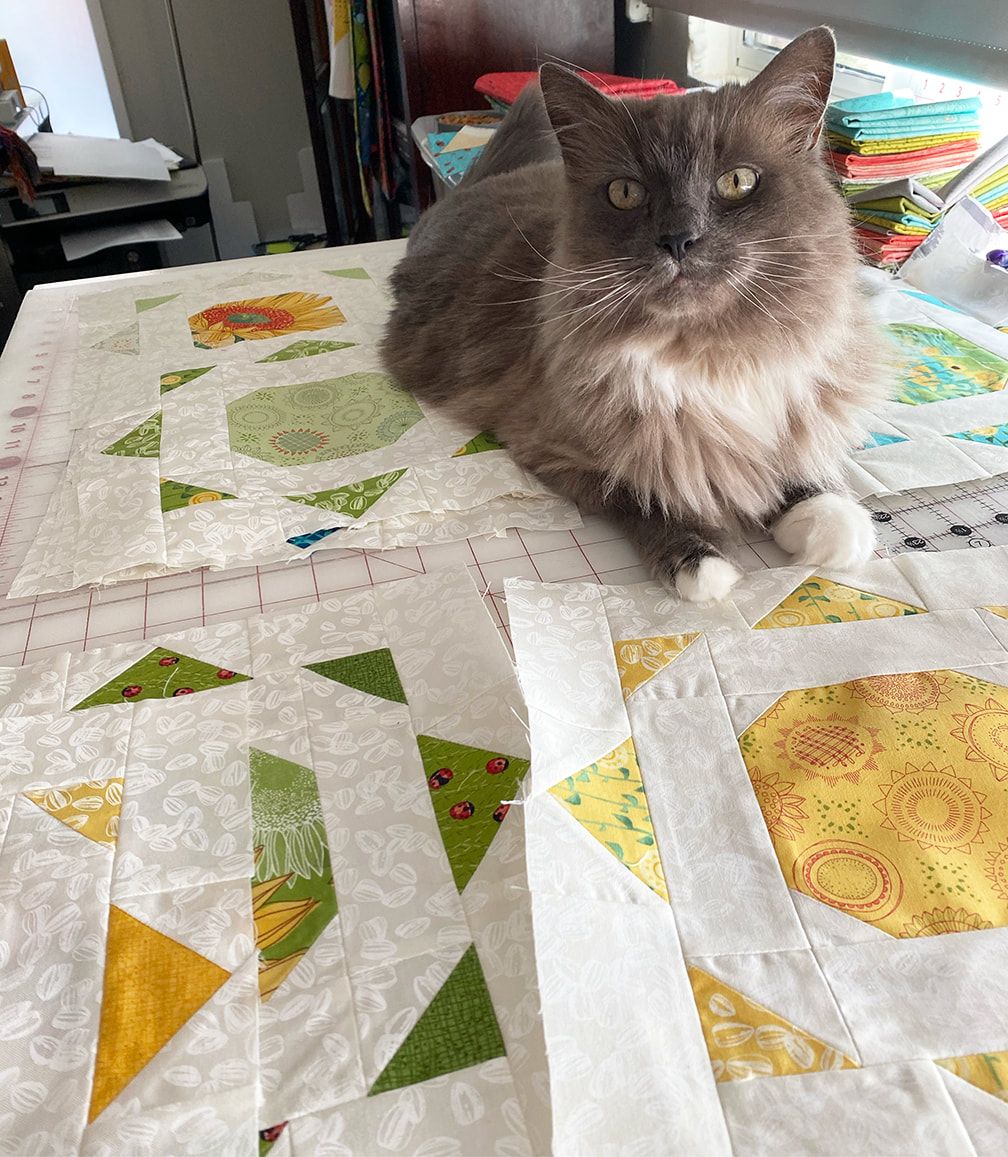 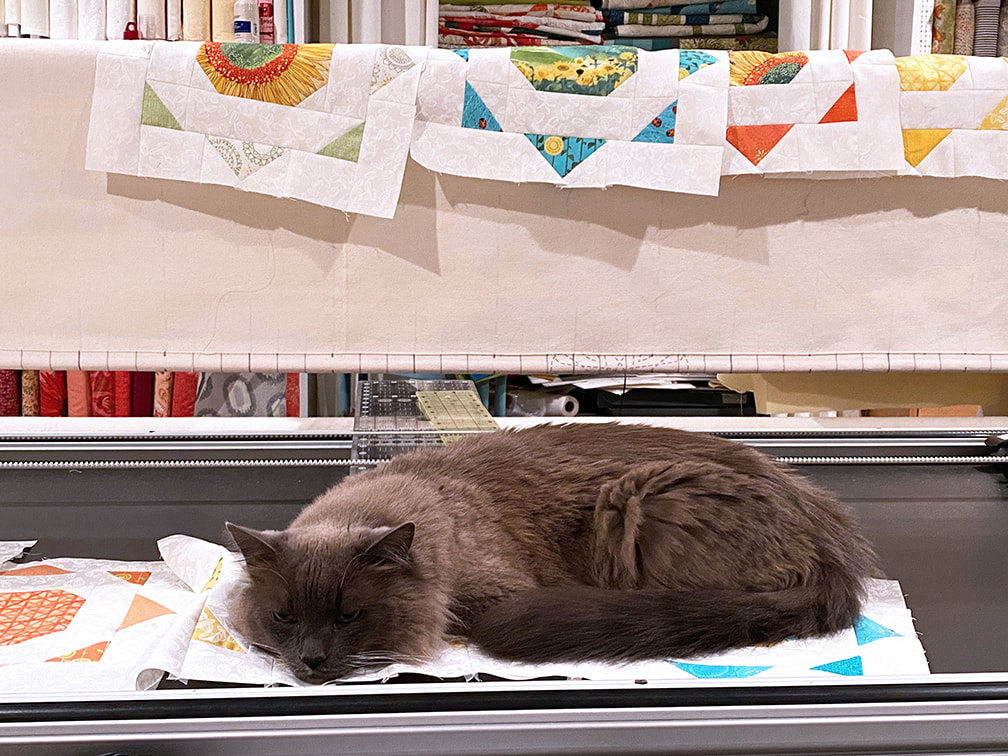 Simple Solstice will be shipping to shops and the Solana fabric will be shipping in October. If you want to check out this and the other patterns shown with Solana, visit my previous post or my shop. Happy sewing and enjoy the sunshine! 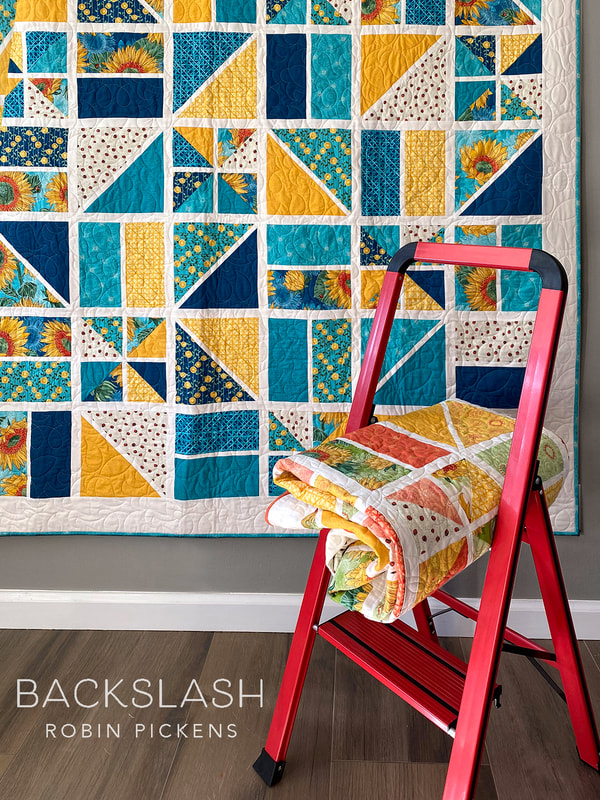 There are rectangular pavers leading up to the front door so the sound of the UPS man with boxes and a dolly have a "Clunkity, clunkity" sound as the wheels drop into the open spaces between the pavers. I know that sound well around here and today it was the sound of PATTERNS ARRIVING! 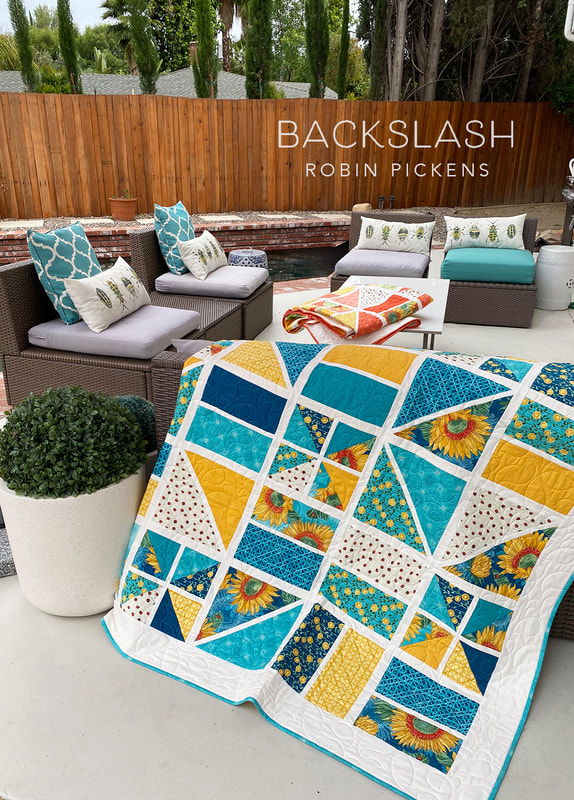 There are three new patterns for the Solana group of fabrics and this one, BACKSLASH, was the last of the three to arrive from the printer! Tonight we will be bagging patterns while watching tv and tomorrow I will box up some orders going out. Of the three patterns, this one feels the quickest to do and I really like how much fun stuff is in it due to all the print fabrics. It's a little bit of background, a lot of prints. 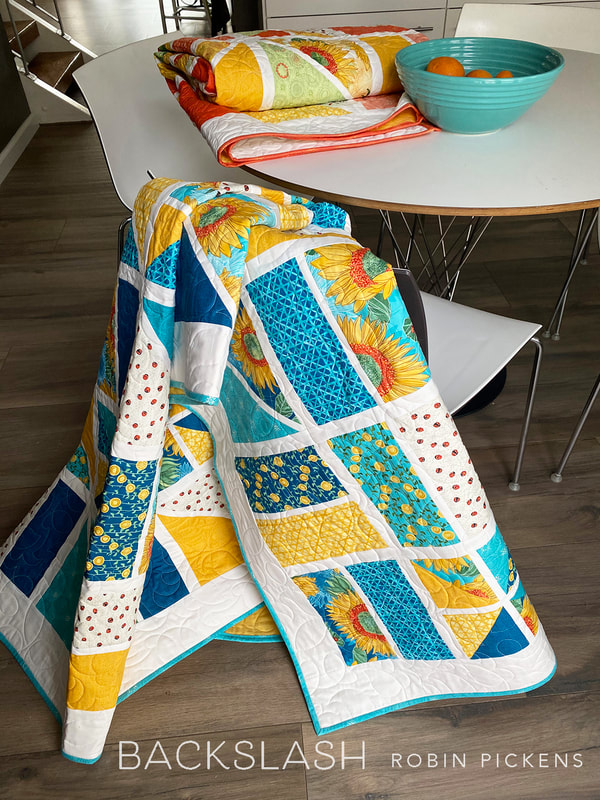 ThI've made Backslash in color stories- shown here in blues and yellows and one in coral, yellow and green. I liked the flow of movement I got with using a family of fabrics in consistent yardage cuts. This quilt is shown with 11 print fabrics. For the Lap size, you would use 1/3 yard cuts, for the Twin 1/2 yard cuts and for the Queen 3/4 yard cuts (plus background). This quilt can also be made with a Layer Cake. That gives it a busier, scrappier look but could be really fun too! The forward slash and backslash thin sashings on the angled blocks combined with the smaller/grouped in 4 half square triangle blocks provide lots of angles for your eye to travel around the quilt. 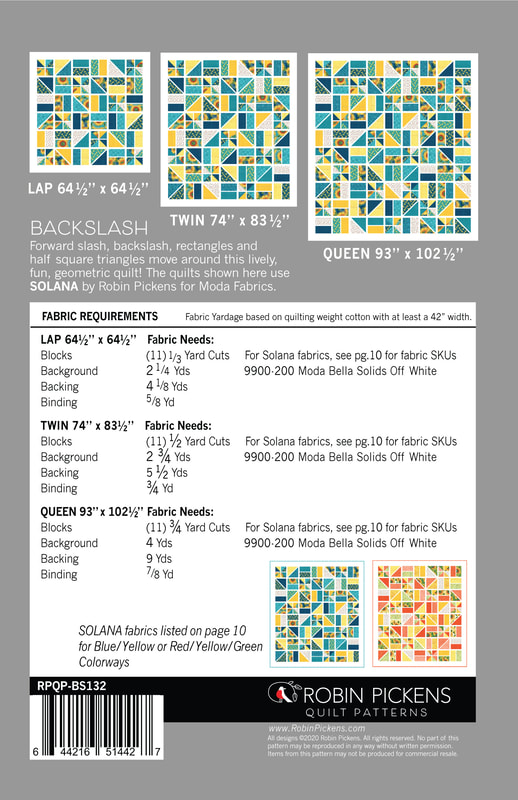 This quilt is suitable for more novice quilters or is great to use to showcase a lively group of fabrics together. I hope you have as much fun with Backslash as I did and that you will also check out my other Solana patterns of Simple Solstice and Fair and Square at my shop! (Solana ships to shops in October) Happy sewing! I love envisioning past patterns in new fabric lines and since Abby Rose is in shops now, let's play with those cabbage roses! 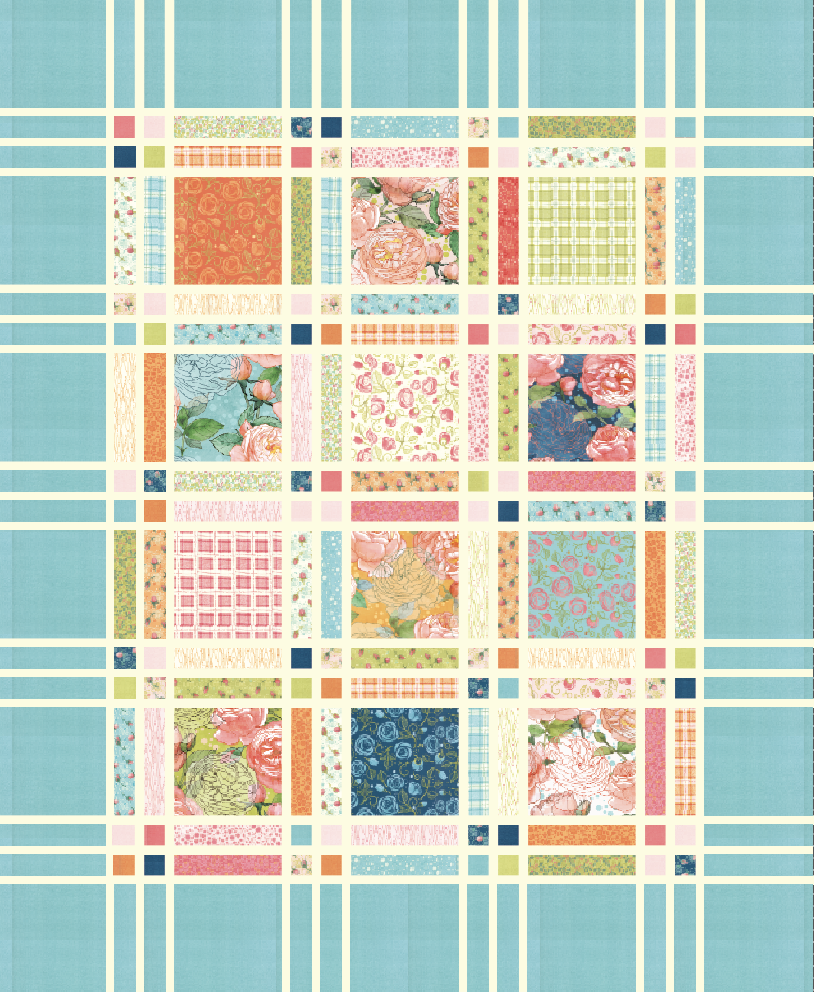 This light blue in Abby Rose is Thatched Seafoam and I just love the softness and warmer tone of that pretty blue! I wanted to see that as the larger side borders with a cream to highlight the fringe thin sashings. A good choice for the cream is Thatched cream 26 or Bella Solids Porcelain. 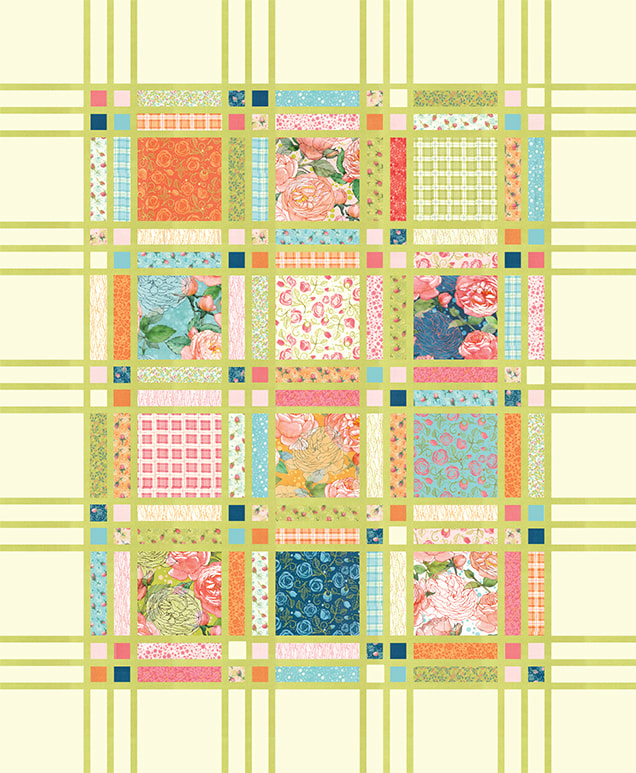 Here is the cream as the main background with the Abby Rose/Thatched Greenery 124 as the sashings. We have blenders in the Thatched texture with new collections and they don't all automatically become new basics in Thatched. But if a color is different enough and popular, it's a good chance that it will. Greenery is not as yellowy as charteuse, although it is close. Its pretty and soft, like the other Abby Rose colors. 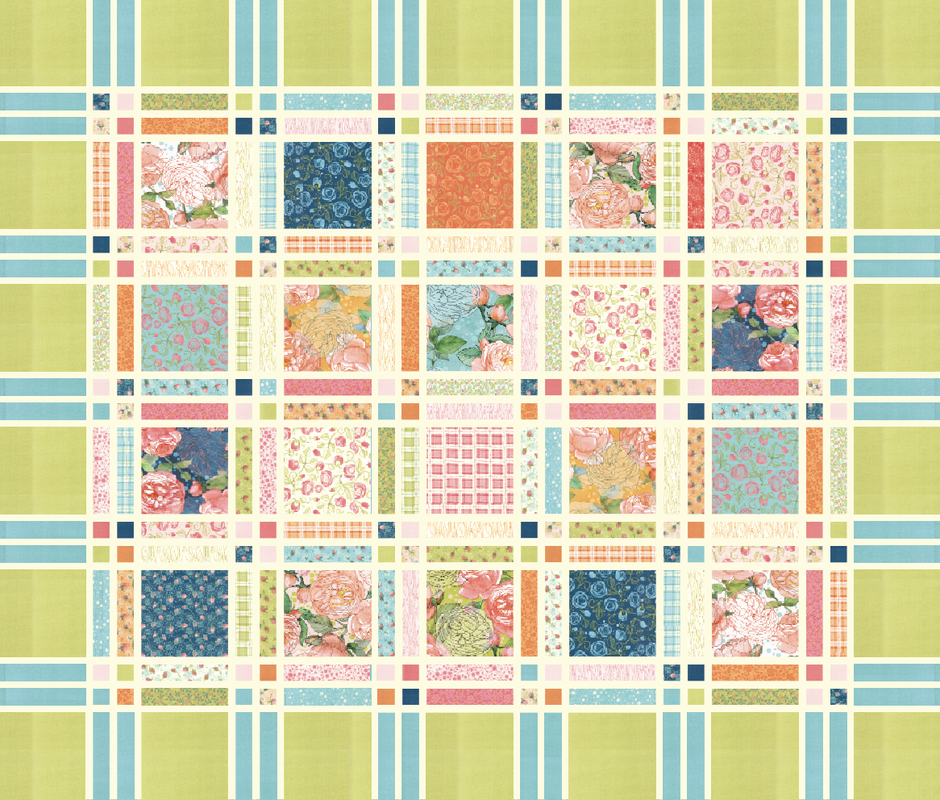 If you were making a king sized quilt, I would assume doubling the twin size. This mockup shows the Greenery as the large border block with the seafoam as the rectangles in the borders. I like the idea of mixing two colors for the borders! You could even go completely scrappy with the borders and have it be an extension of the prints in the body of the quilt. 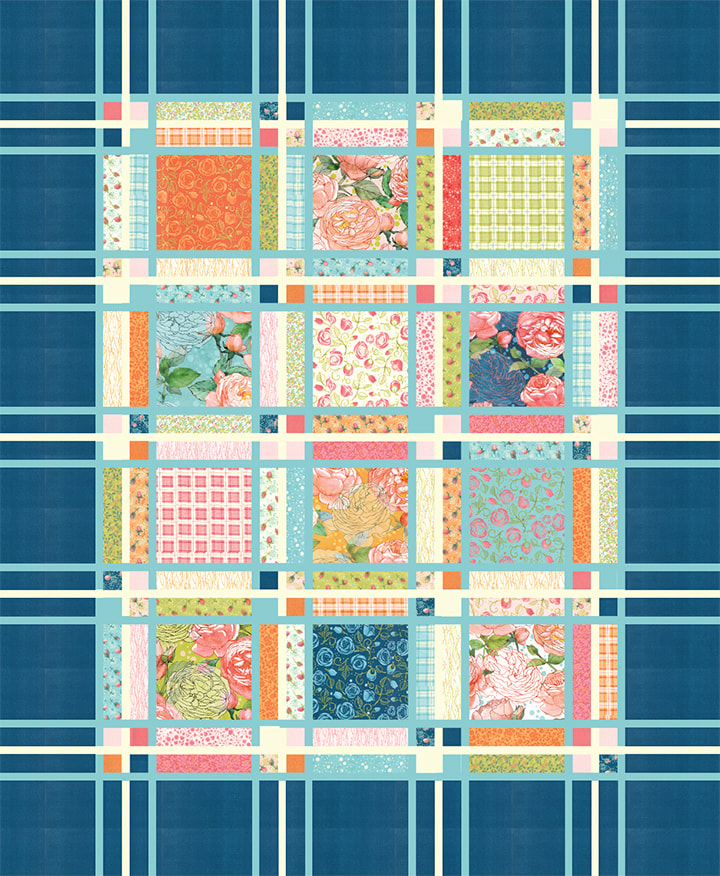 This last image uses the darker, Night 89 Thatched from Abby Rose. It is the same as 89 Marine. I have been so fascinated by Marine, Navy and Burgundy Thatched lately as deep, rich tones. They are so full of depth and personality! Notice on this image that the thin sashings are done in Seafoam Thatched for the two outer pieces, and cream for the inside piece in every group of three. Or you could go from light to dark in three steps to get a more gradated ramp. Lots of possibilities. I just love the drama of the darker border color!
I think Fringe is also a good pattern to play with those large blocks as crazy quilt piecing, string piecing, embroidery panels...lots of options! I hope "seeing" the possibilities with Abby Rose is helpful here! Happy sewing everyone! 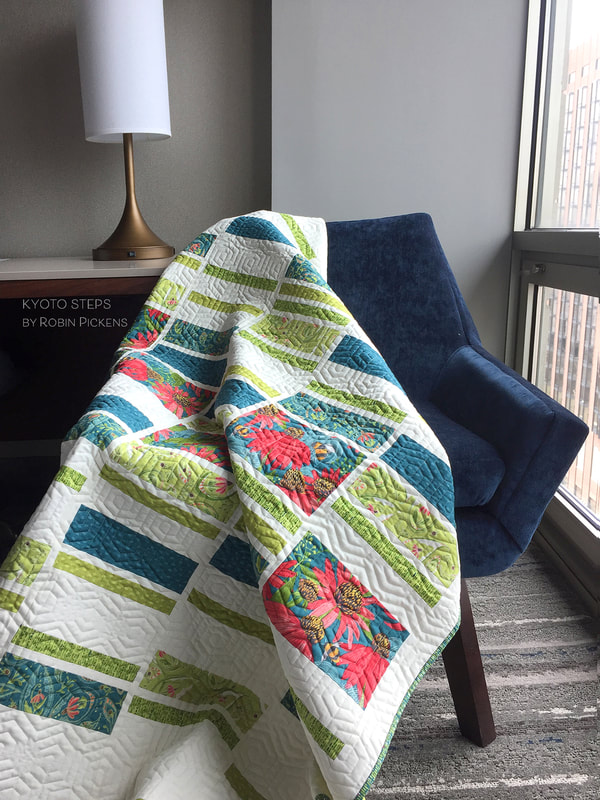 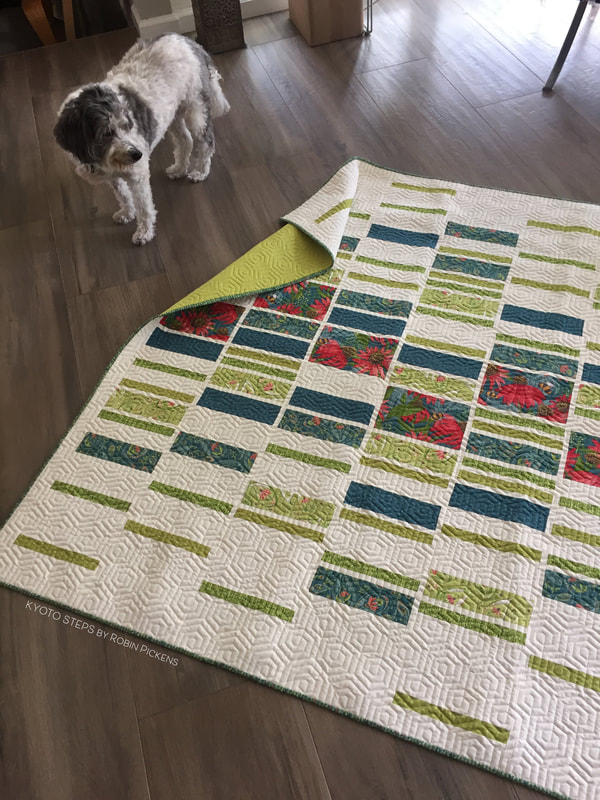 Kyoto Steps quilt pattern was launched with Painted Meadow fabric and we were just cutting some more kits in the studio last week. My kits do use the coneflowers and bees in the Painted Meadow fabrics and are available in both Twin and Lap size in the red and blue/green colorways. I did a little video to show my Kyoto Steps quilts on my youtube channel. I hope you will check out other videos on my channel! 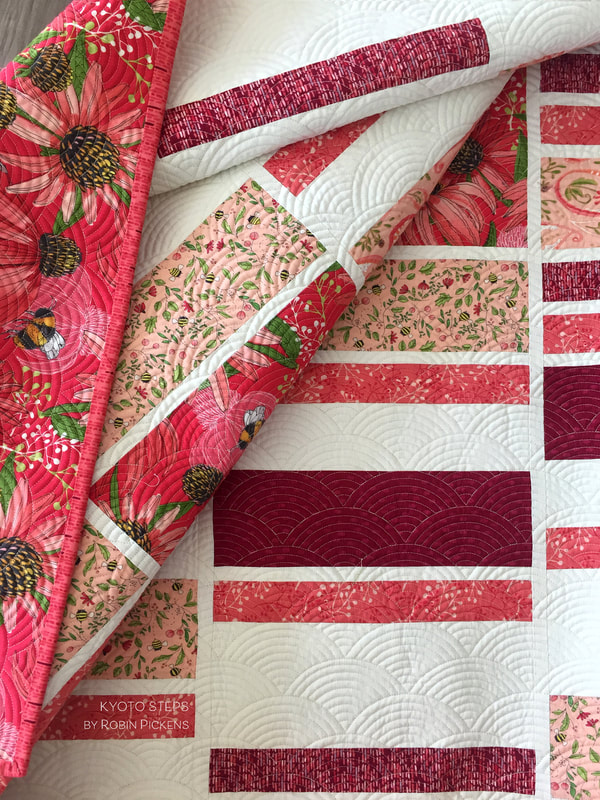 Since Abby Rose just shipped to shops recently, I thought this would be a great time to show how this quilt could look in Abby Rose! The quilt needs 1/2 yard cuts in 6 fabrics (plus background fabric) for the twin size, 1/3 yard cuts plus background for lap size, and if you are making a full/queen you would have a mixture of 3/4 and 2/3 yard cuts plus background fabric. I enjoy mixing groups of 6 fabrics to see the different looks in romantic roses!  I've included information under each image to list the Abby Rose fabrics used in the mockup. I've listed the name, color and SKU number in case you want to order fabric from your local shops. The first mockups play with orange and pink and pink and green colors. Pretty, springy quilts in light and sweet colors. 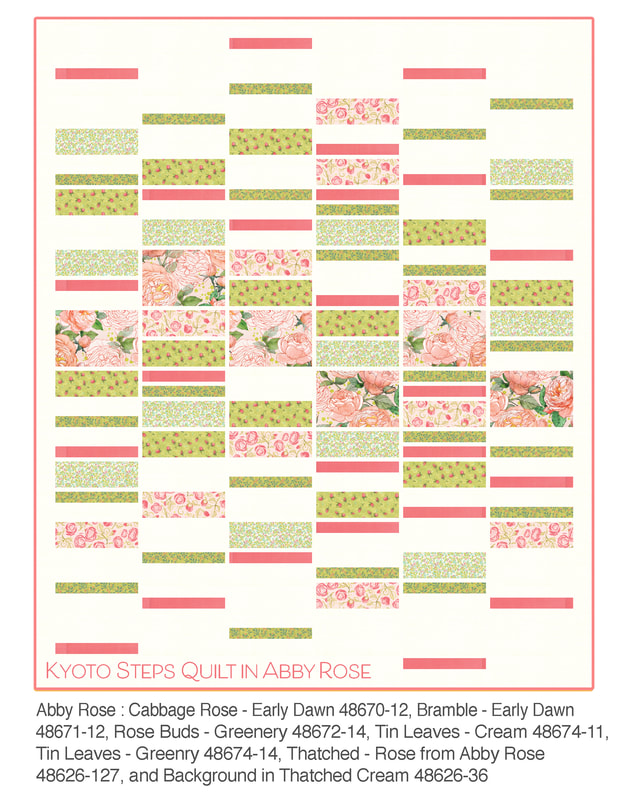 How would it look to use a background with more color and with dark shades? I tried Thatched in Cranberry and Burgundy to offset a pink and orange mix and I love the deeper feeling of these. 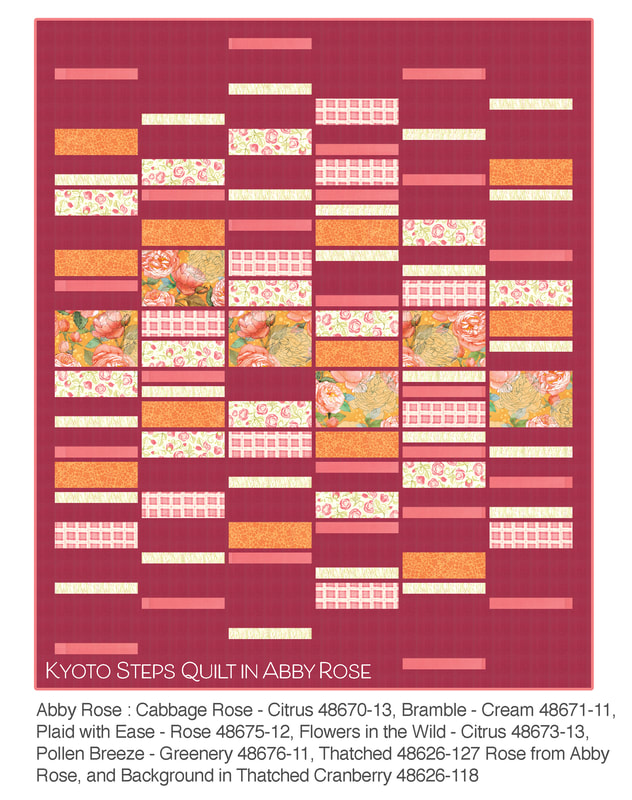 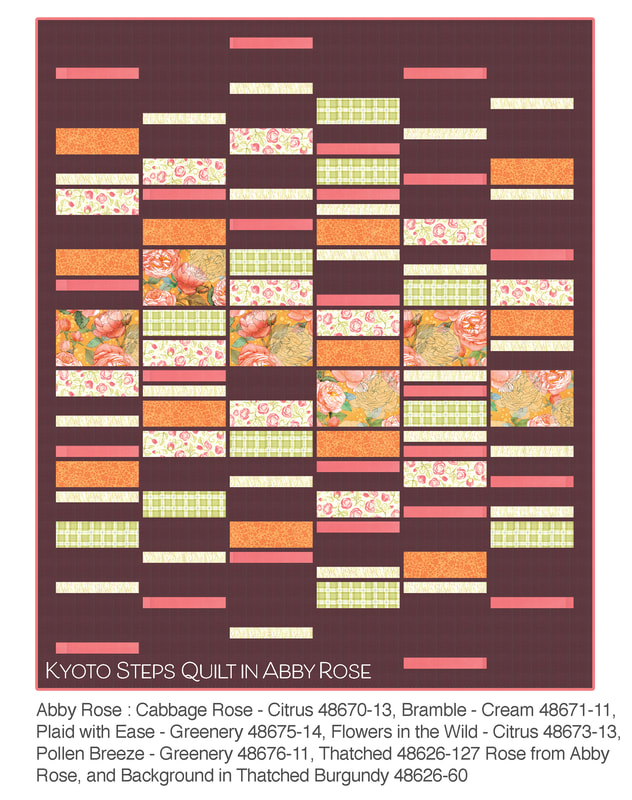 Greens and Blues? Abby Rose has a soft seafoam blue that mixes nicely with the fresh green. The darker blue is called Night in Abby Rose and is the same Thatched color as Marine 89. I like the crisp feeling of this darker blue against the cream background. I also like using the lighter seafoam blues with Night as a background. 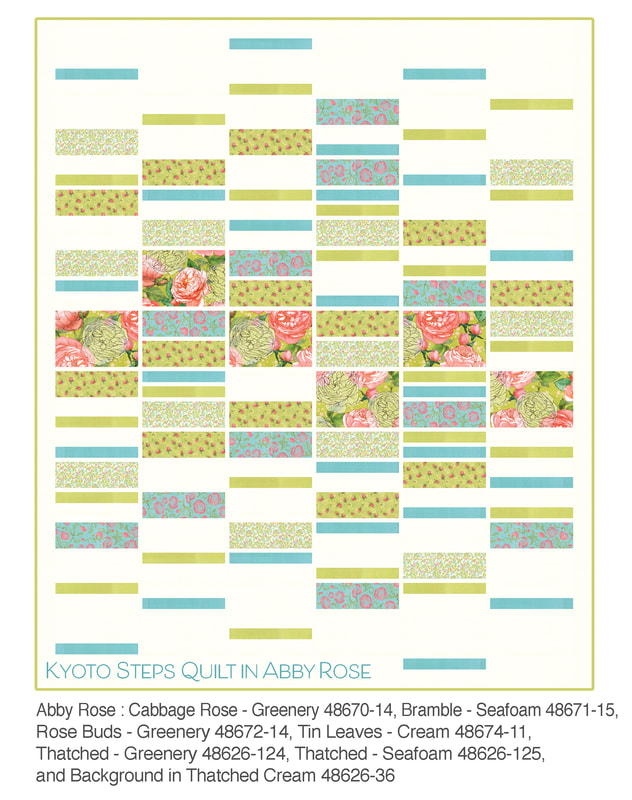 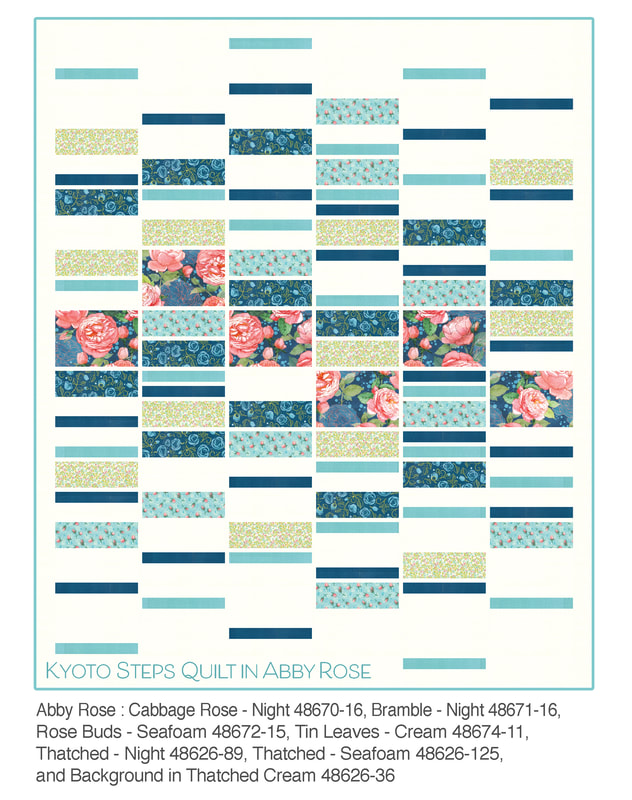  If you are looking for kits using Painted Meadow, visit my shop at www.robinpickensinc.com. You can also see more details of the Painted Meadow quilts on my youtube channel. For Abby Rose, check with your local quilt shops and have a great time sewing! 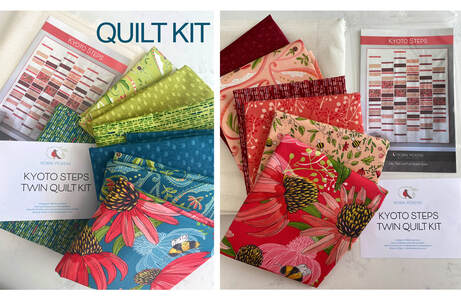 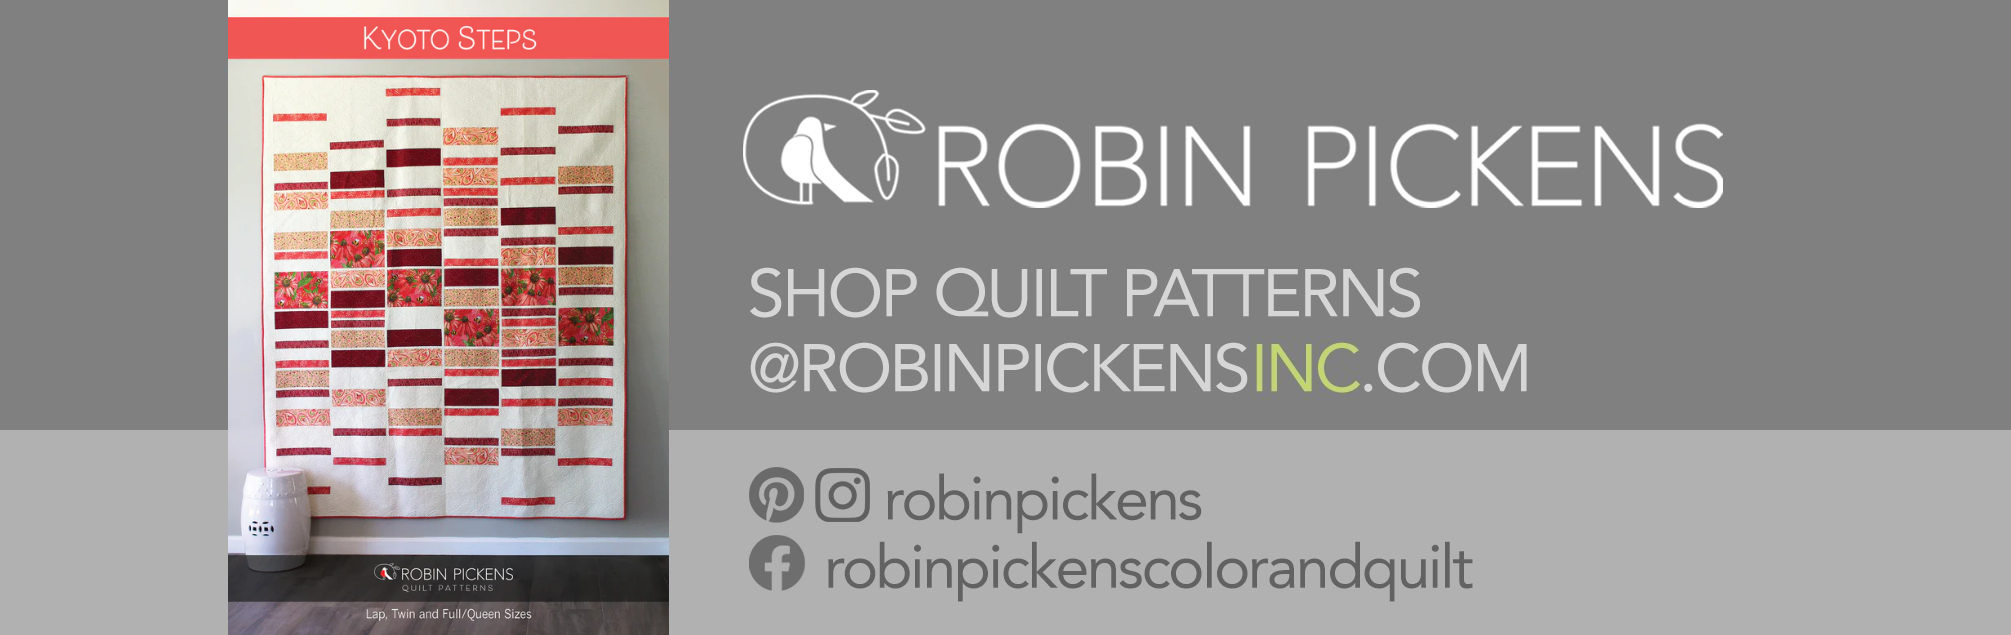 |

About ROBINDesigner of colorful florals for Moda fabrics. Modern to transitional quilt designer. Illustrator, sewist, crafter. I am proud to be a designer for Moda Fabrics!


Shop Robin's Designs
 I am an affiliate for Fat Quarter Shop and may earn a small commission through my links. Thank you for your support!

Check the March 6, 2017 Episode!
Categories
All
Archives
February 2024
© Robin Pickens Inc. All rights reserved. No images may be reproduced without permission.
|
 RSS Feed

