|
Janet Clare brings us a lovely lovely block this week with "What a Lark!" There is so much fun to have with this block, treating the center as arrows or a plus sign. I also like how we can line up colors within the half square triangles to let them be little triangles or form into bands of color. The bottom center and right show how those lines can be in gradations of color to almost look like the center is radiating light or it is a supergraphic. I also think it is interesting to see how those corners can change looks when I see the right one on the top row. I notice the elements of the squares more prominently Here is our black and white, with and without lines. This week the sewn blocks really have more difference between the two palettes. The popsicle one is springy and fresh with Dotty Thatched in Lime. I love that fizzy look of the dots and how the green looks with a variety of blues. A little pop of orange is a fun accent. Here is the popsicle palette plan so far! My blocks are planned for the upper left corner and lower right side. The snuggly palette is soothing and warm with Buttermilk Thatched background. I kept these blocks simpler with fewer colors. That top corner felt ignored before! Now it's starting to get some action. Melina made 4 blocks for this week. We still go back and forth each week on what color palette we prefer! I can't wait to see how this looks at the end. But for now, keep sewing!! Happy summer and hope you are staying cool.
0 Comments
Barb Groves is our designer this week with her "Polaris" block. Use the triangle backgrounds as stripes, accent colors or a band running through the block. Thanks for this simple, sweet block this week Barb! It is nice to have a block without so many pieces this week! I've got two blocks in my quilt this week for both the popsicle and snuggly palettes! My blocks are in the lower right and also the split color middle between the top two sides. Loving those warm and snuggly colors! Hope you are all staying cool and safe and are having a good summer. Keep on sewing and posting! Happy Blockheads!
Sherri McConnell brings us "Sandcastle" quilt block this week for Moda Blockheads. Quarter square triangles are a big part of this week's block and the little stitch-and-flip corners add a lovely little accent area. When my colors are side by side to visually extend a shape, you see squares on point or arrow heads or rows of diamonds. I like how the small triangles in the first two in the middle row look like little ears, or on the bottom row, when it looks like the tops of cats heads on the last two. Gray scale for easier envisioning with other colors: And with the lines for ease of seeing the actual pieces: My sewn up blocks look fairly similar this week between the two palettes. The main difference is in the white vs buttermilk background and ruby vs cranberry in the middles. My Sandcastle blocks will go in the upper right corner and in the lower left row of the quilt body. In the Popsicle palette it looks like this: Here is the Snuggly palette: We are two months in to our sew along! I hope you are having fun with the blocks and are sharing your progress in the facebook group. Happy sewing!
Happy week 6 of Moda Blockheads! This is an especially fun week for me since it is MY block this week AND I am sharing my SETTING PLAN for my quilt. Just a couple quick things about me, in case you are new to Moda Blockheads or new to me: 1. I try to do a weekly "color study" for the new blocks and I play with color and light and dark placement to see how those factors influence how the final block looks. I post them each week on my blog and in the facebook group and on my instagram account. 2. I've been designing fabric for Moda, going on 10 years! I started working with them after winning the Fabric8 competition on spoonflower.com, which Moda sponsored. It has been a wonderful experience working with them and I am happy to design floral inspired lines and have basics collections of Thatched and Dotty Thatched too. 3. I design quilt patterns and a lot of my patterns span a modern-to-transitional feel. I am a very spacial/visual learner so I try to diagram my patterns a lot with visuals. 4. A common question I get is about what computer program I use to create my color studies. I use Adobe Illustrator. I have EQ8 but am most comfortable on Illustrator so that is what I always go back to. So let's get on to this week's block! MOONBEAM. Can you see the arrows of light as they shoot off into space? Whether you see this as a moon or flower, I think the directionality of the corners and potential for layered light in the center nine-patch offer lots of interesting elements to play with. I love the simplicity of stitch and flip corners and each of the four snowball units use those. If you struggle with getting those to be even, have no fears here, since this block does not require the angled corners on those snowballs to match other seams precisely. If they did, sometimes using a little glue to hold pieces in place is helpful to getting accurate snowball corners. For those instances I put the glue on the two pieces facing right sides together, on the part I will be cutting off , just a little bit away from the seam I am sewing. Color studies for Moonbeam. The last one feels the most moon-like to me with glowing white against a dark inky sky. My other experiments feel like flowers, plaid explosions, double sided arrows or arrows that change direction and now point IN vs OUT. This block can be busy and complex or simplified down to mostly arrows, like the middle one shows. After all this experimenting with color studies...I still went with a sewn block that is most like the first one. Here is the color study done in black and white, without the color influence: When working in color, I did not see how much the white corners stood out until I saw it in black and white. It is very helpful to take photos of your pieces when you lay them out and then make the photo black and white to see what your contrast levels are. And with the dividing lines of the actual block construction: The quilt block pattern for this block as well as the past week's blocks are on the Moda blog at: https://my.modafabrics.com/inspiration-resources/blockheads-6-archive Sewn blocks in my two color palettes: Popsicle and Snuggly. Keep reading to see the full plan I have for these blocks and how I will be laying them out. If you want previous information about these two palettes, I've posted about them at the start of the sew along at www.robinpickens.com/blog/moda-blockheads-6-begins Here is the block done for both the Popsicle and Snuggle palettes. I wanted to share my layout idea for my quilt. There are a few sizes for this sew along. I decided to make the biggest block the center, focus on next largest as four corners, and surround those corners with smaller blocks. By adding additional half square triangle units I am making a giant star-like or X block. I also wanted cohesive color groupings within the quadrants so I focused families of warm or cool in corners for Popsicle. For Snuggly palette I separated pinks or browns. In order to differentiate between an area of color that is the quilt setting and the colors that will have a quilt block in them, I shaded down the block areas with white. The full color areas are the quilt setting additional pieces I am creating. Each side will have star points created from half square triangles. I'm making 4 1/2" finished HST so starting with 5 1/2" squares, trimming to 5" and then assembling into the bigger triangle edges. The bigger blocks face each othr to make the overall star points for the quilt body layout. The background cutting to get these side pieces requires 26" of fabric. I'd get 7/8ths of a yard to have some room for error. Or you may have lots of extra background fabric already from the blocks you are making and will not need to supplement as much extra fabric. From background material, you will need (8) 9 1/2" x 5" rectangles, (8) 5" x 5" squares and (12) 5 1/2" x 5 1/2" squares. You will also need a total of (6) 5 1/2" squares each of A/B/C and D/E/F to make the half square triangles. I've used different combinations on my color quadrant sides so I am using a variety of colors to make up my A/B/C and D/E/F squares. I've used a simple two-at-a-time construction for making my HST, with a line diagonally, corner to corner and sewing 1/4" to each side of the line. I press to dark side and trim to 5". Then I assemble my rows or columns as shown below: This is what my sewn sides look like in Snuggly and Popsicle: This 27 1/2" x 14" block will be the center of the four sides of the quilt top. I also have rectangles and squares of colors that run up to the star points. A quilt block will be in that smaller square area within the side of color bands. For the color bands, cut 14" x 9 1/2" rectangles in colors that match with your star HST ends. You will also need either (2) 5" x 5" squares or (1) 9 1/2" x 5" rectangle per side to be at the base of the quilt block from the sew along. Because my colors are split into quadrants, I'm mixing those colors in to the blocks that go in those spaces to continue the color split. I hope this makes sense! You can simplify by using all one palette. I just decided to switch it up a little and do multiple color groupings, because more color is something I usually like! The other twist for me is mixing regular Thatched and Dotty Thatched. Same colors but there is a lot of interest to me in having that subtle change of dots or no dots, sort of like another layer of depth and texture. The Snuggle palette looks like there might be some dotty in those mocked up spaces but that quilt will be all regular Thatched. I think it will be interesting to see how much difference there is between the two quilts when they are all done. Here is a peek of how my layout looks with the blocks we have done so far. And here are the groups of sewn blocks so far!! Many thanks to Melina for working on these. Otherwise I'd still be doing some catch-up! Please feel free to pop back over here to see any new blog posts or color studies. I also have a facebook group "Robin Pickens Sew Happy Community" where we will be doing a little sewing together in July of my Bar Hop quilt pattern. And you can find me on Pinterest, instagram as @RobinPickens or on my youtube channel youtube.com/c/robinpickens.
Thanks for sewing along and being a part of this wonderful Moda Blockheads experience! Robin This is Kiley Ferons' block, Cat's Cradle, for week 4 of Moda Blockheads. I like the soft angles of the outer shape that is created from the half rectangle triangles. For my color studies I kept thinking that center block would be great for some fussy cutting! So keep that in mind with any of these as borders around a fussy cut image. Keep the outer sides all background white or split them into black and white high contrast sections. More white in the top right brings propeller motion. In the middle row, the middle middle image just pulls me in to that center and I like the various shades of colors surrounding in each quadrant. Those borders feel 3d to me, like faceted cuts of a gemstone. The bottom row plays with more white pieces to highlight an angled view. The middle one started to whisper "spool" to me so I had to try that with a striped center. I love the spool of thread! Here is another view in black and white and with the line divisions. On any of these color studies, to actually make these versions you need to read through your directions and assign different fabrics and more varieties to the pieces. But that is part of the skill-building and fun of starting with a pattern and making decisions to get the look you want. Here are the actual sewn blocks from Melina. I am so glad she was busy sewing while I was away at the ModaVation retreat. She did mention that you should make sure you read the directions on this block. We have a tendency to look at pictures and the written instructions can be very important any time you do half rectangle triangles to get your trimming of pieces correct for proper seam allowances. Here is the Popsicle palette. Having a little bit of dots sprinkled into parts of my blocks adds a bit of whimsy. My overall background on this palette is Thatched cream 36. It is interesting to see how the feeling changes subtly with the snuggly palette with the Buttermilk Thatched background that is shown after these images. Snuggly palette with Buttermilk background: Four weeks in and I've got 5 blocks that are starting to tell a color story of their own. My block is week 6 so I will try to have my setting idea ready to share with you then. Snuggly palette. The Dotty Thatched is only in the popsicle one so I'll be interested to see how much influence those dots have on the feeling of the quilt. Don't these groups look pretty? I'm happy to have a fun project like Blockheads for summer and fall sewing. Baby steps each week really adds up. Happy sewing everyone!
Moda Blockheads Day! Time to catch up on a few things. 
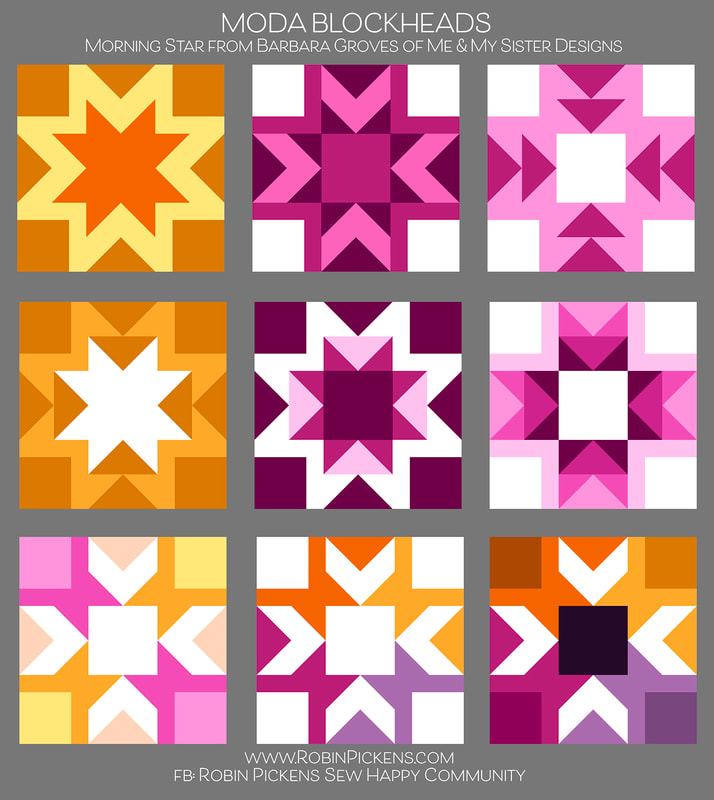
First off, color studies for this week's block, Morning Star from Barbara Groves of Me & My Sister Designs. Are you a supergraphic 70's star outline lover? Or prefer a row of flying geese arrows? Blocky sides? Arrow points towards center with different color corners? Such fun to play with this block and the outline that surrounds the star. This is an awesome block to play with. Thanks so much Barbara. 
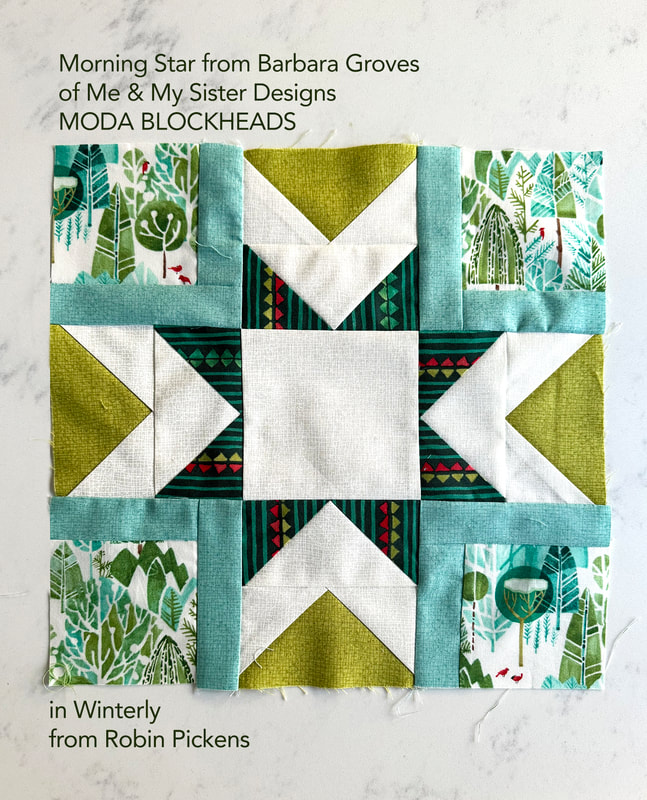
This is my block that I made this week in Winterly fabrics. I decided to make those outlines in the corners the Seafoam color to bring in more of the cool tones in the tree prints in the corners. I liked having a darker green in the center star points in contrast with the Chartreuse sides. Back in the first group, when I showed my block, I sewed it up in Winterly fabrics and I knew I wanted to make a Christmas quilt, but didn't have a plan. I have numerous Christmas quilts but none done from a sampler or from a sew along. It took awhile to think about it but now I have a plan. 
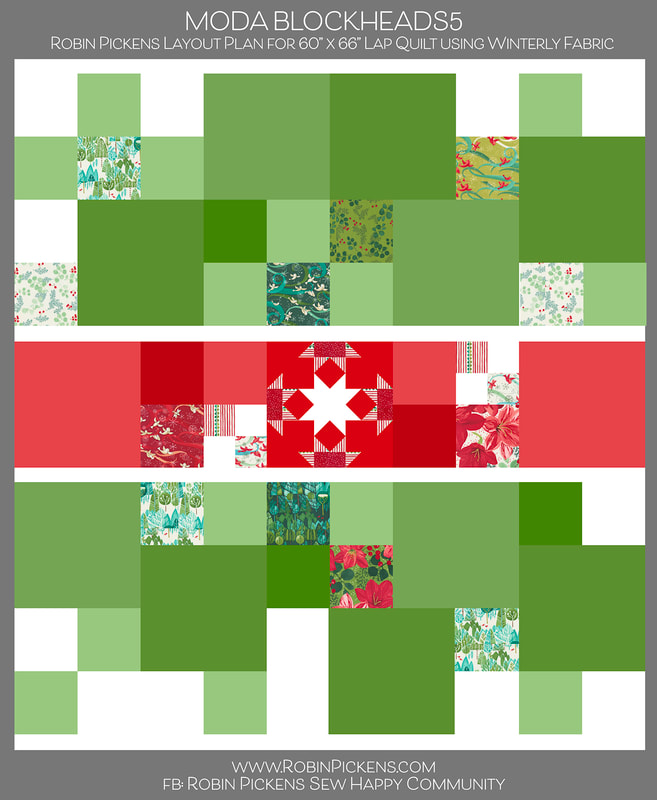
For the past 2 Moda Blockheads quilts, I've made very structured medallion and linear quilts. I wanted a quilt for this one that felt a little more free-flowing but organized. The star blocks seem like the perfect opportunity for a holiday quilt. You can see my first block I made, my "Community Star" block (group 1, block 8) on my previous blog post. Most of my Christmas quilts have a lot of red color so I wanted this to be more green-focused, using more of the tree/landscape/greenery/bird prints from Winterly. The quilt will use a mix of 6" and 12” green blocks, in a flowing arrangement, with a band of red blocks running as a band through the center. I will also intersperse 6" squares of fabrics from Winterly to show off those fabric design, coordinate with the blocks, and fill in any needed spaces. The Thatched colors that I am using along with the Winterly prints are Thatched Cream 36, Crimson 43, Pine 44, Ocean 144 or Dewdrop143, Seafoam 125, Spring 54 and Chartreuse 75. There is a larger group of greens to go with the larger percentage of the quilt and add interest by mixing the warm (Chartreuse) and cool (Seafoam) greens. 
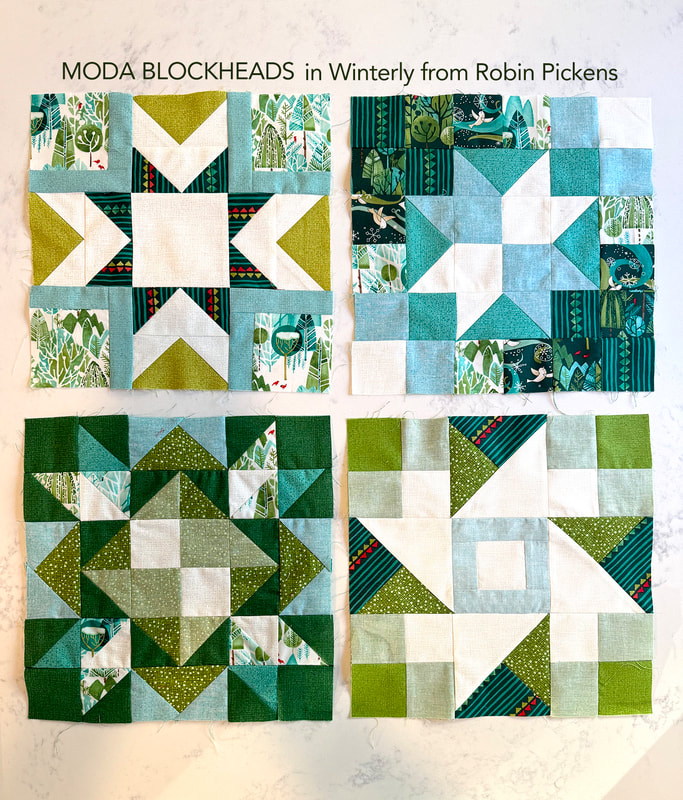
Now that I have decided on my plan, I have some catching up to do! According to this layout, I need about 10 of the 12" blocks and I worked on 4 of those. The blocks above are Morning Star, Super Scrappy Star, Bright Star and Shimmer Star. As I do blocks, I keep track of my progress by filling in my layout image. Since I do color studies, I make up these blocks in Adobe Illustrator and can easily swap in my Winterly fabrics for my layout. This helps me see what I am missing and how to keep the balance of color and light and dark. 
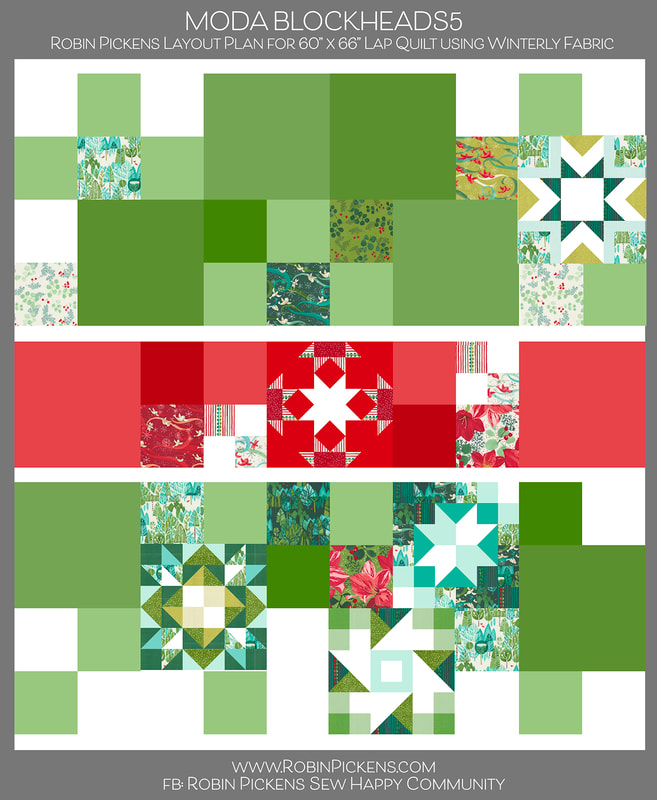
I was a bit late in figuring out my plan and now have LOTS of catching up to do (and I'm sure no one else is in that predicament, right??). I'll share past color studies that I posted in the facebook group along with blocks as I make them here on the blog. This week I made the 4 blocks. The first color study for this week is at the top for Morning Star. The very first block of group 1 was from Betsy Chutchian, called Bright Star. 
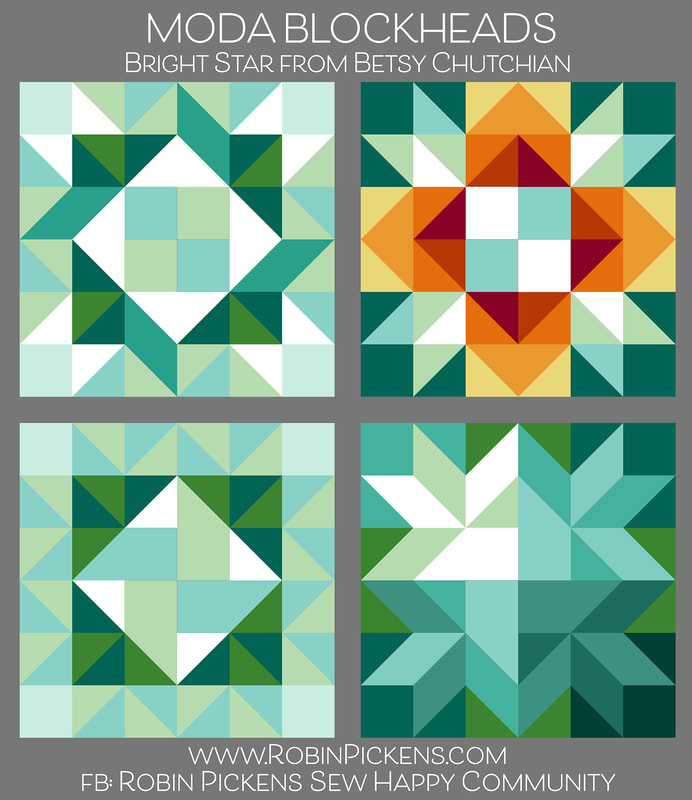
Well, I could have played with this block all day long since there are potentially so many things I could try. I loved the little ribbon like corners and honestly, I think this block is a little busy and I should have limited the number of fabrics and colors I was using. But that is okay since I can balance this out with other, simpler blocks or just the Winterly squares around this. 
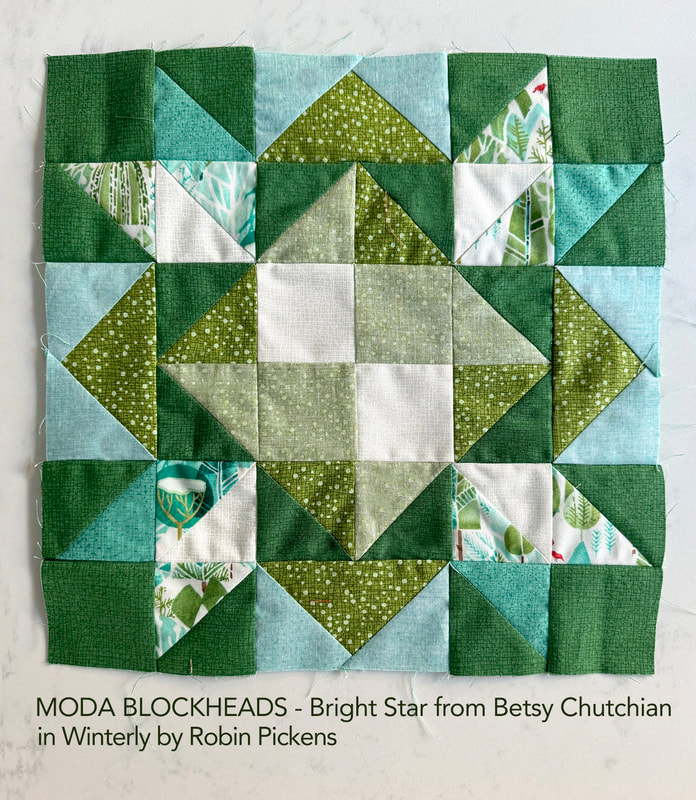
I've also made Super Scrappy Star from Corey Yoder. This was from group 1, block 4. I liked the last of the color studies a lot with the lighter center star and two corners trailing off to darker shades. 
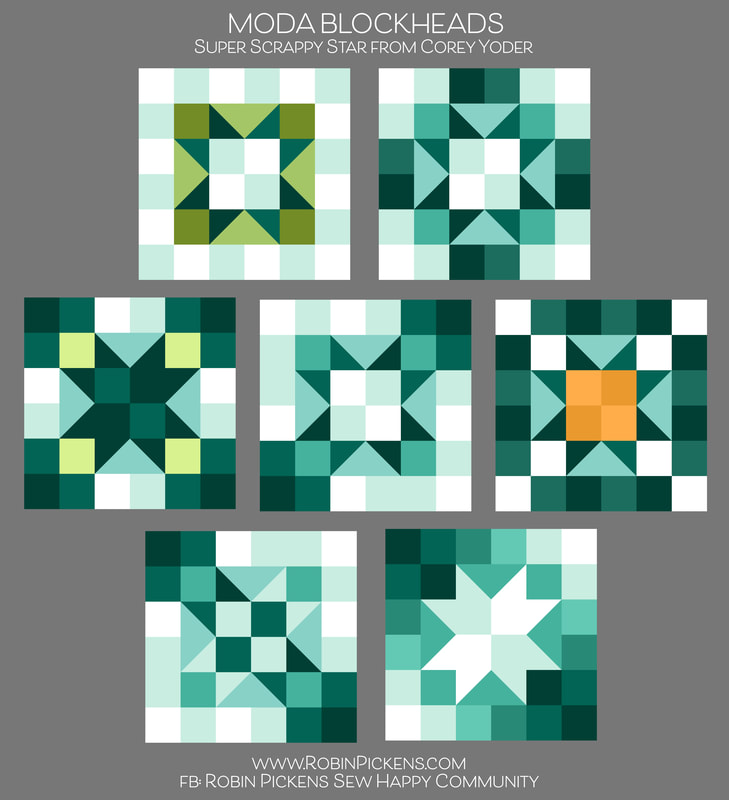
On a block like this, I am using Thatched fabric and also flipping it to the back side to get that lighter shade of the color (the more chambray-looking ones). I just noticed in the photo that my lower left seams are not matching up so well. Hmmmm. To fix or not to fix? I'll probably end up fixing it... 
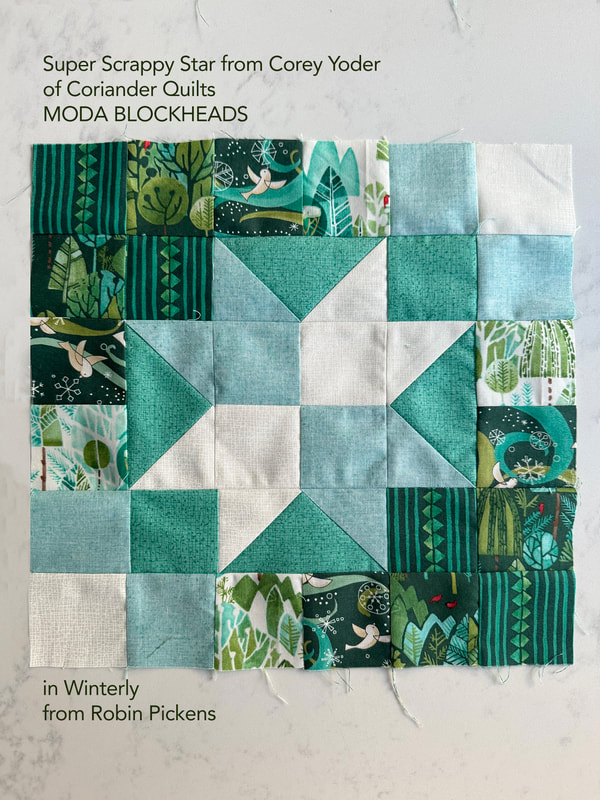
This is last week's color study for Shimmer Star from April Rosenthal. Arrows, checkerboards, ribbons and pinwheels! And yes, stars. 
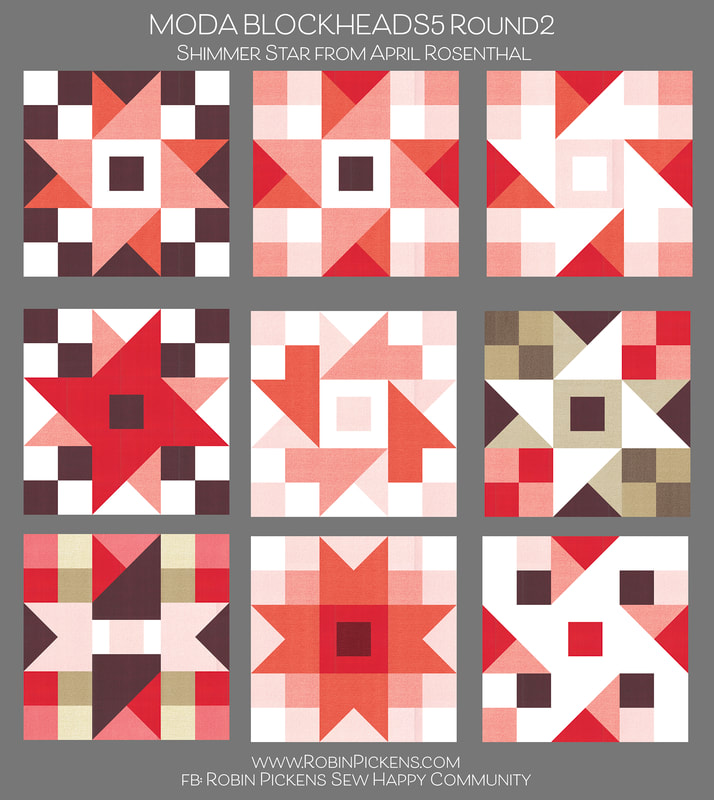
My actual block based on the top row, far right, color study image. I like how Thatched Seafoam (backside) and Spring go with that Pine stripe from Winterly. 
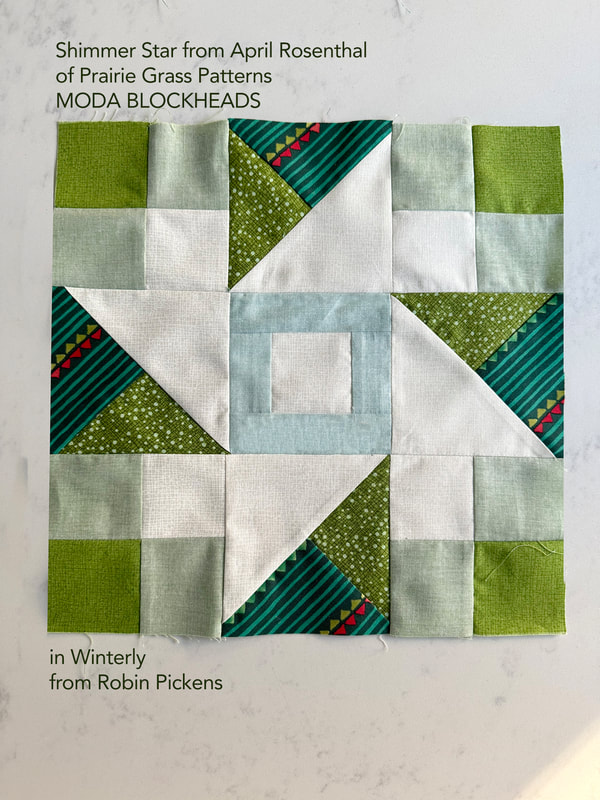
I don't think I'll be getting around the the paper piecing on this block, so I'll post the color study now. This was group 1, block 3 from Brigitte Heitland of Zen Chic, called Stellar Elegance. It sure is elegant! And I love how it can be a split day/night image. For my next round of blocks, I think I will focus on some of the smaller sizes. This shows the scale change between the 12" and 6" block sizes (and this is one of my Community Star blocks). 
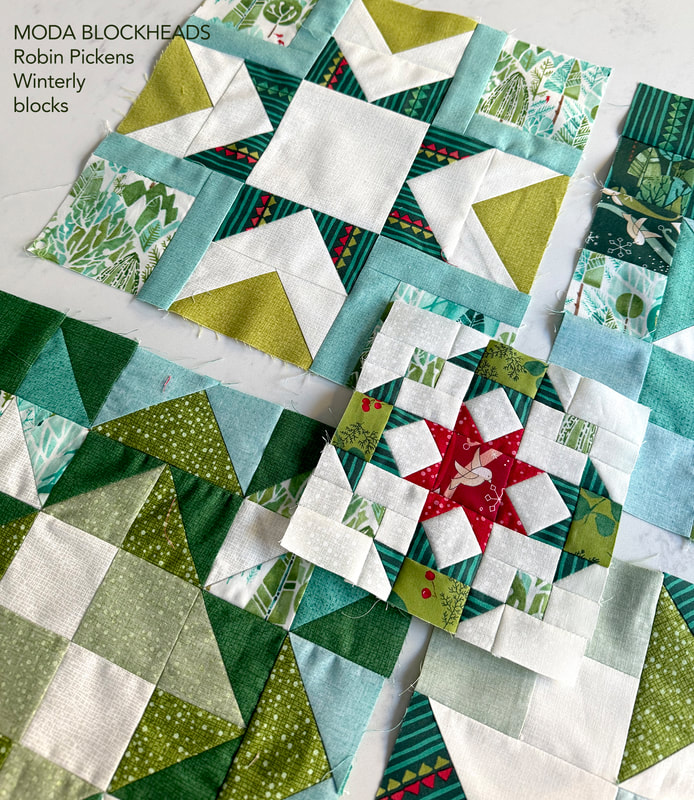
Now that I finally have it all planned out, I get to do the fun part and SEW! Well, the color studies are also a fun part for me as well. I am often surprised by what pops out as I play on the computer. But there is such a satisfaction of seeing those happy fabric blocks evolving when sewing and feeling and working with cloth and thread. 
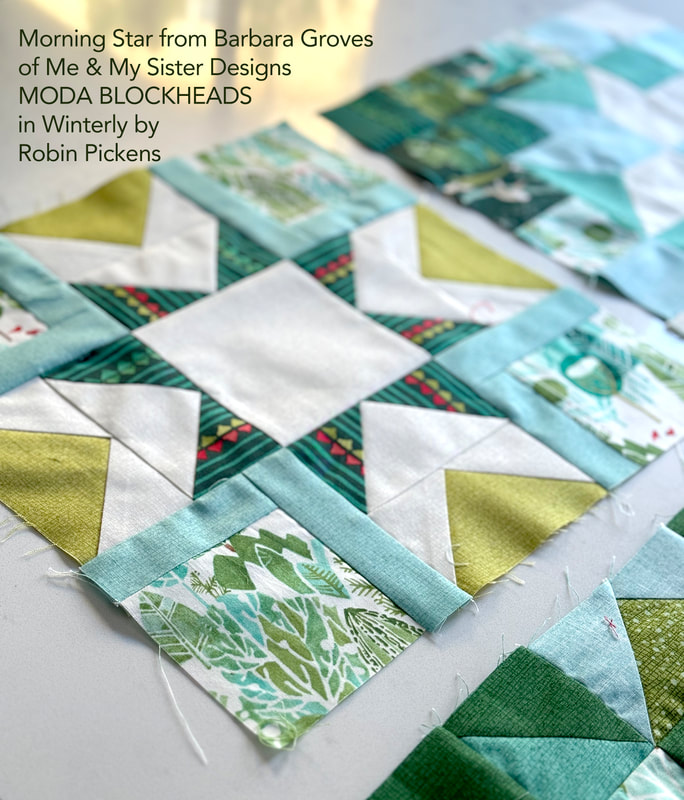
Keep up with my progress and share your own projects through my Facebook group "Robin Pickens Sew Happy Community" where you can also ask questions and be in community with other quilters. Hope to see you there! You can also find me on Instagram and Pinterest @robinpickens as well as on youtube.
Happy sewing in the new year!
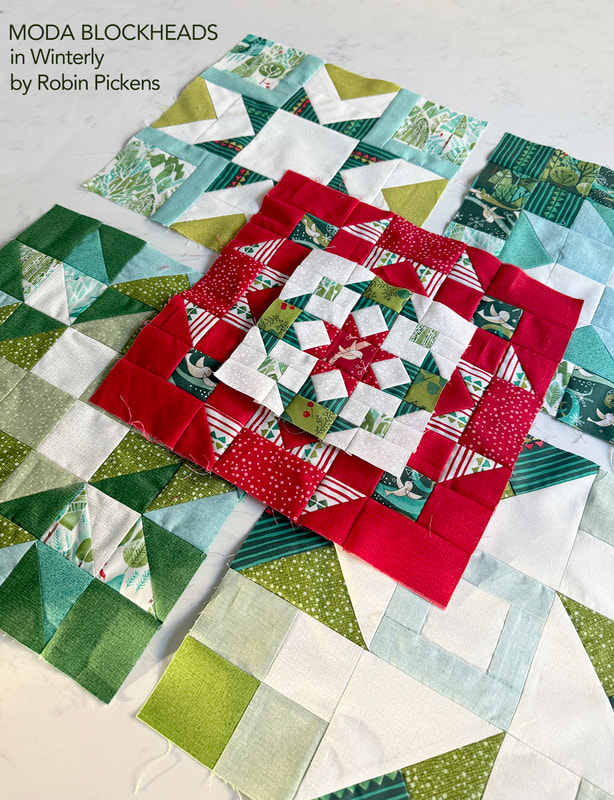
 
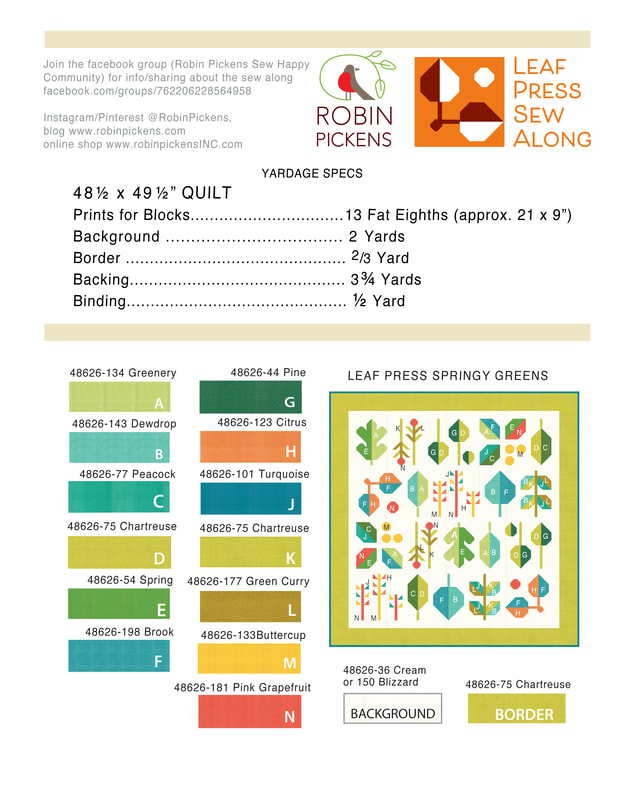
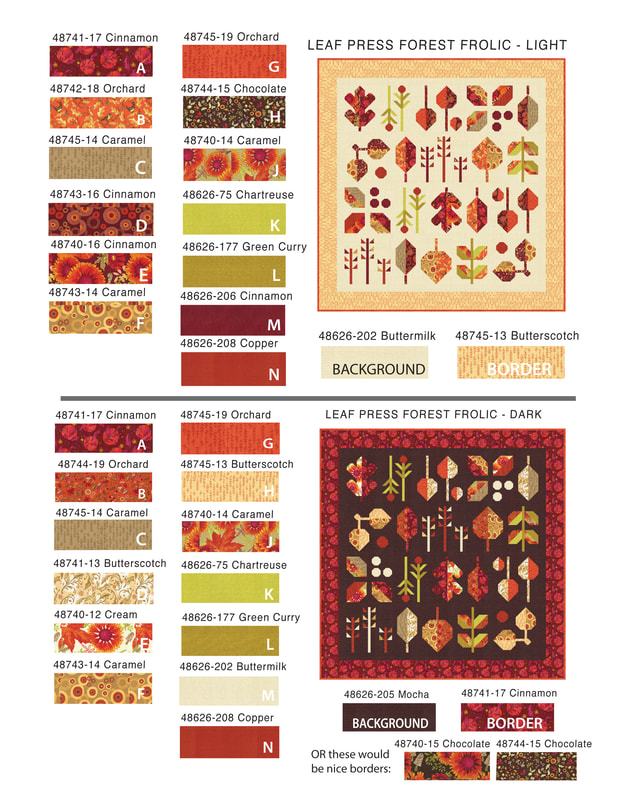
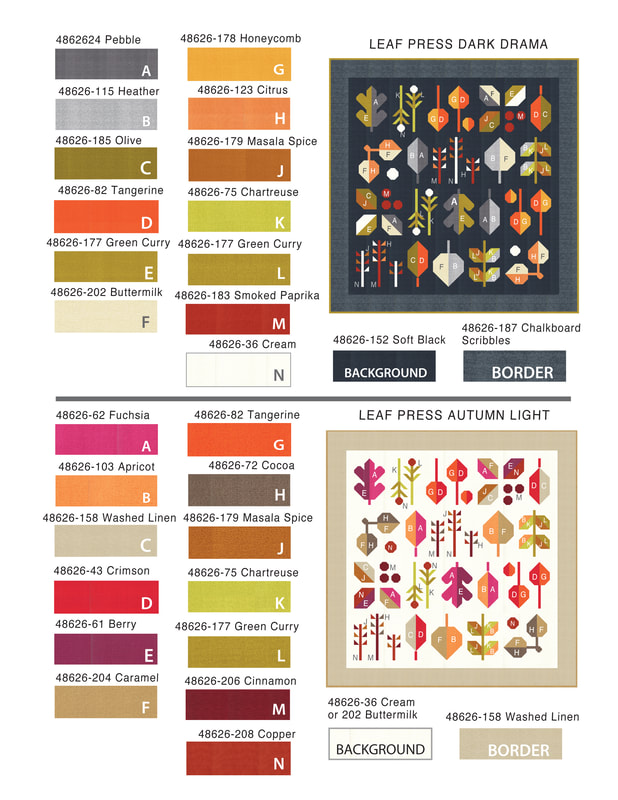
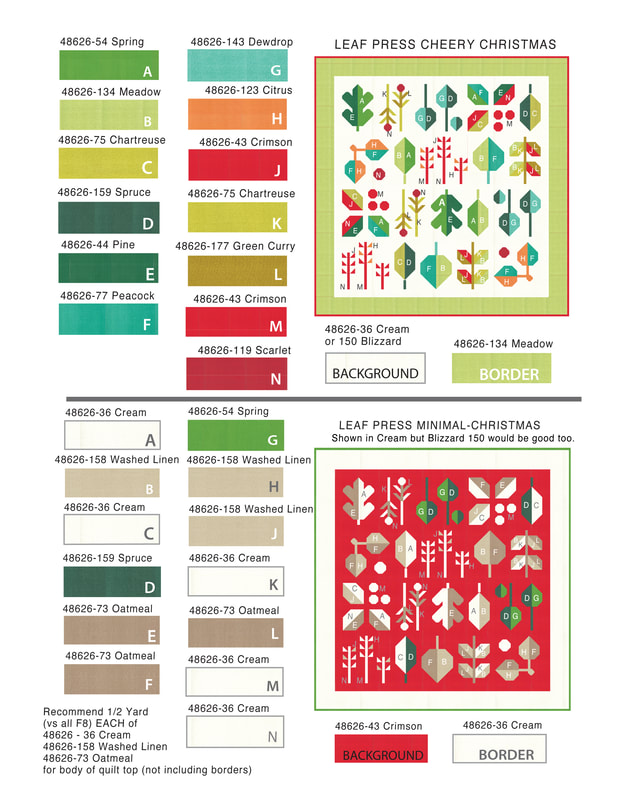
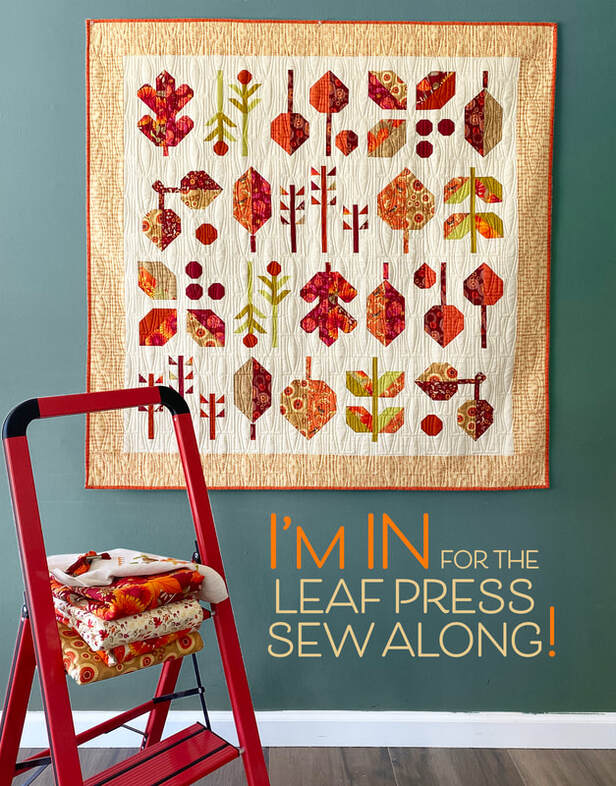
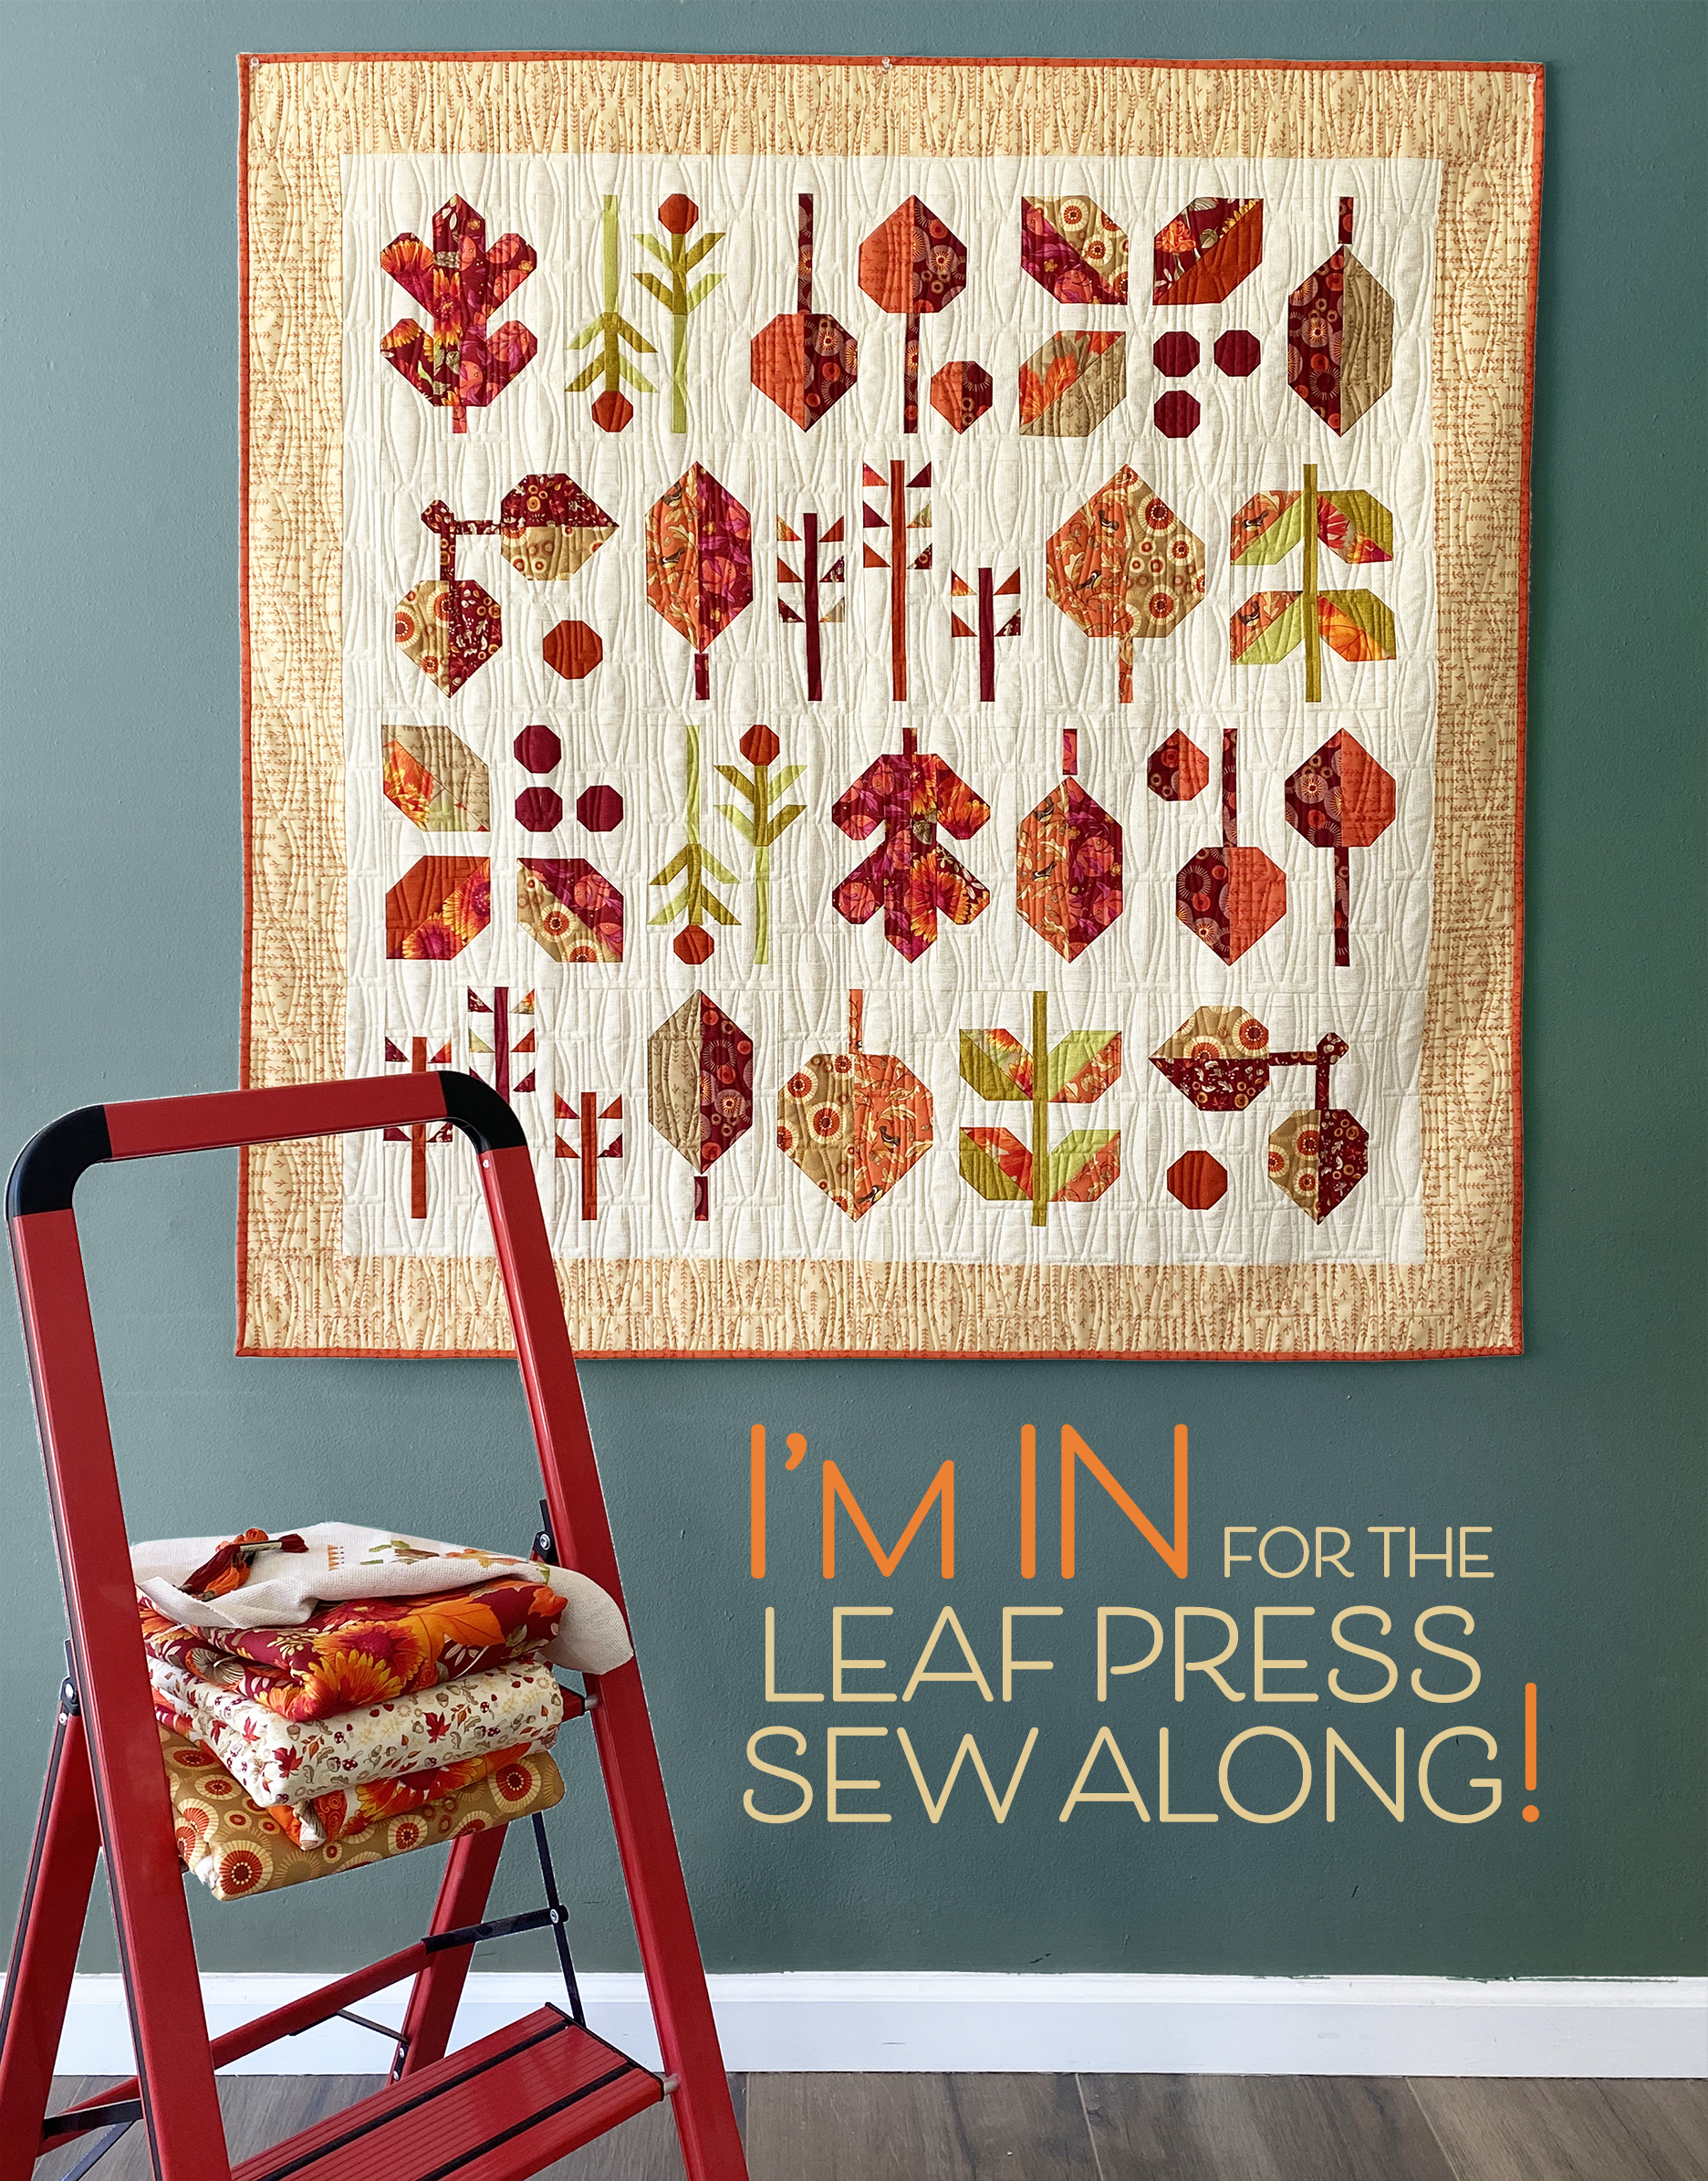
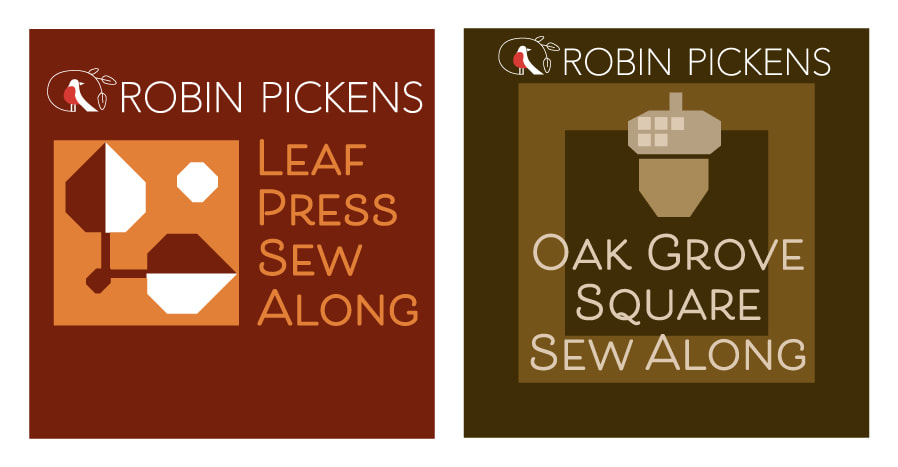
I am eagerly anticipating the start of not one, but TWO sew alongs that I am running this year. This is my first time having my own sew along, so I'm going to go ahead and just apologize for whatever funny glitches and things happen on my learning curve. But it is time to start and get more comfortable with doing more video sharing. I hope you will come along for the journey! 
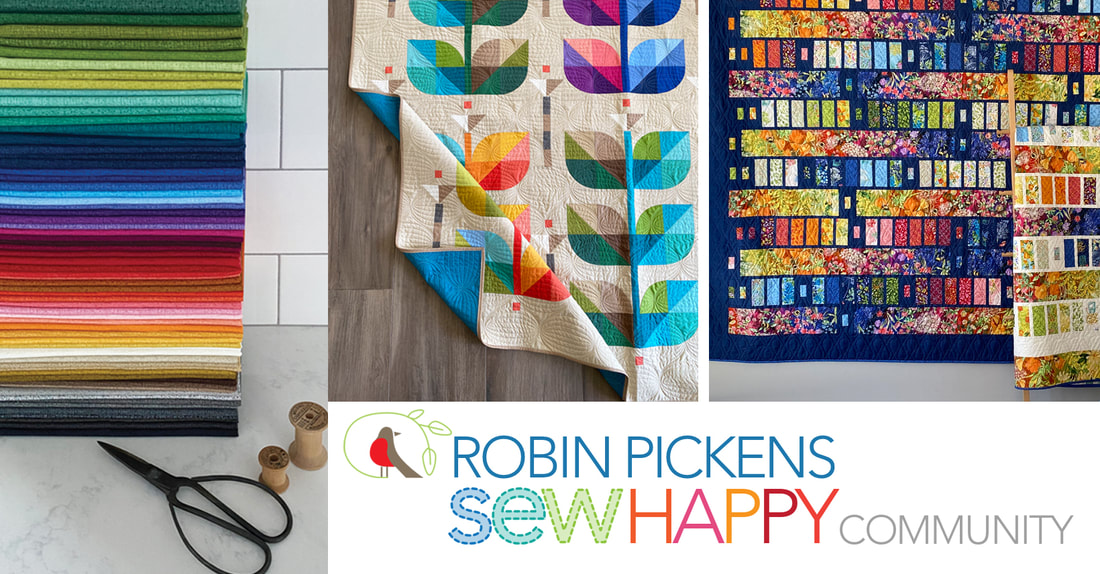
This also means it is time to open a Facebook Group. This group is for those of you who like sewing with my fabrics and patterns. Maybe you have questions. Or hopefully you want to SHARE pictures of the things you are making with my fabrics and/or patterns! This is that space for sharing and supporting one another. I'll also run the sewalongs from the group page and hope to see lots of leaf blocks popping up as the sew along gets going. Want to join the group? Visit Robin Pickens Sew Happy Community and ask to join. https://www.facebook.com/groups/762206228564958 I will do some facebook lives and then post those to youtube as we get going with the sew alongs. I'll also be running a poll to find out when you like to attend a live feed...mornings? During the week or weekends? I'll also be having a few prizes for some random folks who POST their progress while we sew along. No, you don't have to keep to my schedule. But participation and sharing, wherever you are at, is encouraged! 
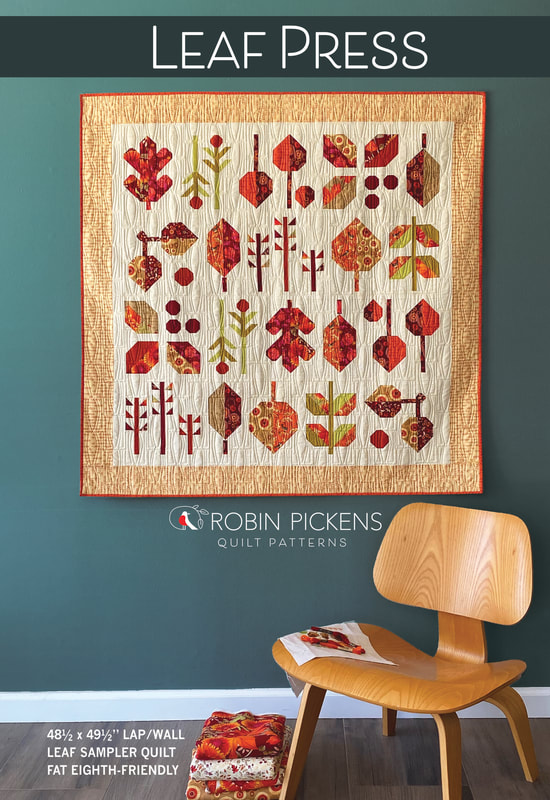
TSo lets talk about LEAF PRESS. It was Lissa Alexander from Moda Fabrics who suggested a leaf sampler. I THOUGHT I was done designing my group of patterns for the Forest Frolic fall collection until she mentioned the idea and then I just couldn't get it out of my head. This might have ended up being my favorite quilt design from the group (although it is still a close toss up with Oak Grove Square). I like the nice lap size and range of leaf types and there is something that feels a little modern as a sampler to me. The number of blocks and variety of leaf types works out nicely to a weekly sewalong where we do couple units a week. We'll be starting at the end of August and finishing up around the middle of October. You will need to buy a pattern. This pattern is in a larger size 8 1/2 x 11" booklet for diagraming all those leaf shapes! Check with your local shops to see if they are carrying it or check my online shop at RobinPickensINC.com. A document with the tentative schedule is in the facebook group FILES. 
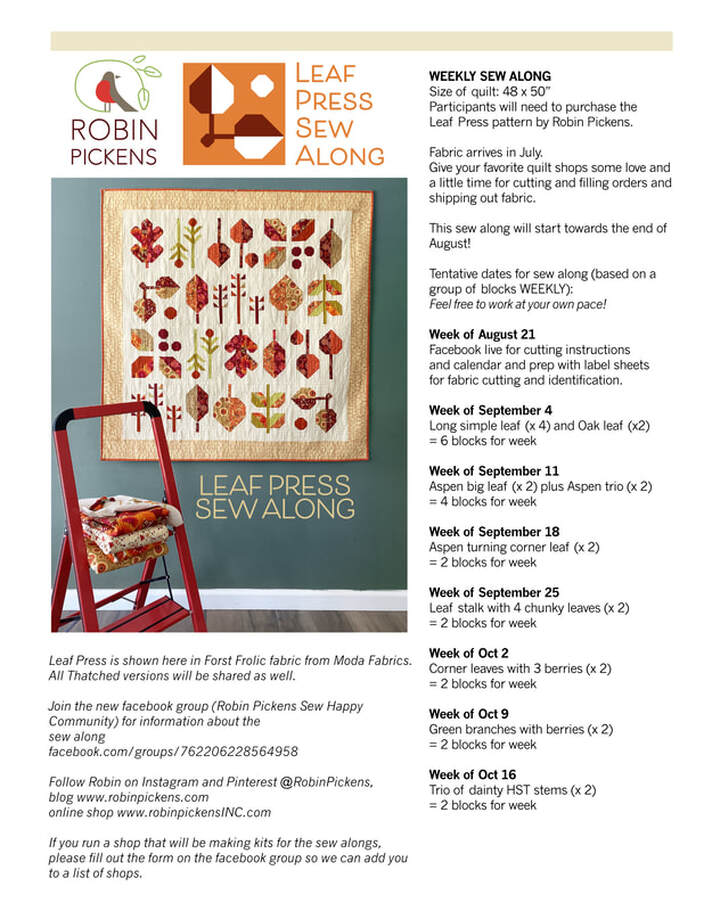
I've only made this particular quilt in the new Thatched Buttermilk background but wanted to mock it up on the computer in the dark brown Mocha color. I like that too! 
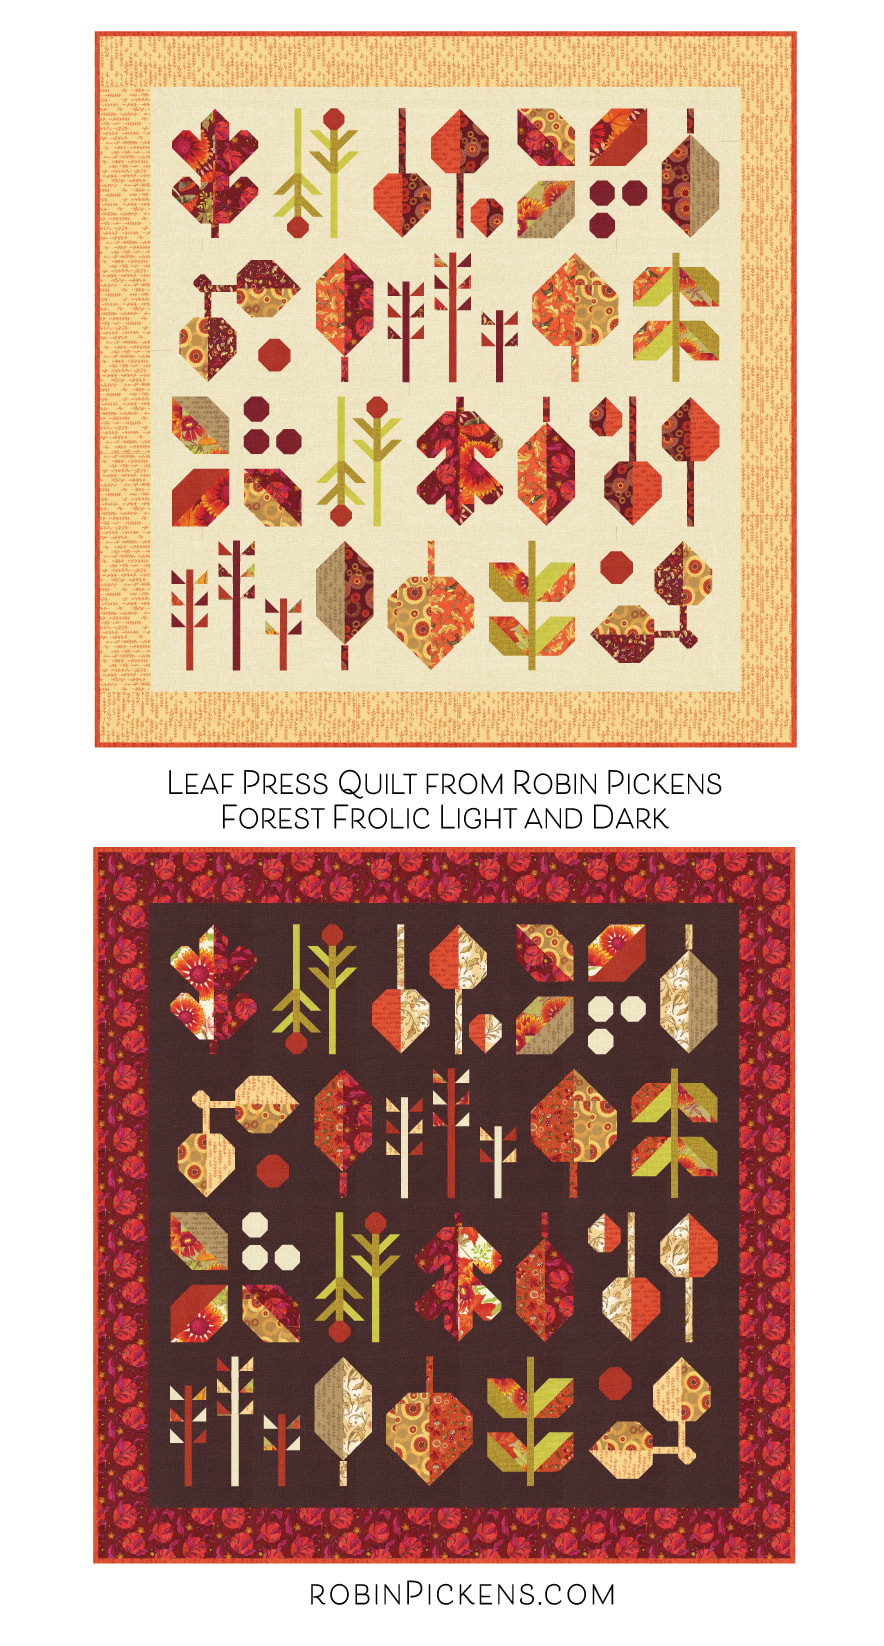
The fabric specifications for Leaf Press include: 
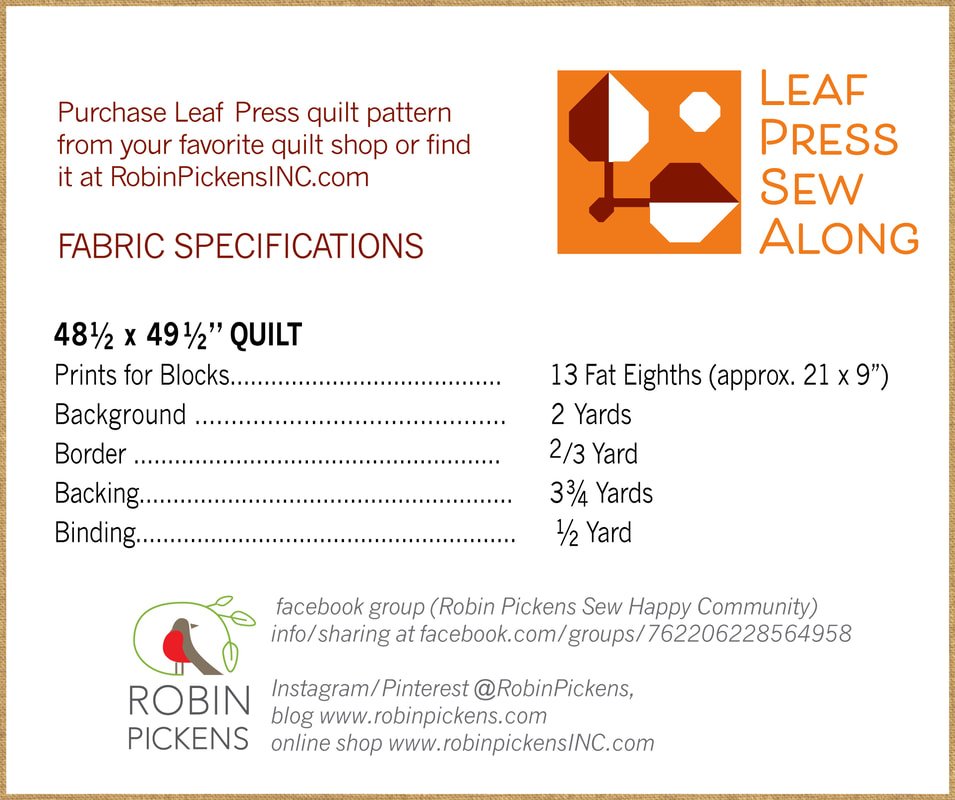
13 Fat Eighths for those leaves. Now I'm sure someone will ask if they can use a Layer Cake of 10" squares. YES you can. One layer cake should be enough. It would also work well as a scrappy quilt. Instead of Fat Eighths you can assemble 7 Fat Quarters for leaves. While playing around with the ideas for this quilt, I wanted to try it in colors as well that were NOT about fall. What about a springy palette? 
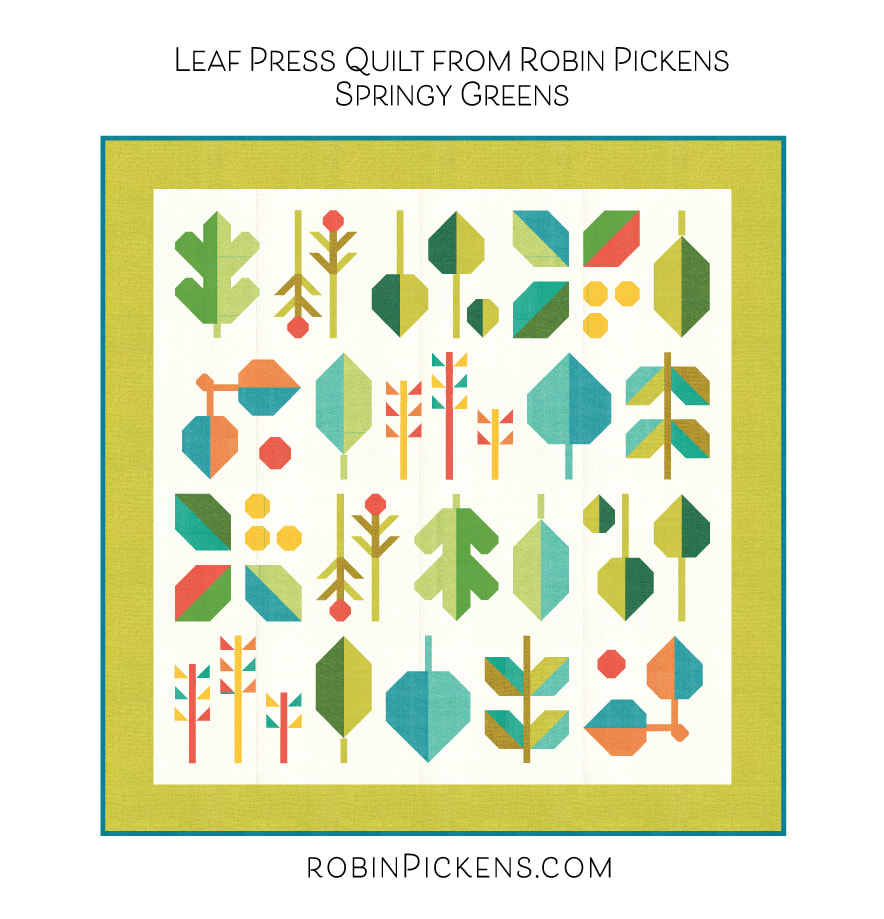
Or fall colors in all Thatched? 
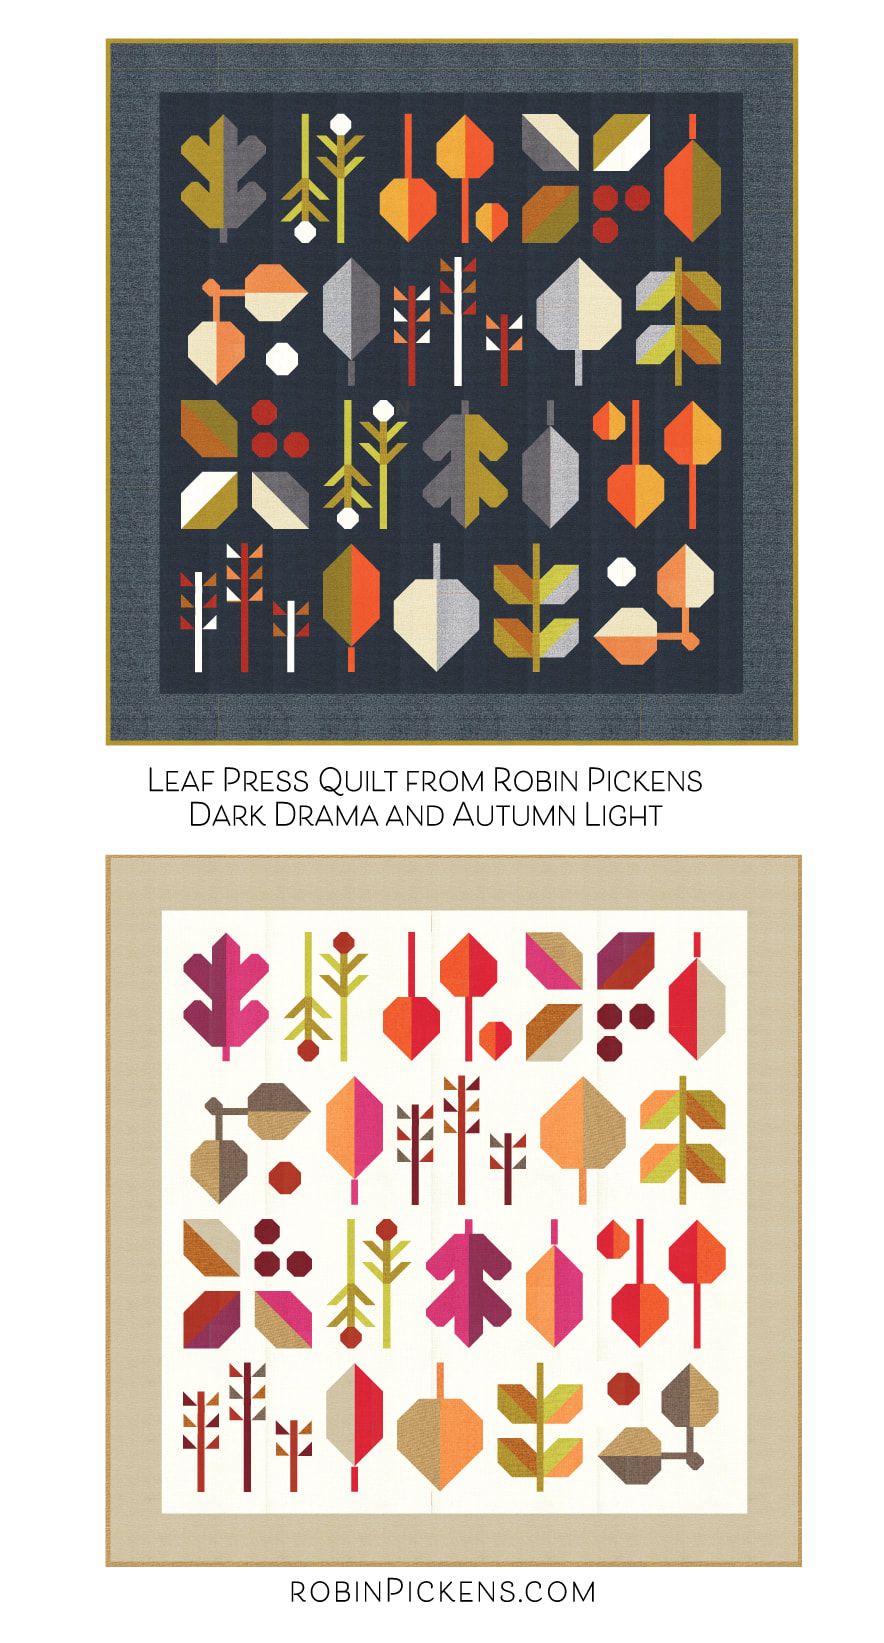
Rachel from Santa Monica Sewing Arts suggested a Christmas palette... 
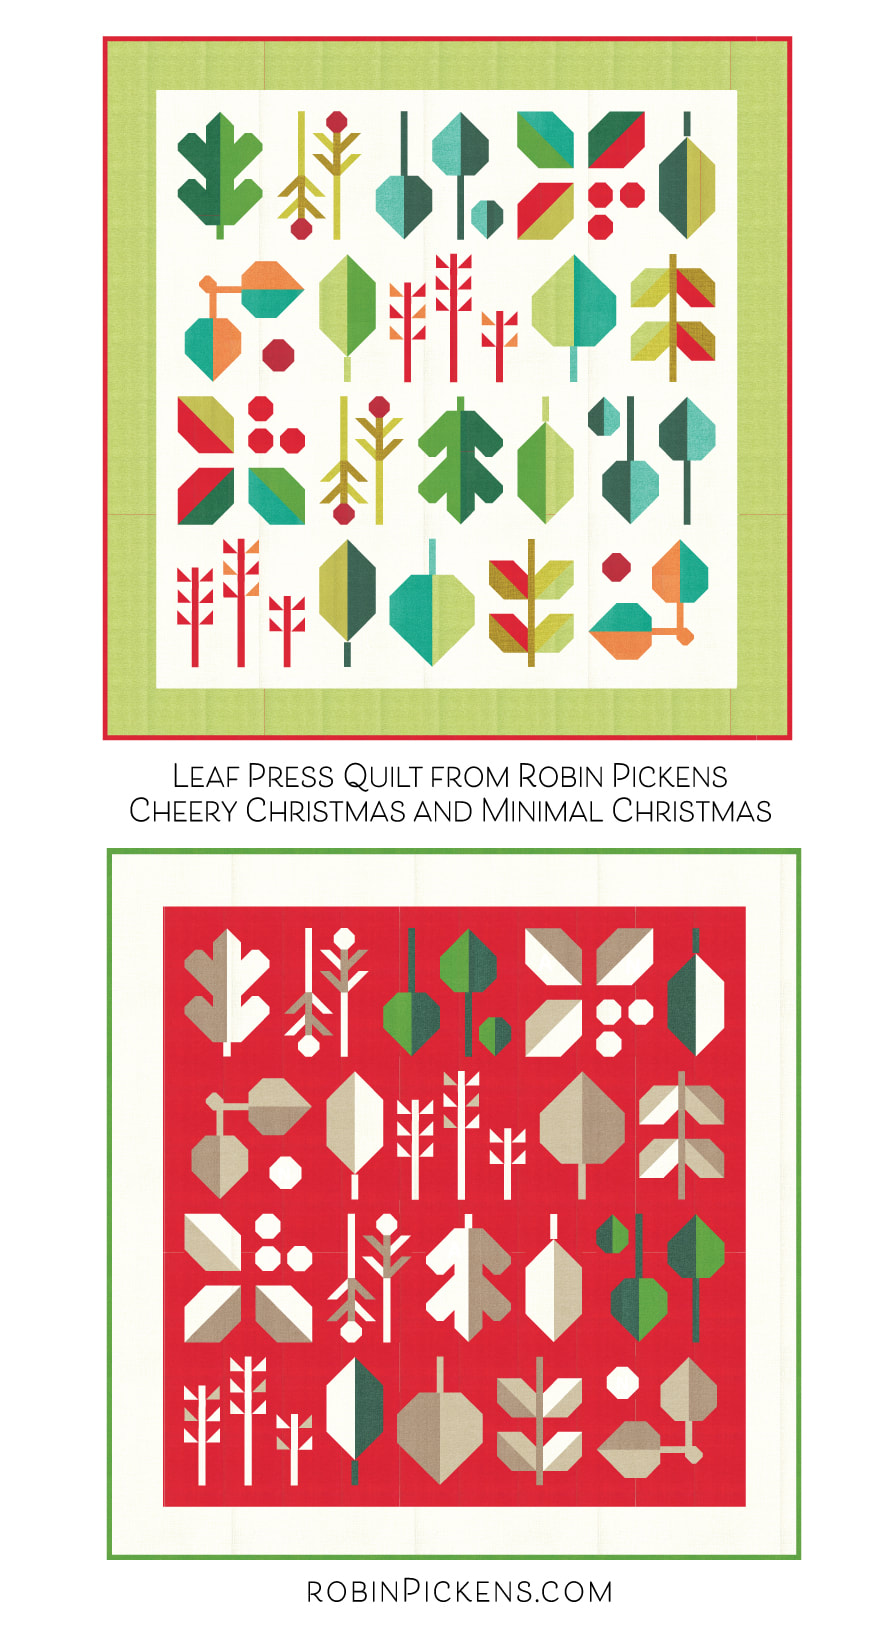
On this last one, I've made it more minimal in terms of the variety of colors. The greens are a little accent and the while, washed linen and oatmeal are all from 1/2 yard of fabric. Makes me think of snowy leaves with a layer of thick frost. What if you want to do one of these...or if you have a quilt shop and want to kit some of these versions? I'm including all the specific fabric colors here and they are also listed in the FILES section of the facebook group. If you do have a shop, please fill out and email us the form so we can compile a data sheet of shops that are carrying the Forest Frolic fabric, Thatched fabrics, Thatched Widebacks, bias binding, etc. to share with folks who are looking for places to order. 
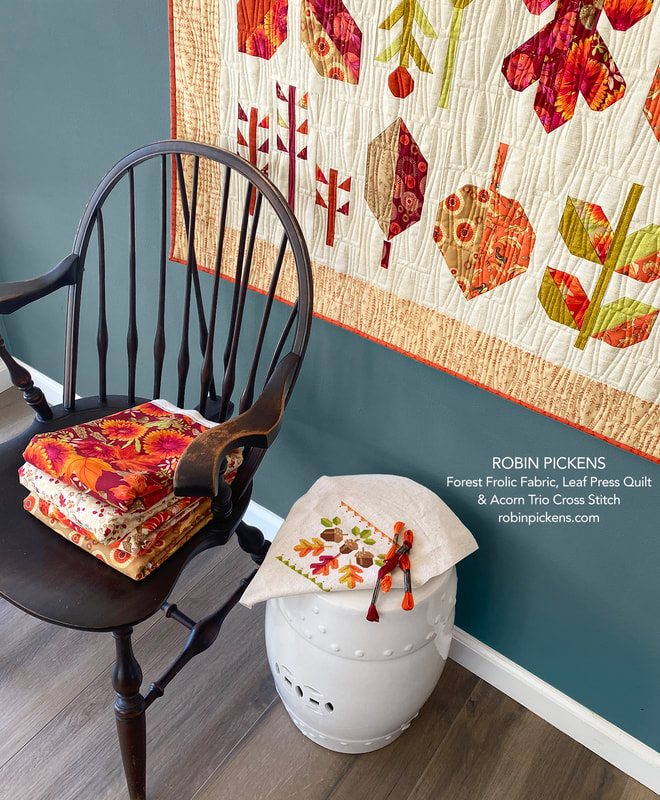
The blue "download file" is a pdf of the specs I am listing below. I'll have more info next week on my monthly sew along, Oak Grove Square. I will do some color studies for that one as well (but not as many). I hope to see you sewing along with me this fall.
One last note...Forest Frolic is shipping NOW from Moda! Yay!!
|
About ROBINDesigner of colorful florals and Thatched basics for Moda Fabrics . Modern to transitional quilt designer, cross stitch designer, sewist, crafter. I am proud to be a designer for Moda Fabrics!
Shop Robin's DesignsI am an affiliate for Fat Quarter Shop and may earn a small commission through my links. Thank you for your support!
Categories
All
Archives
November 2025
© Robin Pickens Inc. All rights reserved. No images may be reproduced without permission.
|
||||||||||||


RSS Feed
