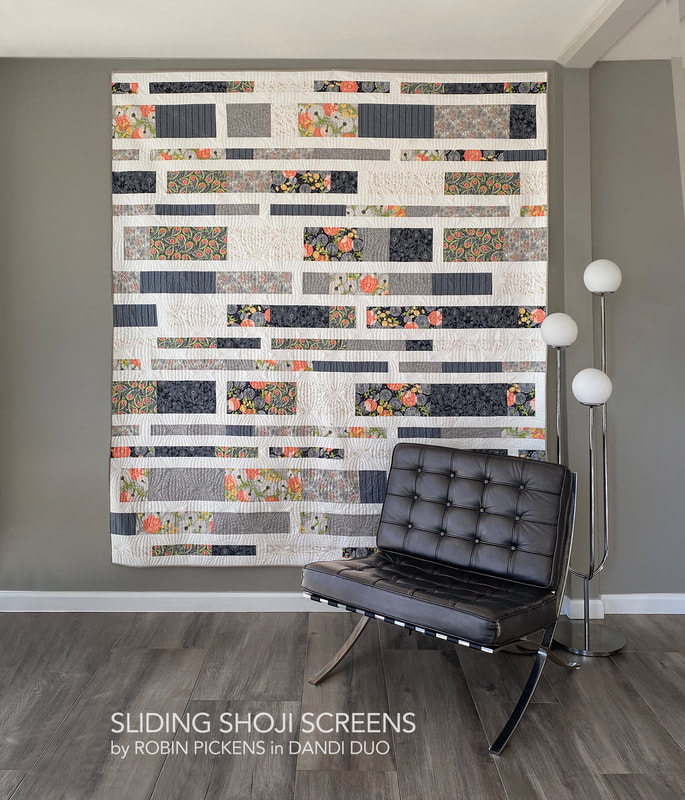
 Another quilt to go with the Dandi Duo group is Sliding Shoji Screens. This quilt is revised from an earlier version. It was one of the first patterns I had created and was released with my first collection for Moda, Poppy Mae. Since then I've learned a lot! 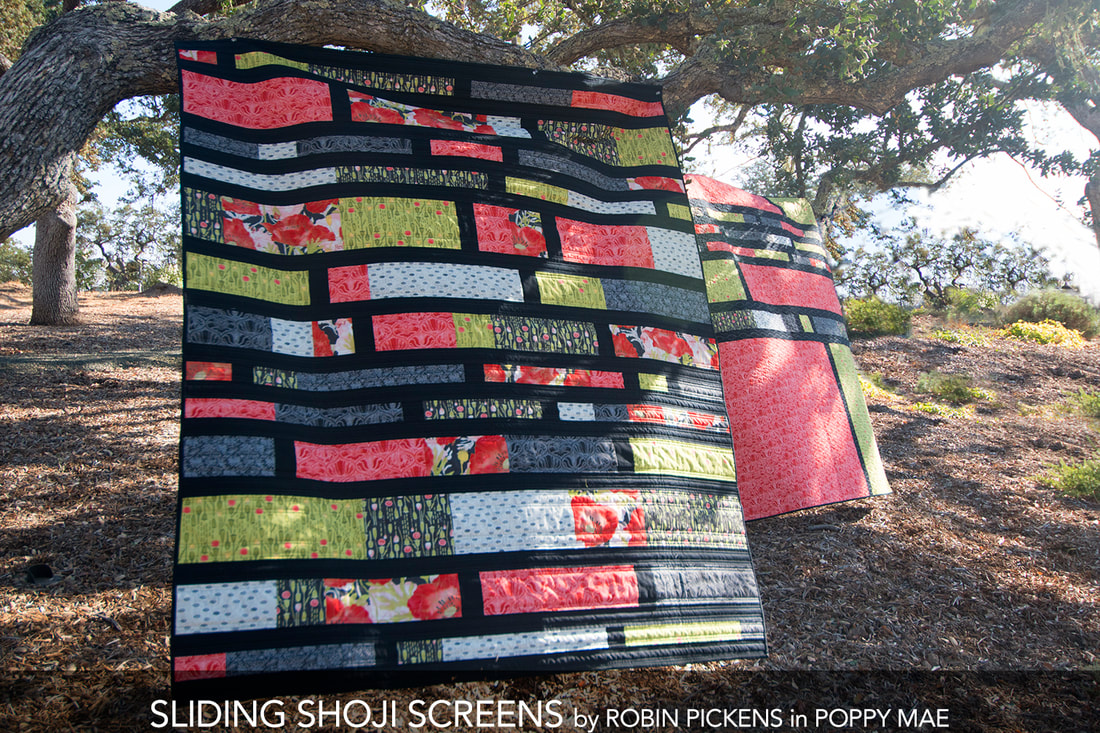 Some revision were in order and I also wanted to give more sizes. I have eliminated the companion piece made with leftover strips and have changed the cutting directions to fit better within 40" width of fabric (vs 42" so allowing for shrinkage of prewashed fabric). There are three sizes. Lap 63 1/2 x 74 1/2", Full/Double 80 1/2 x 90 1/2" and Queen 96 1/2 x 90 1/2". The lap is actually the closest to what the original Sliding Shoji Screens sizing was. 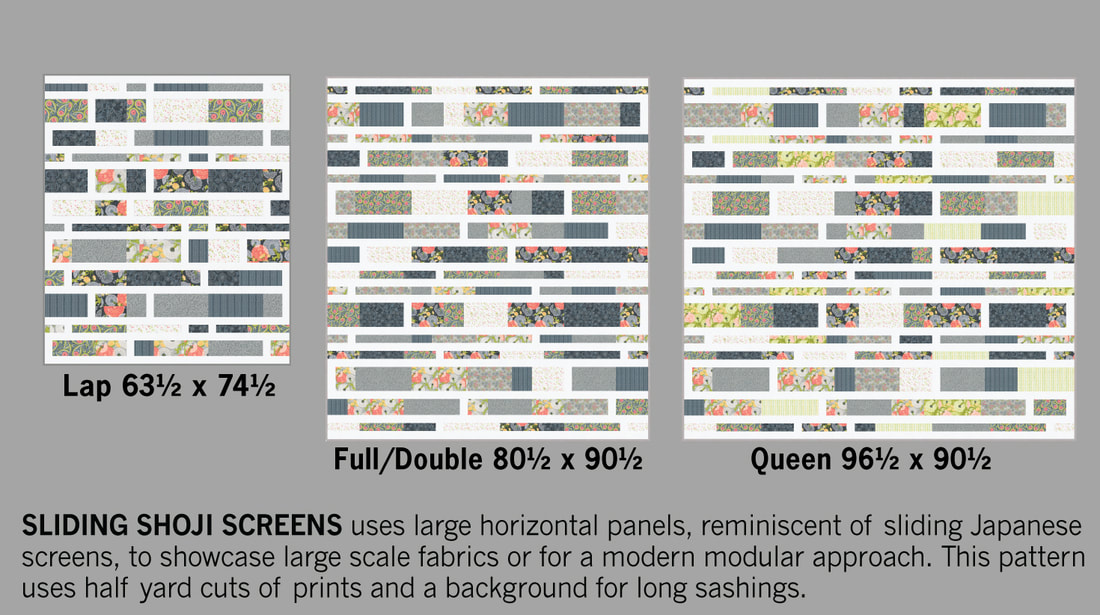 I love the crisp white sashings with the soft grays. For the queen size I've added in the cross stitch stripe and dandelions on green. I enjoyed making this sample in the Full/Double size and for a larger bed, I will place it with the stripes running vertically if I need that wider size. 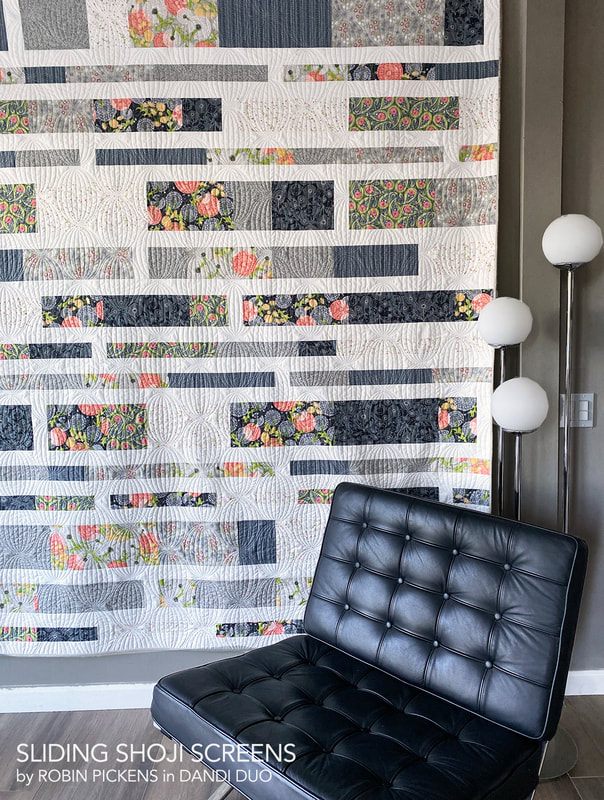 The pantograph I used when quilting this is Rondelle by Jessica Schick. I got it from Urban Elementz online shop. I placed the ovals perpendicular to the horizontal stripes of the quilt. 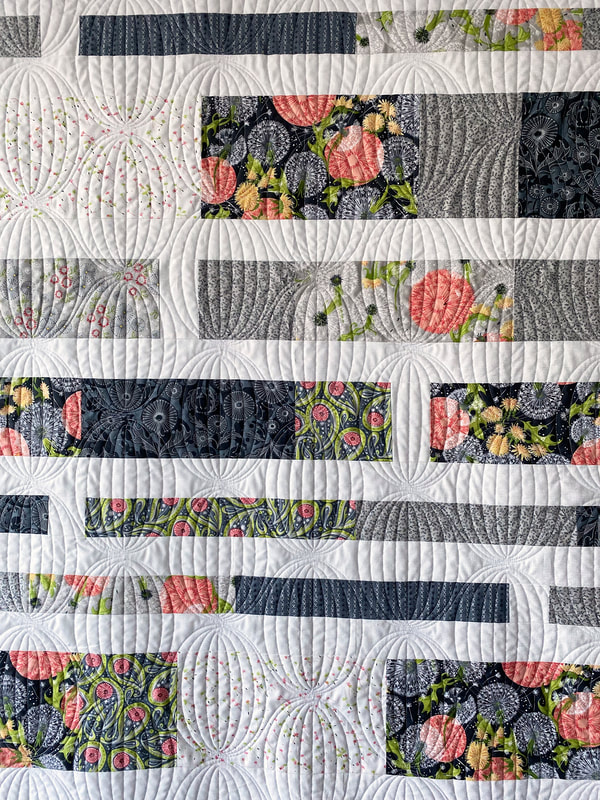 The fabrics used on this Gray/White version is listed below, plus another colorway that is a springy palette. 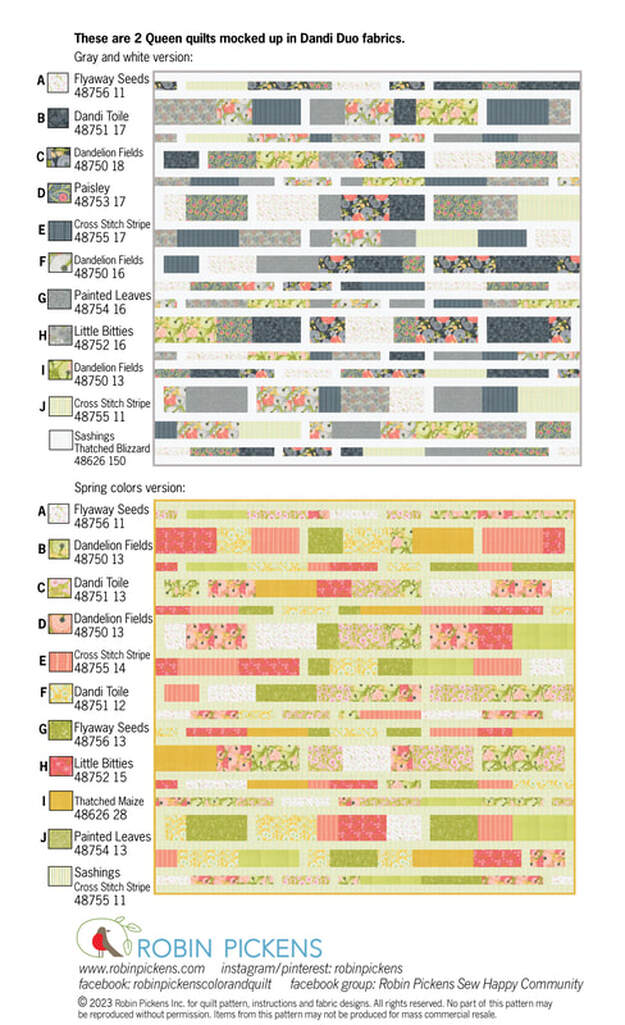 I think the cross stitch stripe would be a very fun sashing to run through the whole quilt. 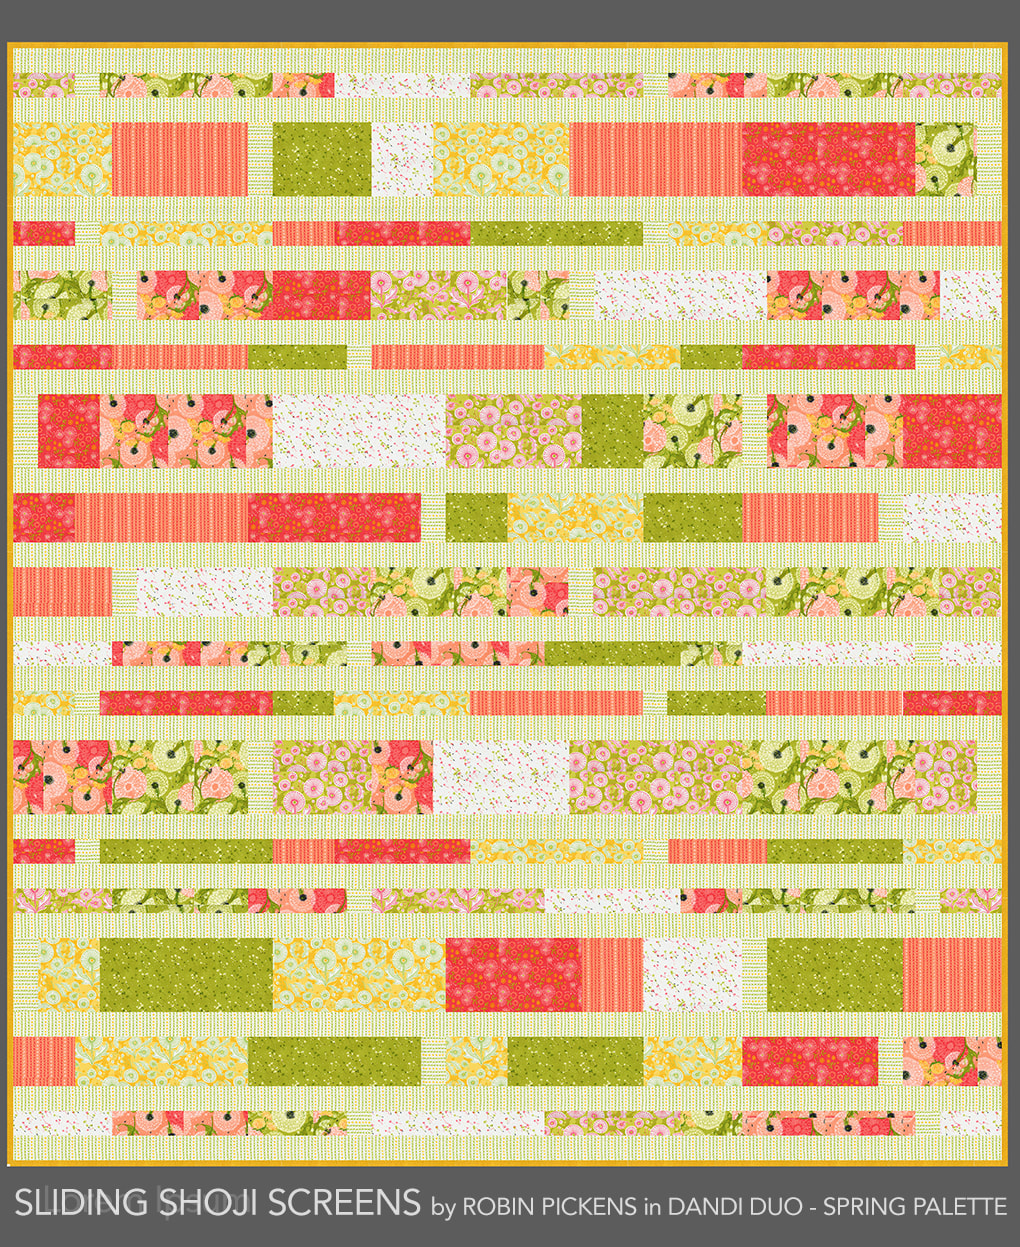 The original inspiration for Sliding Shoji Screens came from the desire to have larger panels to showcase bigger prints/fabric designs. There is a shifting balance between the larger rows and thinner rows and little moments of sashing separating within the bands. 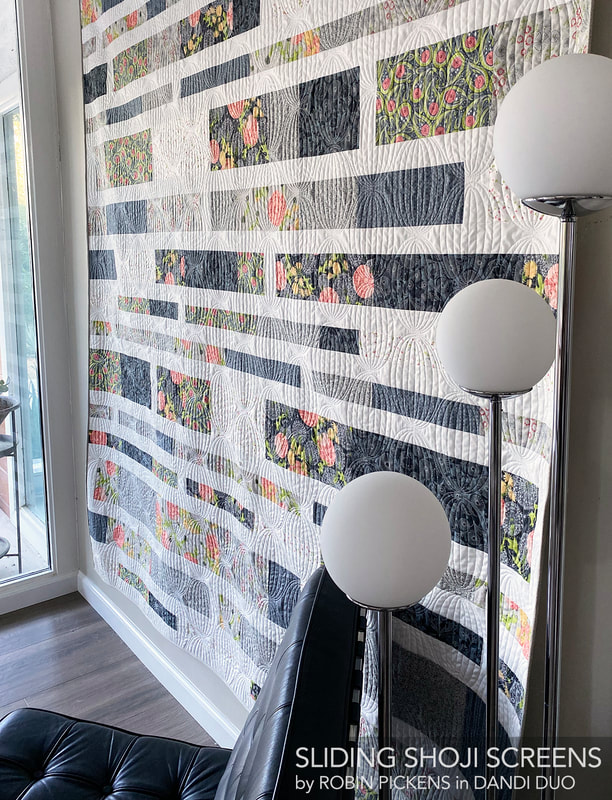  Sliding Shoji Screens uses HALF YARDS of prints. Lap needs (7) fabrics in half yard cuts plus 2 yards of sashing fabric. Full/Double needs (8) fabrics in half yard cuts plus 3 yards of sashing fabric. Queen needs (10) fabrics in half yard cuts plus 3 1/2 yards of sashing fabric. You can find the pattern at RobinPickensINC.com SLIDING SHOJI SCREENS Still two more patterns to share for Dandi Duo...Partial Eclipse and Posies Table Runner and Placemats! 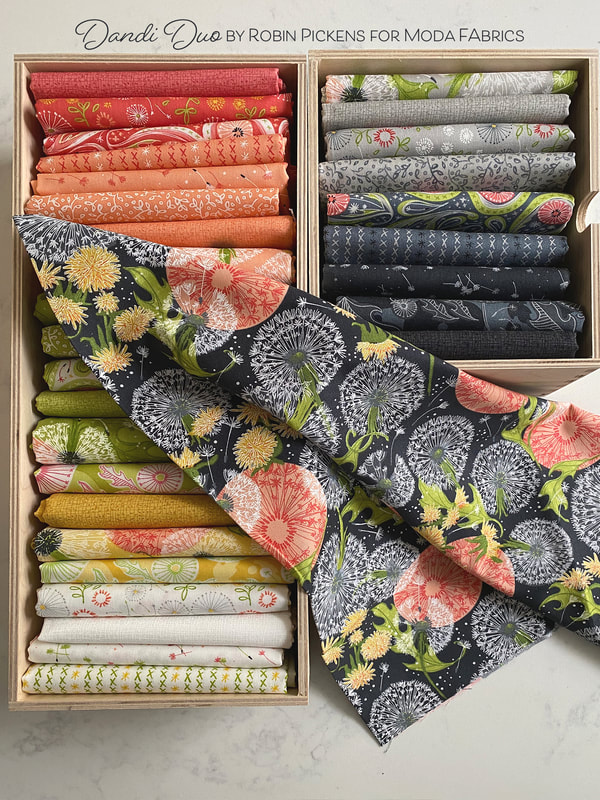 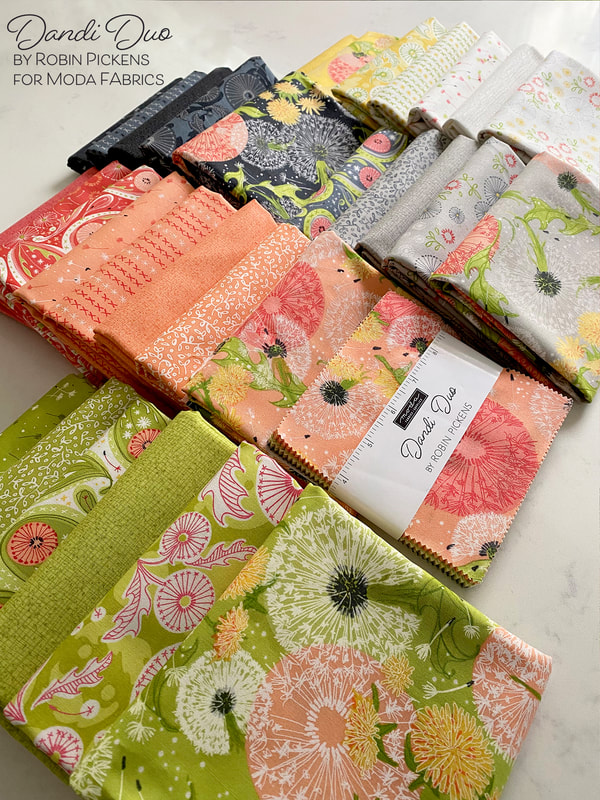
0 Comments
Back when I did the Splendid Christmas line I created a wall quilt called Cardinal's Christmas Wreath. It was the first bird quilt I did and started my love of making bird blocks! I've now sized the bird to various different sizes and still have fun making my flying friends. I also started thinking about this bird being for different seasons and not just Christmas. The first ideas for Fall started like this, with the idea of a Fall wreath: 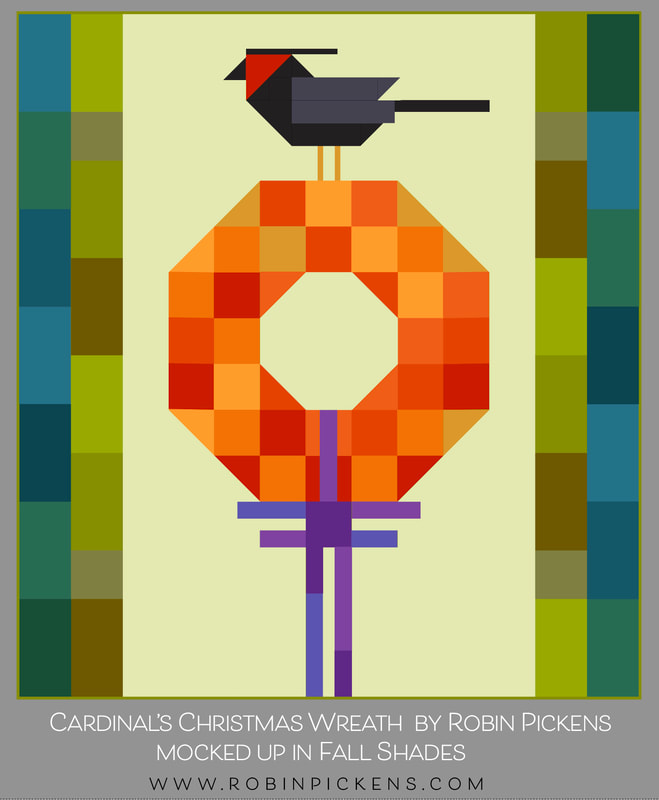 And then I thought about dropping out the bow and also experimented with a black background with a green bird. What if I filled in the wreath so it was more like a pumpkin? 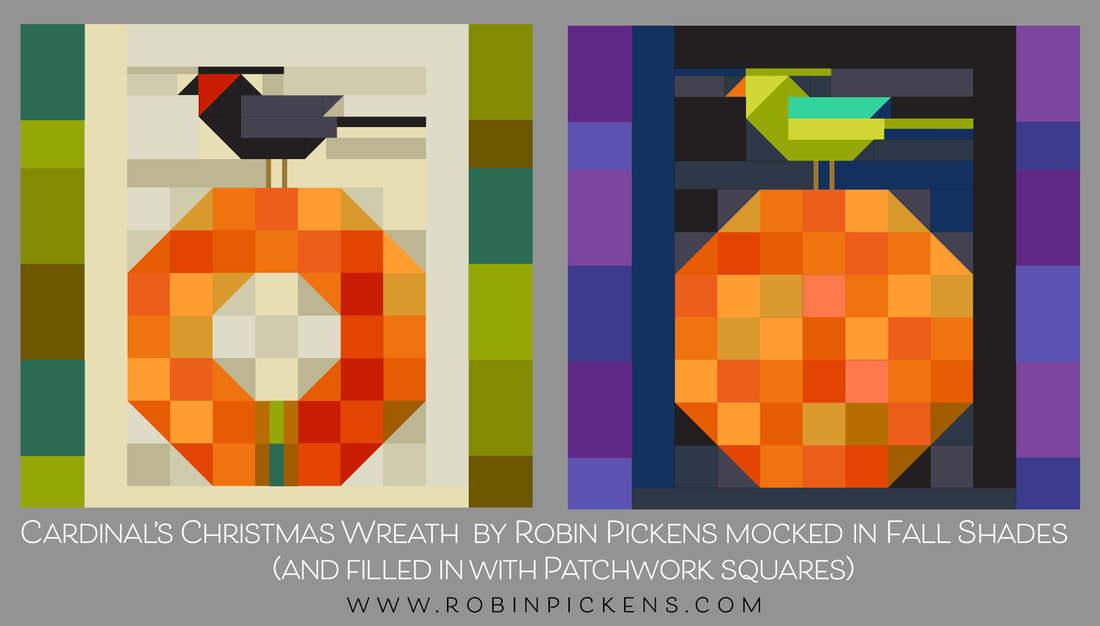 I took this idea (the one on cream) on retreat with me to play with along with some scraps of Thatched fabrics I had. The pattern "Cardinal's Christmas Wreath" has two sizes, a 54 x 60" large and 45 x 47" medium size wall. I have made the larger one for Christmas and decided to do the smaller size for this autumn one. 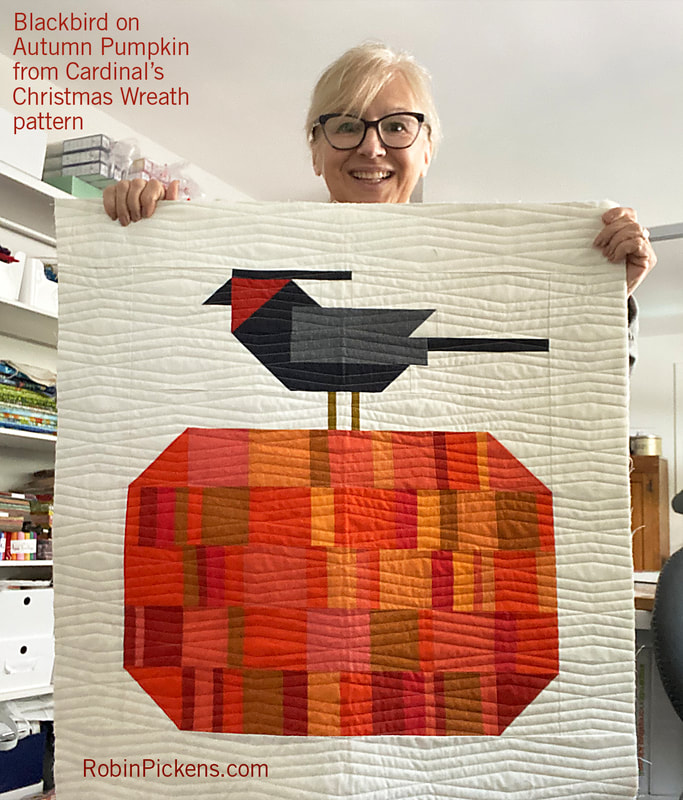 This really was a fun, smaller sized project to do AND I used all scraps. I did make some other changes as I experimented and made rows. First off, I dropped the borders on the sides. My finished quilt is 30" across and I thought that was a good size for a wall space. I also liked how the pumpkin looked more squat and horizontal so I kept the size height of the rows but just used less of them. And my corners for the pumpkin use one half square triangle at the ends, vs on two rows for a more angled corner. What does this look like as a diagram for better understanding? This is the structure and it follows the bird pieces and construction as written in the pattern. 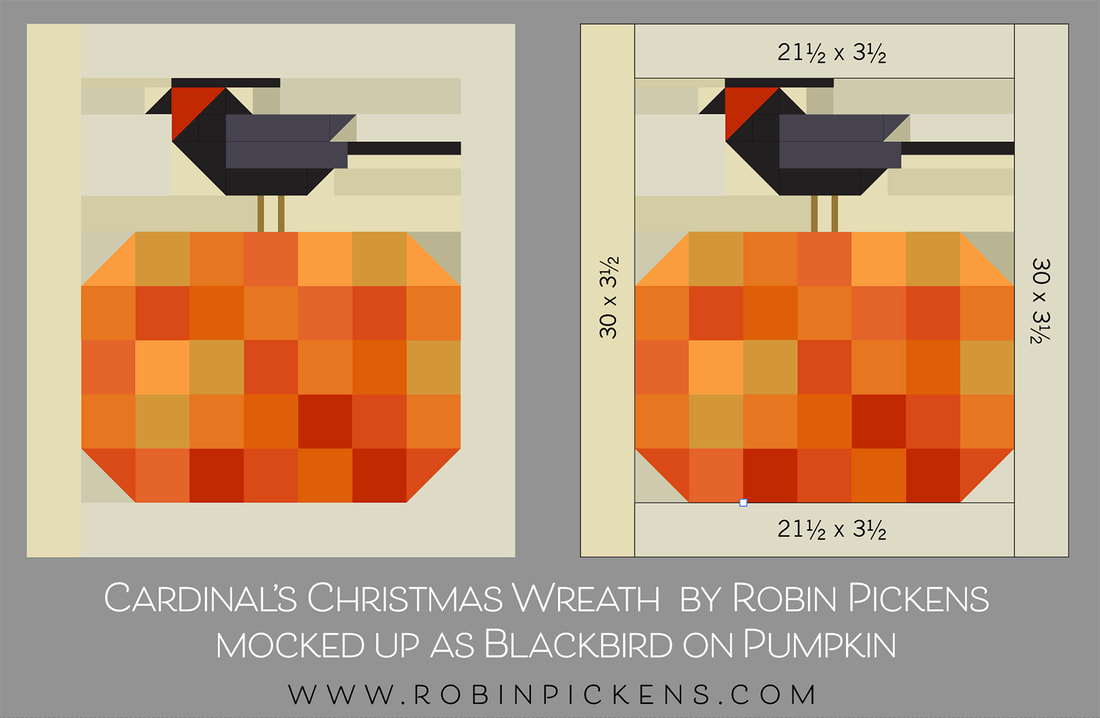 Again, I'm using the smaller size in the pattern (numbers in red in the pattern). The pumpkin would be filled in all the way across with no opening for a wreath. There are 2 LESS rows of blocks for the pumpkin body. only the top and bottom rows have a half square triangle at the very ends for rounding off the shape (vs two rows). I have still constructed my bird with the 21.5" piece on top as is called for in the pattern. But I'm using an extra one on the bottom and using 30" x 3.5" strips on the sides. This means there are a number of background pieces you would NOT need to cut (if you are not doing this as a fall wreath). This would need 3/4 of a yard of background fabric (vs a full yard). Instead of the list on page 3 for Background, you would cut this list: 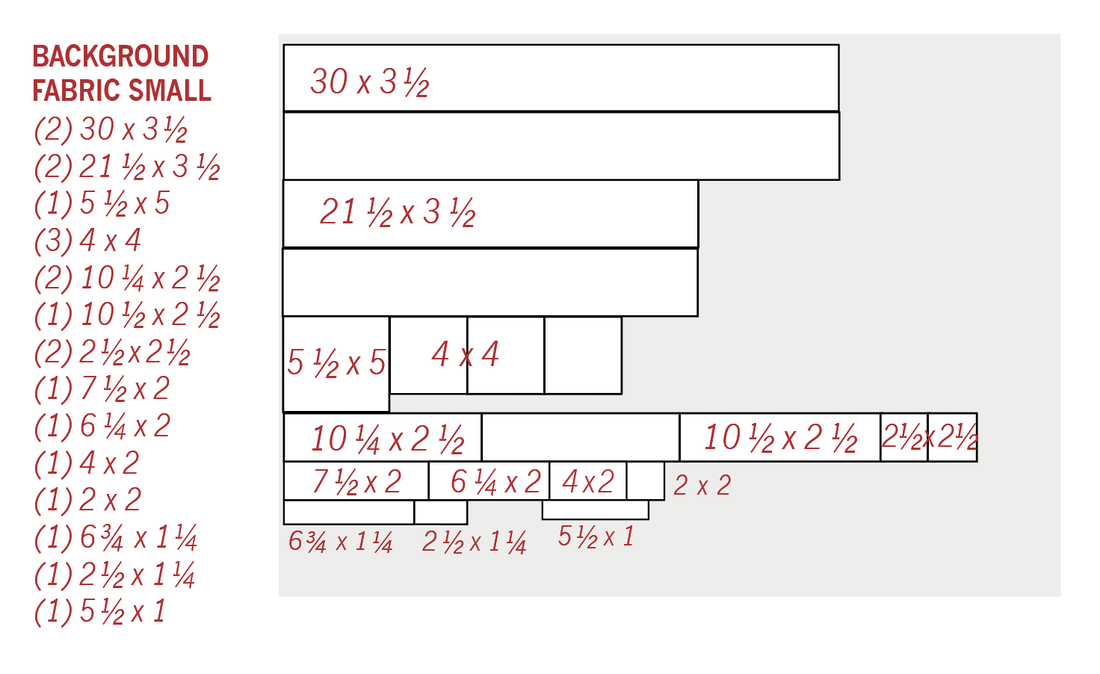 Of the (3) 4 x 4" pieces, (2) of them are for corners and one is for the bird's chest. I have taken out the pieces for the bow and wreath insides, wreath bigger corners and adjusted for the new size of surround with the background. On page 1 the green fabrics shown are for the wreath. If you are making a filled in pumpkin that is more squat but made from all squares, cut: (2) 4" x 4" for corner HST (31) 3.5" x 3.5" squares in a mixture of oranges/fall fabrics. Page 2 shows pieces in red fabric and charcoal fabric for cutting the birds. Flip the colors so you are cutting the BIRD BODY from black and the (1) 4 x 4 from bird's mask color (mine is Smoked Paprika). Do not cut the bow pieces unless you are making as a Fall wreath version. It is up to you if you use the borders. If you do not want the border, skip cutting those from bottom half of page 2. I did not use all squares on my pumpkin. I made my quilt with a more improv approach using my scraps. I cut them all around 1", 1.5", 2", 2.5" and 3.5" in width while keeping them all 3.5" high. I made strips and trimmed to the 21.5" length. The Thatched colors I used were Tangerine, Clementine, Apricot, Citrus, Masala Spice, Rose, Pink Grapefruit, and Smoked Paprika. 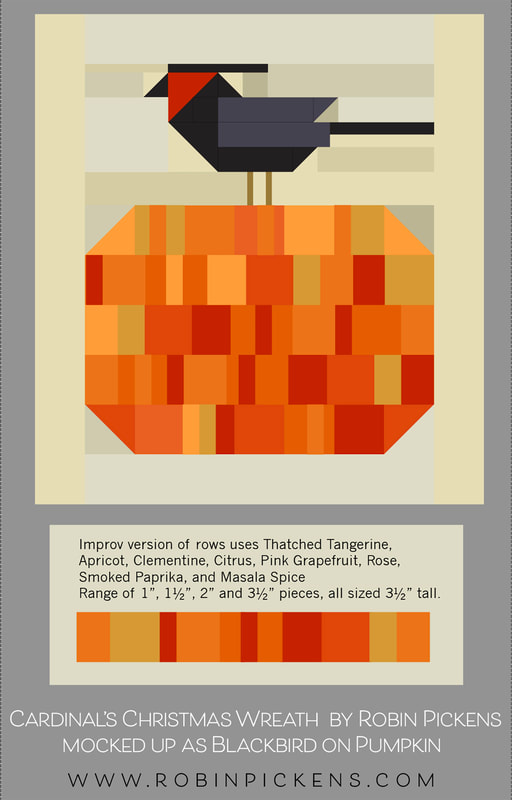 These notes have not been to an editor and I'm trying to have them be as accurate as possible. I did notice the pattern does not say on page 7 that the background piece between the bird's legs is the 2.5" x 1.25" piece (and that is 2.5" as written in the list and not the 2.75" shown on the diagram). I've got Cardinal's Christmas Wreath on sale currently for half price. I hope you like this Fall version! I think it could be cute to add a green wool leaf to the top of the pumpkin! The pantograph I used for longarming is RICH GIRL (extended width) by Longarm League. I used it in the default size I believe. Happy Fall! Check out the pattern at RobinPickensInc.com!
I love that pattern play with Tulip Tango has started with a couple of my favorite patterns, Ring Around the Posies (on the previous post) and MOD FLOWER BOX! I mocked this up awhile ago to figure out a kit for the Shipshewana Quilt Festival to make for a workshop I am teaching there this summer. This first one is the version they picked and I love it! The tulip fabric on cream has such a pretty look and I really love the Love Butterfly print in the collection and used that for the outer border and inner pink border. 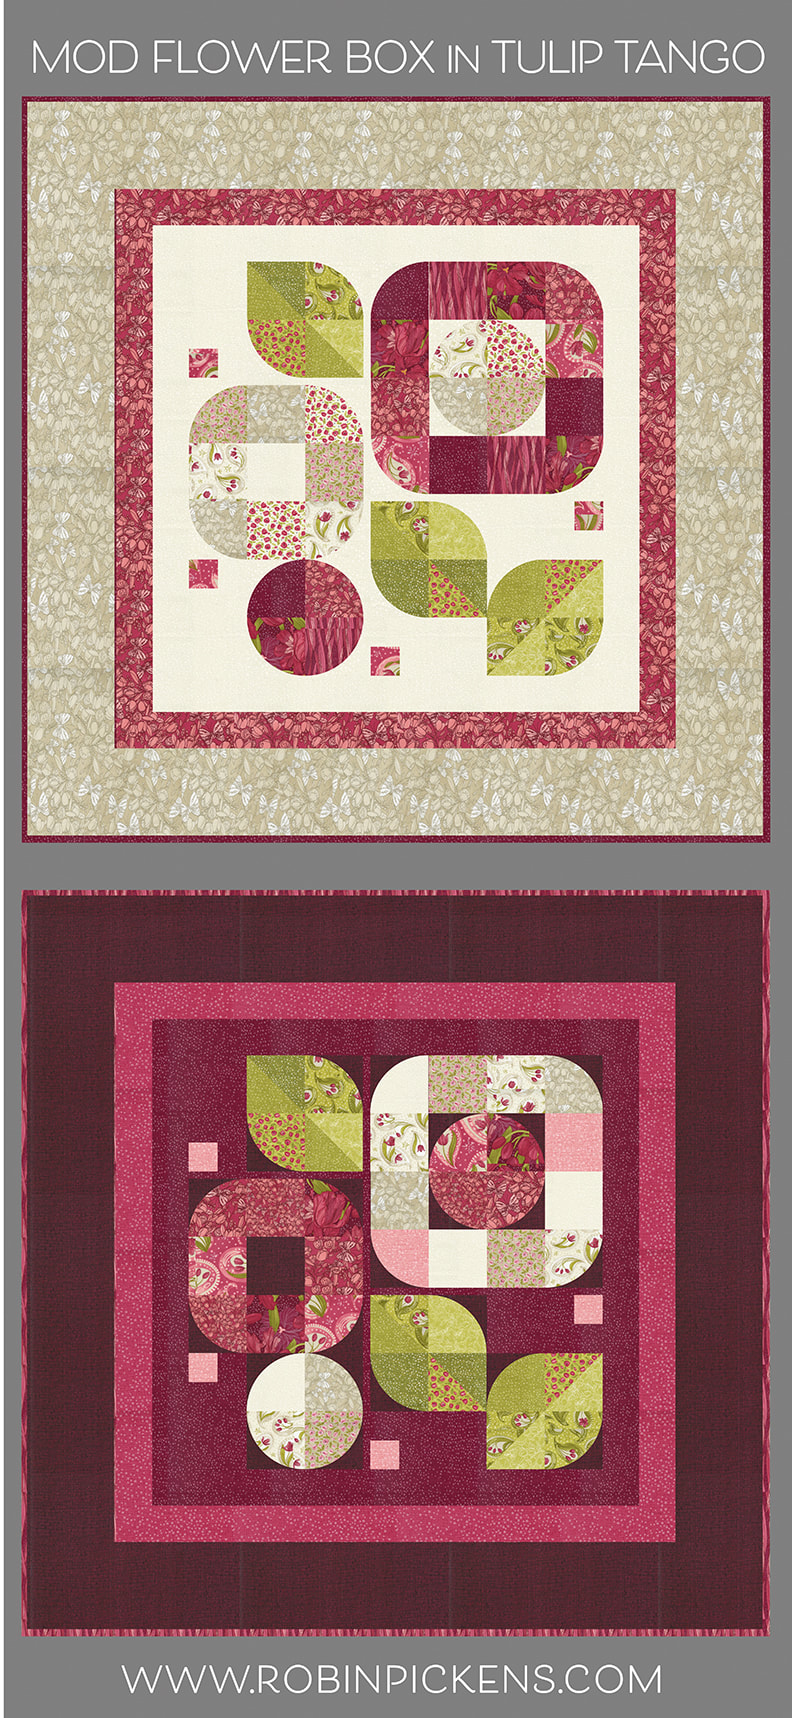 I think this version with Cranberry Dotty Thatched paired with Burgundy regular Thatched (#60) is also striking. The reds are rich and dramatic. This version is showing an option I have on the Mod Flower Box pattern, which is to put a subtle difference in the background fabric on the curves. This gives the curves that "boxed in" look, thus the BOX in the name. But how about those greens and grays? The mood of these deep colors change when paired with the Dotty Thatched in Sprig and Chartreuse. The cream center still keeps the colors crisp and clear while having that springy border or growing greens to compliment the leaves. 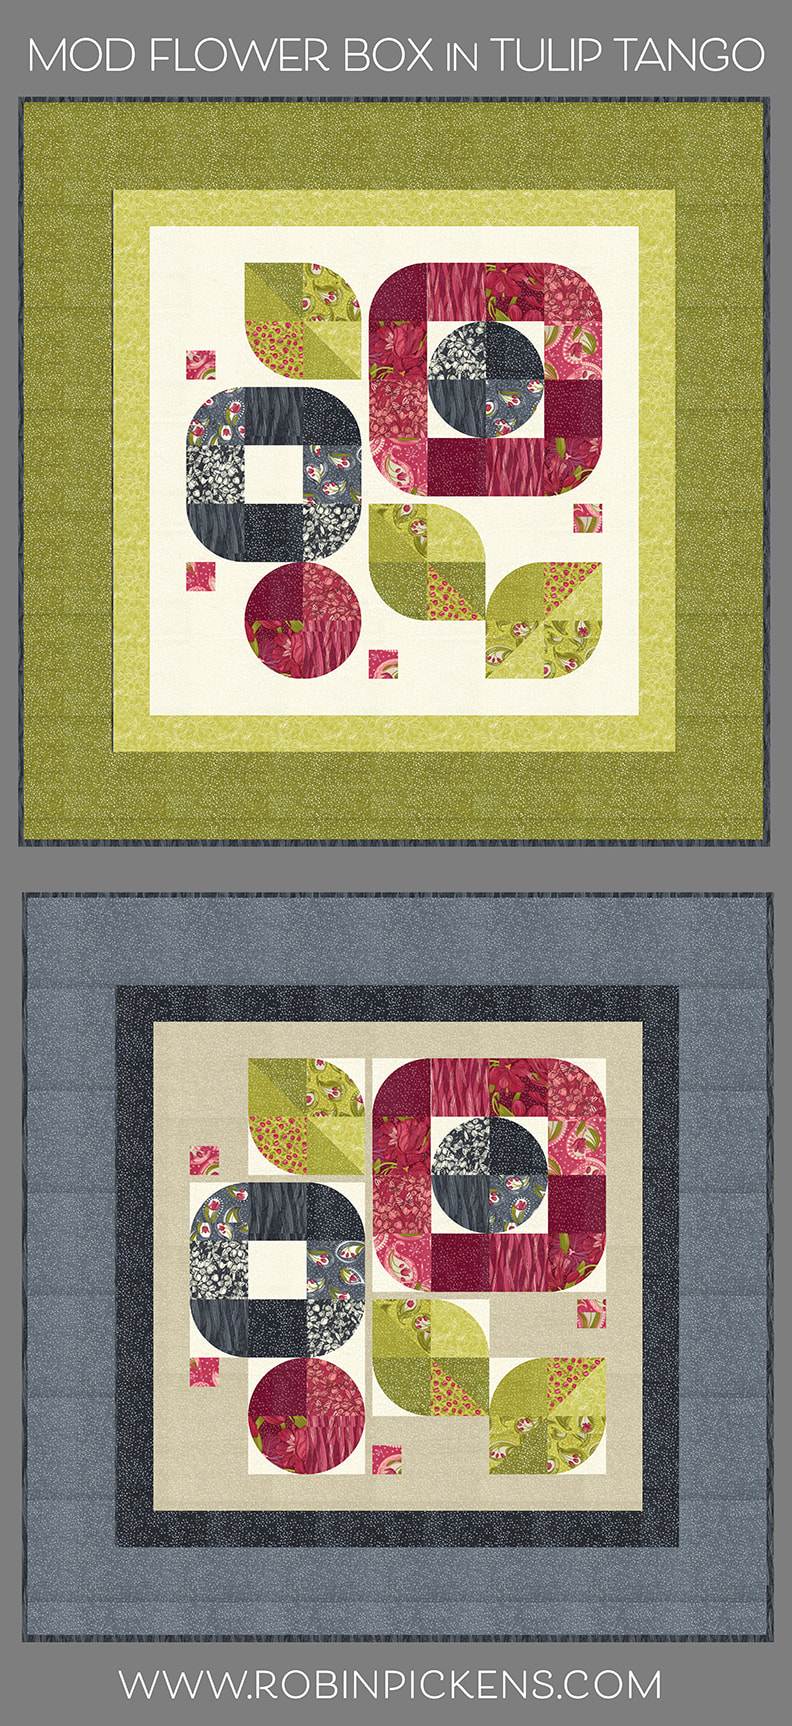 And a Dotty Thatched Shadow border is softened by the larger Gravel colored outer border. Combined with Washed Linen background and highlighted backgrounds for the curves in cream, this version feels serene and meditative. How about more prints? Those big tulips in the big border perhaps? Or the Tiny Tulips? When the outer border has a busier print, I think it is good to separate that with a regular or dotty Thatched smaller border. This gives my eye a place to rest for a moment and clearly defines the spaces without overwhelming with print on print. Another version of the "boxed in" flowers with Burgundy Thatched against the Cranberry Dotty Thatched background. 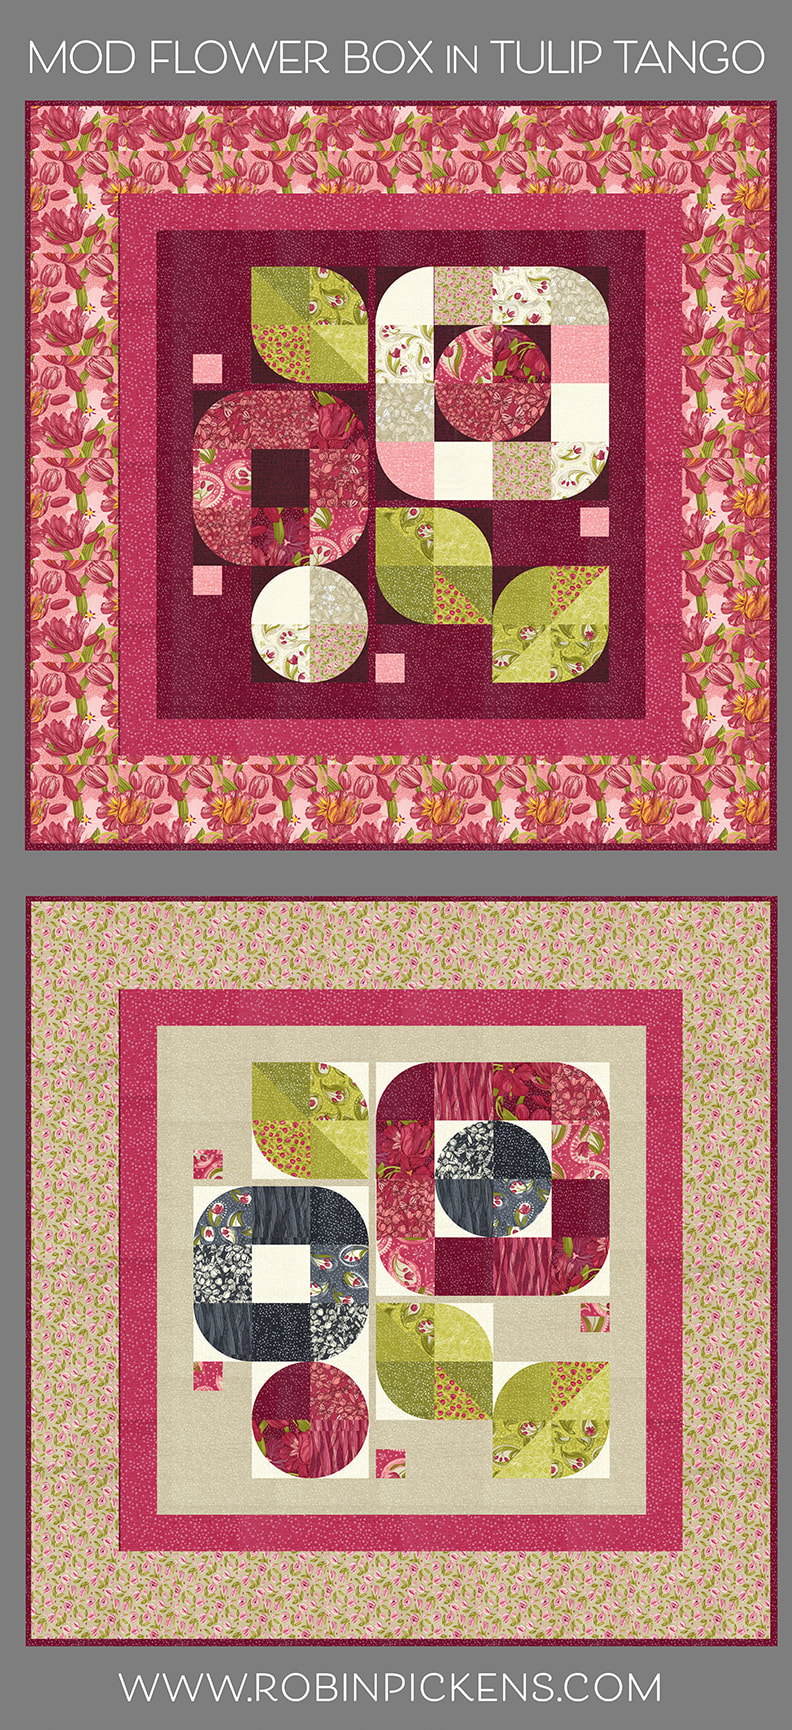 This last one has a warm energy with the earthy linen color mixed with the pinks and shadow grays. I hope you find a version that speaks to you! One of the fun things about this pattern is that it uses curves but not too many, so it is great for those who are feeling a little afraid to try curved piecing. This is an easily manageable amount of curves and only a quarter curve vs a half or full circle. The pattern includes a paper template, but I am also a big fan of the Creative Grids Circle Savvy Ruler for making my curved quilts. I'll be doing a workshop at Shipshewana this summer with the top version of MOD FLOWER BOX or the all-Thatched version. The class is sold out, but I will also be doing some demonstrations in the shop with the Circle Savvy Ruler so if you are there, please stop by to say Hi! I think there are a few spots left in the Tightrope class! 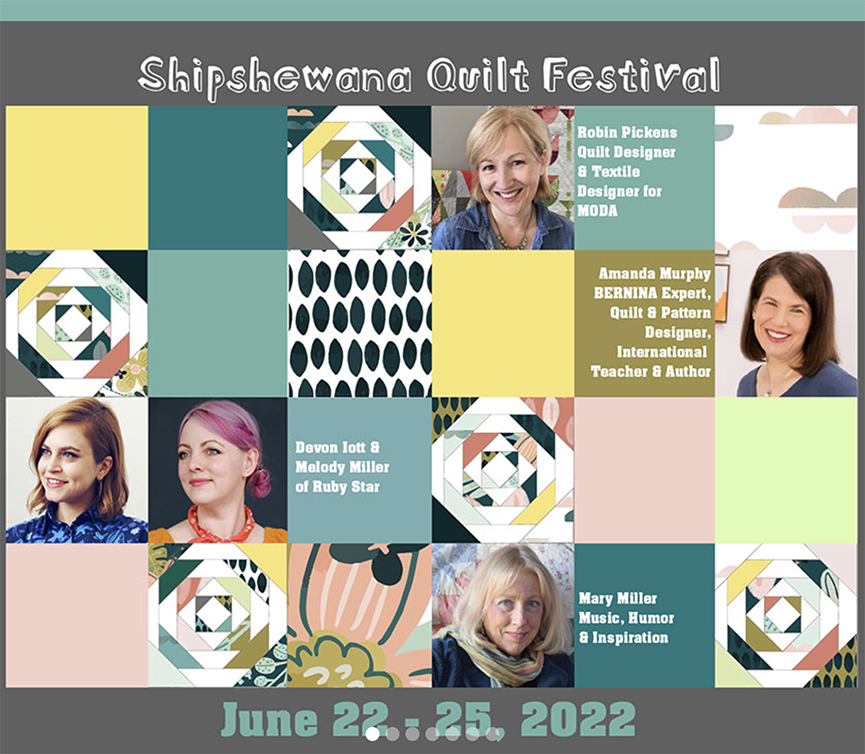 I am honored to be in the company of these other designers and quilters at the festival! I've learned a lot from watching Amanda Murphy with her Bernina longarm (which is the one I have with qmatic) and am very excited to meet her in person. I am so pleased to know Devon and Melody from my shows with Moda Fabrics and look forward to more time at this event!  MOD FLOWER BOX can be made with Fat Eighths, Fat Quarters, Charm Packs or Layer Cakes. Check your local quilt shop for the pattern or visit www.RobinPickensINC.com if they don't have it. This is the all-Thatched version: 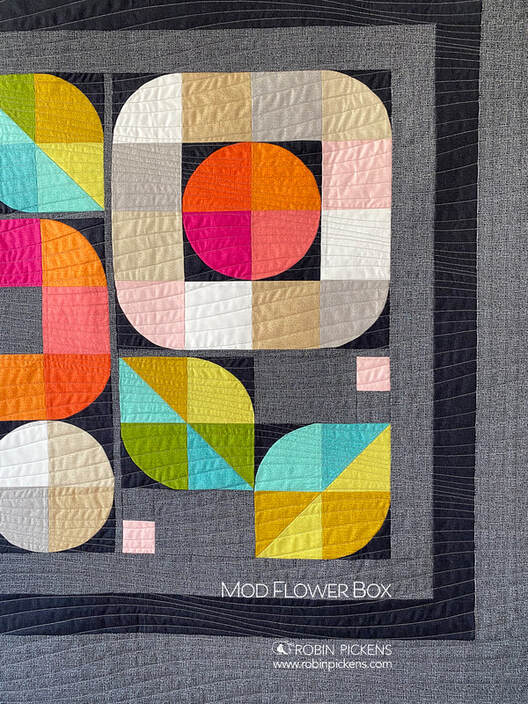 Hope to see you at Shipshewana and I hope you have fun with TULIP TANGO in MOD FLOWER BOX!
In my newsletter I asked what quilt people wanted to see mocked up in Tulip Tango and RING AROUND THE POSIES was a clear winner!! I will be showing more quilt mockups in this fabric line but here is RING AROUND THE POSIES to explore with the Tulip Tango collection. 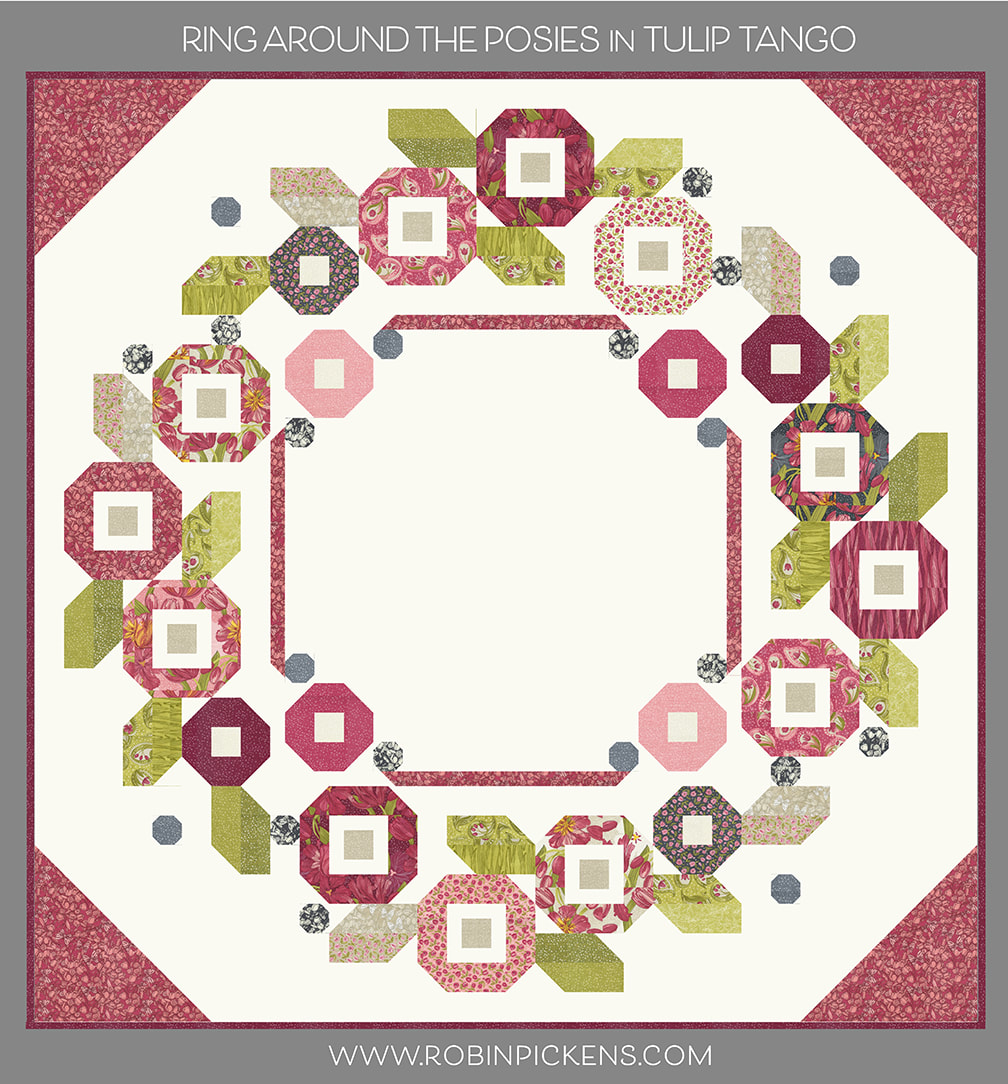 Lets start with the Dotty Thatched Cream background and Love Butterflies in the corners (in Tulip color). Classic reds on cream looks crisp and bright. When I use the Dotty Thatched background in Washed Linen with Cream corners it has a soft and romantic look. I would definitely want to snuggle up under this one!  This is the same Dotty Thatched Washed Linen with more of the Grays from the collection. I've used Love Butterfly in Shadow for the corners. I've also used more gray strips for leaves and flowers with the pinks still prominent for the flowers. One thing to point out here is that I've used a different fabric for the interiors of the flowers to give them a little more pop. This is Dotty Thatched in Cream and if you use a different fabric inside the flowers like this, you need a 1/4 yard of fabric for those. 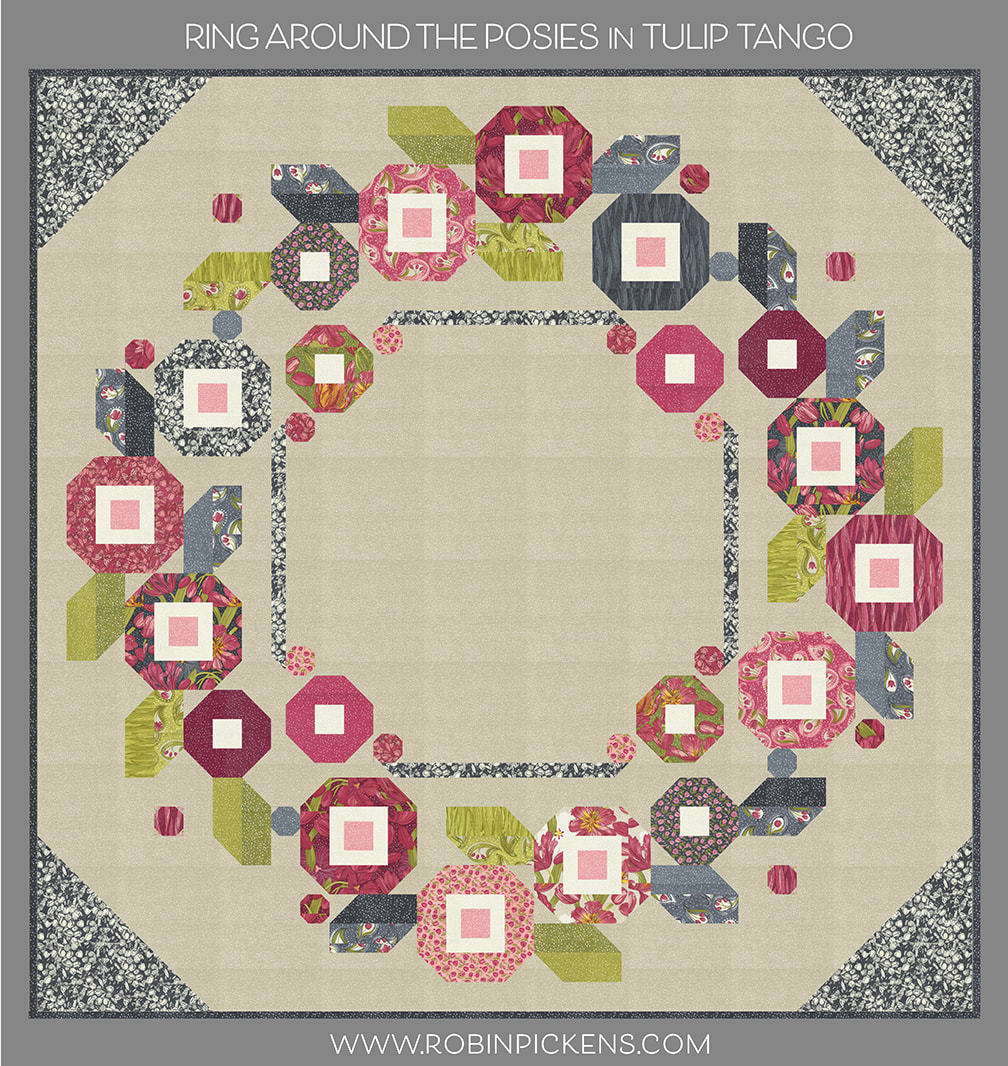 Here I've used the lighter interiors again but sticking to more reds in the collection. The background is Dotty Thatched 118 in Cranberry with corners in Dotty 202 Tulip.  A little darker background is regular Thatched Burgundy 60. I am using the background color inside the flowers too and the main Tulip print 48710-19 in Cranberry for quilt corners. 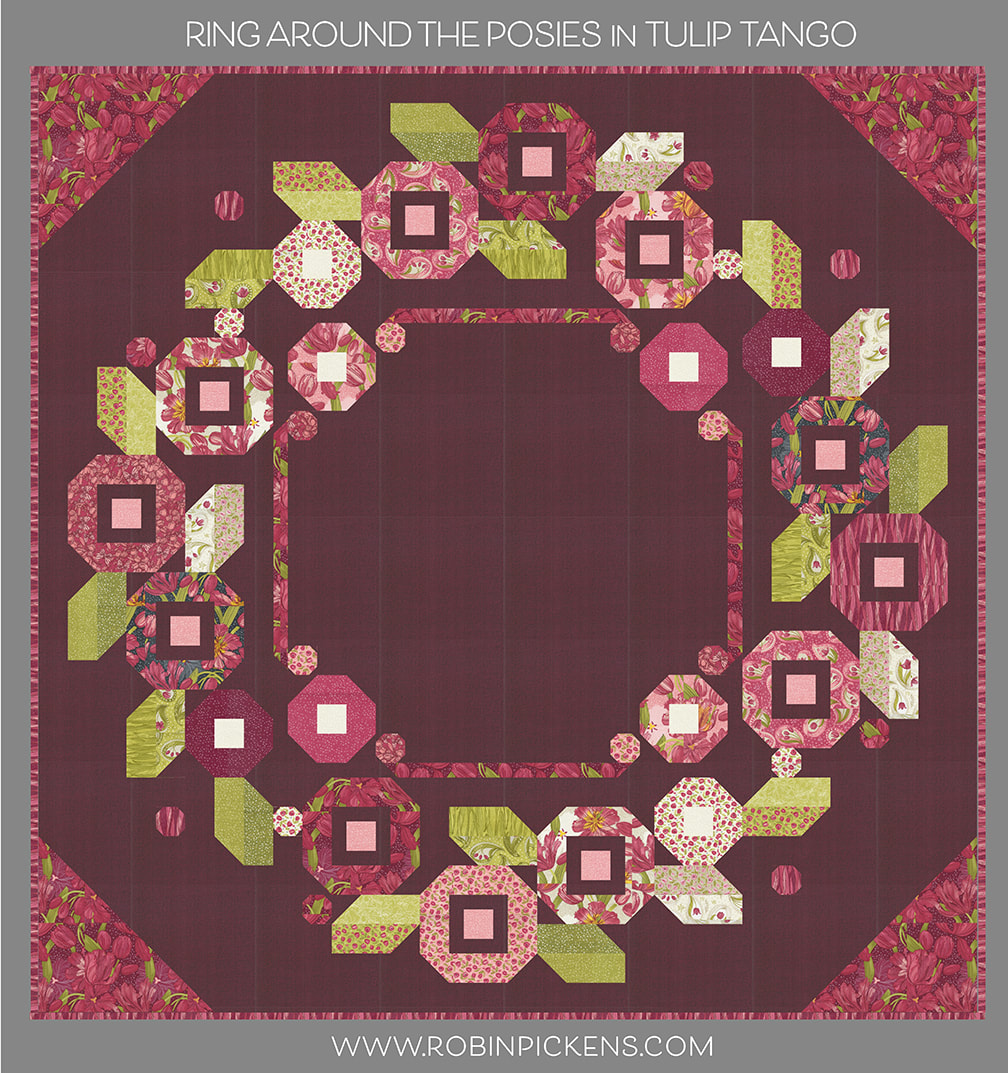 One last one...dramatic night time garden with Thatched Soft Black 152 as the background color and Dotty Thatched 48715-117 in Shadow for quilt corners. Those colors glow against the Soft Black background! I love using the Swirling Leaves print as my bindings because it gives it a free flowing striped look.  Are you ready to make RING AROUND THE POSIES in Tulip Tango? I am trying to decide between the two washed linen versions. If you are looking for the pattern, please check your local quilt shop to see if they have it. You can also find it at my shop at ROBIN PICKENS INC. More mock ups to come...how about MOD FLOWER BOX next?  It's finally here! Carolina Lilies has made it through the supply chain obstacle course and arrived in quilt shops! Yay! I'm so ready to do some more sewing with those peach, ruby, green, aqua and teal colors. What to do? Well, my dear Mother asked me what I would recommend if she wanted to make Criss Cross Kisses in Carolina Lilies. So of course I had to mock it up! 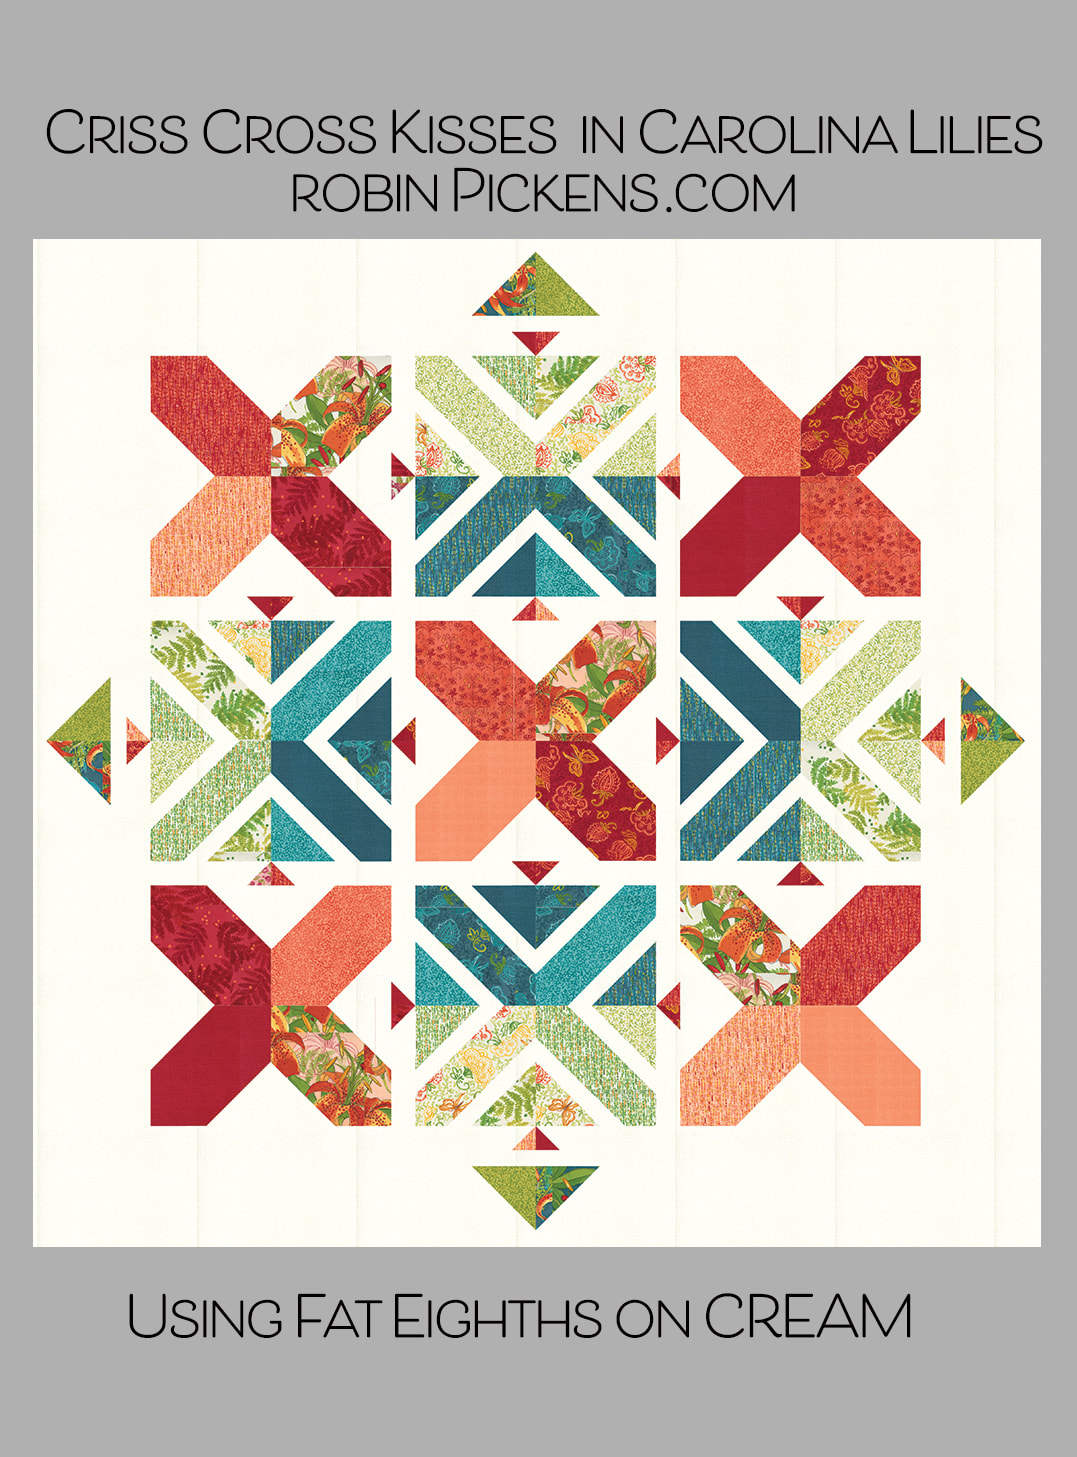 I've mocked these up in the 63 1/2" lap size quilt. These first ideas use Fat Eighths of fabric. Carolina Lilies has a sweet little print of tiny vines in a white on cream which would be lovely as the background. But the Thatched Cream is a great match too. I've kept the idea of the red Xs and doing a split light and dark outline X with the inside halves in teals and the outsides in the lighter green/cream colorways.  The fabrics I've used here in the Fat Eighths are the Carolina Lilies main prints 48700-11, 14, 21, Boho Blooms 48701-11, 12, 21, Ferns 48702-11, 12, Little Drawings 48703-13, Vines 48704-11, 13, 17, 20, Dashed 48705-11, 12, 14, 21, Thatched 48626-191, 193, 199. I also think this looks nice on a dark background and using Thatched Soft Black would be very dramatic. The same colors are in the top image on dark. The bottom image uses more greens and aquas from the collection with only a red interior and outer triangles. 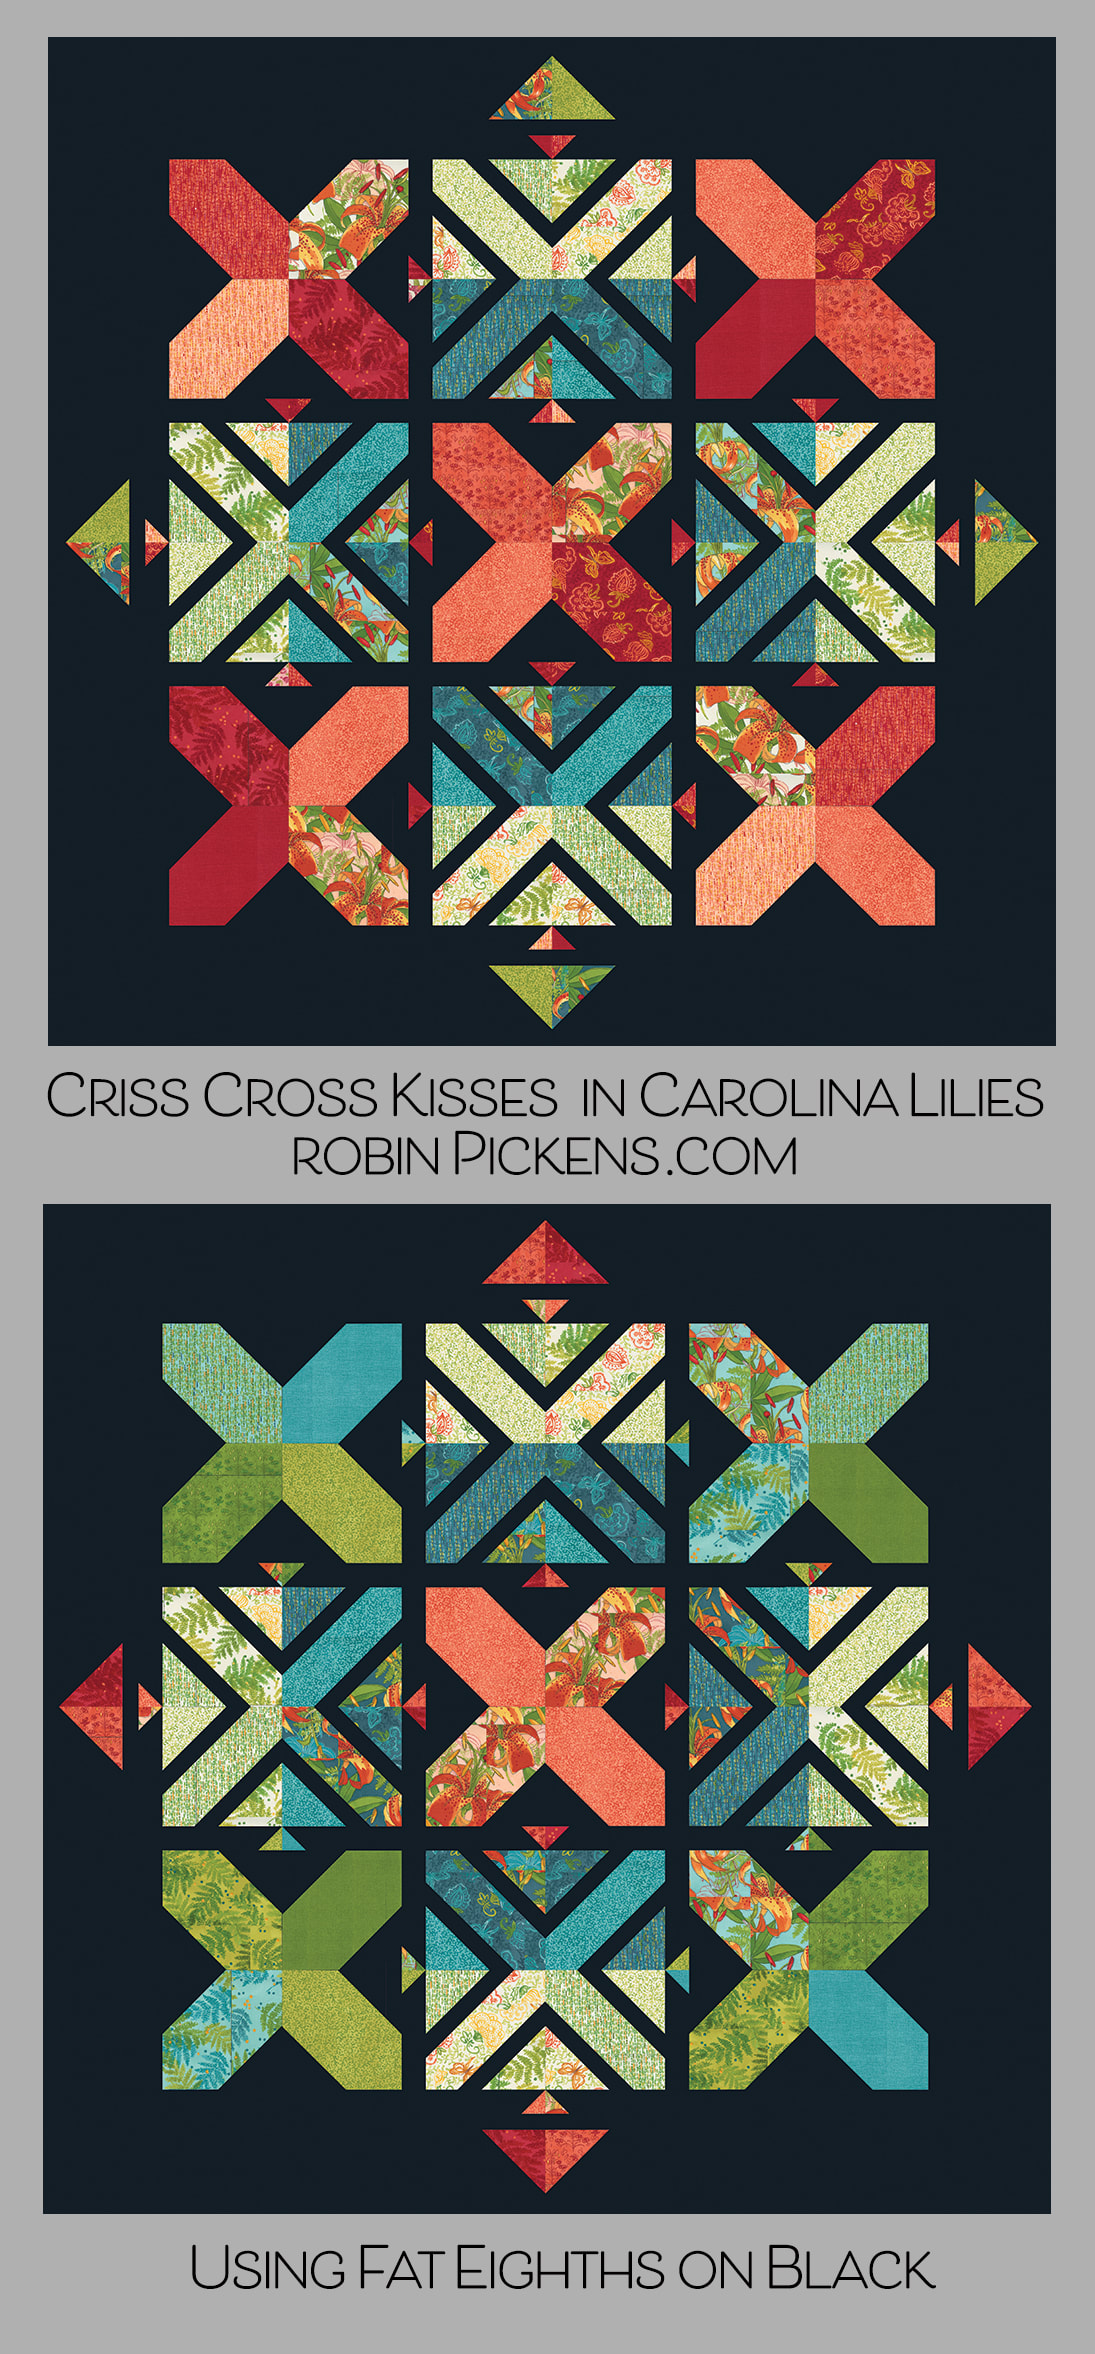 But what if you are using a Layer Cake? The mix of fabrics is a little more varied and there are not as many reds to do all red Xs. But it still looks great with a scrappier red/green/aqua look. On the bottom of the Layer Cake mockups I flipped the teal and red families so the solid Xs are green/teal and the surrounding outline Xs are reds. Subtle differences but fun to see. 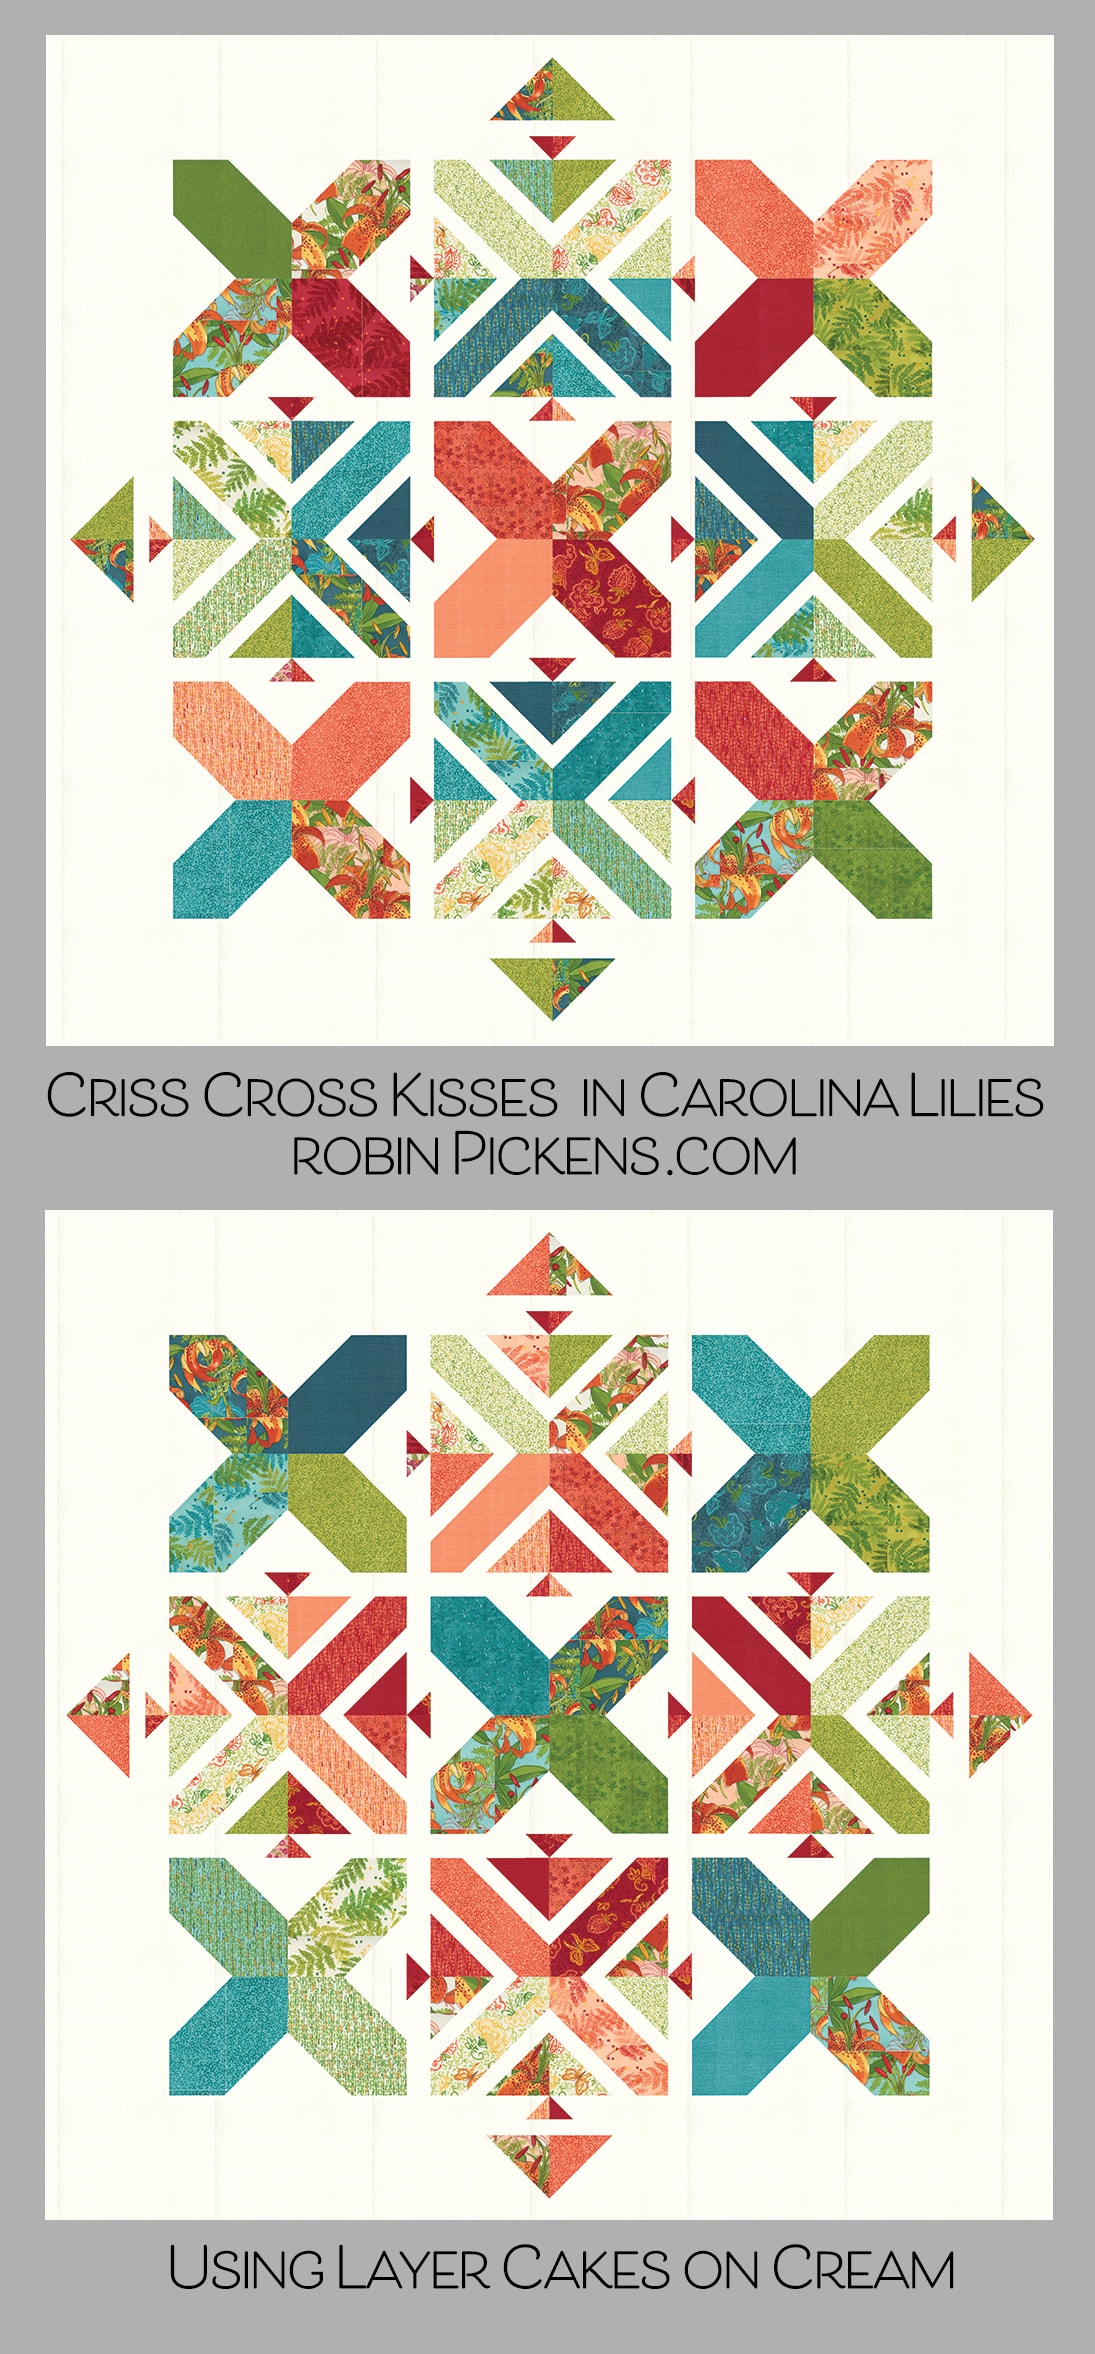 What IF we tried a background color that is unexpected? Here is Thatched Green Curry 177 and it gives this such an interesting vibe! Colors and their combinations give such strong personalities to quilts. 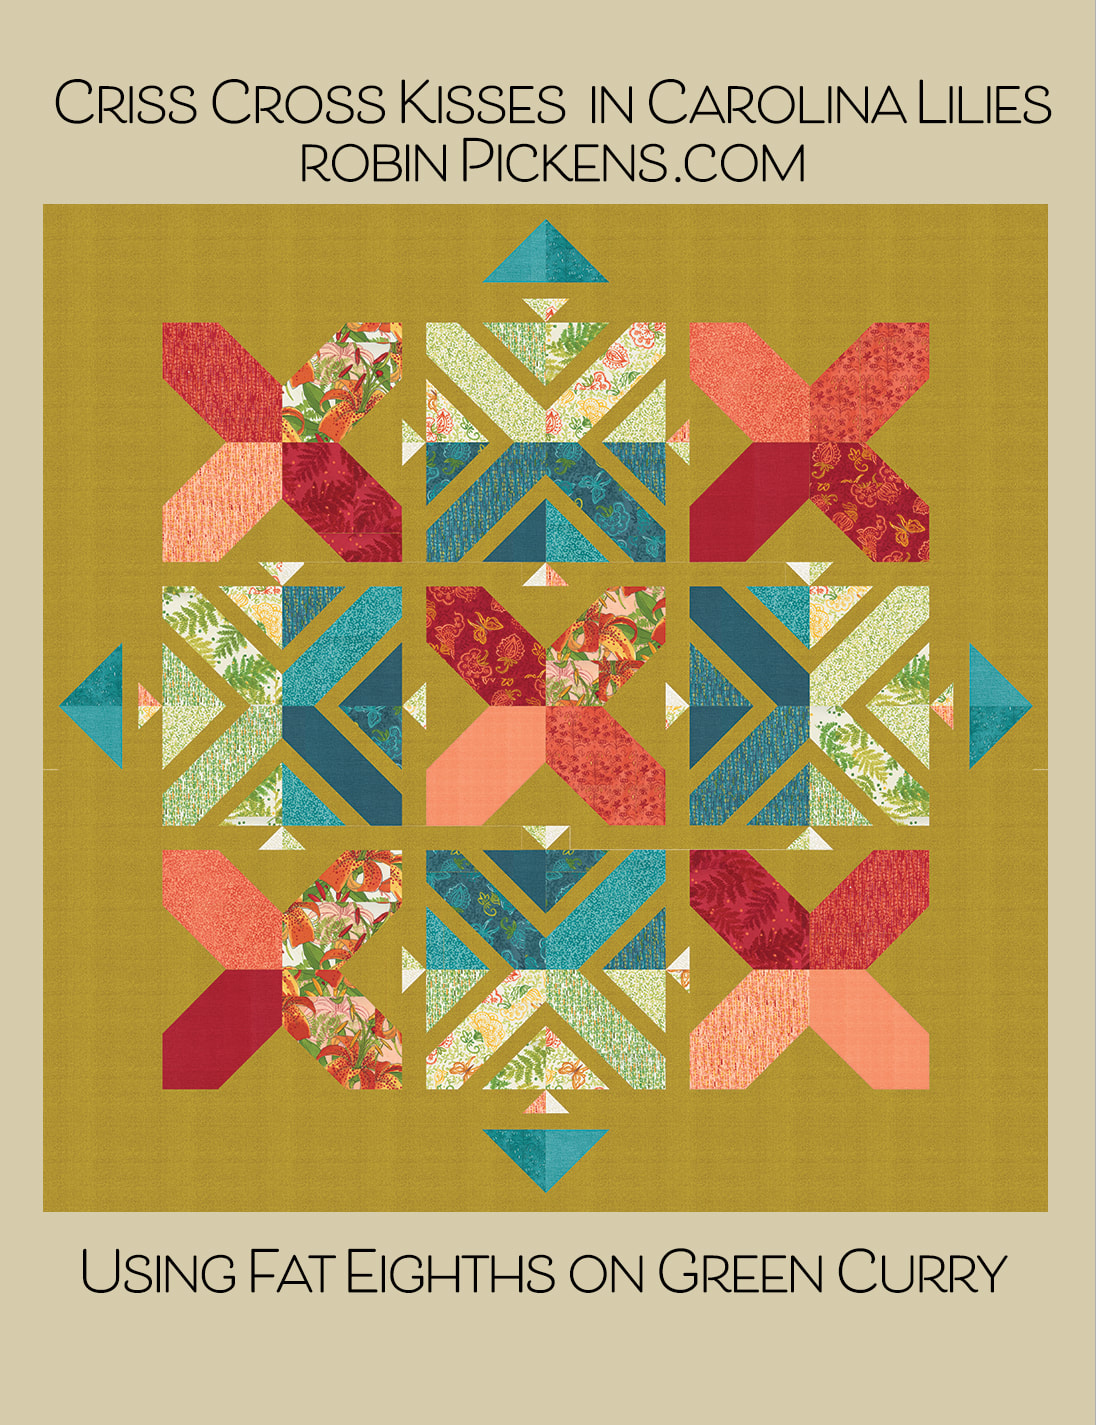 Have fun exploring Criss Cross Kisses with a new fabric grouping! Check your local quilt shop and happy sewing! Criss Cross Kisses Quilt pattern can also be found at my online shop RobinPickensInc.com  I had not shared my new quilts yet on this blog that I designed for Tulip Tango! The rush of November swirled into the holidays so quickly and with deadlines for fabric lines and calendar artwork added in, I somehow overlooked that. So it is the New Year and time to get back to some more sharing! 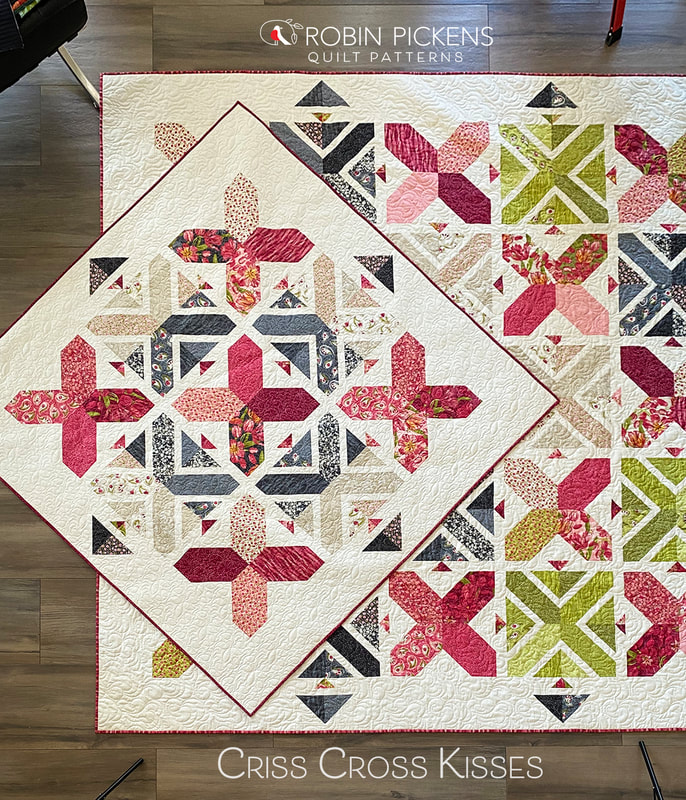 The Xs on this quilt make me think of cross stitch and a criss cross motion. And x's and o's make me think of hugs and kisses. So Criss Cross Kisses it is! This quilt is a fun play of both solid and "outlined" Xs with a variety of fabrics making up each X. 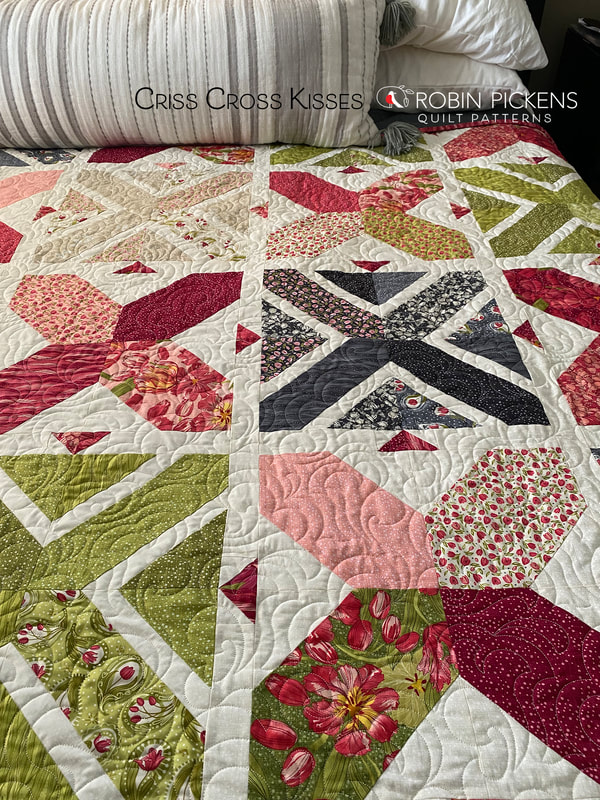 There are a lot of opportunities to play with the groupings of color or light and dark with these blocks. I liked separating the Outlined Xs below into cream/linen and gray halves. I then wanted the grays all grouped around the center X. I kept all my Xs in the Red/Pink families. By grouping light and dark halves, you create interesting shapes (like a chunky plus sign) within the overall layout. 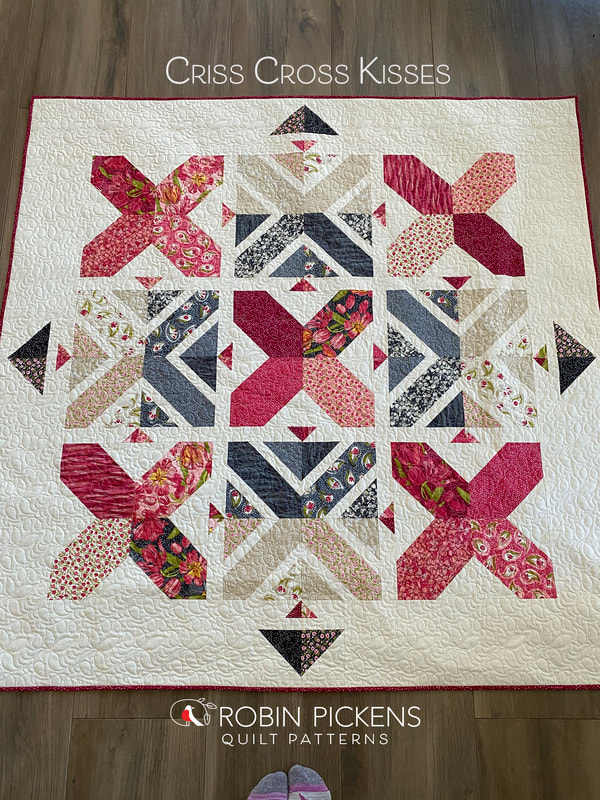 In contrast, the Queen bed sized (and it is shown here on a king so you can see it can also work on that size mattress) is made with more random placement of colors. But again, I kept Xs within a color family each for this one. 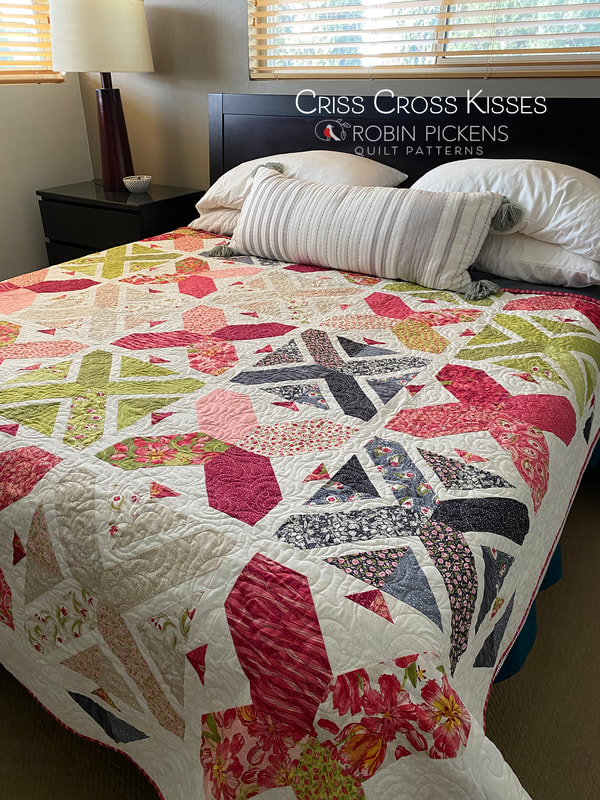 This quilt can use Fat Eights (for lap) or Fat Quarters (for Queen) of fabric to make the pieces or you can use a Layer Cake(s). I used the Fat Eighths/Fat Quarters instead of Layer Cakes so I could group my colors specifically (the Layer Cakes will give you a slightly scrappier look). On the lap sized quilt (which is 63 1/2" square) you need 20 F8. I used 10 in red fabrics, 4 in linen fabrics, 4 in gray fabrics, then another 2 from the gray family for the outer border triangles. On the queen sized quilt you need 27 Fat Quarters and I selected 13 red, and a mixture of black, linen and green for the other 14 for the outline Xs and border triangles. If you use a Layer Cake, one will work for the lap and two are needed for the Queen. You can even use Fat Sixteenths on these- double the number of F8 or 4x the number of FQ to do so. 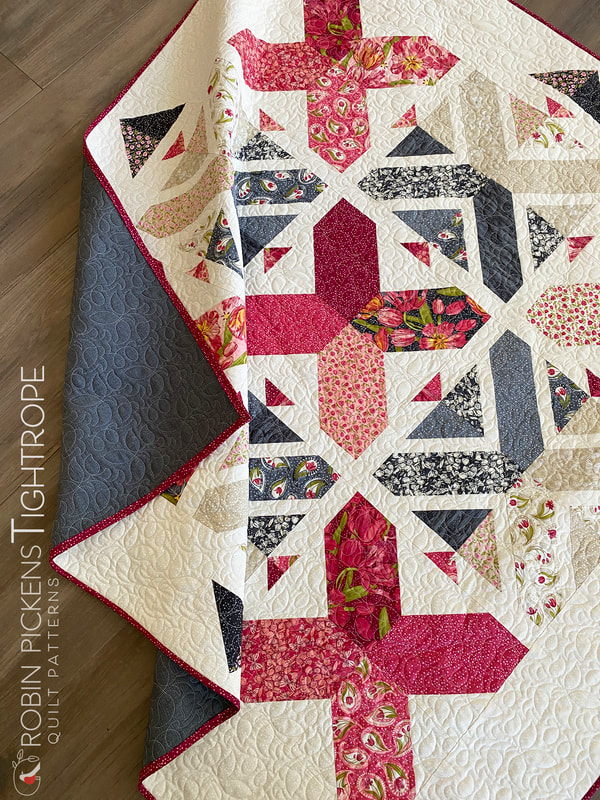 For this pattern you are using stitch and flip corners on those outline Xs and reusing parts for the corner backgrounds. Similarly, the big sold Xs cut those corners off but I didn't want them wasted. I challenged myself to think of ways of integrating the leftover corners that were cut off. That is how the little arrow heads that play in the sashings work their way into this quilt. They give more direction and size contrast within the quilt while adding little pops of those big X colors throughout in little ways. 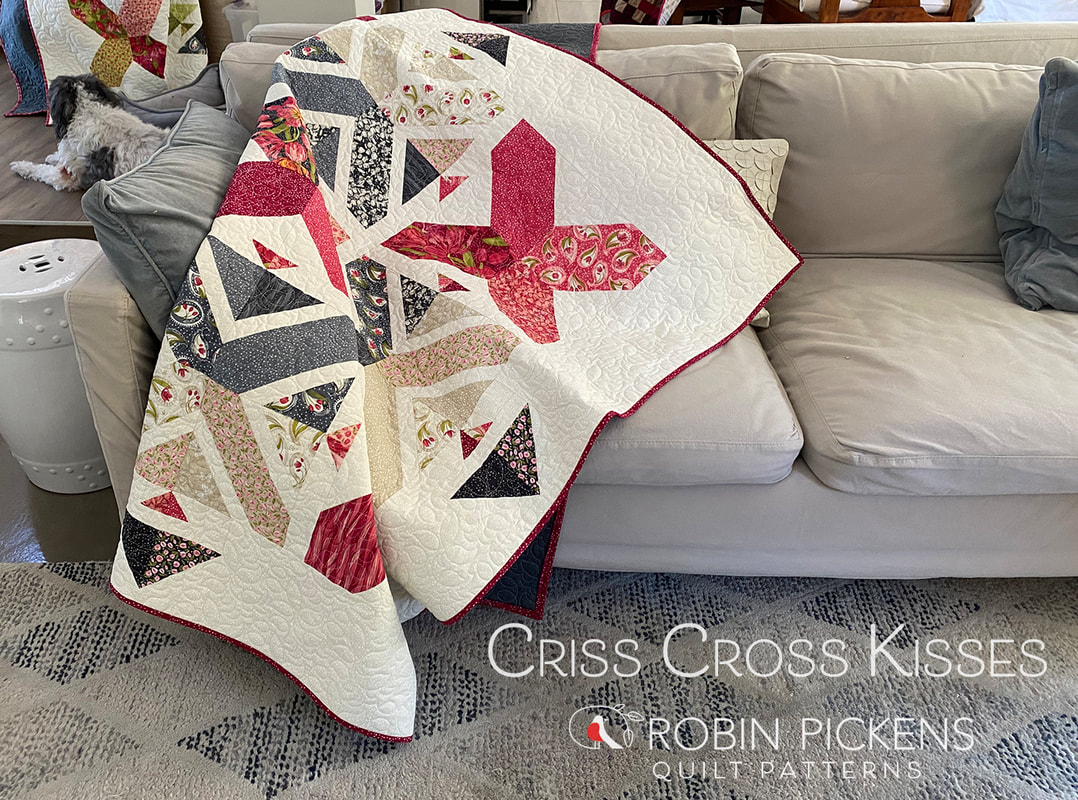 With the strong diagonal directions of the pieces, I thought the border including arrow heads of a larger size was a nice balance. On the lap quilt, it reminds me of a compass of North, South, East and West. 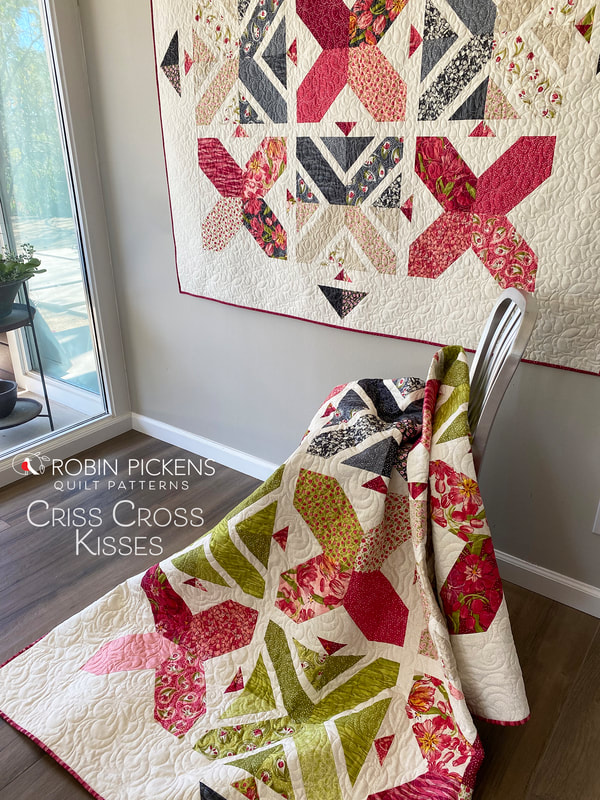 This pattern design idea was actually started back when I first designed my Dear Mum patterns. It has been rumbling around in my head for awhile and I'm happy to see it finally come to life. Sometimes things need to develop over time and this is one of them. The lap quilt was pieced by Susan Strumpf and the queen by me. I longarmed both and used the Leafarama pantograph by Keryn Emmerson and Whirlwind by Wildflower Quilting/Karen Farnsworth. 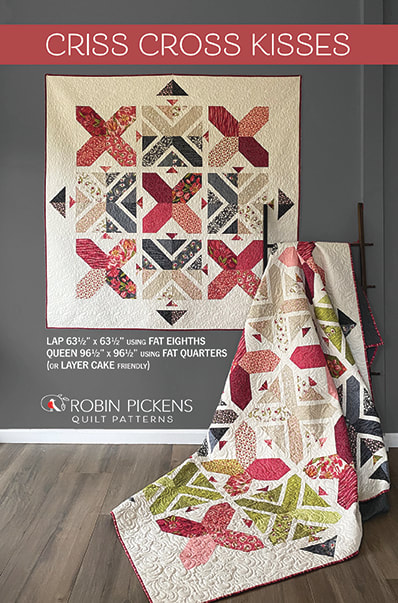 Criss Cross Kisses is up in the shop in digital pdfs and printed patterns. Tulip Tango fabric should arrive in shops in approximately May 2022. Check the next blog post if you are interested in seeing it mocked up in Carolina Lilies (thanks Mom for your special request for that!) 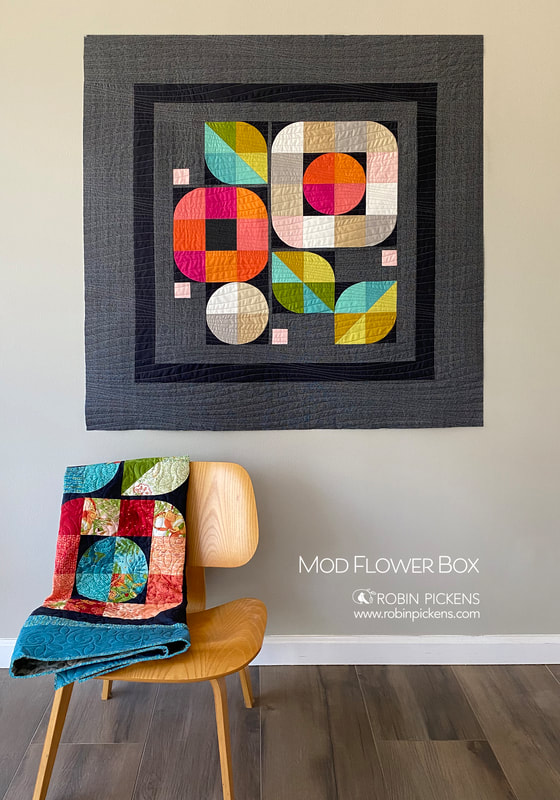 I am often a "transitional" quilter (or you could call it modern traditionalism)- relating to sewing between traditional quilters and modern quilters. I love to make more traditional quilts, but I also enjoy how modern quilts can allow you to express your creativity in a different way! For some people, modern design can be a bit intimidating. They may only know of more improvisational modern quilting and not have comfort with improv. However, modern quilting doesn't have to be difficult or intimidating. You also don't have to use a complicated pattern to get that modern look. To help you embrace the modern quilter that is within you, I am sharing one of my easy modern quilt patterns which creates a stunning quilt with tools that you have on hand and no matter what fabric you choose to use! 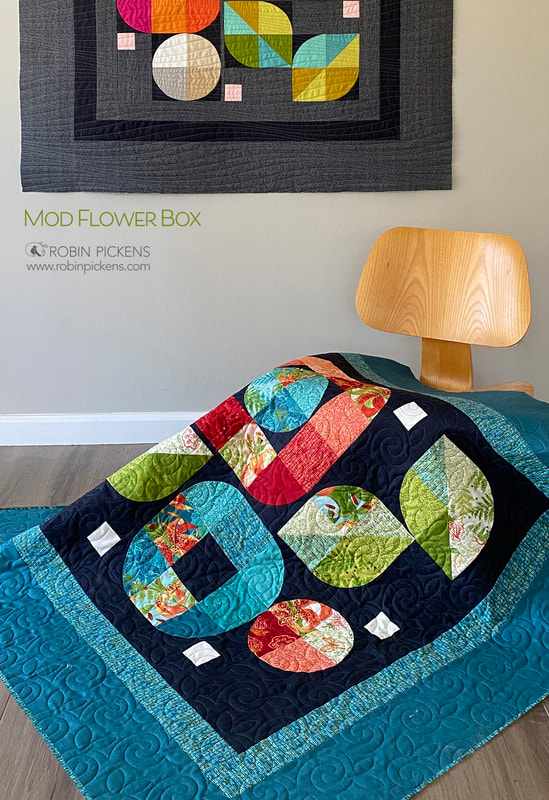 I enjoy a modern quilt design that is not overly complicated. In fact, I often feel a simpler, pared down design will have a more modern feel. I wanted to come up with a modern quilt that would allow you to easily create with fabrics you may have on hand, utilizing scraps, yardage, or even precuts (and precuts as small as a 5" square Charm Pack). I combined curves and squares into striking modern blooms in this geometric garden. This is Mod Flower Box, ready to bloom upon your wall! I'm showing two versions of this modern quilt in these photos. You can see how it still has a striking composition whether done in all solid fabrics or a combination of prints. This version on the chair is made with Carolina Lilies. This collection is scheduled to ship to shops in November 2021 and features spotted lilies, paisley prints, vines and ferns. Rich teal and green colors mix with spicy reds and peach tones reminiscent of my Painted Meadow collection. I chose to keep the background a dark soft black so there is high contrast with the colors and they really pop! I like to see the different ways that light and dark colors change up a quilt (keep reading for a lighter version below). 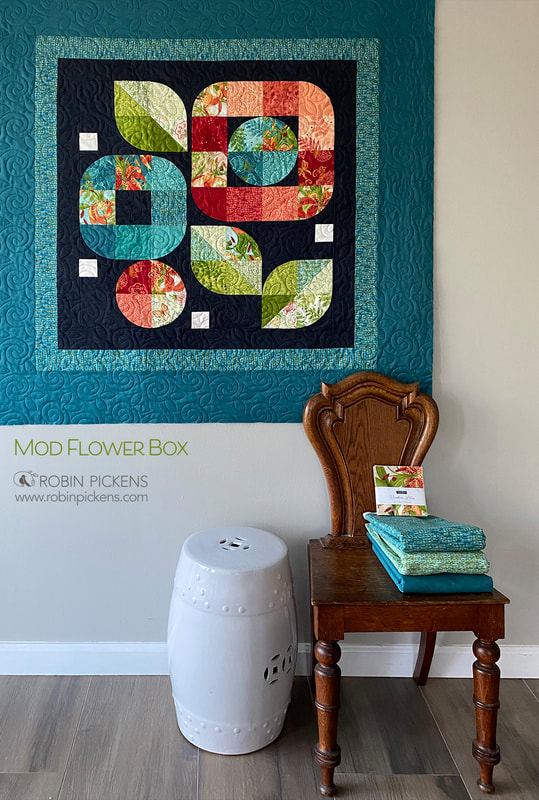 The wall/lap quilt in Carolina Lilies uses Thatched Soft Black 152 for the background and borders in Thatched Lagoon 199 (the teal color) and Dashed lines 48705-21 in Teal. The flowers and leaves are made from one Charm Pack of 5" squares. You can also use a Layer Cake of 10" precut squares and cut them in half both, horizontally and vertically.  Another option for making this quilt is using Fat Eighths. My favorite version of this modern quilt is the one that looks like solid fabrics. It is actually using Thatched basics for the fabric. I've paired a use of bold colors with this subtle textured fabric to make the hues really stand out in a dramatic way. With the floral groupings all in the center, the outer borders create balance with a more expansive negative space that can be good for specific border quilting or just a breathing space and strong framing device. To get the look of these graphic areas of solid color, I've used a mix of 14 Fat Eighths, with 9 for flowers and 5 for leaves. For this version, I wanted to emphasize the corners and really play with the spaces left from the curved blocks by "boxing in" the flowers. That is where the name Mod Flower BOX comes in (plus the extra outer border).  The background is made with Thatched Chalkboard Scribbles 187 with curves and inner border using Soft Black 152. The flower and leaf blocks use a mixture of Blizzard 150, Washed Linen 158, Toast 156, Gray 85, Early Dawn 122, Sugar Rose 127, Citrus 123, Clementine 138, Fuchsia 62, Green Curry 177, Sunlit 142, Grass 197, Dewdrop 143 and Brook 198. 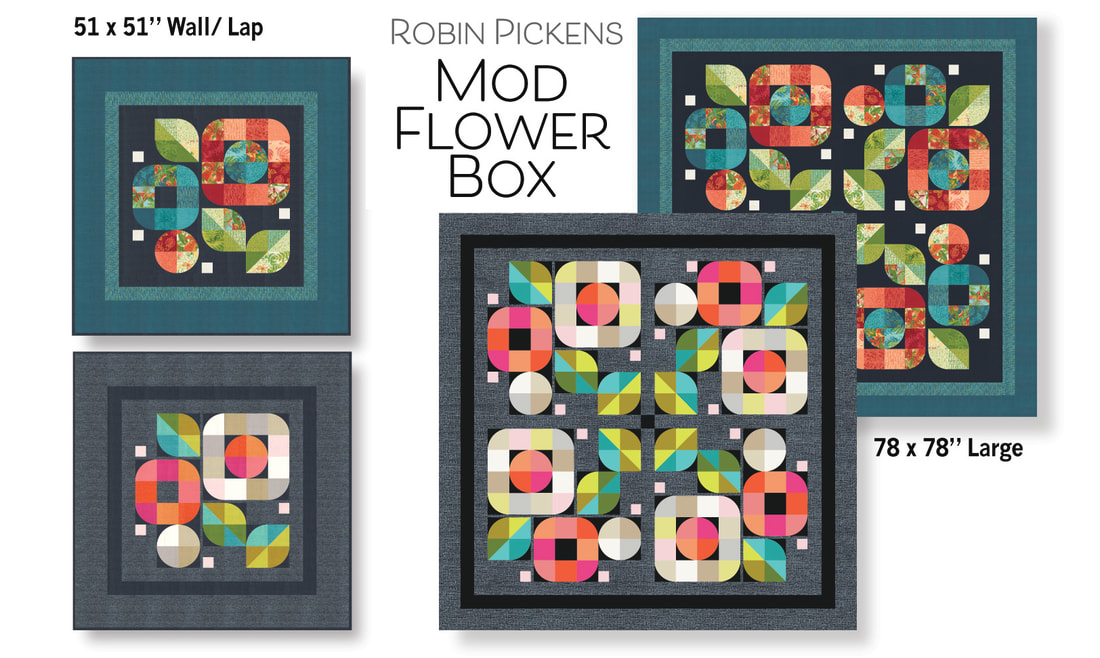 There are two different sizes of Mod Flower Box. The wall/lap size is 51" square with borders. If you choose to not have borders for a smaller wall quilt, the inner part is 34 x 34". The large quilt sized 78" square, uses 4 units of the rotated Mod Flower Boxes. Depending on which quilt size you choose, the Mod Flower Box pattern can be made with a Charm Pack or Fat Eighths for the wall/lap size or with a Layer Cake (or 4 Charm Packs) or Fat Quarters for the large size. 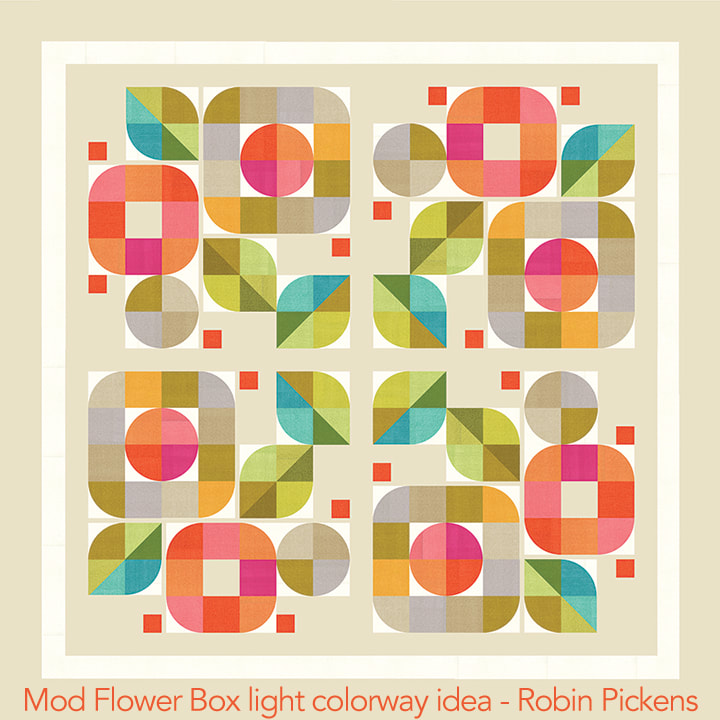 I am planning on starting this lighter color version of Mod Flower Box, probably with a Washed Linen background or maybe Sandcastle 157 flipped to the backside and accent corners for curves in Blizzard 150. Speaking of colorways, this is actually one of my favorite things about this quilt design! You could create your own quilt top in almost any color scheme! For instance, you could use solid colors, different styles of fabric within a particular color palette, ombre fabrics, or simply your favorite colors. Color always gives me a new way to look at modern quilt designs. Needless to say, the color choices you have are absolutely endless!  I've made lots of quilts with curved corners and I DO include a paper template you can work from in the pattern (or pattern downloads if you buy the pdf file version). I do prefer to use a specialty ruler for doing curves and know of a number of them. I usually go to my trusty Creative Grids Circle Savvy Ruler since it has every size I want and I know I will get a really good result cutting with these! I note which slots in the pattern if you have this ruler too. 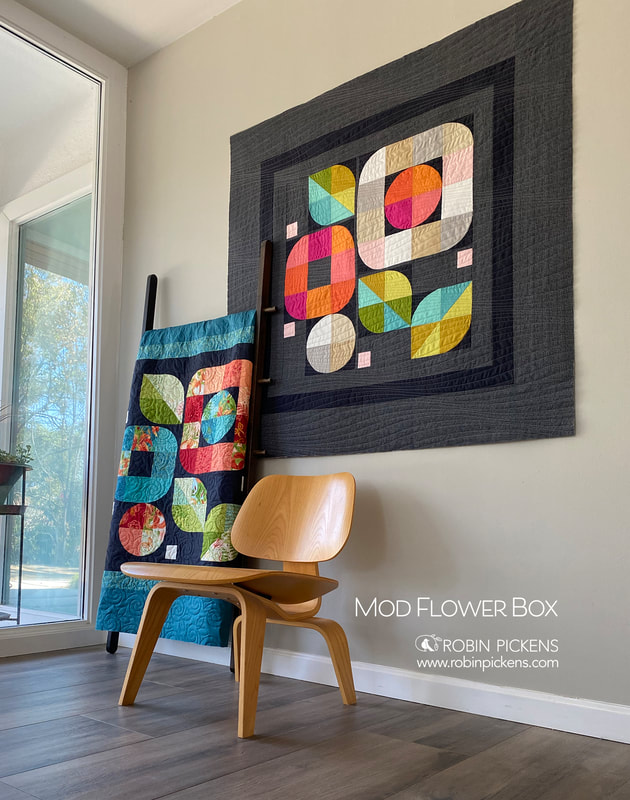 Since we are talking about curved corners, many beginner quilters stay away from modern quilts due to ''sewing curves''. I took this fact into consideration, so if you are new to curves, this is a great pattern to try since it only uses quarter circles vs half or full circles! Quarter circle curves are not very hard and I'd suggest making a practice quilt block or two first and then go for it! I love the look of curved blocks- so soft and curvy and gentle. They are a fun thing to experiment, plus, it will make you more confident in your quilting skills! 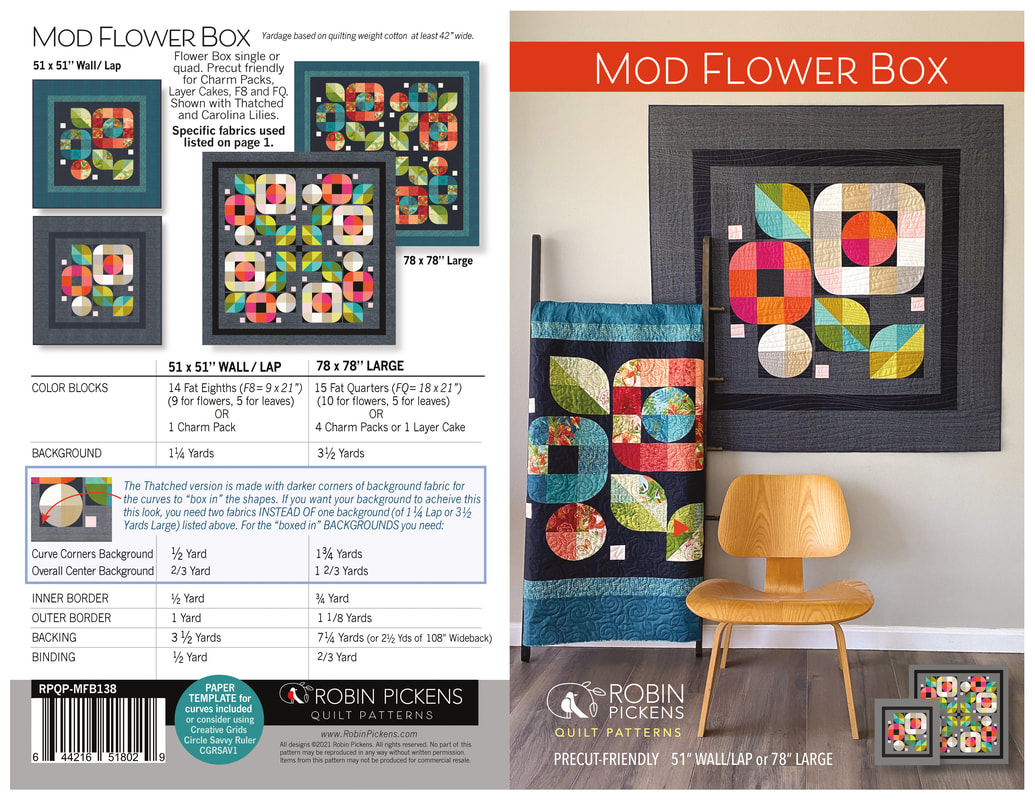 So, if you are ready to take a break from traditional quilts and want to create your very first modern style quilt, then the Mod Flower Box is a great place to start! Above I have included additional information on quilting materials and specifications. However, since this is only a blog post, I highly recommend that you check out my shop to learn more about this fun quilt pattern! If you are interested in the pattern, it is up in my shop at RobinPickensInc.com! 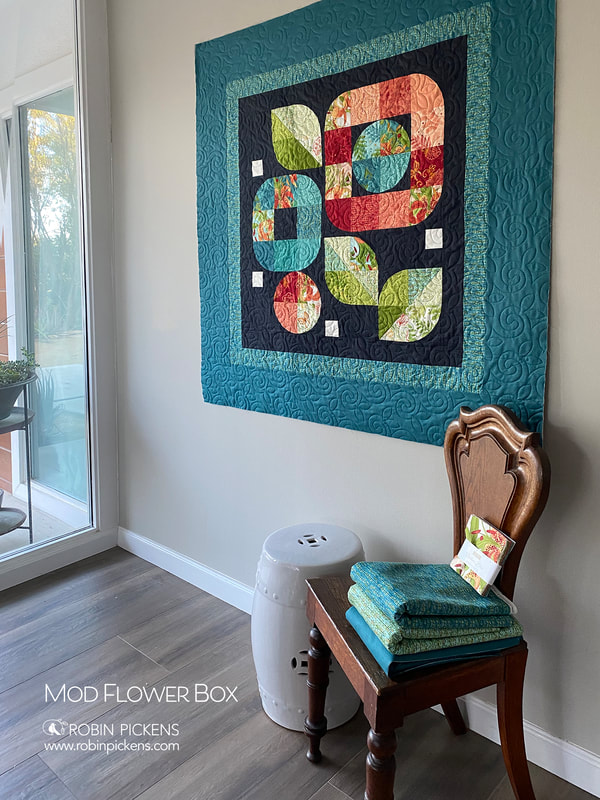  With Project Jelly Roll approaching, I decided to take a look at my Jelly Roll-friendly patterns to figure out what I am going to work on and perhaps share some ideas. One of my Jelly Roll patterns is Definite Plus. 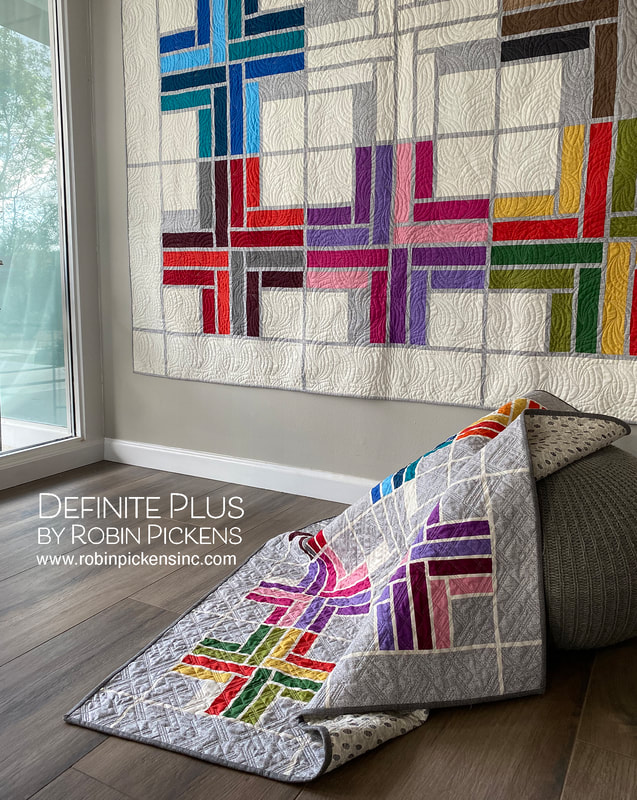 My original Definite Plus quilt is made in Thatched basics. I loved playing with the color families and having a "ghost block" image in the center of just sashings and background. And I made this in both the large size on cream and the small size (using a Honey Bun or 1 1/2" strips) on Heather. 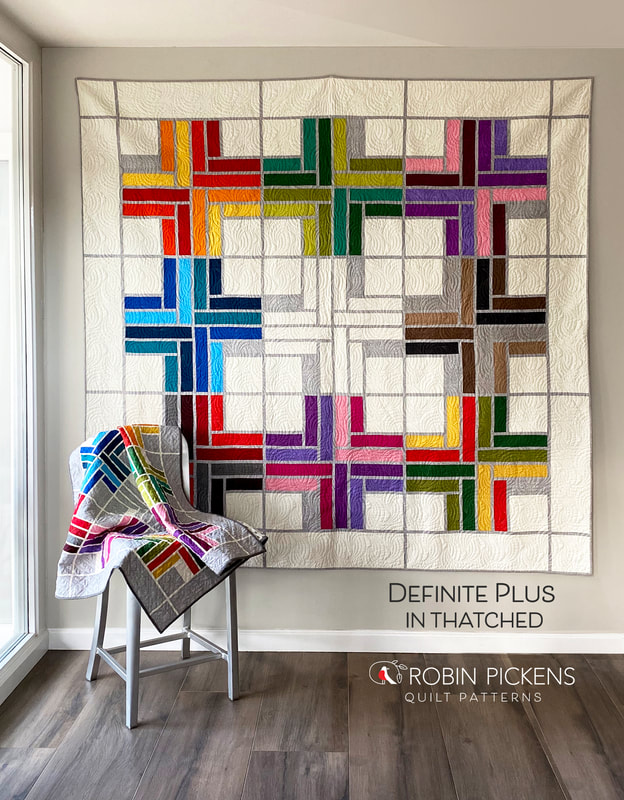 I wanted to see what this would look like made up in a Jelly Roll of print fabrics from a collection. I decided to make one that had no outer borders and no ghost block for the center. Full quarter log cabin blocks without an accent. If you make the large size without the outer border, it goes from being an 82" square quilt to 69 x 69", which makes a lovely large lap or can fit on a twin bed as a nice extra quilt. 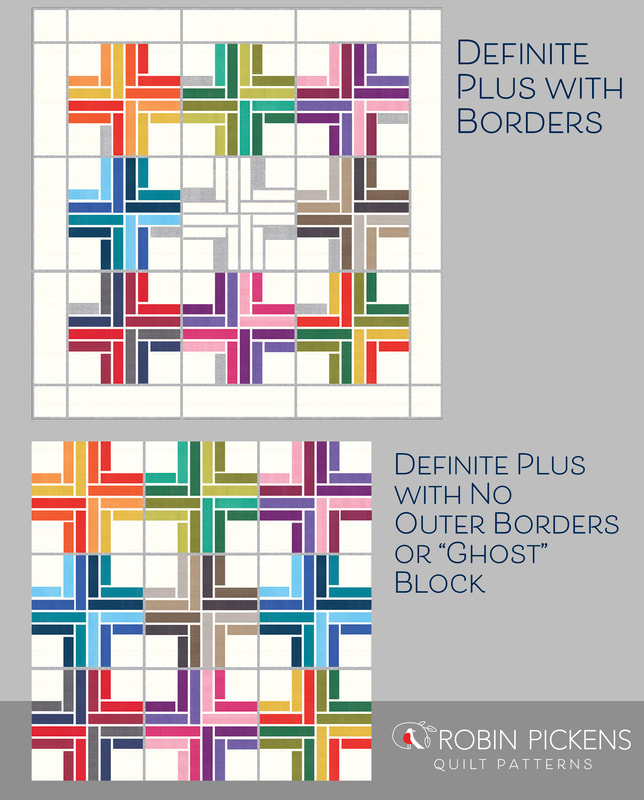 How does this impact yardage and cutting? I have only made it this way in the Large size, so I don't have the specifications for the Small at this point. For Large quilt with no outer border and no ghosted center block or accent rectangles: Sashing: 1 2/3 Yards for sashing instead of 2 1/8 Yards. When you are cutting, you will cut a total of (56) WOF strips. (4) of those will be cut to 34 3/4" and joined end to end to make the long sashings horizontally between the rows. Instead of (44) 6 1/2 x 1" pieces, you will need (36). Background: You need 1 1/4 Yards for background instead of 3 Yards. You will only be cutting the centers of the Quarter Log Cabin blocks and need (36) of them. 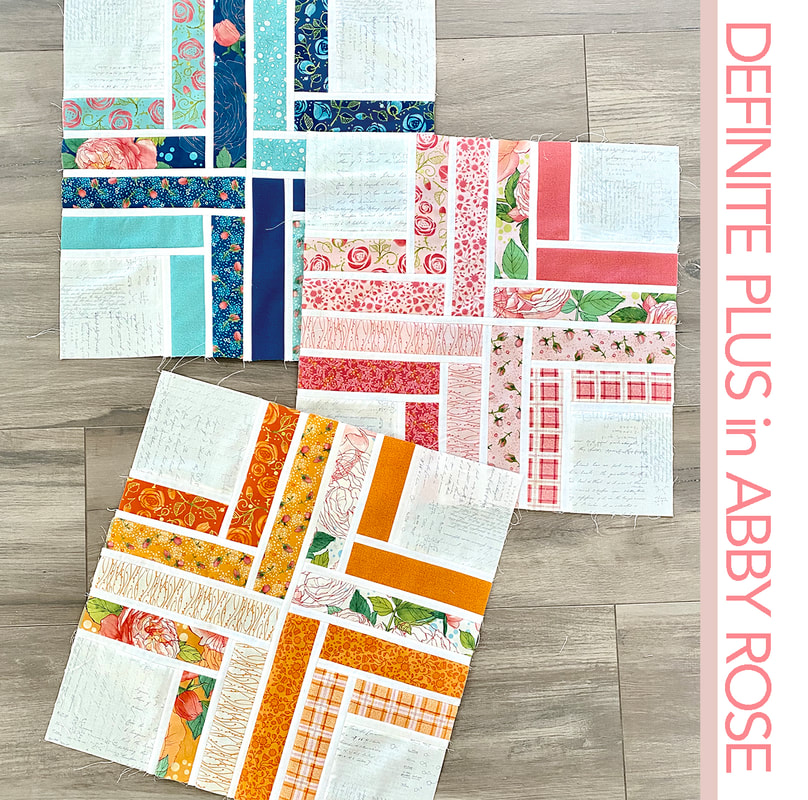 For my print version, I decided to use Abby Rose for my strips. I made all my centers with Zen Chic Modern Paper for a pretty, romantic feel. My sashings are Moda Bella Off White 200. I still kept my groupings of 4 that make a plus sign in color families. 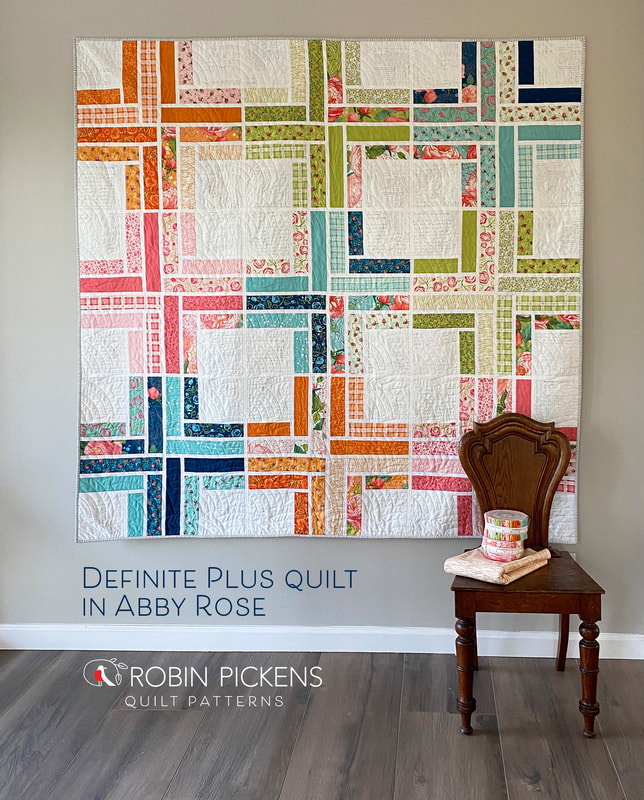 I like seeing the contrast of prints vs a more solid look for this quilt. I am very excited to try it again with upcoming lines and try other versions of background and sashing colors.  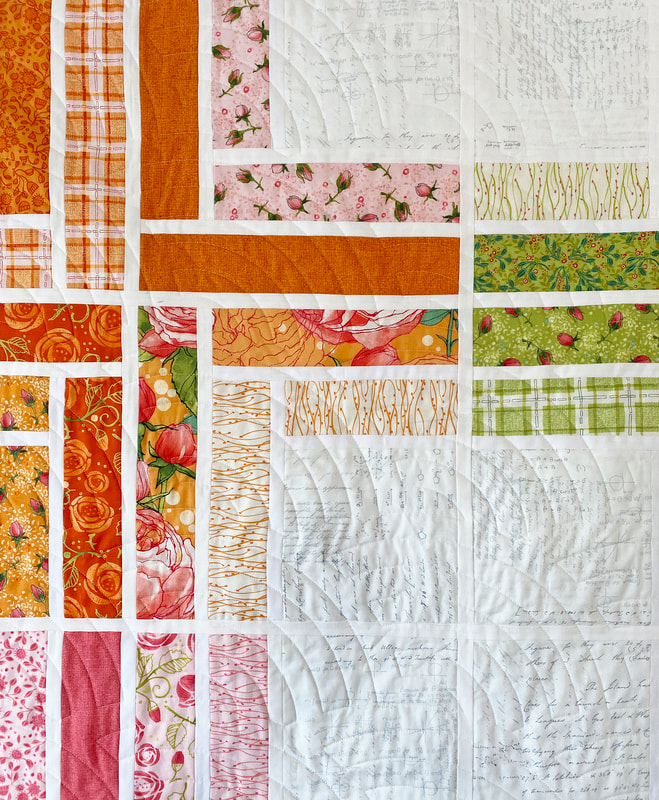 And just one more idea, since I'm playing around with it...what if the placement of colors were more improvisational and the background squares also had some pops of color? I decided to take a look in the suggestion of my Hygge Happy color theme direction (with Washed Linen, Toast, Cocoa, Sugar Rose, etc). What do you think? Playful or too random? 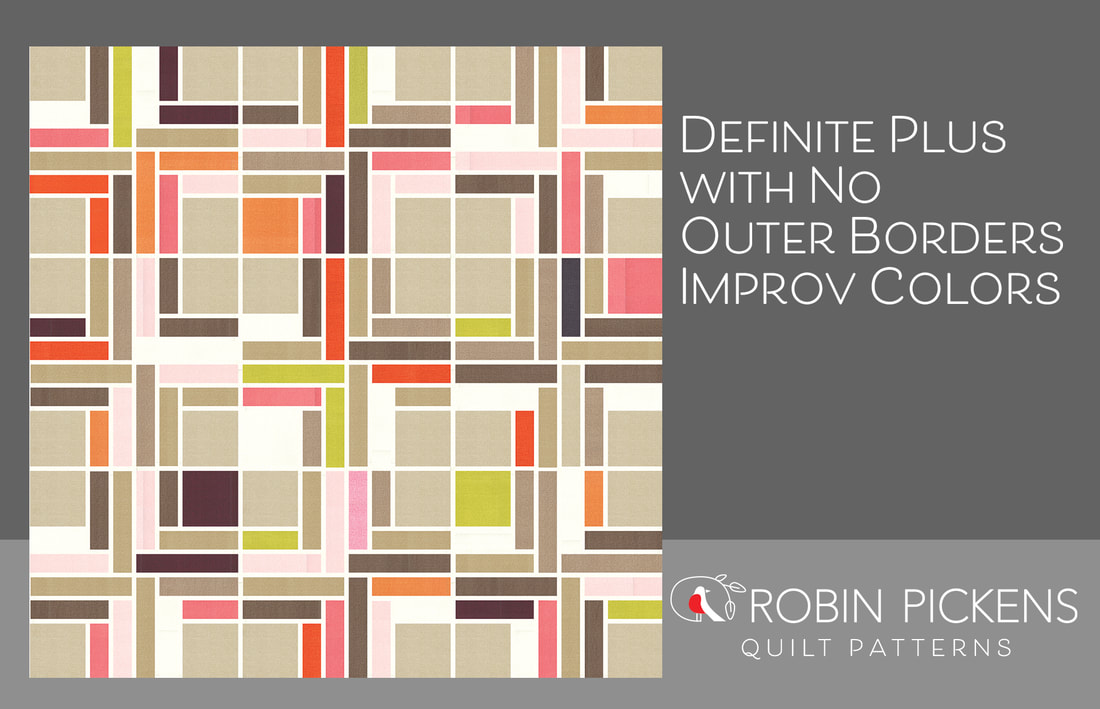 Looking for more Jelly Roll-friendly quilt patterns? Hop on over to my shop and check out Showering Stars, Ring Around the Posies, Equalizer, and Blockstep. And please join in the fun on September 18th 2021 as we sew those Jelly Rolls! 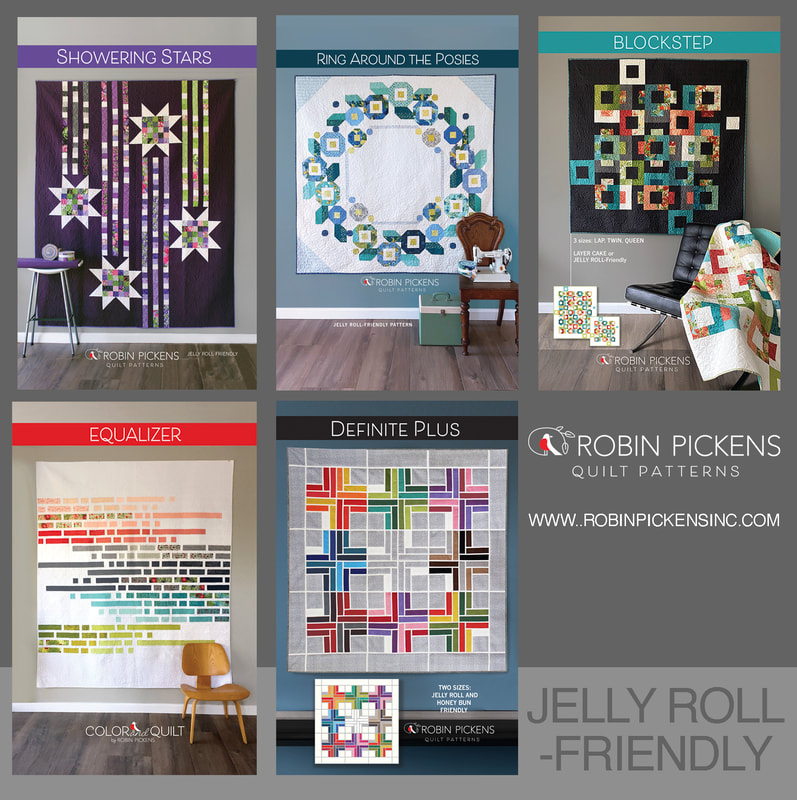 I am so happy to announce that the last of the new patterns that accompany the Cottage Bleu fabric line have finally arrived! To celebrate, I am releasing my brand-new quilt designs which are called Wind Drifter and The Collector! 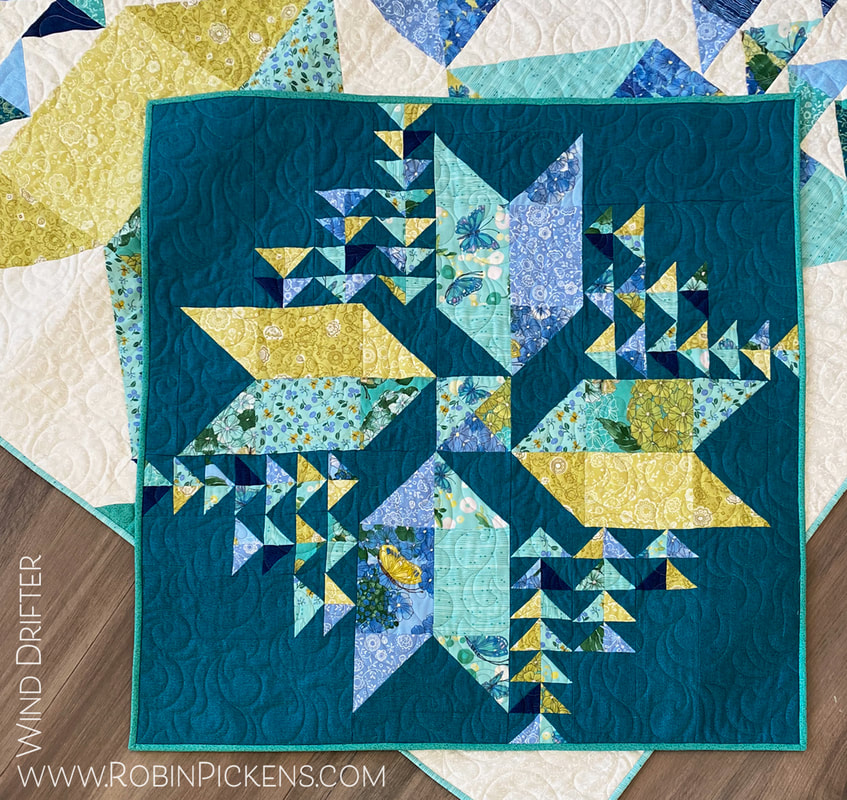 First, let's talk about Wind Drifter! If you are a beginning quilter and are wanting to make your first half-square triangle quilt, this pattern would be a perfect place to start. This is because Wind Drifter is an easy quilt pattern that uses half square triangles (or HST blocks) paired up and stacked in lines to make pinwheels of motion! They remind me of rows of flying geese blocks but with more dimension by using the two fabrics of the HST. When designing Wind Drifter, I wanted to combine rows of triangles, basic blocks, and individual triangles, to create a fun quilt design that looked complex but was still easy to put together. I JUST finished putting the binding on the small version of Wind Drifter and have been trying it out around the house. I intended for the small one to be a wall quilt but I think it also makes a lovely table topper! I think you could add large borders and make a lovely baby quilt or crib quilt as well. 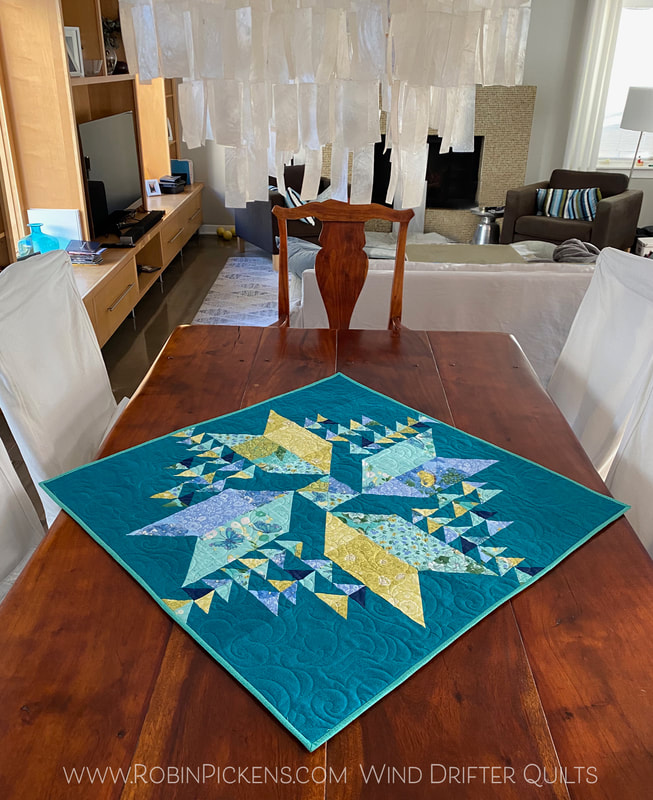 I enjoy seeing the smaller quilt paired with the larger Wind Drifter quilt and the combination of dark and light. The background fabric I have used on the small one is a new Thatched color in the Cottage Bleu group called Pond 48626 145. It is such a nice deep tealish green. The medium green on the small binding is Horizon 48626 144.  When it comes to the size of the quilt, Wind Drifter can be made in two different sizes. The large quilt size is 65" square and the small is 32 3/4" for the small. Below you can see the finished quilt in both sizes. For the larger version, I've used the same color palette as I did in the smaller version. The biggest change that I made was using the white/cream tonal Floral Fling print as my background fabric. Using this particular print, gave such a nice, subtle texture in those open spaces. Both of these quilt directions are written for using Fat Eighths. However, when it comes to fabric choices, the possibilities are endless! You could easily make different variations of this quilt using solid colors, prints, or even textured fabric. Plus, I love the idea of using a larger, scrappier mix of different fabrics for the half square triangles. If you have a stash like mine, you can imagine making the entire quilt top as a scrappy triangle quilt! Since we are on the topic of fabric and triangles, I did want to point out one thing about this pattern. If you are looking for a great way to show off bigger prints within this pattern, try placing them in the sections which have the larger triangles or arrows. They create a balance between large and small. The combination of arrow directions leads your eye around the quilt and to the center where the Quarter Square Triangle Block lives. 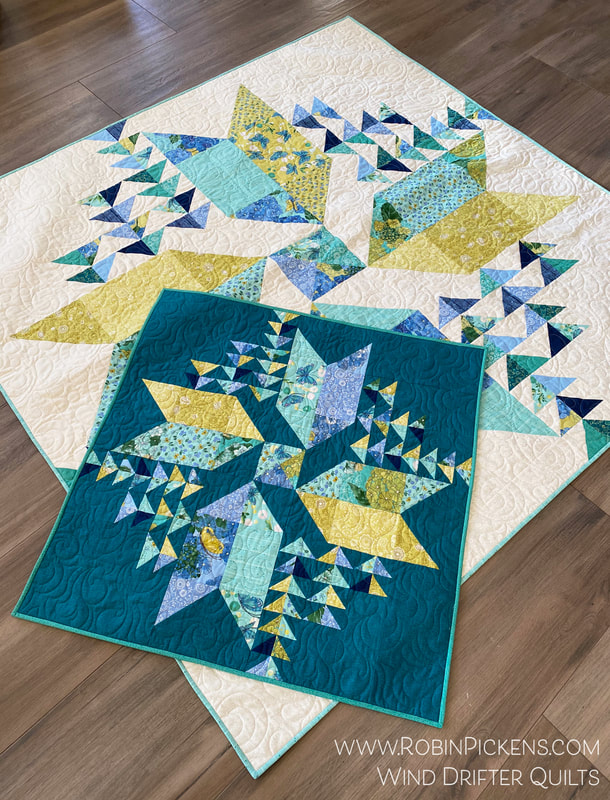 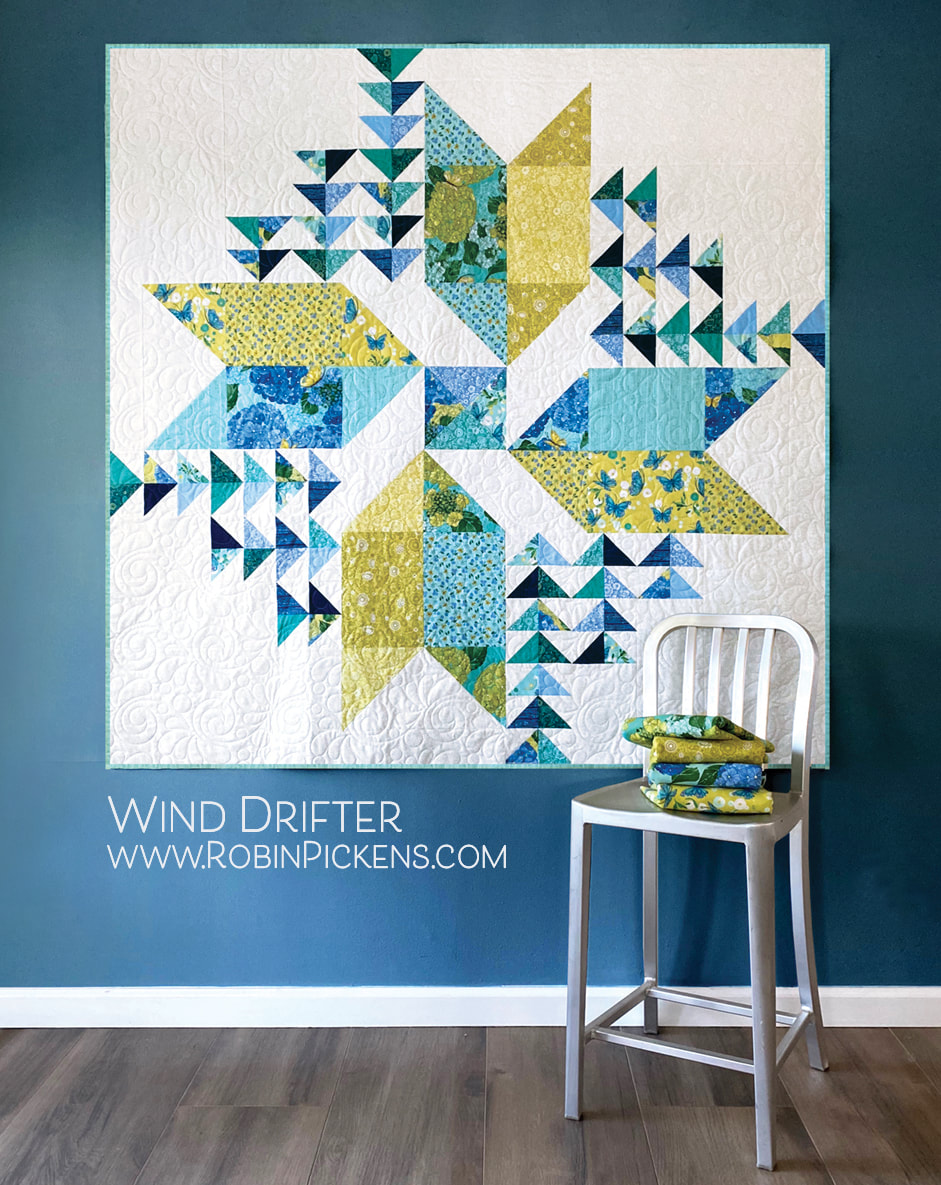 Moda Fabrics is kitting Wind Drifter in the large size with the cream background. The kits will have triangle paper on a roll, which makes the paper piecing of the small half square triangles so fast! I love triangle paper. There is less trimming and they are so accurate. You do not need to make a drawn line on the backs of your squares. Just follow the sewing lines. They also make creating a half square triangle quilt such a breeze! My other new pattern, The Collector, was a really fun project with vases, jars and bowls to show off pretty prints. I went with a chinoiserie feel with my vases, thinking of lovely blue and white ceramics. but I also think these would be super cute in novelty fabrics like cookies and pickles and crackers in the pantry...just flip the wide vase angled top upside down and you have a wide jar with a lid instead of a vase. Is your collection of sewing items? Fill your vessels with buttons, thimbles and threads. Or maybe you like toy airplanes, marbles and jacks? So many different ways to show your treasures in these collector jars. 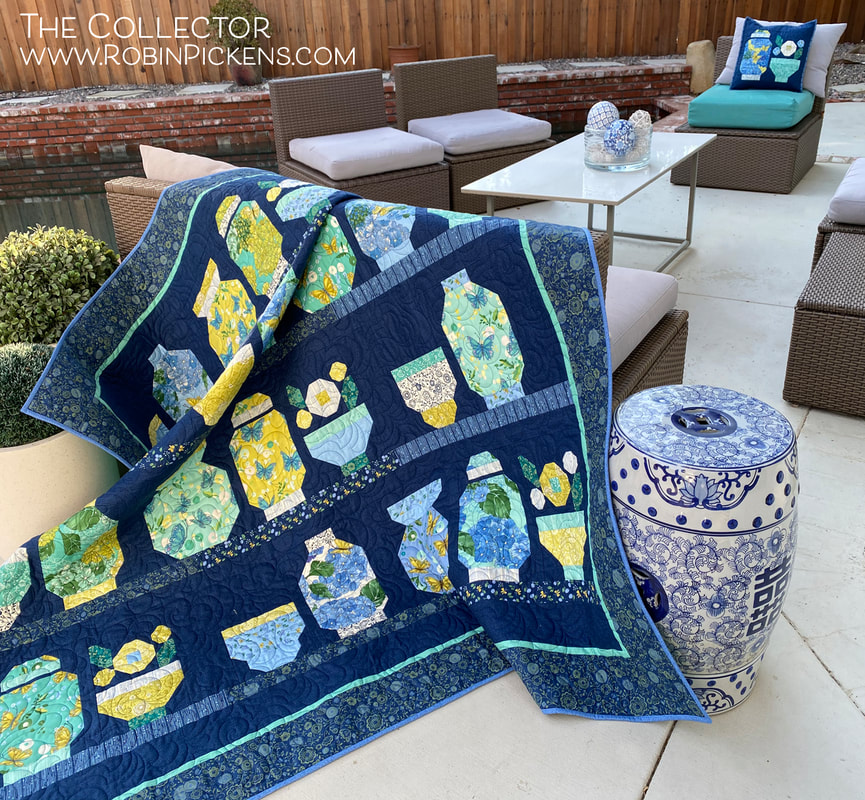 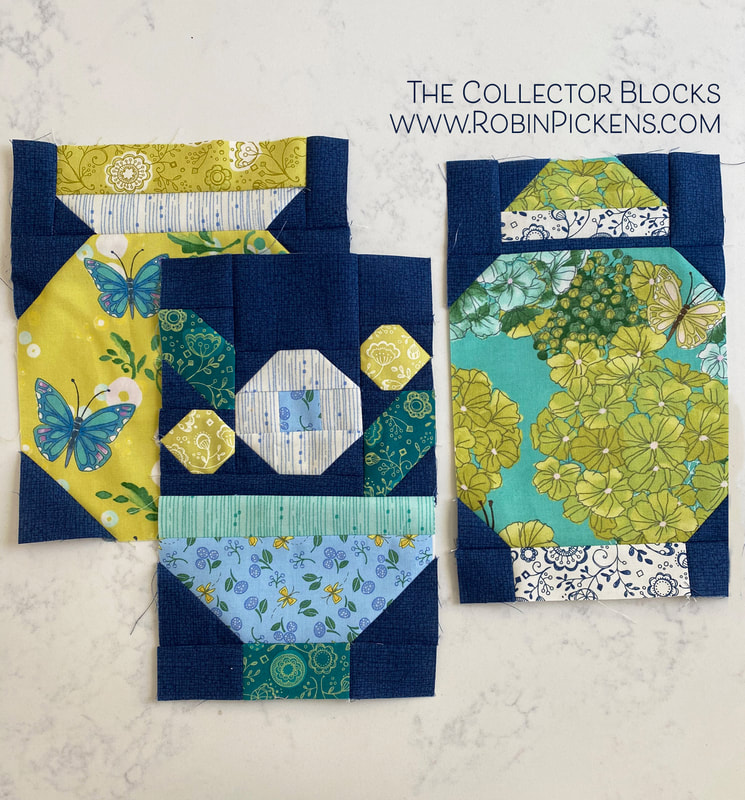 These vessels are arranged into sets of 2 or 3 units, then repeated. I had sewn together one strip and put it on the dining room table. Wouldn't that make an interesting table runner? 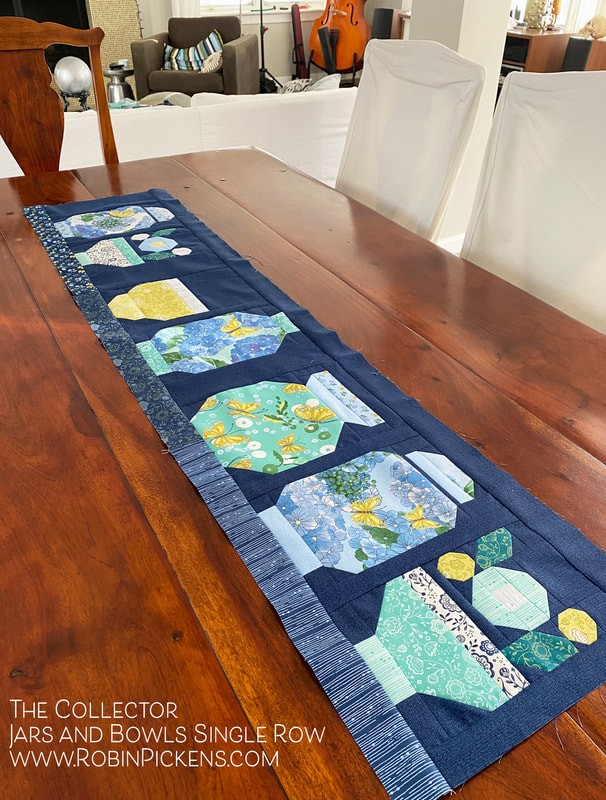 And I used a couple extra blocks I made to make a coordinating pillow with my quilt. 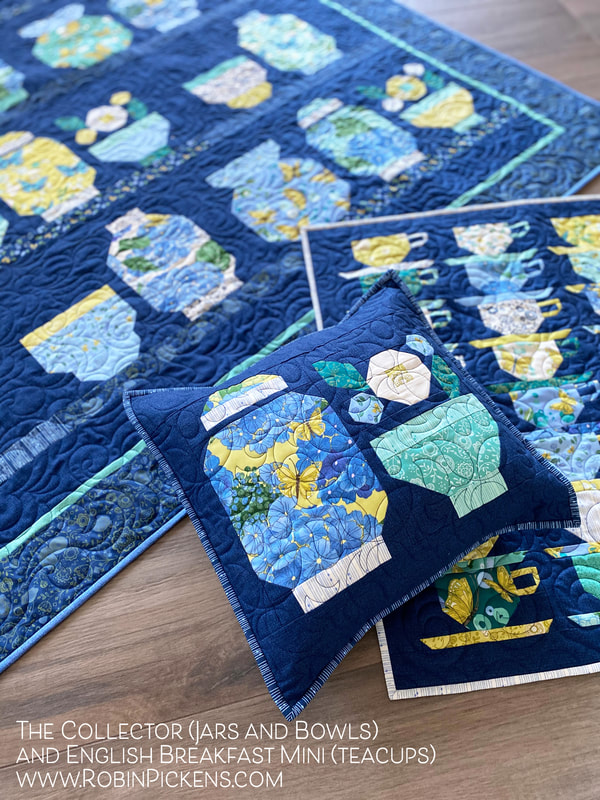 The Collector is sized 67 1/2 x 65" and is also made from Fat Eighths with background and border fabrics added. This would also be a good scrappy project (especially if you have a piece of fabric that you have been saving for a ''special project''). Look for pieces for your vessels that are 8 1/2" high and 8 1/2 wide to fit the larger jars and vases. Also, if you have a bunch of fat quarters in your craft stash, this would be the perfect quilt to use them in! 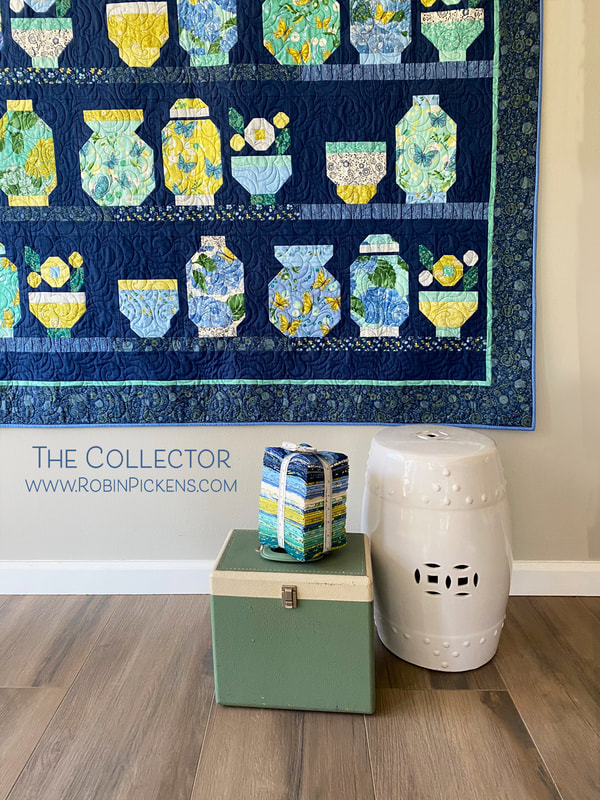 The quilts shown here are using Cottage Bleu, which should be shipping from Moda Fabrics in April. This quilt also goes well with English Breakfast mini quilt with tea cups. I enjoyed a little home decor theme with this collection and had fun with those big hydrangeas in bursts of blue splendor. I hope you have as much fun as I've had with these patterns and I'll share more as other versions are done with new fabrics. I've been gathering fabrics to make one like jam jars (so fruit themed fabrics) and one with sewing notions (I'm still looking for the perfect buttons!). And I might even do a spooky Halloween one with curiosities in the jars! Stay tuned for that one! Happy quilting! 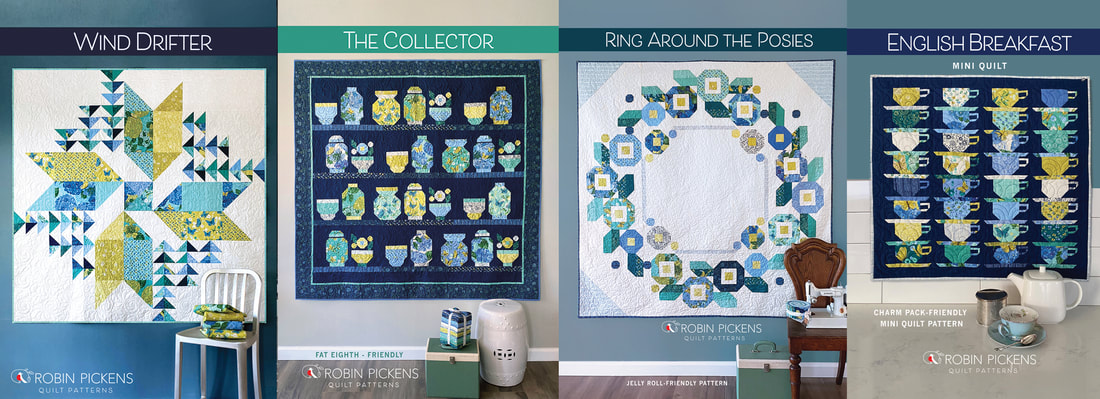 Fair and Square has a special place in my heart because it was in the first group of patterns I designed. I've learned a lot since then and ended up completely rewriting the instructions. This quilt continues to be a learning experience for me! 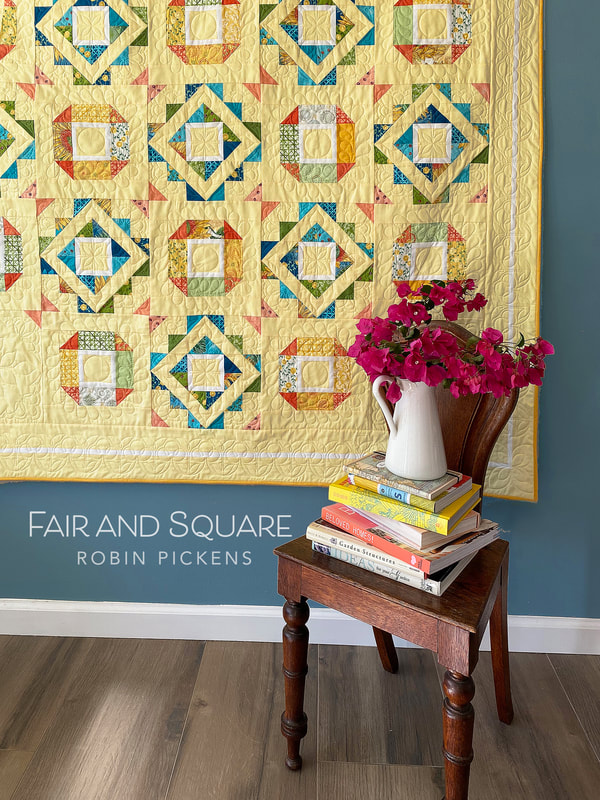 I made a revision to the design from the original quilt. I wanted to show this quilt with a soft, buttery yellow background to go with my big bright sunflowers. Sometimes with a pale color mixed with prints needs a little more defining contrast. I loved how a thin white border gave a little additional crispness to the block centers. I decided to carry that thin white sashing around the border to define the space. 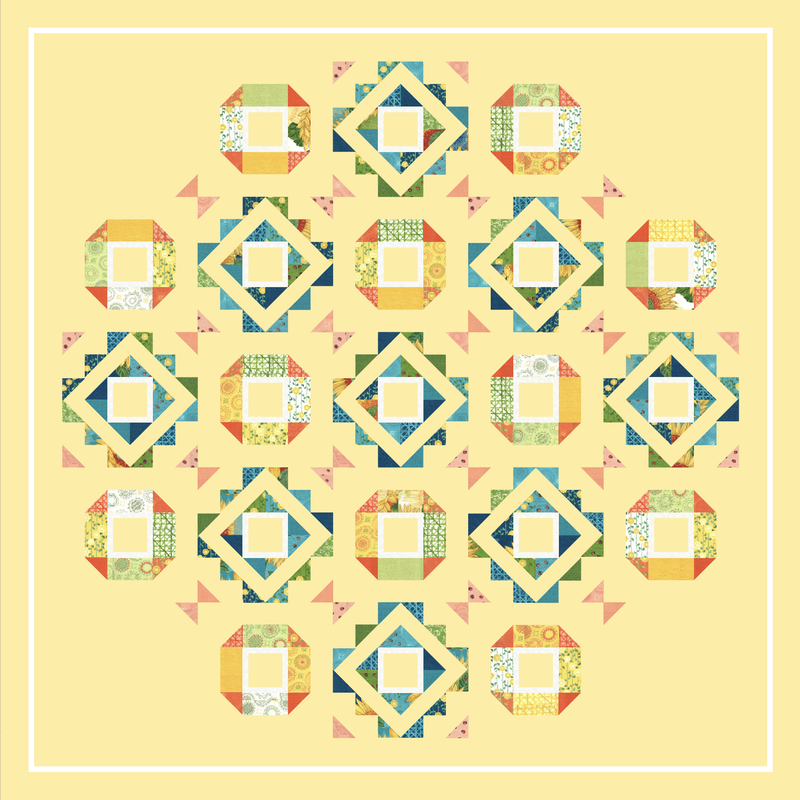 The first time I made this quilt I thought the process of making half square triangles went on FOREVER! Now I just enjoy seeing those big blocks come together from a fun mix of little triangles. This quilt can be a fun way to use up some of your extra half square triangles (I save all my extras for scrappy projects) or pieces at least 3" square. Yup, got a lot of those. This pattern specifies a layer cake but can also be made with scrappy pieces approximately 3 x 5" with background fabric added. 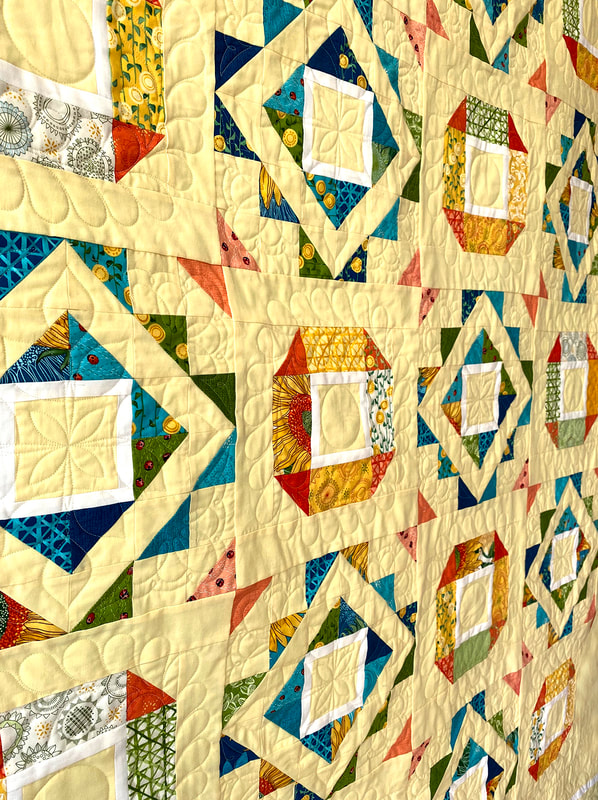 Part of my learning experience this time on the quilt was doing the longarm quilting. My system is computerized and I put the sewing designs into the individual blocks vs going with a continual pantograph that is edge to edge. I did a different border design and two designs rotating between the two types of block styles. Aligning the design, staying centered, working out what looked right with the blocks...I did numerous tests on scraps first. I can say I have SO much respect for the amazing longarm quilters out there that I see doing incredible custom work. It's not easy and requires patience and expertise, even when its guided by the computer. I'm glad I pushed myself to try this. It's not perfect, but I think I gave up the quest for perfection a long time ago! I quite enjoy seeing the areas that have mistakes because it records learning and improving for me. 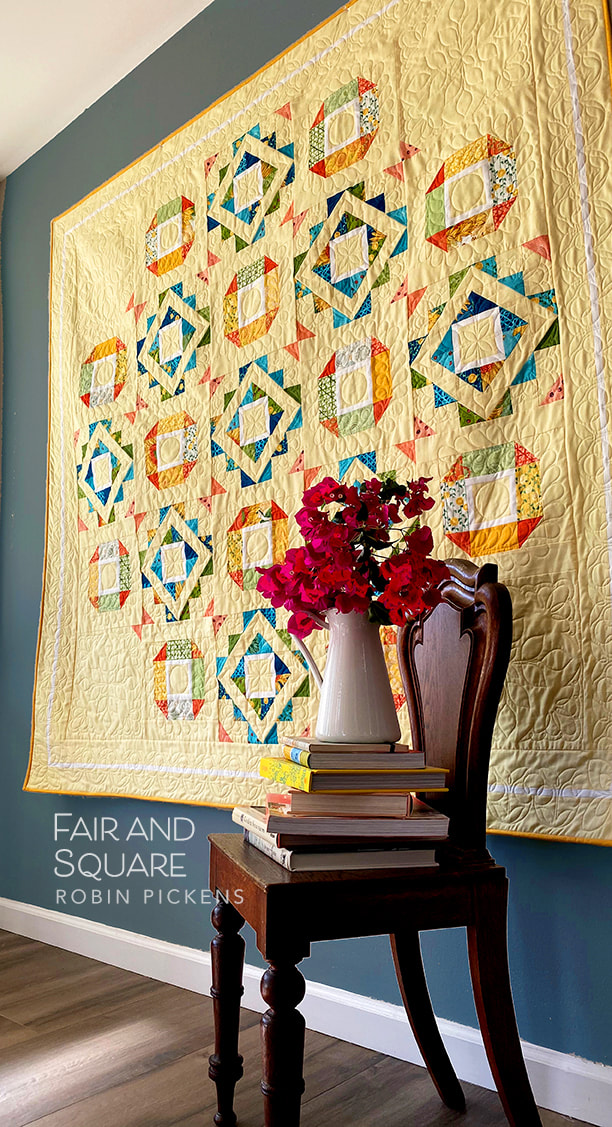 The back of this quilt has the print from Solana of little ladybugs. I just couldn't wait to try this on a backing since it is such a fun little print and I love ladybugs! They seem like good luck and fond wishes coming from busy little bright ladies. This print is great for a backing since the ladybugs have little dashed lines of curvy walking paths in a subtle texture in the background so its very forgiving if you make mistakes while quilting. Yes, I know that from personal experience. 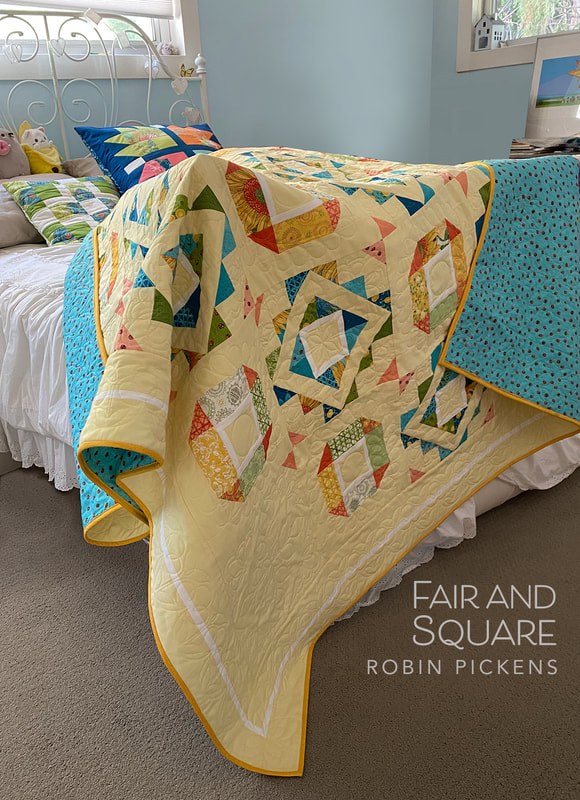 In case you were wondering what yellow this is, its Moda Bella Solids Baby Yellow 31. I paired it with Bella White Bleached 98. This is the original Fair and Square quilt I made with Poppy Mae, my first Moda Fabrics line. It was quilted by Gina Siembieda. 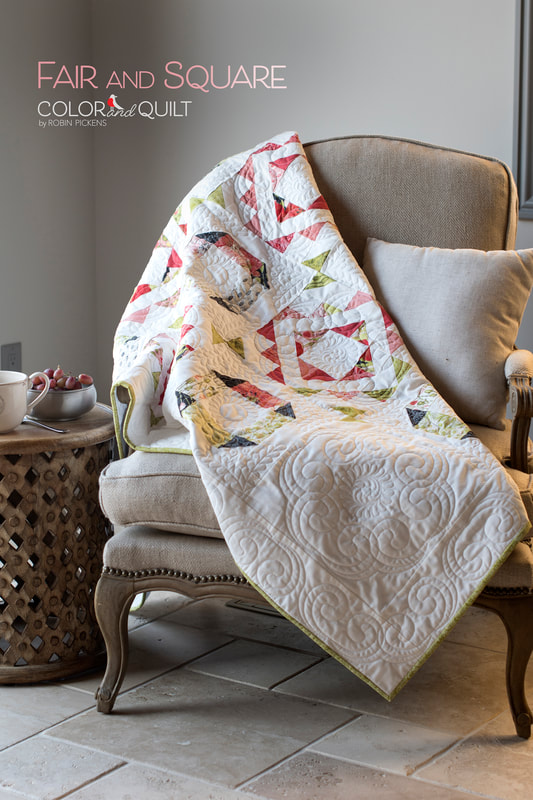 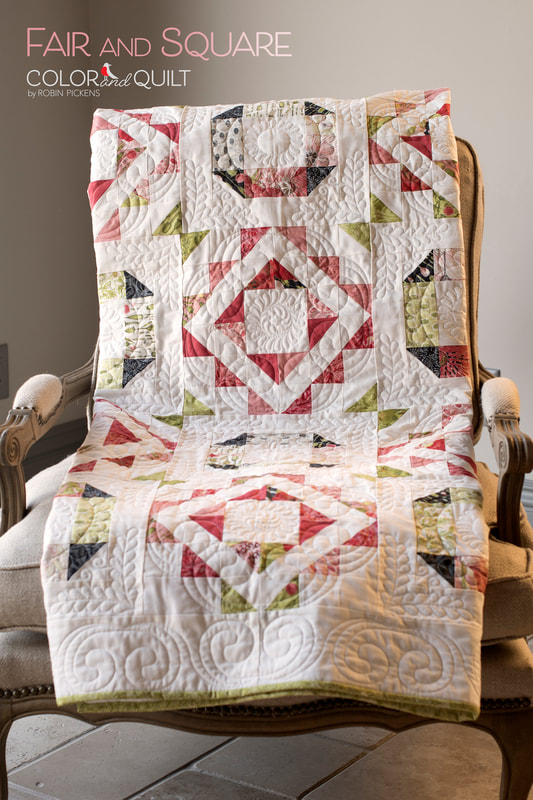 If you want to check out other quilts made with Solana, visit these posts: https://www.robinpickens.com/blog/simple-solstice-on-a-sunny-day https://www.robinpickens.com/blog/solana-patterns-here-comes-backslash or visit my shop! Have a sunny, happy sewing day!  |

About ROBINDesigner of colorful florals for Moda fabrics. Modern to transitional quilt designer. Illustrator, sewist, crafter. I am proud to be a designer for Moda Fabrics!


Shop Robin's Designs
 I am an affiliate for Fat Quarter Shop and may earn a small commission through my links. Thank you for your support!

Check the March 6, 2017 Episode!
Categories
All
Archives
February 2024
© Robin Pickens Inc. All rights reserved. No images may be reproduced without permission.
|
 RSS Feed

