|
I've had requests to show my sewing space and I've shown it in bits and pieces before but thought it was time for a better tour! My daughter was home this past weekend and she spent a day helping me clean it up so it was presentable to share. We made a video and posted it to youtube and I'm sharing that here. I'm also giving a little more info on some specifics of my setup and things I use. 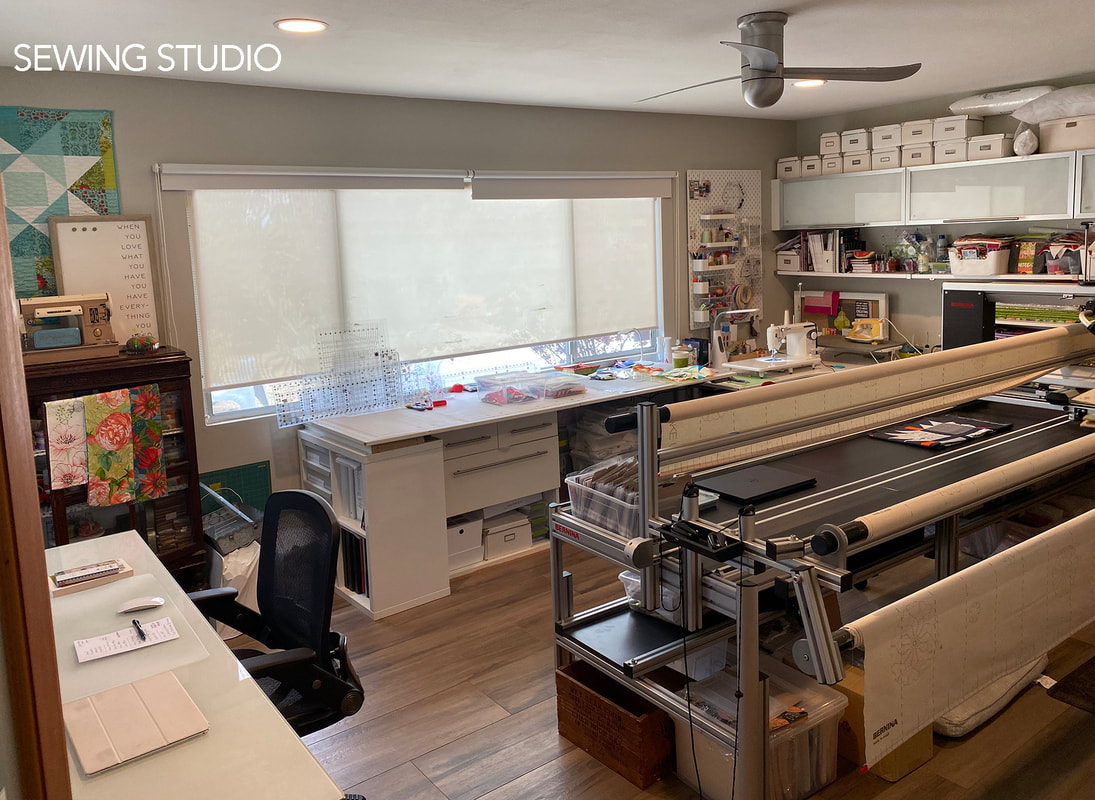 This space has gone through a lot of changes and rearranging. When we first moved into this house this room was carpeted and had wood paneling on the walls that had been painted a peachy color and turquoise formica cupboards and counter built into the end wall. Those came out. We put in drywall and wood floors, but after water damage downstairs, years later, we moved everything out and the room was tiled. I've rearranged this room many times and at one point it had 5 large desks in it, along with numerous bookcases, chairs, boxes of samples, etc. My husband has commented that I couldn't possibly get more furniture into the room. Of course that is when I decided to add a longarm. I was determined. I can make it fit. That whole plan and journey is really deserving of it's own blog post, so I'll just say here that this is the new and improved layout with more things moved to the walls (and my daughter's room since she is at college), leaving space in the center for the longarm. Welcome! 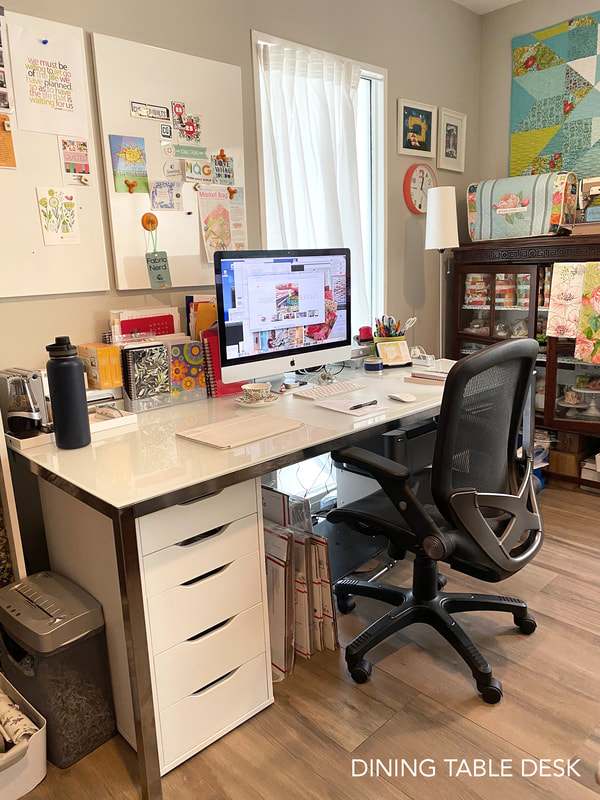 I spend a lot of time at this desk. It is actually a dining table from Ikea. It is the "TORSBY" table and I see they have it now with a high gloss white top. My table has a glass top which is painted white on the underside. I like having a larger desk surface by using a dining table, plus I like the clean modern look of this. This table measures 53" x 33 1/2" so I can spread out. I like the fact that the top surface is glass because sometimes I do watercolor painting here (or in the kitchen) and when I do, I can clean off the surface of the glass easily. I tucked a Ikea Alex drawer unit under the table/desk. This holds my pens, envelopes for orders, postage, packing tape, plastic bags for kits, office supplies, etc. It fits really nicely. I also have some holders on the desk top for my notebooks, calculators, business cards and clip boards. The magnet boards are also from Ikea. Just so you know now- I have a LOT from Ikea. I love their creative solutions with furniture and all the options they have. 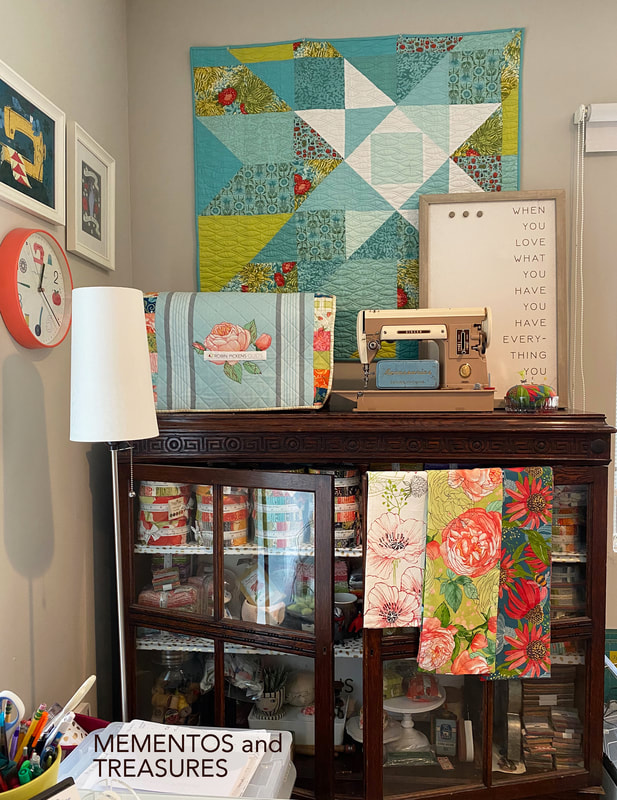 In the corner I have an antique chest that was my Aunt Doris'. She was the only relative living out here when I moved to California so it seems appropriate that I use it to house things that feel like sentimental treasures to me. I've got the fat quarter bundles and jelly rolls for each of my collections with Moda. I also keep some Christmas giftware little critter figurines I did for One Hundred 80 degrees and lovely pincushions. I like to hunt for vintage sewing things so old thimbles, spools, rulers, sewing machine oil and parts, along with buttons and some vintage cameras live here. When you close the glass door it makes a creaking noise, like the chest is talking to you. I covered the shelves with some removable peel and stick wall covering in white with gold metallic animal spots because it felt fun and fresh (by Valspar and found at Target). I also rotate the vintage sewing machines I display on the chest. The brown one is my newest and I got that from Aspire Sewing in Anaheim at the Road to California show. I love the two-tone tan. Under the sewing machine cover I have a beautiful hand crank Singer that my husband gave me as a gift. How great that I can machine sew even if the power goes out!! Add in some artwork on the wall from Crafted Moon and a sewing notions clock from Moda and I'd have to say this is a really happy corner of the room for me! By the way, the quilt on the wall is STARLET in the medium size, made in Dear Mum fabrics. And the sewing machine cover is a pattern in Jenelle Kent's FARMHOUSE FRESH book using her toweling fabric. 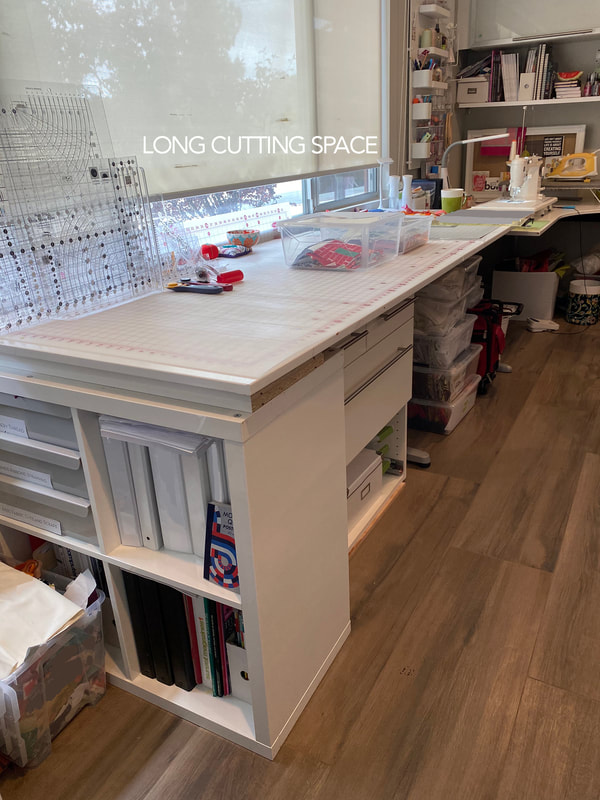 When planning out the rearranging to fit the longarm, I knew a priority to me was to have a longer cutting space. I used two desk tops from previous desks with a cupboard that was left over from our kitchen renovation (I mentioned water damage...well, it started in the kitchen and we had to redo that too) and a Kallax shelf unit from Ikea as an end support. This gives me storage and cutting table support and is a good height. I can measure out over 2 1/2 yards at once from a bolt on this surface and that is a great help when I am making kits or doing backings for quilts. Having a longer cutting table is a great thing to have in a quilting work space! Since my longarm is right behind me when I am working at this cutting table, I can always turn and use it as a counter space for compiling kits too. This area has become a very efficient work space. 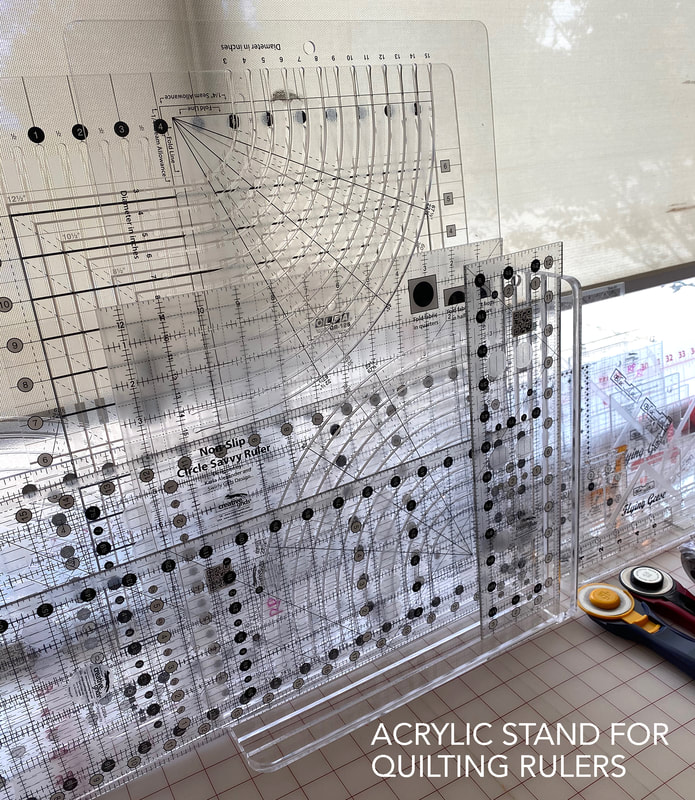 On my cutting matts, I have acrylic stands that hold my numerous rulers. They are from A. T. Enterprises and I found them at Road to California. The grooves make the rulers stand up straight. I have a lot of Creative Grids Rulers. No matter what others I try, these seem to be my favorites that I use the most. I use Bloc Loc for trimming my half square triangles and flying geese units, but Creative Grids has become my GO-TO rulers for cutting. When I have blocks that need eighth measures, I use the Primitive Gatherings Creative Grids Itty Bitty Eighths Square and for most of my general cutting, I use the Creative Grids stripology ruler (designed by Gudrun Erla) and 3 1/2" x 12 1/2" ruler, 4 1/2" x 8 1/2" ruler and the big 8 1/2" x 24" ruler for cutting width-of-fabric cuts. So I keep these handy and at the cutting table, vs the other specialty ones that I keep on the wall shelf. I have the perfect 10 ruler too and use that for layer cake projects, but the ones I just mentioned are my normal daily rulers ( the 3 1/2", 4, 1/2" and 8 1/2" long one). For rotary cutters, I usually use Olfa Splash or Martelli Ergonomic (Ergo 2000 which is kinder to my wrist) rotary cutter. 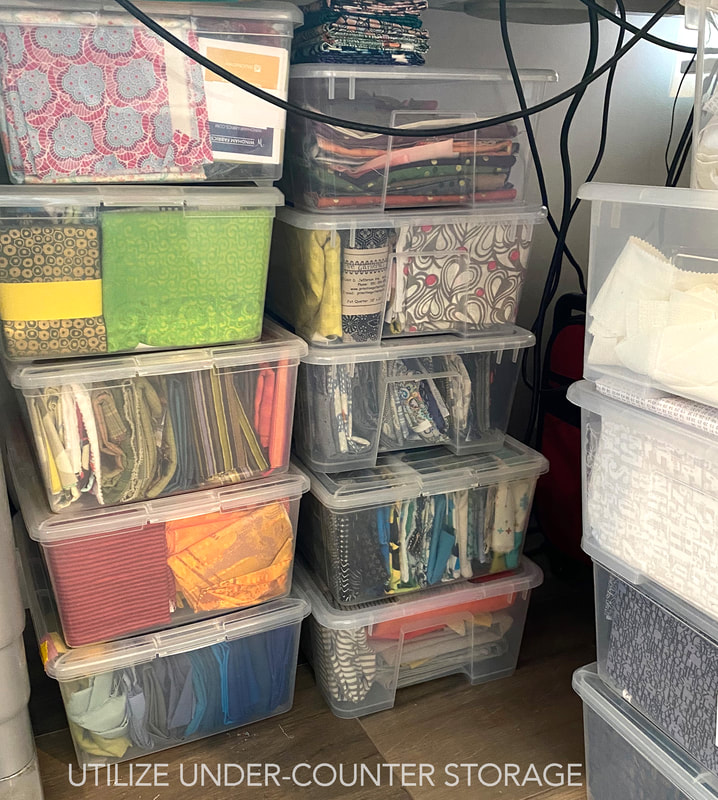 I try to utilize space under my furniture as much as possible. A little further down, under the cutting surface, I keep plastic bins of my fabric stash that I have collected through the years. I keep the stacked bins with fabrics by color and genre, so mid-century fabrics are together, batiks are together, woven plaids together, etc. I can pull out the tubs as I need them. 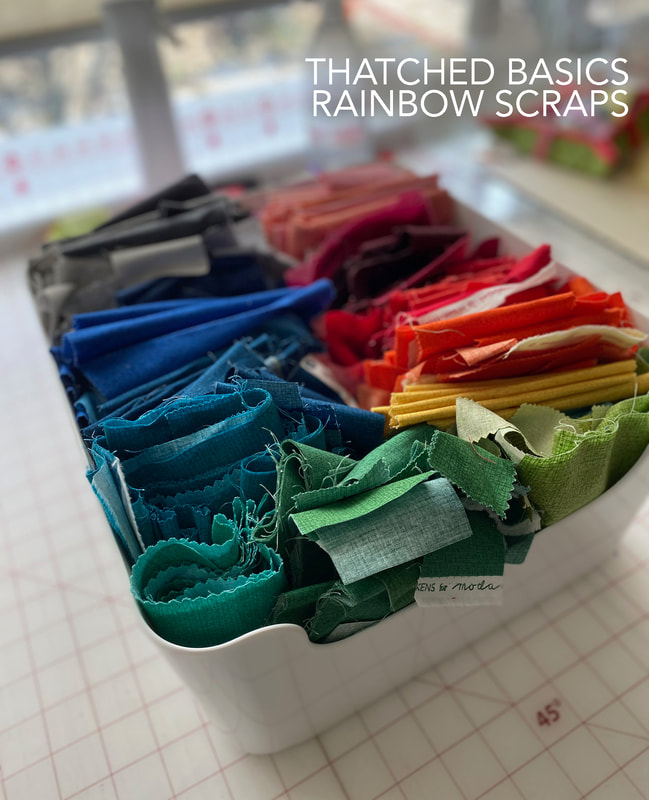 I also keep my scraps for projects in some tubs and containers I can easily access as I'm doing sewalongs and other scrappy projects. These Variera containers from Ikea provide a nice space to fold up and store my Thatched Basics fabrics in scraps as I work on numerous projects. I keep some of these on shelves or on rolling carts, where they are easily accessed. I put the colors in according to the rainbow ramp of colors I have used. It is easy to pull out a bin, use scraps, put the remaining back, and keep some order to the studio. 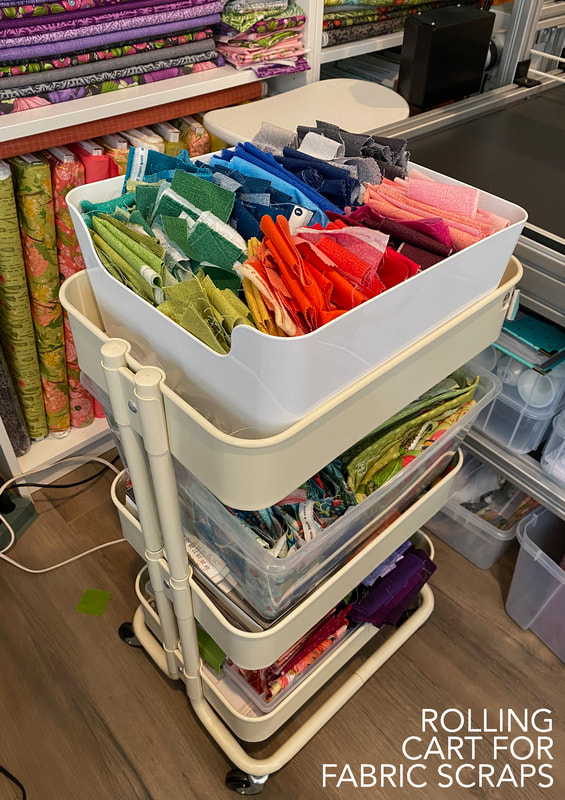 This Raskog cart holds the bins of fabric scraps well and I like how it can roll over to the table or cutting surface easily. I have another cart for other sewing notions but I keep this one for fabrics near the cutting table. I can take the tubs of fabric out and replace them as needed and roll it to where I am working. This is where I pull most of my fabrics for my Moda Blockheads3 blocks each week. Since I am doing a quilt with rainbow bands of color for this sew-along, keeping the scraps in color groupings makes this very easy to assemble and play with the options. One of my quilts will be made in all Thatched basics and the other in Thatched plus prints so I like to keep that Thatched bin very handy. 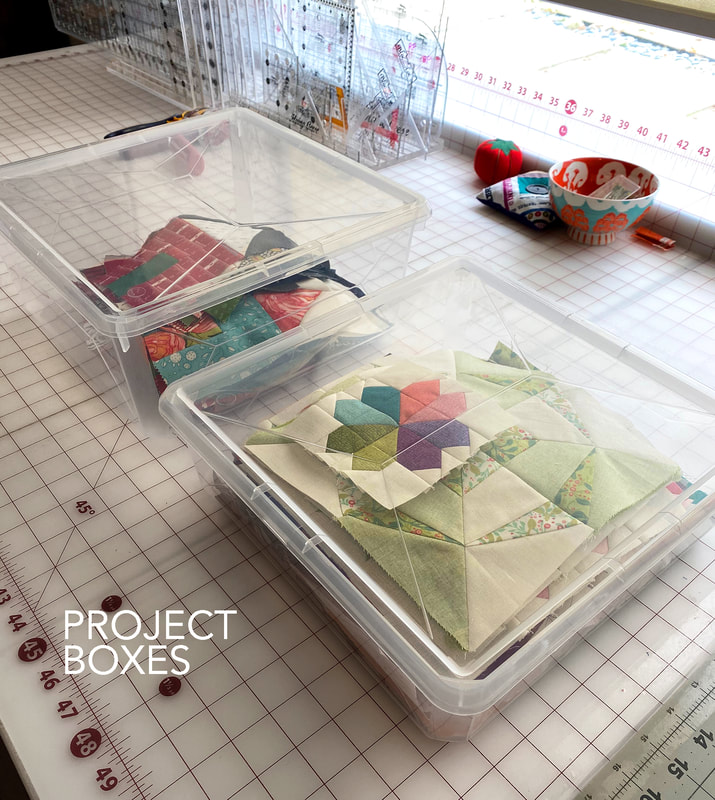 Speaking of Moda Blockheads, I am making 8" blocks (with occasional smaller blocks for other projects) and I found these great project boxes at Target to store my blocks. I love them because they are 11.8" x 11.8" so if you are making any blocks that are 10" or smaller, the pieces and finished blocks fit really well! These boxes are only about $2 or $3 a piece so they are very affordable and I stack them on top of bookcases with other projects in progress. I've got about 9 or 10 of these boxes for my different WIP. The box to the left of the Blockheads blocks above has my Moda Village #modavillage blocks for Christmas and Abby Rose versions. This pattern is from Miss Rosie's Quilt Company by Carrie Nelson and is lots of fun! Want to read more about that? Check out my blog post on my Christmas village. 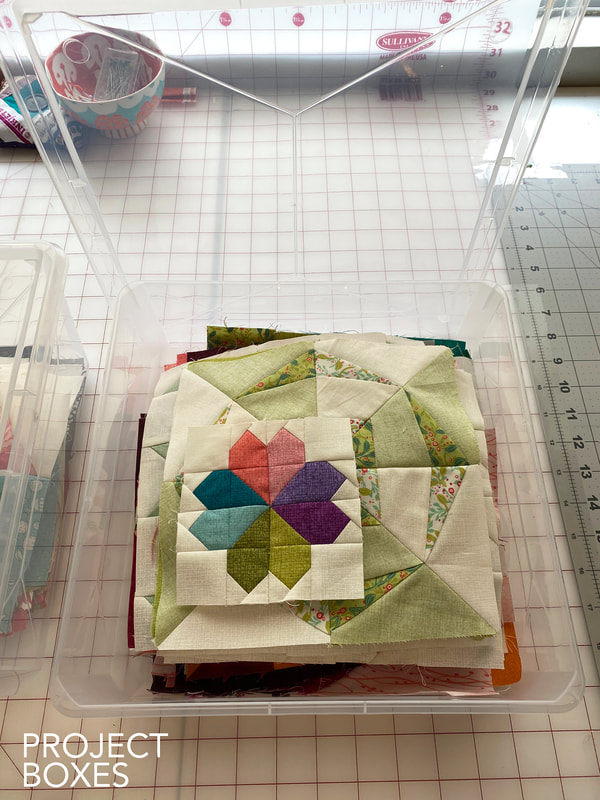 I think as the Moda Blockheads progresses, I'll need to get the taller versions of this box. There is also a 10" high one and I just might have to go for that taller size to hold my growing blocks! 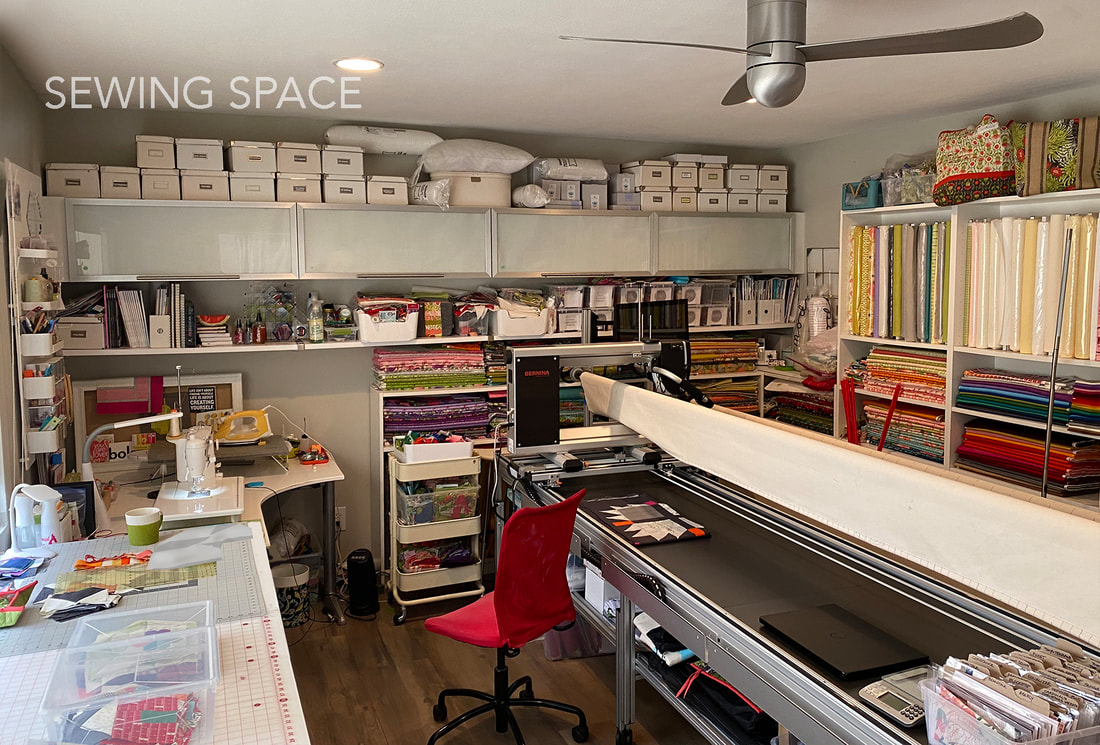 In the corner I have a lovely corner for sewing and piecing. Some nights, when things are dark in the rest of the house, this little corner is glowing and humming with the activities of late night sewing. The cupboards along the wall hold various cans of spray basting, paint brushes, stationery, and color swatches. The shelf below holds containers for strip piecing, extra rulers, magazines and works in progress. My sewing corner is lit up by a light from Costco with multiple brightness settings and a little fan to blow cool air on me on hot summer days. The corner desk is from (again) Ikea with a curved side that gives me extra space for a desktop ironing board, my Oliso iron, a bulletin board, and my peg board with notions is on the wall in front of me as I sew. I love sewing at my trusty sewing machine, my Juki TL2200. This straight-stitch machine is my daily helper and workhorse. I also have a Bernina 125 for classes and a Juki HZL-F600 for other fancy stitches. But this Juki TL2200 is my bestie in the sewing room. 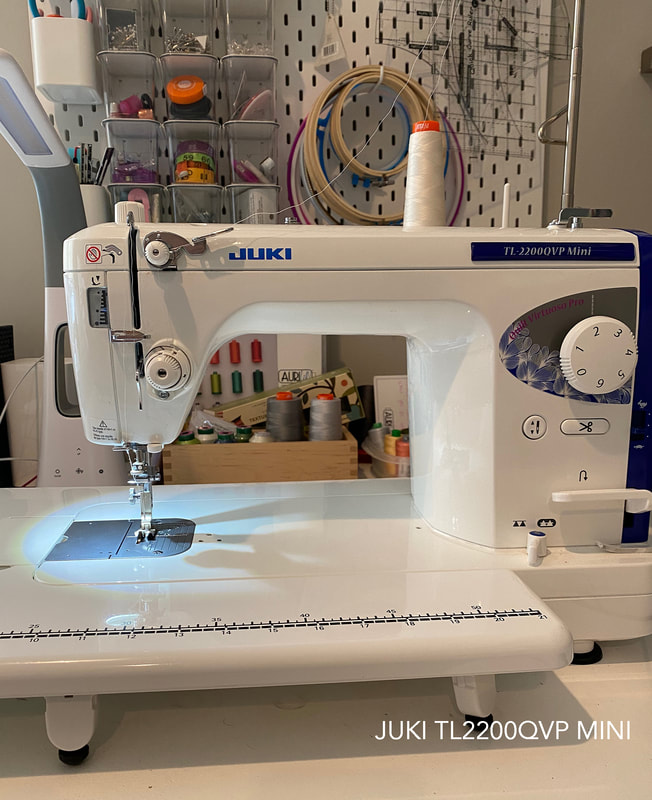 I got this machine at the Quiltcon in Savanah from SewingMachinesPlus.com and it has run like a dream. I recently ordered more bobbins and needles from them and have had excellent customer service from Sewingmachinesplus.com. I've also faced this machine perpendicular to me and put an extended table on the desk and done free motion quilting on this machine with great results. I love my Juki! 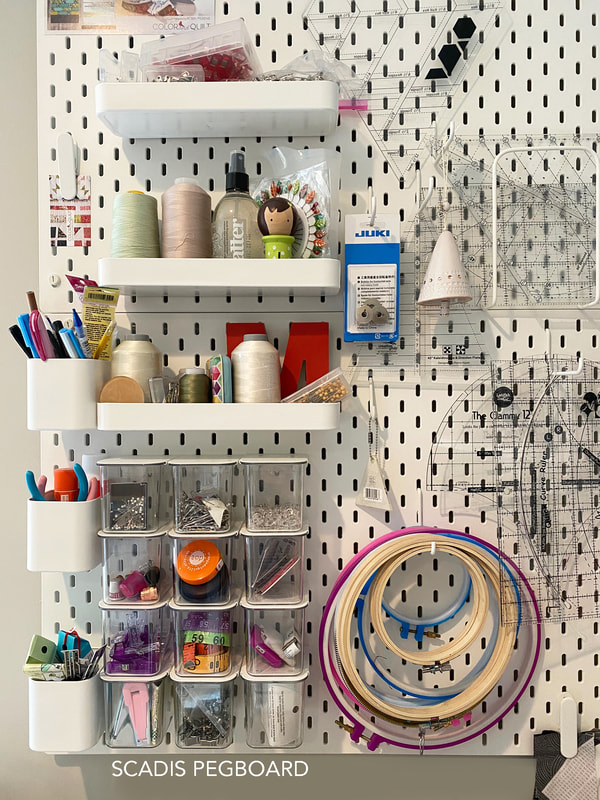 This is the Skadis pegboard system from Ikea that holds a lot of my sewing notions. I have pegs for embroidery hoops, rulers and things I want to hang. The little slide-in containers hold my push pins, safety pins, measuring tapes, bias tape makers, pins, thimbles, needles, clips and marking chalks. I find it is so easy to have these things get lost and mixed in with other things that having this wall system really puts some order and structure to my organization. The shelves hold large threads, bobbin buddies, pins, starches and other notions. The cups hold pens, markers, needles, rulers, pliers, and snips. I've got two boards stacked one on top of the other and there is a little extra room. I think if I had one it would have not been enough so I'm happy to have some higher space that I don't use as much to have that extra storage. 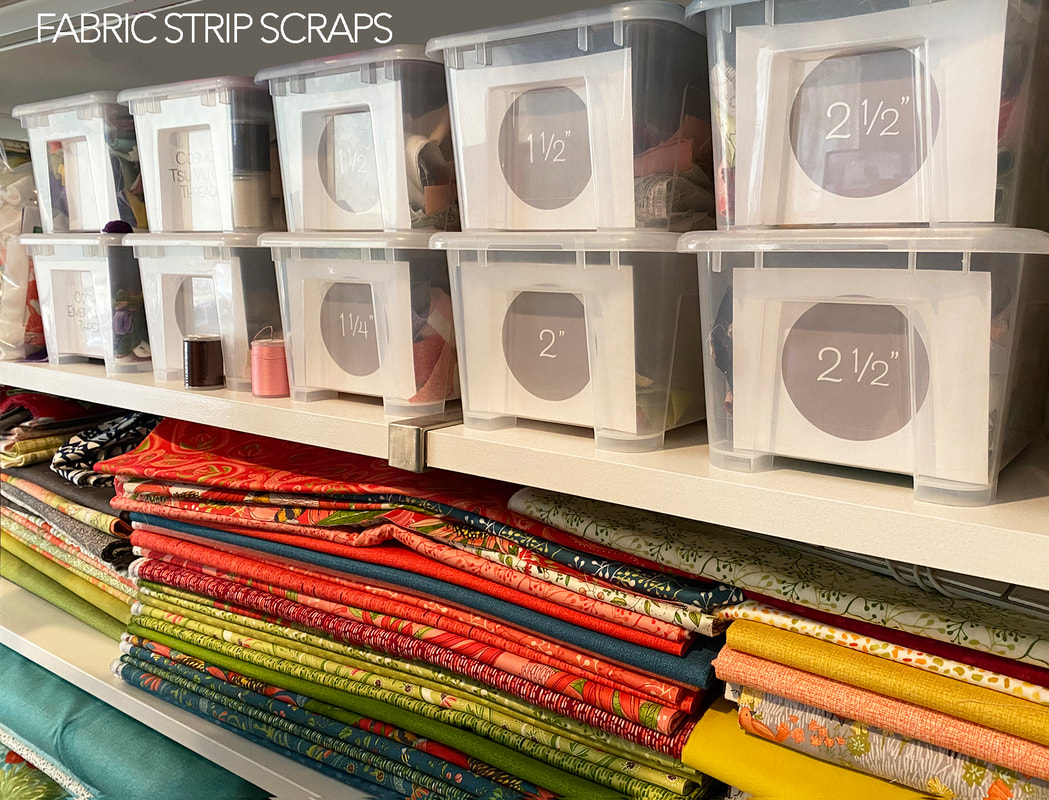 The shelf on the wall holds some of my scraps as well as the cart. I use the smaller Samla bins from Ikea for strips that measure 1/2", 1", 1 1/2", 2", 2 1/2" and so on so I can easily pull down containers and access leftover strips for projects. I print out the size labels on my computer and slide a printout into the front side to easily identify my organization bins. 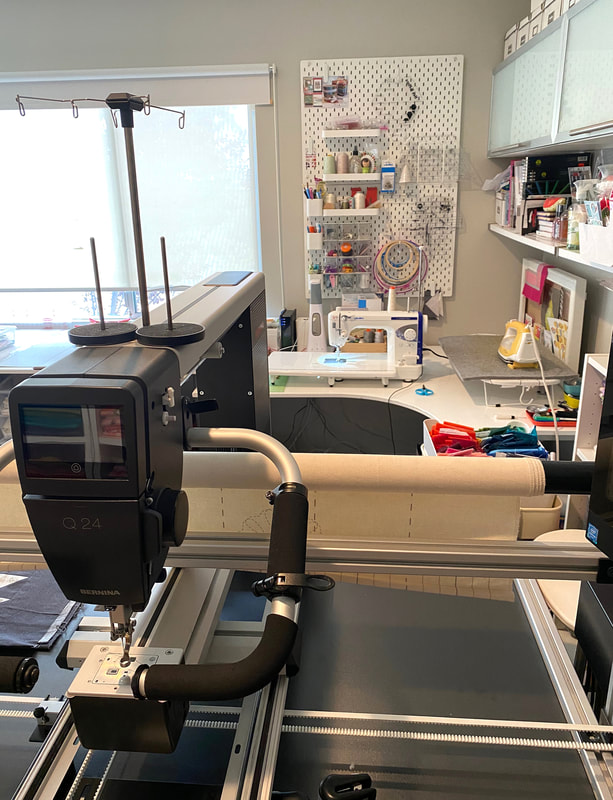 When I'm at the longarm, this is my view. I can see my sewing space and my window. I've got a Daylight Company floor light that also helps to light up my longarm space as well as can lights in the ceiling. Good lighting is important. I'm still learning the Bernina Q24 but it's coming along! 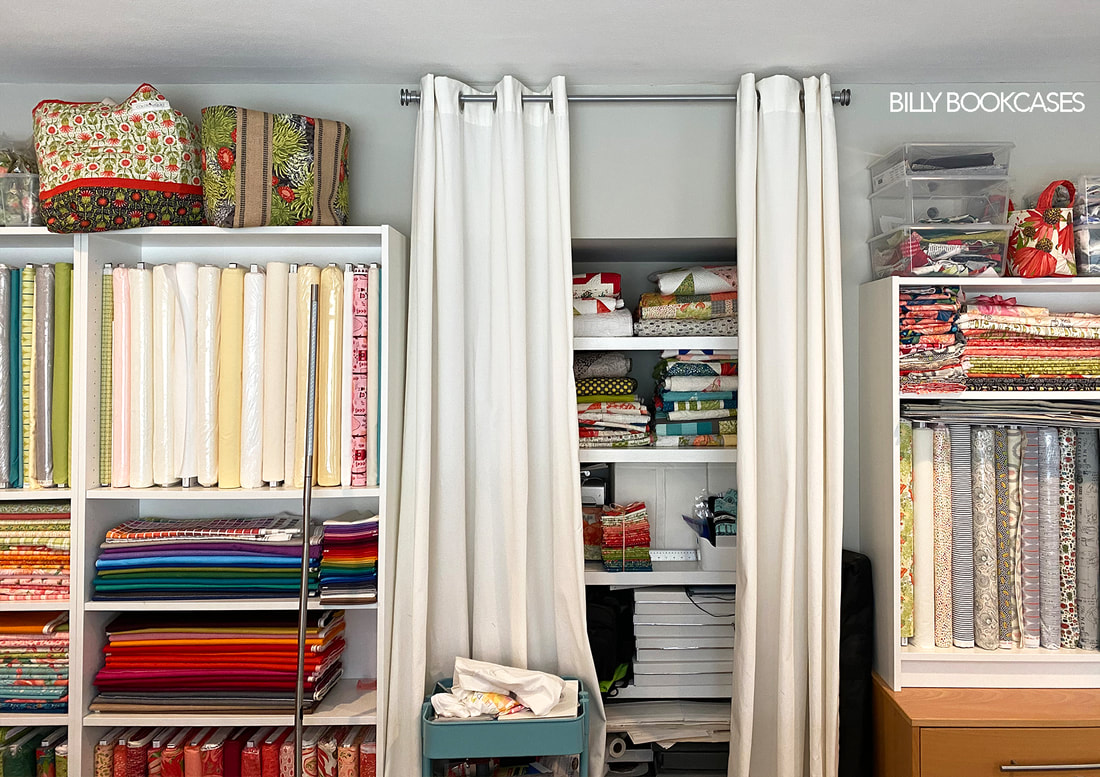 To the side and behind the longarm I have Billy Bookcases that work really well for bolts of fabric. I have overflow of fabric bolts upstairs (as well as bagged and unbagged patterns and other supplies). Most of the fabrics I use for daily sewing and cutting kits are down here in this space. The Billy Bookcases work well in the tall size for two shelves of standing bolts with some middle sections of sample fabric yardage placed horizontally. I store totes and project boxes on the tops of the shelves. My husband also converted a tv nook in the wall into shelving storage for my art supplies and extra quilts. We close it off with curtains to keep the room looking a little neater. When we added the shelving for bolts to the perimeter of the two walls of the room I lost my design wall for quilt blocks. Something has to give, right? I now use the floor of the foyer as a "design wall" and I walk up the stairs and look over at the blocks in their arrangements from above. It works. This is my space and I love it. It is a work in progress. It continues to evolve and change. If you have questions, let me know. I'm including link below to some of the items here in case you are interested in them. They don't pay me, although sometimes a company will give me something to try. I'm sharing what I use on a regular basis. If you want a walk through of the space, watch my youtube video below and check out more videos on my youtube channel. If you want to be notified when new videos come out, select the "subscribe" button on youtube. I hope you have a space that brings you as much joy as my space brings me! Keep creating and sewing! https://www.youtube.com/channel/UCNFGL95Mw4YSj98_k5RakqQ/featured
Ikea Items: Torsby Dining Table https://www.ikea.com/us/en/p/torsby-table-chrome-plated-high-gloss-white-s39931845/ Ikea Alex Drawer Unit https://www.ikea.com/us/en/p/alex-drawer-unit-white-00473546/ Kallax shelving cubes https://www.ikea.com/us/en/search/products/?q=kallax Variera storage box https://www.ikea.com/us/en/p/variera-box-high-gloss-white-70177255/ Skadis pegboard for wall organization https://www.ikea.com/us/en/p/skadis-pegboard-white-10321618/ Samla plastic storage boxes with lids for scraps https://www.ikea.com/us/en/p/samla-box-with-lid-clear-s49871676/ Raskog rolling cart https://www.ikea.com/us/en/p/raskog-utility-cart-white-20382932/ Billy Bookcases https://www.ikea.com/us/en/search/products/?q=billy%20bookcase Sewing Machine Cover in book Farmhouse Fresh by Jenelle Kent of Pieces to Treasure https://www.piecestotreasure.com/product-page/farmhouse-fresh Acrylic Ruler Stands https://www.atenterprises.com/rudi.html Target project boxes (11.8 x 11.8" square) with lids https://www.target.com/p/6-3qt-small-modular-storage-bin-room-essentials/-/A-53927402?preselect=53885131#lnk=sametab https://www.target.com/p/9-1qt-medium-modular-storage-bin-room-essentials/-/A-53927400?preselect=53885134#lnk=sametab Juki TL2200 QVP Mini https://www.sewingmachinesplus.com/juki-tl-2200qvp-mini-sewing-machine.php Oliso Iron https://www.oliso.com/smartiron/ Bernina Q24 Longarm https://www.bernina.com/en-US/Longarm-Quilting-US/BERNINA-Q-20-Q-24-on-Frame Starlet quilt pattern https://robinpickensinc.com/products/quilt-pattern-of-starlet-digital-downloadable-pdf-by-robin-pickens-in-3-sizes-for-wall-or-lap-quilts-51-38-or-26-square Robin Pickens youtube channel https://www.youtube.com/channel/UCNFGL95Mw4YSj98_k5RakqQ/featured
10 Comments
Today I put the last border on my Bird Talk quilt and I was so happy since I've been doing it in little bits and pieces, here and there. One night I will think "okay, I can get all the bird legs done" and another night I assemble the cardinal. Chip away at some leaves...little by little. I had help too with Olivia, who came and calmly cut and pieced leaves and leaf stalks while I filled pattern orders and dealt with computer things. 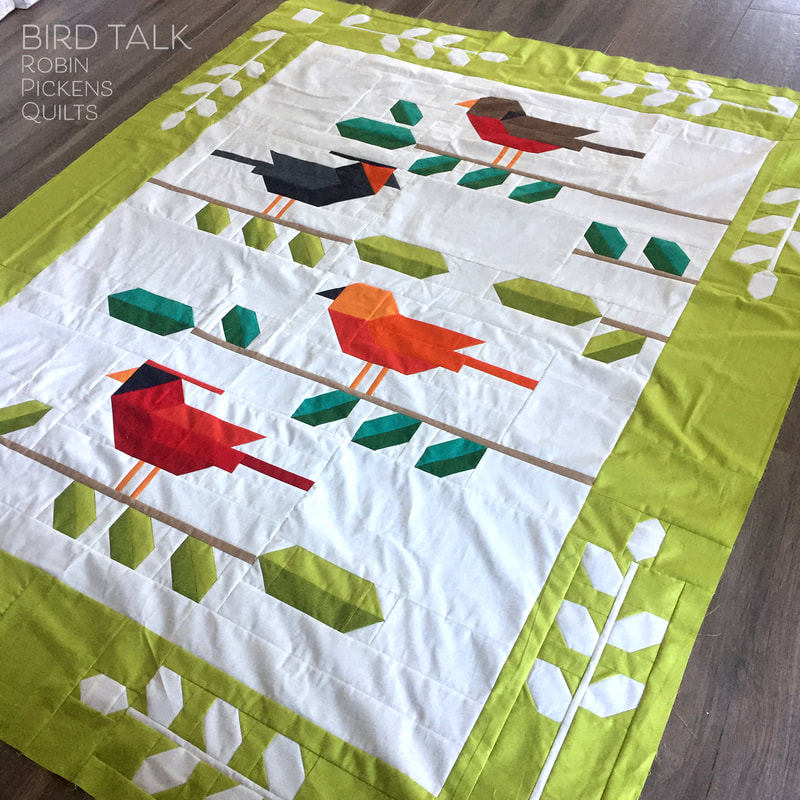 This has been a happy quilt to make. I don't know why, but birds are just so cheery. Maybe it is because I am named after the first bird of spring- Robins hopping along on the lawn with bits of snow still sticking but signaling that spring is indeed coming. Or maybe it is that I love to see the birds jump around and play with each other in a teasing way on the branches of the trees outside my studio window. Whatever the reason, birds just seem free, colorful, light and full of chatter. 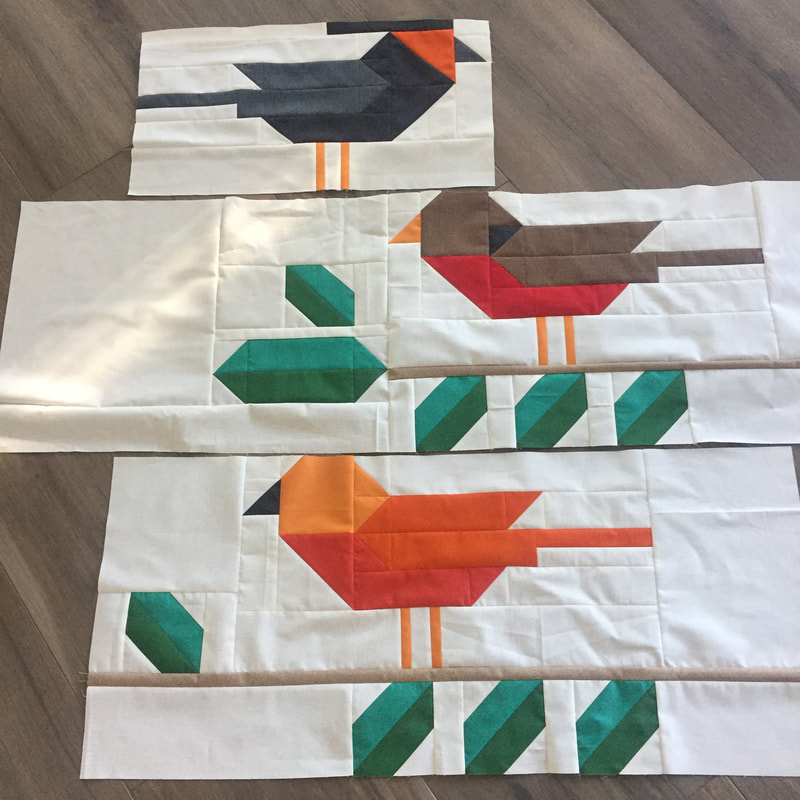 I did start by making birds first. Then leaves. Then border. Then joining it all. The pattern itself is not overly difficult. It is made from patchwork simple piecing, half square triangles and some flying geese. You just have to pay attention to cutting a variety of sizes. I suggest labeling them with some post-it notes as you cut them out. If you want o make scrappier pieced sections of border, combine more smaller pieces into the larger size of block or rectangle for backgrounds. Wouldn't this be fun with all Blue Jays, or black birds with fall colored leaves? I think this will be really fun to play with pattern and color on other versions. This version was made with Thatched Basics by Moda Fabrics. Some of the differences in colors are subtle- for example, there is a light red, medium red and dark red. You could use all one red, but the differences in value help to define wings from underbelly from top of bird. This could be a great place to experiment with ombres too- Hmmmmmm, I'm wondering the effect I could get with those! 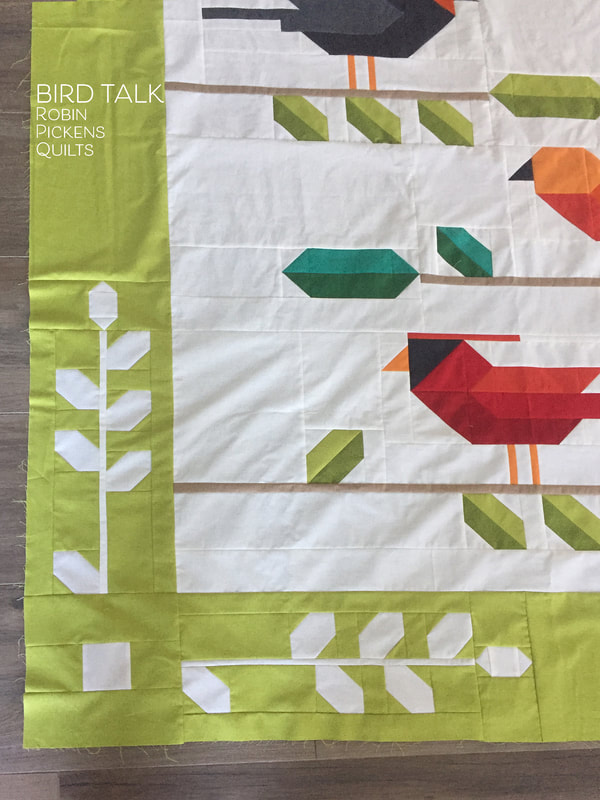 This quilt is a lap size, or a twin with the border. This is the first time I have done a decorative, pieced border and I am really liking how it works with this particular quilt. I wondered if the border would be too much, but now that it's done, I am quite smitten with the border and am looking forward to doing other versions with it. 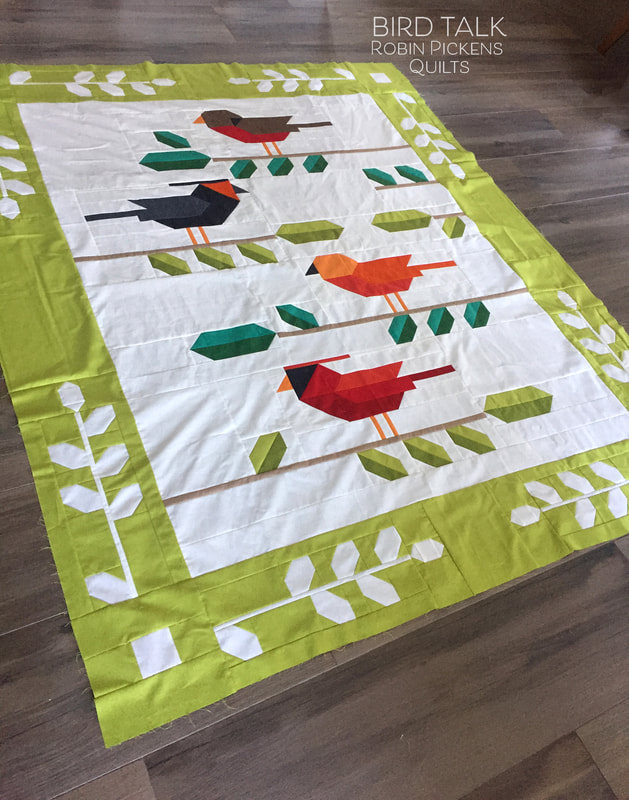 This quilt is easy to make with a combination of fat quarters, fat eighths and some yardage. I will be sizing it down to half scale for a wall quilt, hopefully by the start of quilt market. I had to make a decision on pattern sizes and the pattern itself is a 5 1/2" x 8 1/2" booklet (the size of my other patterns) but its 14 pages of instructions to include what you need for cutting, piecing and borders. I could either make a larger pattern at twice the price and include two sizes, or do two patterns at specific sizes at my normal price (its too much info to put both sizes into the small format booklet). I figured most people would know the size they want to make and appreciate not spending more on the pattern, so two patterns it is. I appreciate knowing if this works for you or if you'd rather spend more and have both sizes together. This bird family is off to the longarmer tomorrow. Stay tuned for the smaller one!! Happy quilting! And for more Thatched fabric patterns, check out my shopify store! Robin 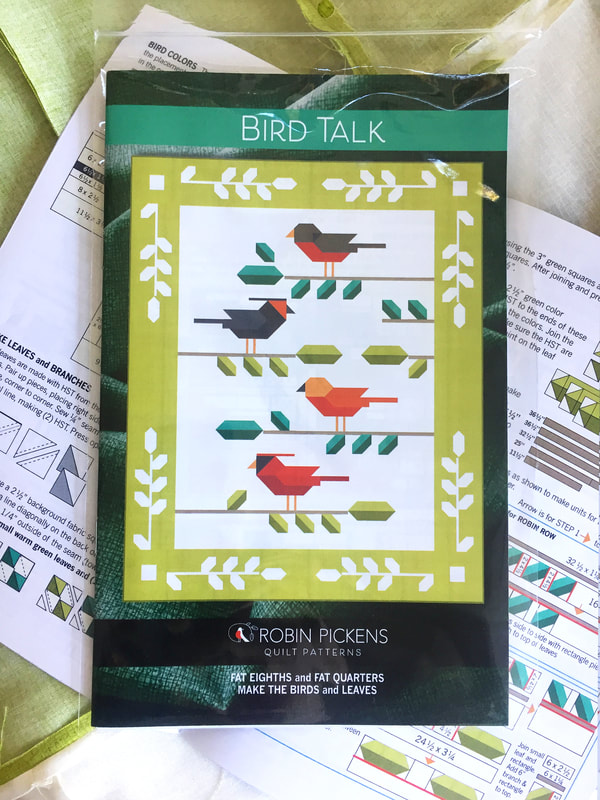  Sometimes I just like to sew. You know, the hum of the machine. The forward motion and progress. Adding piece after piece in a rythmic order and just getting into my zen place of calm at seeing rows of color and pattern coming together. KYOTO STEPS takes me to this zen place. 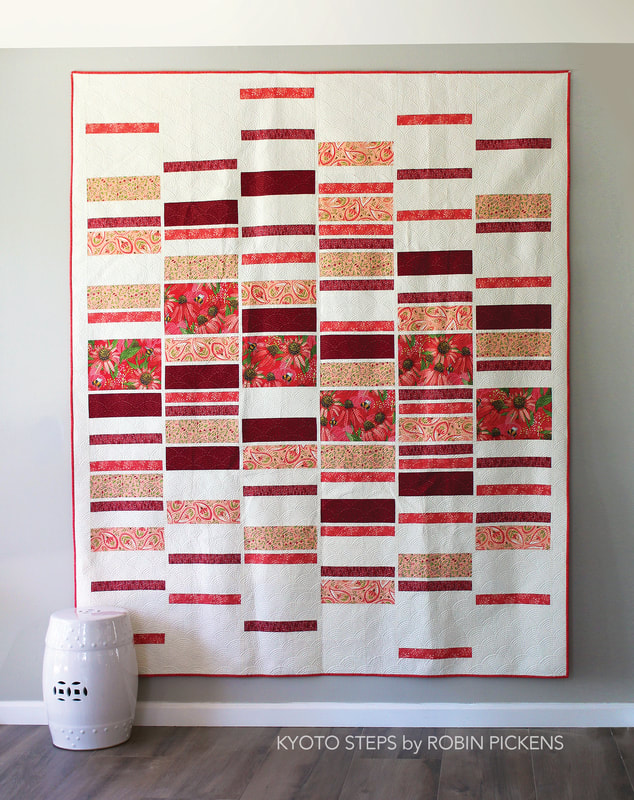 This quilt is easy to make- a logical cutting scheme and straight sewing- but still has a richness of activity and proportions. It is designed to allow some large prints to have a bigger block (yes, my common theme to show off my large florals) that are more centrally located. Then think of the other blocks as steps that skip and hop away from the center in light and dark. 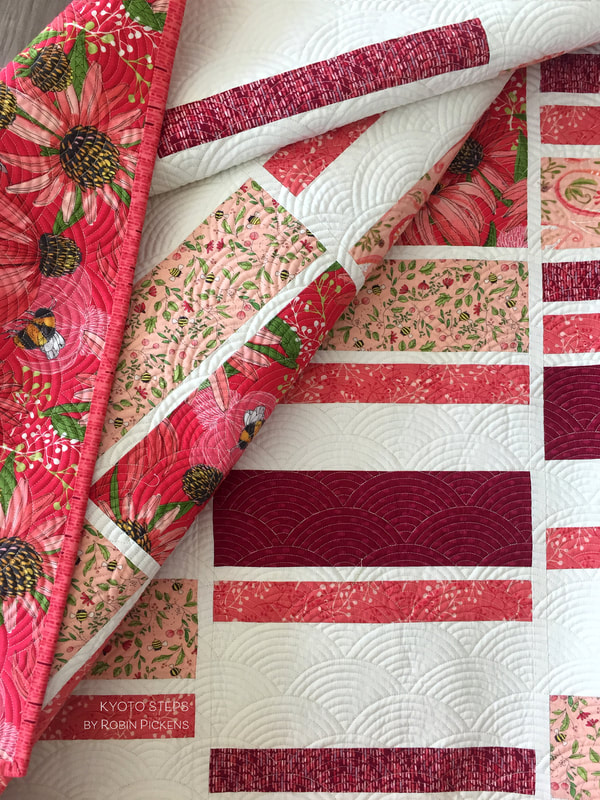 I just love the quilting on this one. I want to rub my hands over it and feel the texture of those fans! Marion Bott (@bottmarion on IG) did a fantastic job with adding the perfect layer of textural dimension to this quilt. The fabric here is from my Painted Meadow collection (shipping October 2019) and I made sure some of my fat bumble bees made it into the large blocks. I also put the large pink print with big Coneflowers on the back of the quilt so there would be lots of drama and excitement when you turned it over. 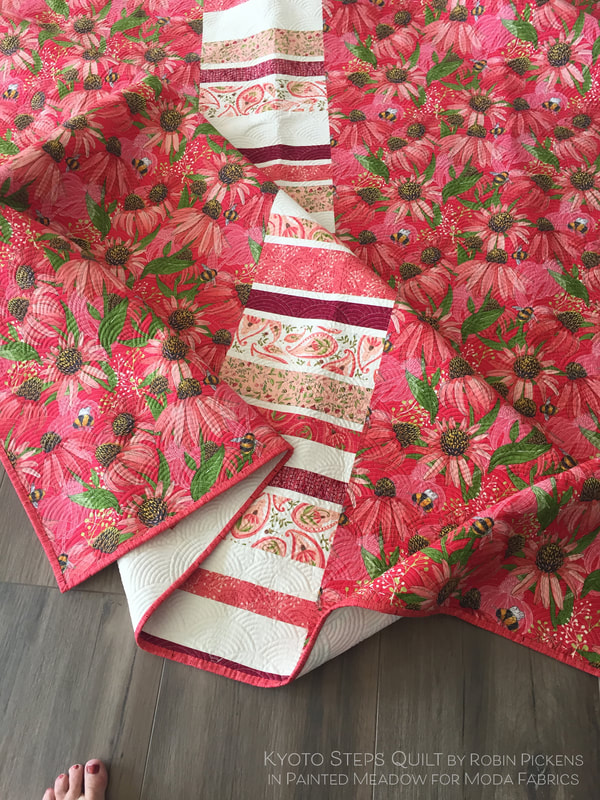 I must admit I really don't like making quilt backs. And I REALLY don't like trying to match a print on a seam when making a back. I'd much rather add a panel down the middle so I don't have to see an unmatched print and use some extra pieces of fabric I have. In this case I made another row of rectangles from leftovers from the quilt top and ran it down the center. I think its stays in the style and spirit of the quilt front and gives a fun interest to the back. 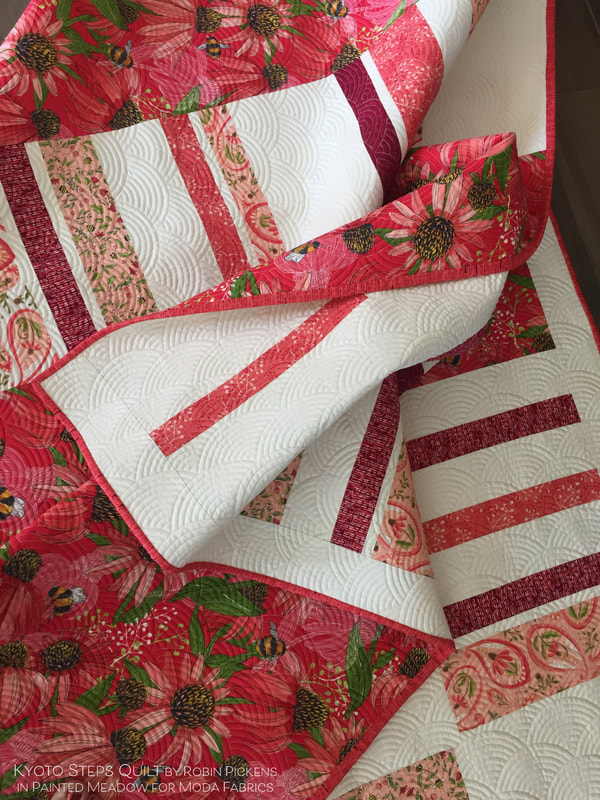 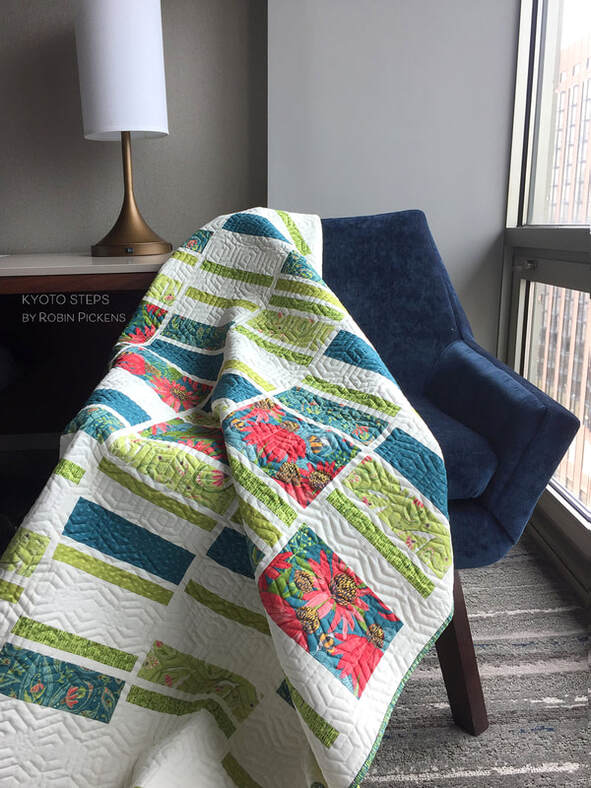 Kyoto Steps looks serene in these teal and green colors. This is a scaled down version of the quilt with slightly smaller rectangles. This lap version still gives plenty of room for a big print to shine while playing with those rhythmic rectangles. Sally Corona (@coronaquiltworks on IG) quilted this one in fabulous hexies. Quite a perfect shape with this chair! 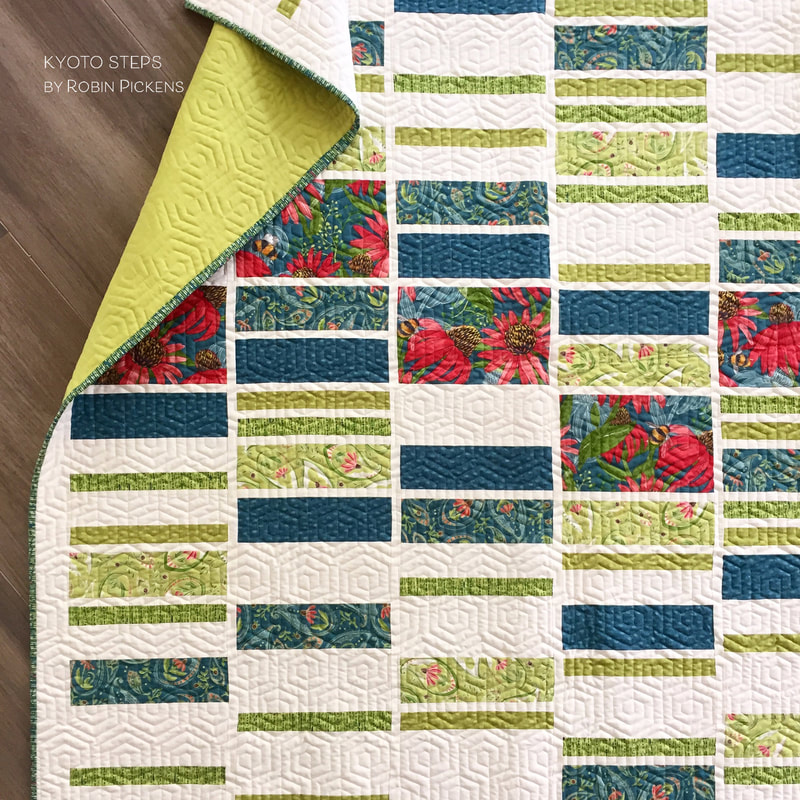 For this quilt I chose a Moda Bella Solid for the backing- I believe it is Pistachio. I wanted to keep it serene and calm but with a pop of color! I like the way the painted lines coordinate print in the Painted Meadow collection make a good binding with subtle stripes of teal, green, deep red or saturated pink color families. 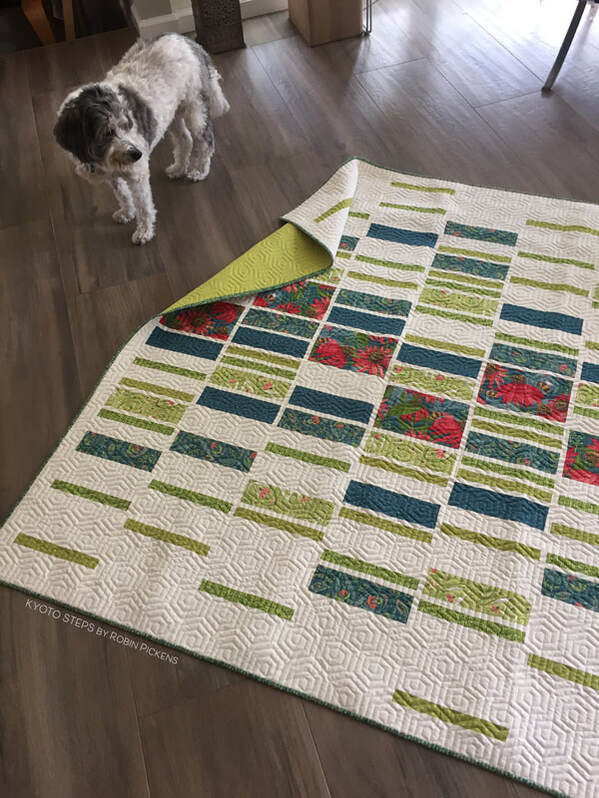 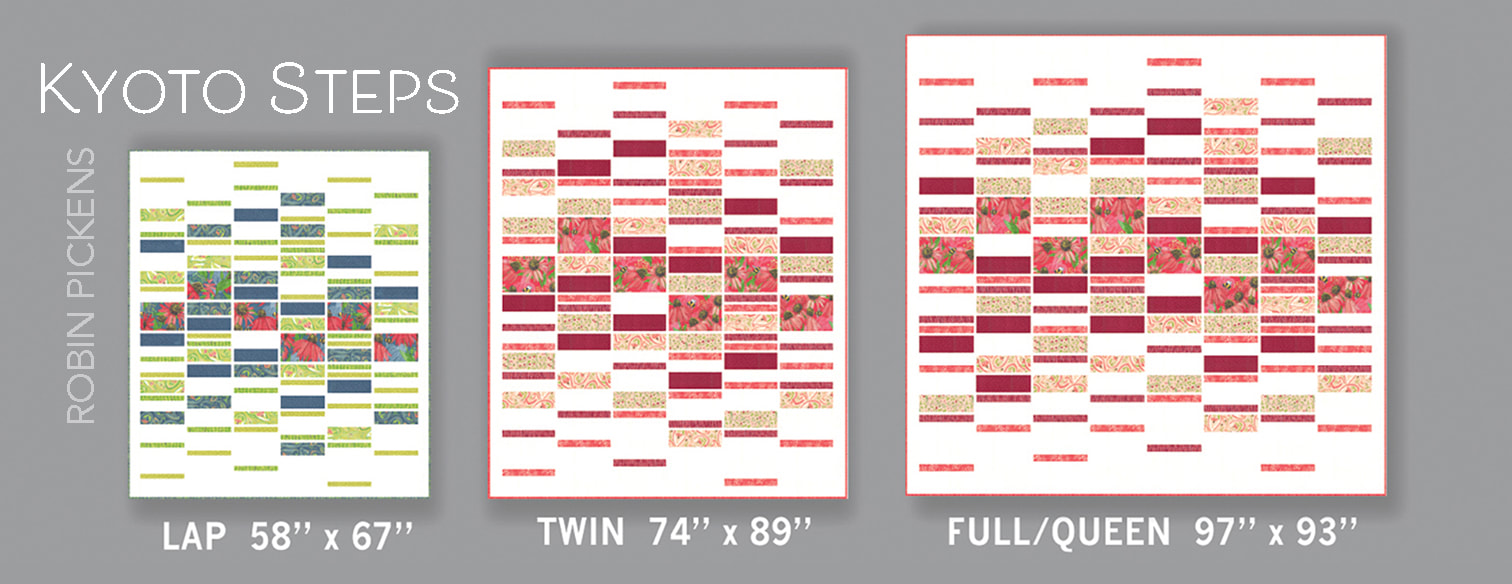 KYOTO STEPS is written for three sizes- Lap 58" x 67", Twin 74" x 89", and Full/Queen 97" x 93". The placement of the rectangles is diagrammed out to make it easy to replicate this spacing of blocks. The quilt is made with 6 half-yard cuts plus background if you are making the Twin, mostly 1/3 yard cuts for the Lap (but get 1/2 yard if your main print is directional like mine is) and a mix of 2/3 and 3/4 cuts for the Full/Queen (also adding background yardage to the Lap and Full/Queen). If you want to make this in a scrappier way, you can use mixes of Fat Quarters for your pieces. If you are using a Layer Cake, the scaled down size of the Lap will work for those 10" pieces. This quilt is suitable for more beginning quilters. 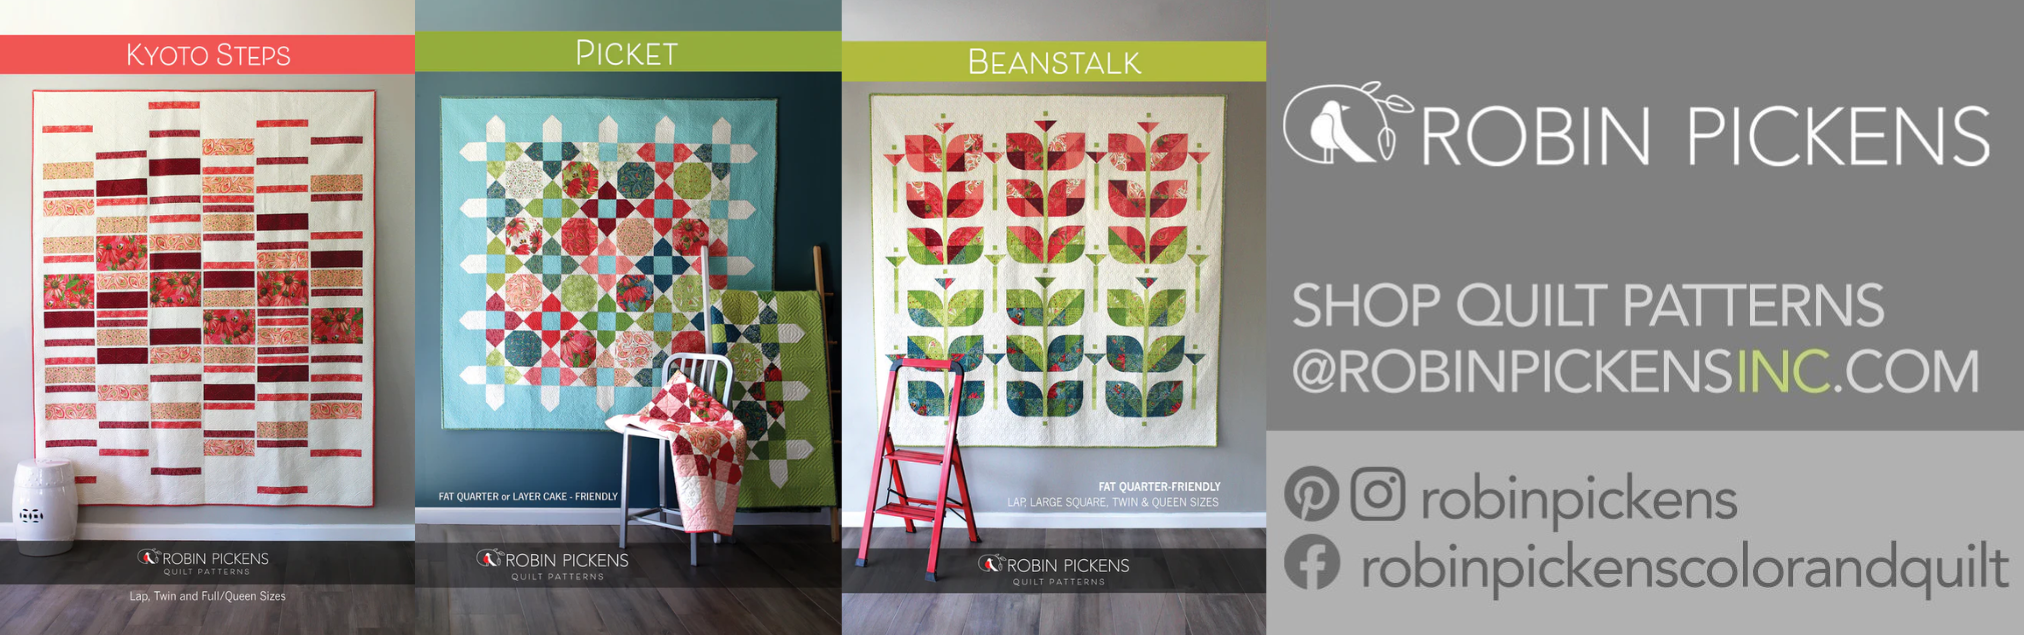 You can find KYOTO STEPS along with other patterns from the Painted Meadow release at my shop and the patterns are shipping to local quilt shops with the fabric collections!
The original inspiration for this quilt was a caned back to a chair I saw at a yard sale. I thought it would be fun to replicate that woven look with center octagons in fabric. As I was laying it out, the design was becoming a bit too busy and challenging. It needed simplification so the lines did not compete with the prints on the fabrics and so I wouldn't tear my hair out! My happy ending place was this center part of Picket, with white triangle corners meeting each other, suggesting the continuation of line and an almost mosaic-like feel. 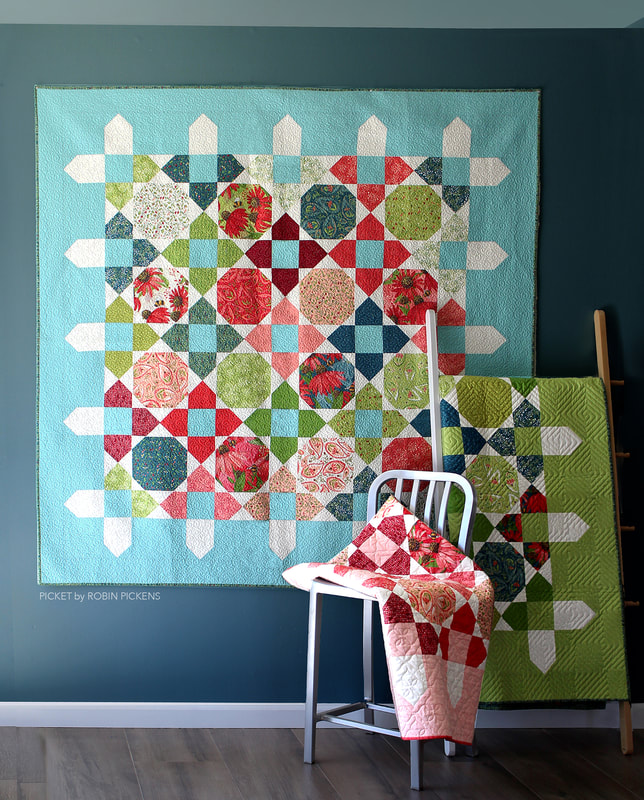 As I was playing with the shapes, I loved how the triangles played together and with some of my diagrams, the flying geese ends started to make their own statement. By lengthening the strips, they suggested picket fence posts (but not too long to be overly literal). The pop of white against a colorful border gave that additional chance to set the mood with color. 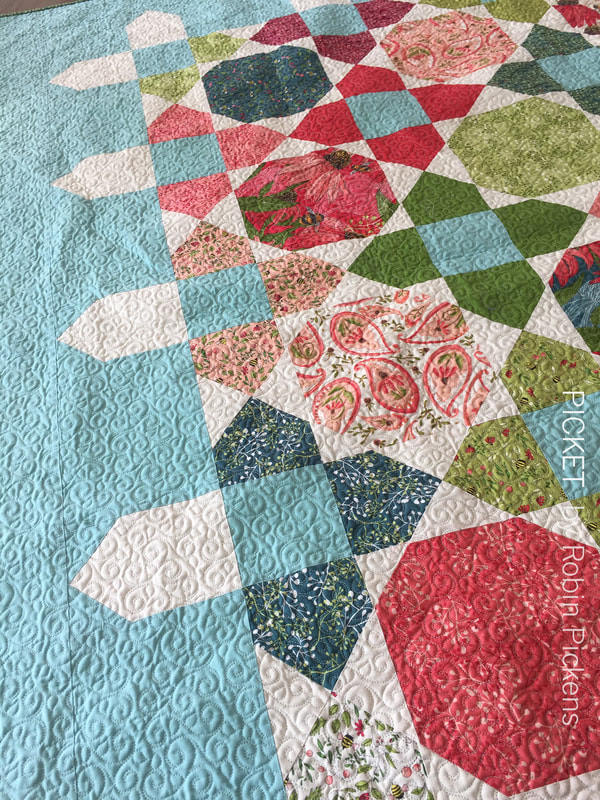 Picket is designed to be made with either a layer cake (or any mix of fun scrappy 10" blocks of fabric) OR with fat quarters. I like using the fat quarters to get a good mix of fabrics but still have repeating prints and to select my fabrics to tell a color story. The two lap quilts here have color themes of pink/coral/red and blue/green/teal. They have such a different feeling based on the warmth or coolness of the fabric colors. 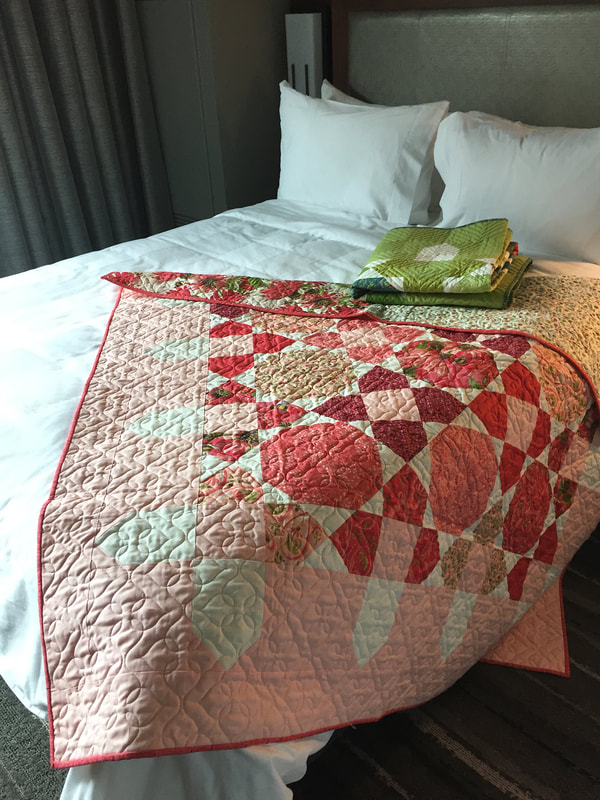 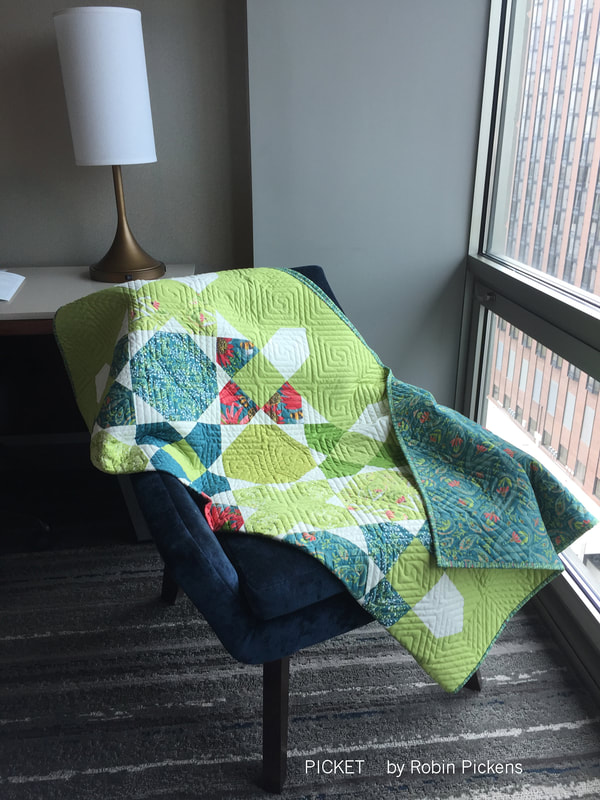 For the layer cake version of Picket, I auditioned quite a few colors for the border and centers of the X blocks but I kept coming back to this Moda Bella Solids Spray color. There is something so fresh about it and I loved how it popped with the teals and greens and reds. 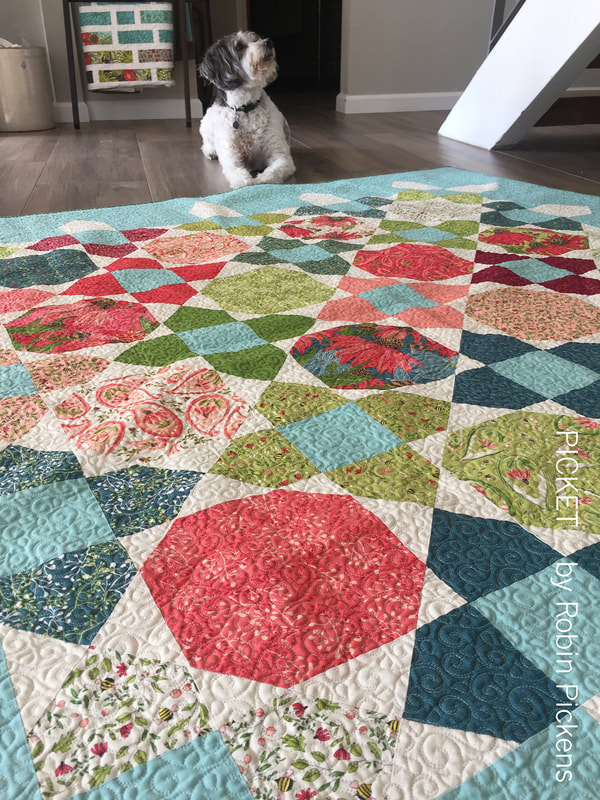 The quilt is made up of Snowball and X blocks, set on point. It's really pretty fast to make once you get in the groove of the blocks. I make up all the Xs, all the snowballs, then play with arranging them. Then at the end, I get to enjoy my colorful garden all surrounded by my picket fence. 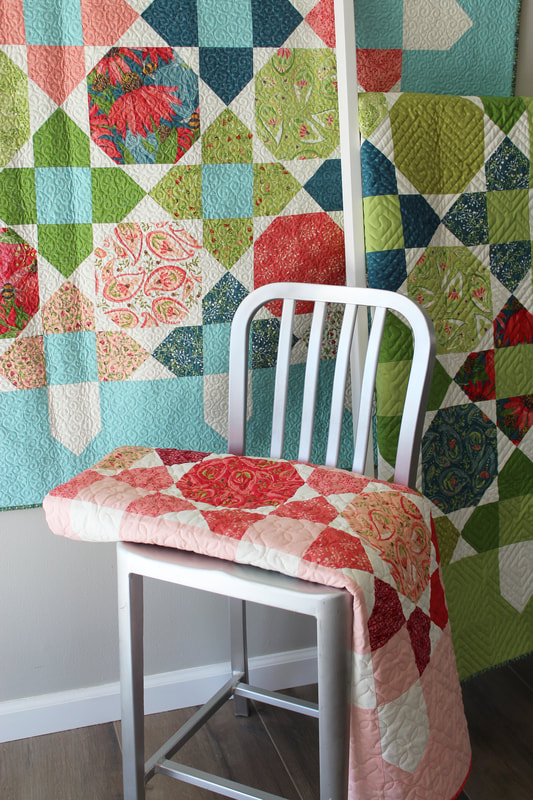 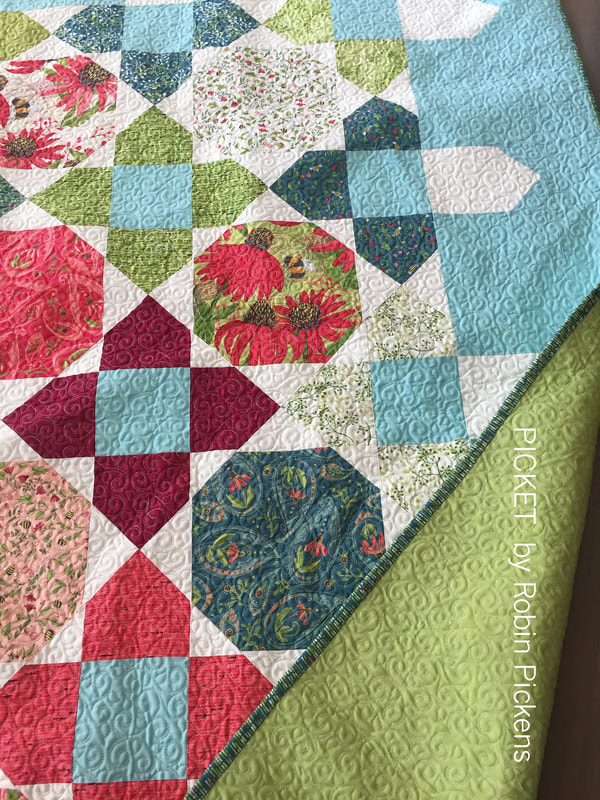 I'm so happy to have had a lot of helpers on these! The large quilt was pieced by Susan Vaughan @thefeltedpear and was longarmed by Marion Bott @bottmarion. The lap quilts were pieced by Danica Willig @danicawilligdesigns and longarmed by Sally Corona @coronaquiltworks. Check out more patterns made with Painted Meadow (and yes, Painted Meadow is shipping to shops in October 2019 from MODA FABRICS!) at my shop! 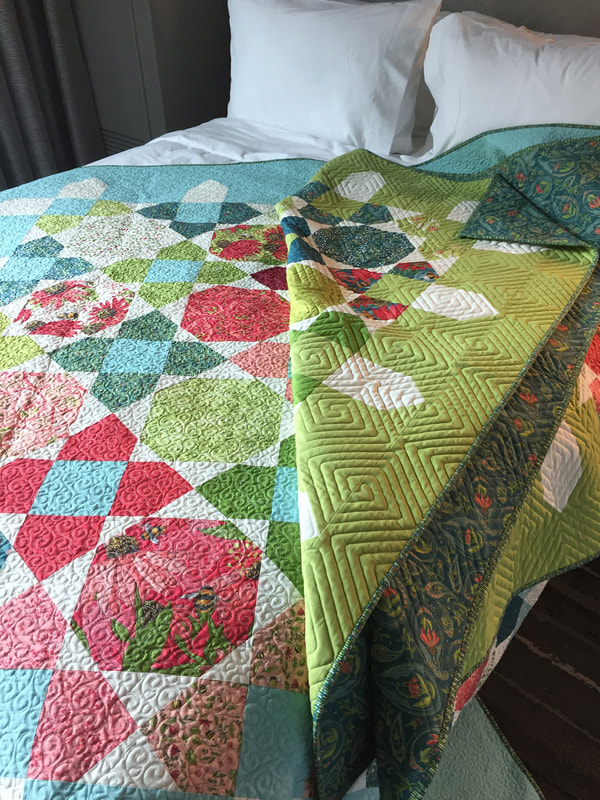  Chunky leaves in curved friendly shapes with graphic triangular blooms. Say hi to Beanstalk! This is a leaf/vine quilt made with Painted Meadow fabrics. The selection of fabrics and instructions use fat quarters for the leaf and bloom prints. The green stems and background are indicated as yardage. 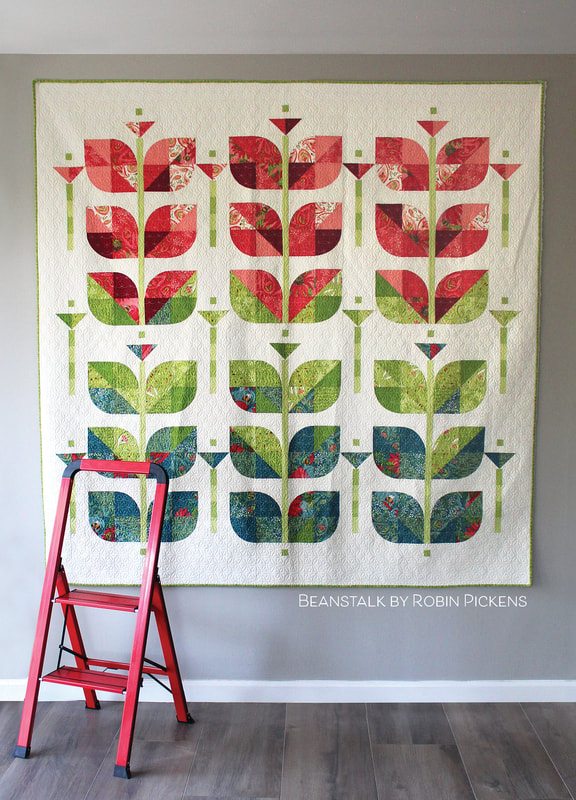 I wanted some growing, garden themed quilts. Beanstalk and my Picket quilts were a direct reflection of the desire to marry plants and quilts. 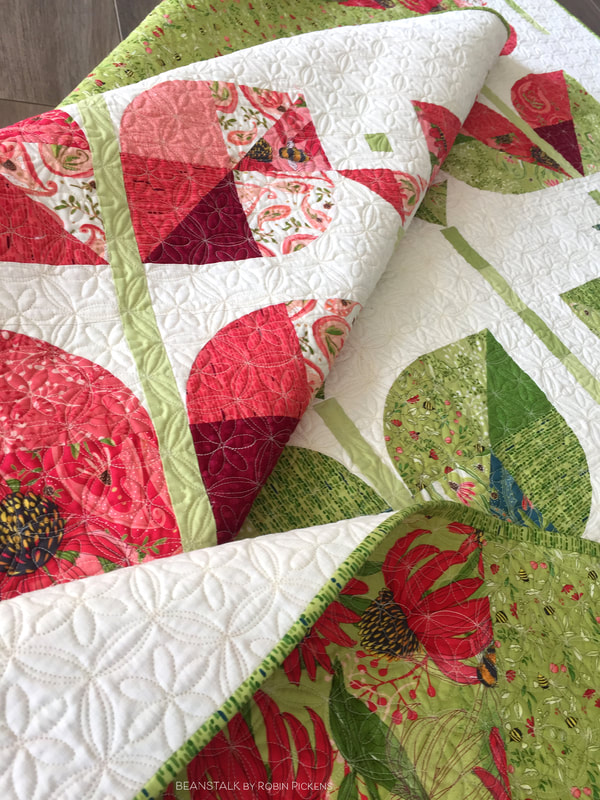 Beanstalk has chunky, curved leaves made with 4" radius quarter circles (8" full circle size) that make the gentle sides of the leaf shapes, meeting half square triangles to finish off the leaves. You can play with the leaves by putting all dark colors to the bottom for a more shaded look or doing scrappy piecing with color and light/dark values. 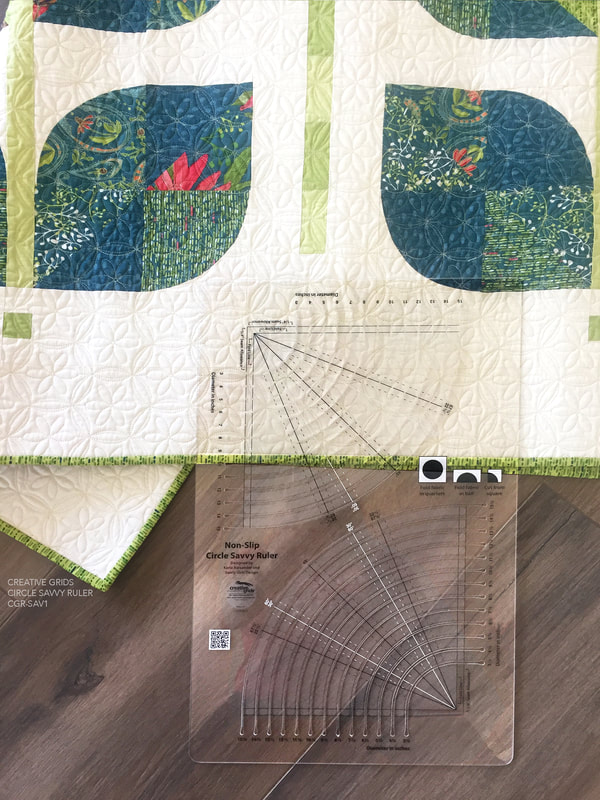 The Beanstalk pattern comes with a paper template to make the curved blocks. However, I made the blocks for this sample using the Creative Grids Circle Savvy Ruler and I recommend it! Cutting circles with a ruler like this makes them so accurate and easy to sew together. I also have a number of Drunkards Path and quarter circle rulers in different sizes and one of the reasons I like this Creative Grids one is that it has ALL the sizes I use in one ruler! I can design with it, try different sizes with it, and translate a pattern for applique vs piecing with it too (different sizes minus the seam allowance). 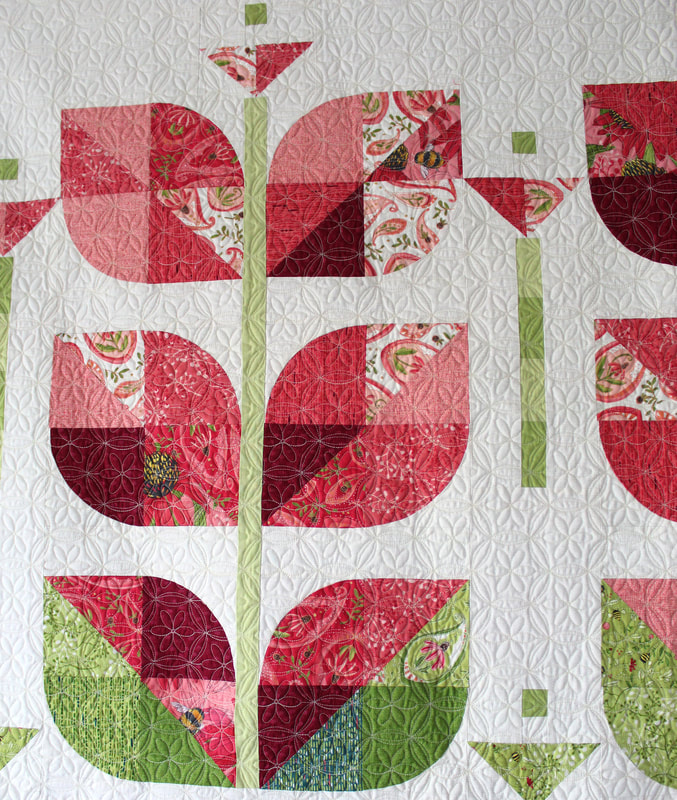 When I started the plans for this quilt, I thought I would make it in only green shades for the leaves. But then I mocked it up with the teal and red shades and loved the graduation amongst the color families. It reminds me of fall and changing leaf colors. I think the reds add a lively touch!  Because I try different blocks to figure out my sizing, I usually make a variety of sample blocks. It seems like such a shame to waste these so I try to incorporate them into the backs of my quilts when I can. For this Beanstalk quilt, I used leaves that were too big and too small and a larger bloom as a pieced block in the center of my backing. 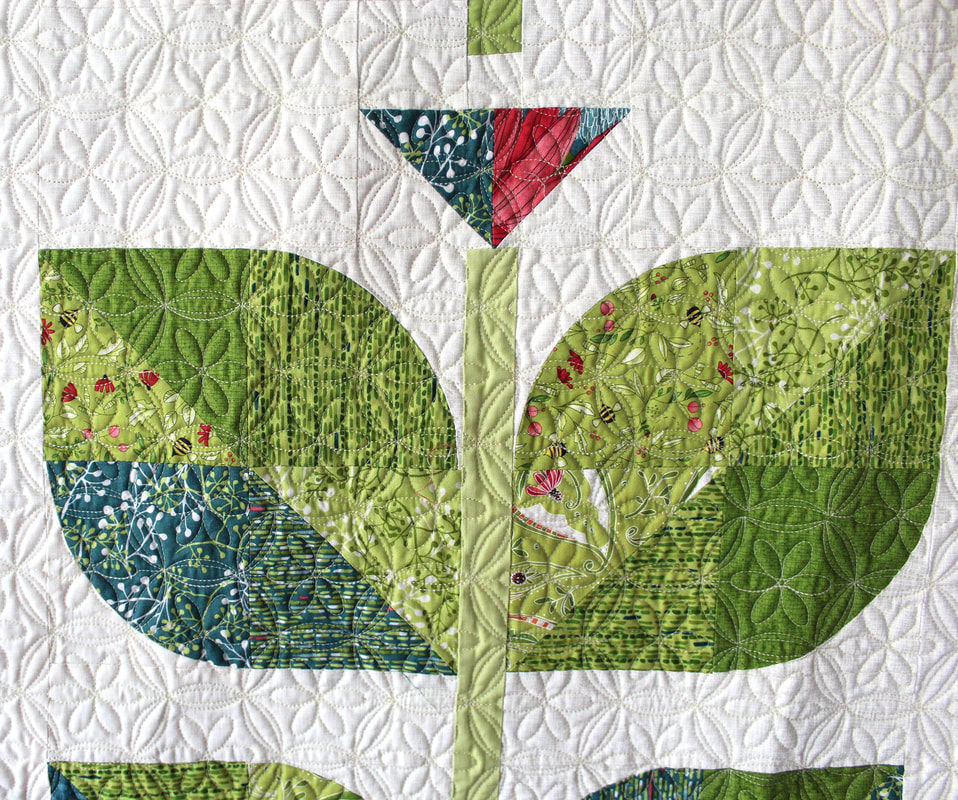 This quilt was longarm quilted by Marion Bott and the pantograph is a Sand dollar design. I love the pretty flower shape and the orange peel structure of this design. It makes such a lovely texture on the quilt! 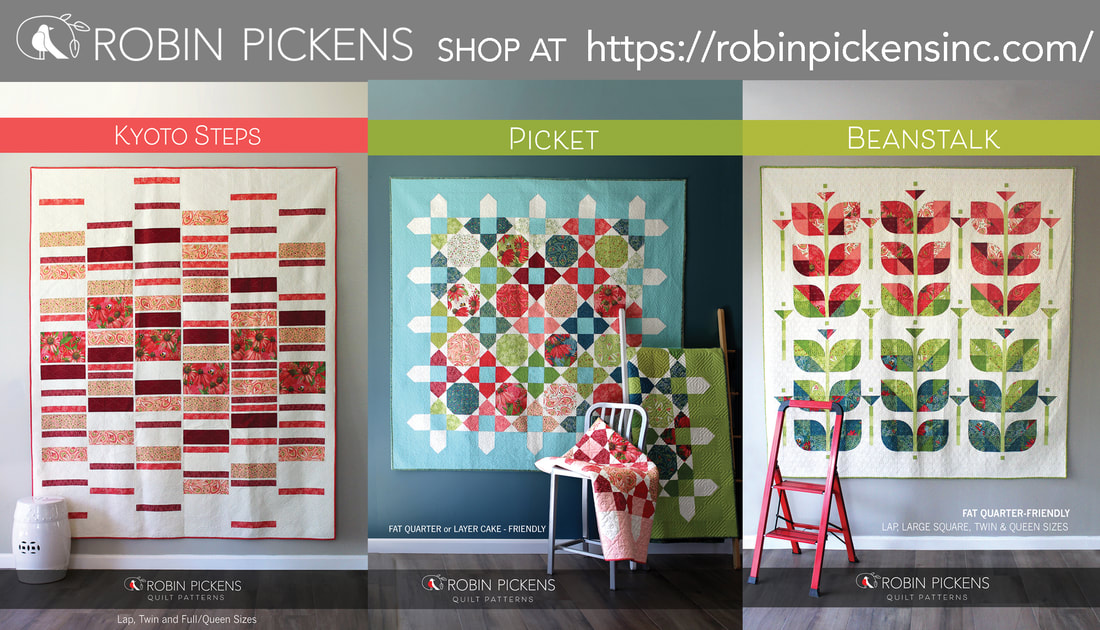 I'm trying to decide what Beanstalk quilt will be next- one from Thatched basics? One with grays and muted colors? I'm not sure but I'm looking forward to planting a new Beanstalk! Visit my shop for this pattern and more that are made with the Painted Meadow collection from Moda Fabrics (shipping October 2019 to quilt shops). Happy sewing!
A quick catch-up on some Moda Blockheads2 blocks. I have learned so much while doing these blocks! I tried triangle paper for the first time (and liked it!) and I stretched myself with smaller piecing on some of these than I normally do. With every sewalong I do I feel my skills become better. I start to think more efficiently when I look at instructions and question if I can make more of the blocks in a different way (like making Half Square Triangles in the 8-at-a-time method). This first one is Sherri McConnell's block "Vintage" and I used a bunch of scraps I had from earlier blocks from my Dear Mum collection. I am pretty pleased with how this one came out. I don't have that much experience doing Quarter Square Triangles so this was good practice!  This was the alternative block designed by Corey Yoder called Rainbow Vine. Mine is not a rainbow but does have a variety of green leaves. I liked how quickly this fun block came together. Now I think I need to make sure the block above in my arrangement has a design that suggests a flower bloom!  The next block is a larger 18" one and is designed by Betsy Chutchian. Feels good to get this one completed and I really like this pattern! I used #poppymaefabric and #blushingpeonies . After making a big 18” block like this I needed to do a small one next!  And last one to share today is this block designed by Corey Yoder. Its called Dainty Blossom and is an alternate for the Block 48 which was originally designed in applique. This is so cheery! 12 inch block with a big blooming presence!  I just may be seeing my blockheads blocks wrapping up here! Time for arranging and joining!
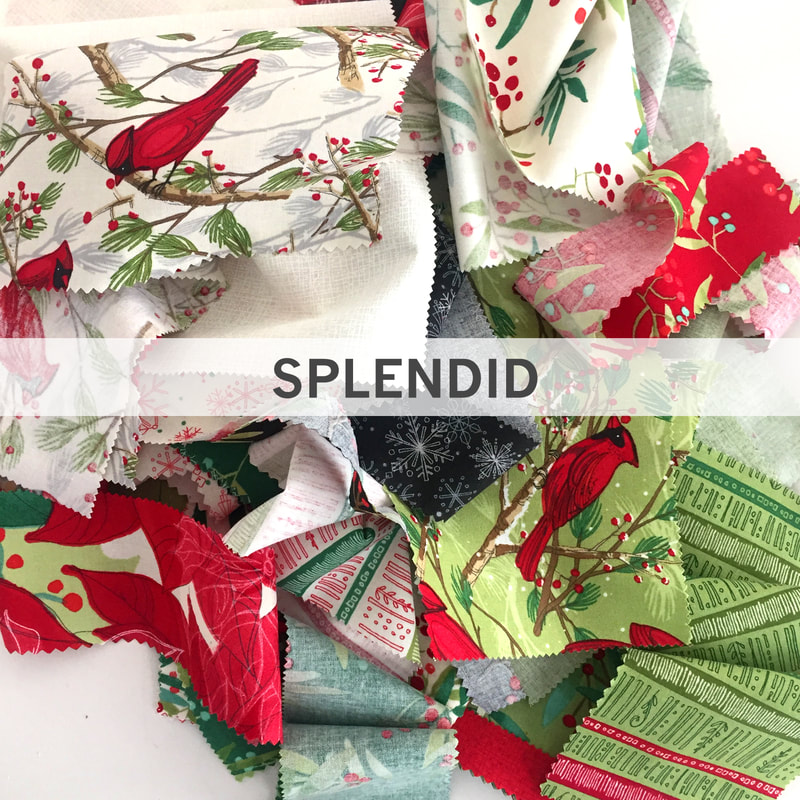
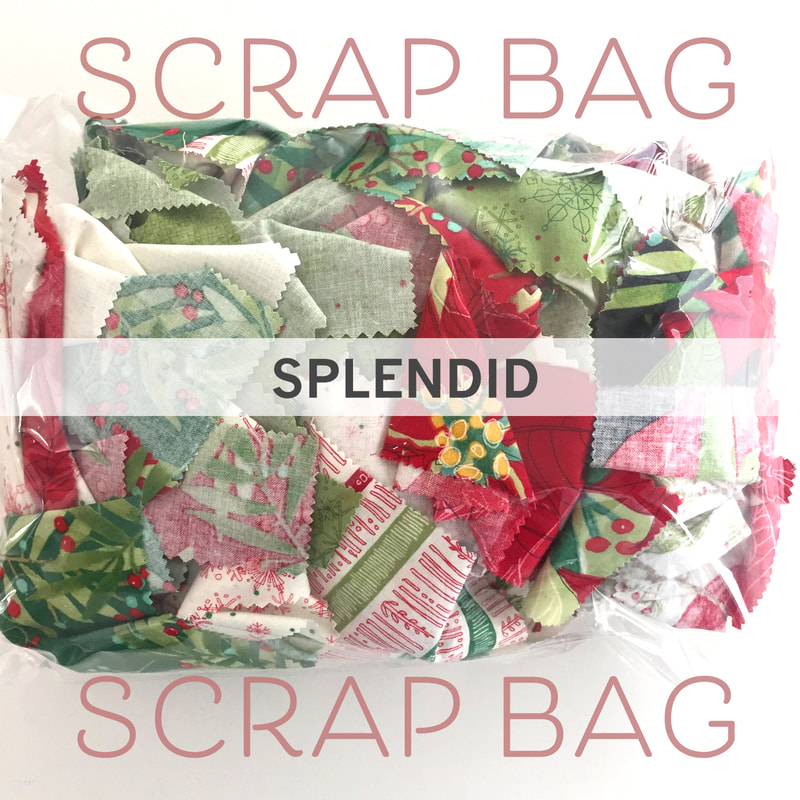
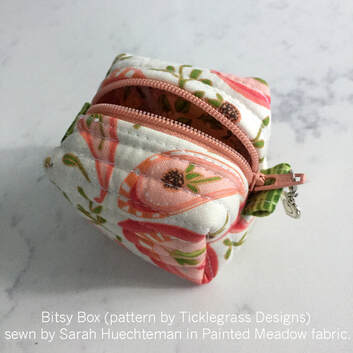
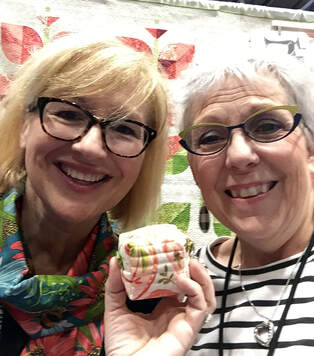
I know its a journey and not a race. But I feel like I can see the finish line. But I'm not there yet. One step at a time...that's how progress happens. These are the things I tell myself when I'm nearing the end and need that extra push! 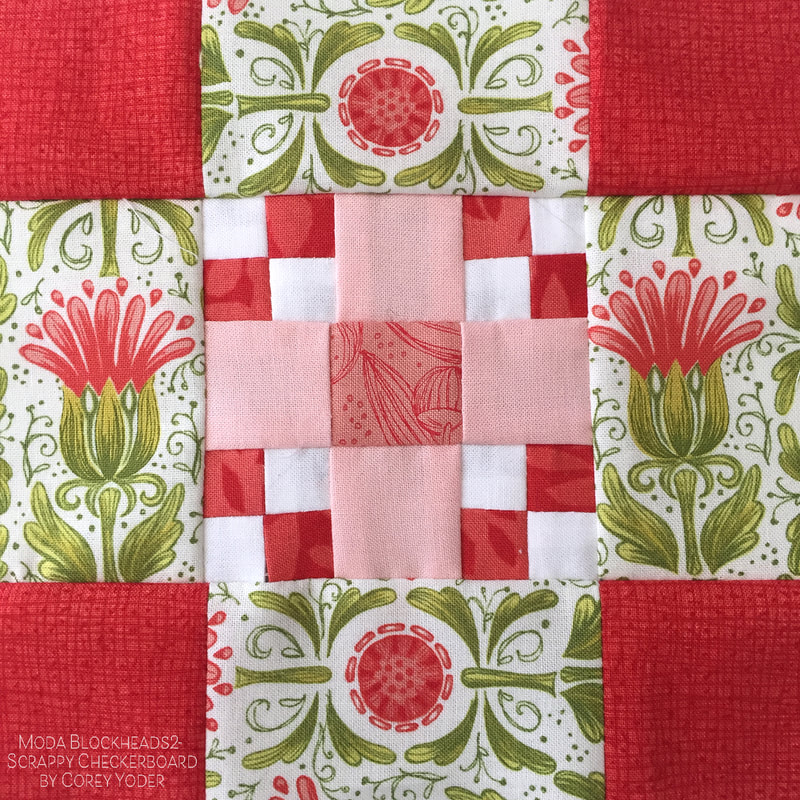 So a few more blocks here. Above its the Scrappy Checkerboard designed by Cory Yoder. Below its Ribbon Star by Lynne Hagmeier. I'm trying to take stock of what I have and what I need from a perspective of color and size. I saw a great layout on instagram that Susan @quiltingcousin did and I liked the organization of blocks in the overall quilt. I've decided to model my quilt after this layout too. 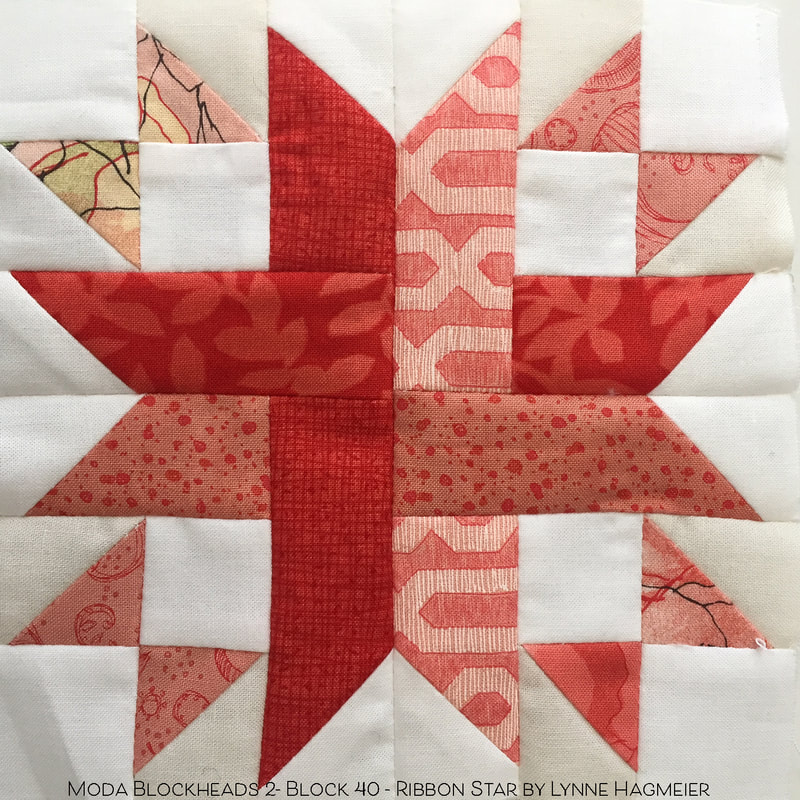 But first, finishing the blocks. I'm not done yet. But I'm keeping up the effort and I WILL FINISH! As I roll closer to the finish line I've done Fidget Spinner by Lynne Hagmeier and Bella Spinners by Me & My Sister Designs. Also Around the Corner by Carrie Nelson and On Point Star by Stacy Iest Hsu. Sew on!!! 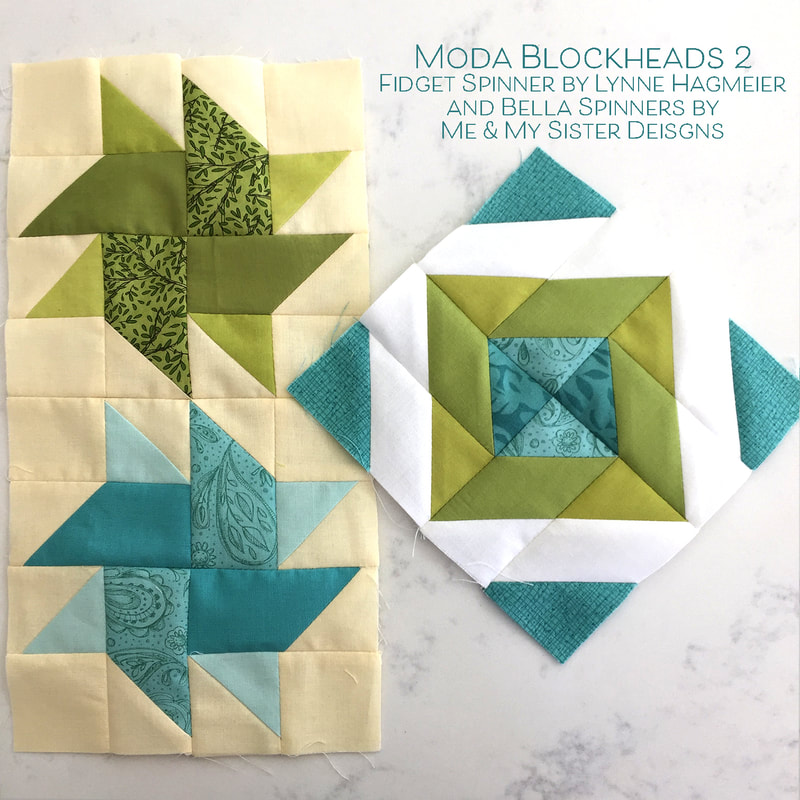 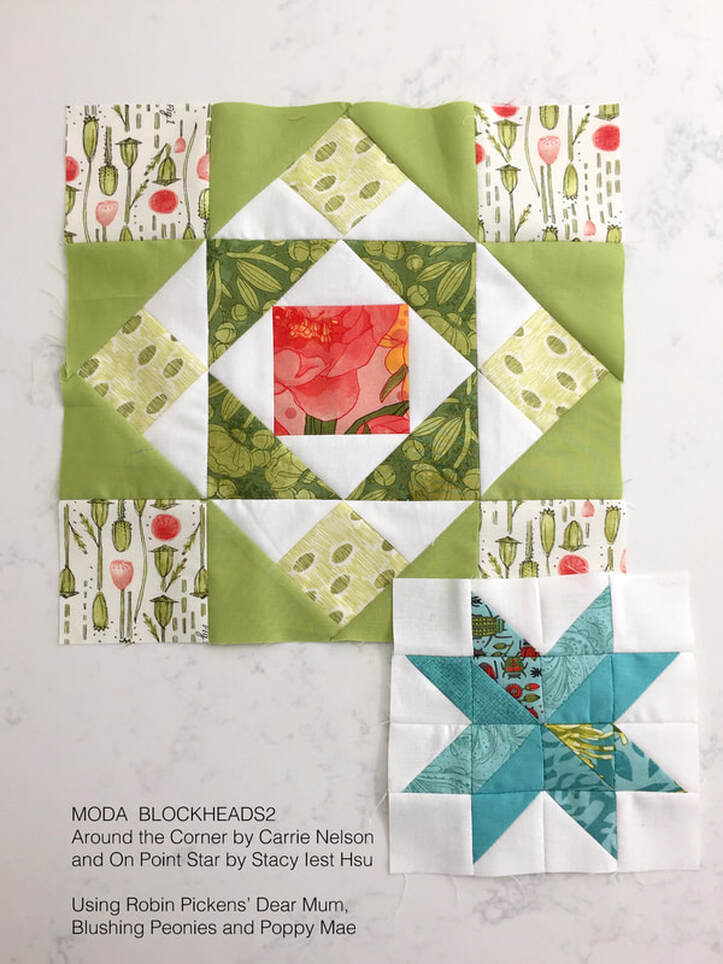 My Christmas quilts featuring my Splendid fabric came back from the longarmer, Marion Bott in Las Vegas (she's @bottmarion on Instagram). Oh I love the textures that get added to the quilts when they have the quilting done! I just want to lightly stroke each quilt and feel the patterns of the sewing. 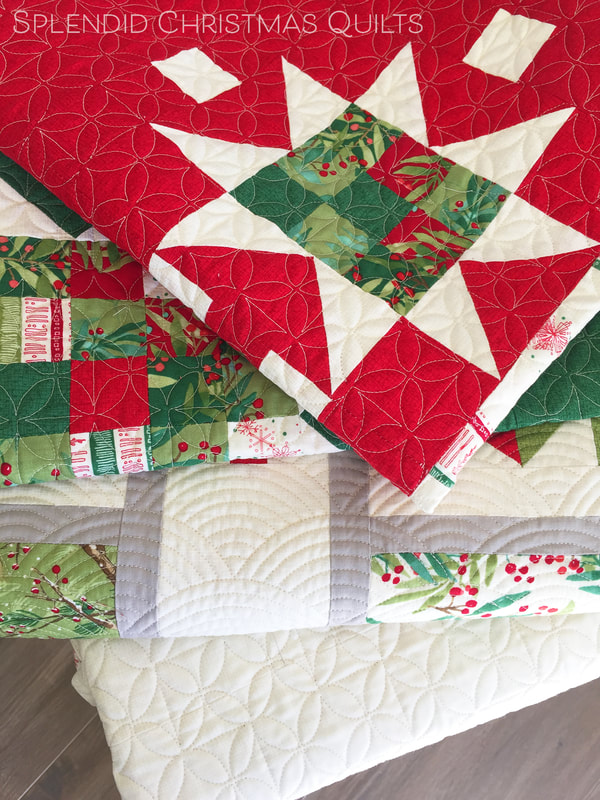 I'm excited that Splendid is in shops now so you can all work on projects with these too! My next step is to put the bindings on and also make pillow backs and add zippers to the pillow cases (or should I leave them as envelope backs?) 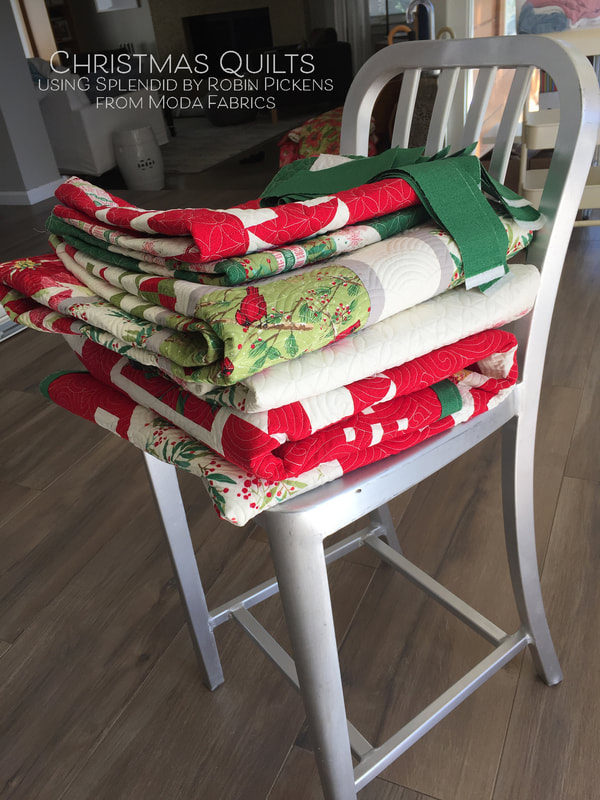 Here is the Showering Stars Table Runner as I'm sewing the binding on. I like the linear pantograph of the quilting. The direction of the lines balances out the long format of the runner and strong patchwork lines of the star trails by going the other direction (horizontally vs vertically). 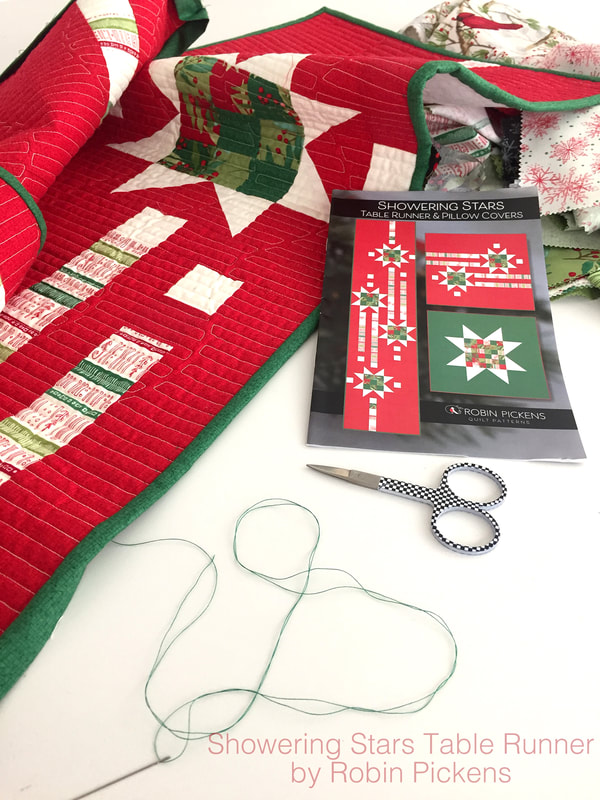 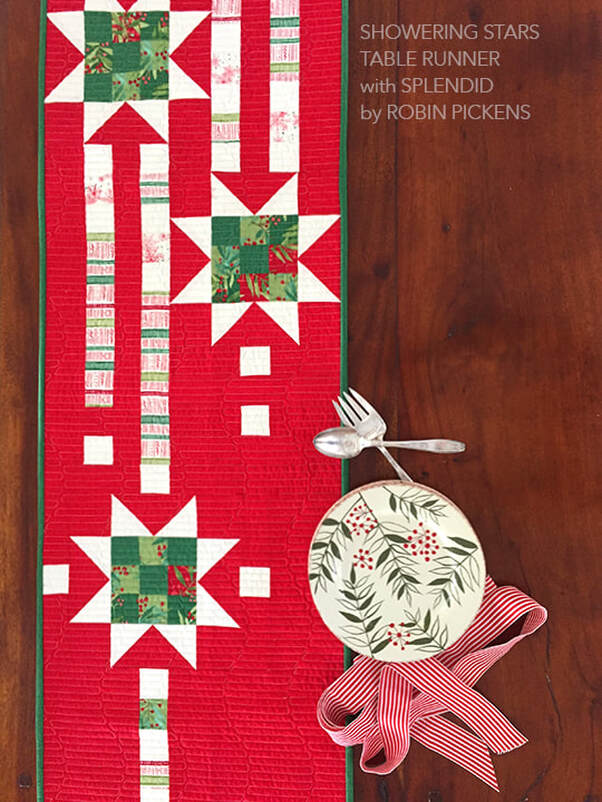 At the time that I was designing these patterns I had to pick out the binding fabric without having the actual made-up quilt in front of me. That is always a challenge for me- deciding binding recommendations so early in the process (but if it goes in a sales catalog I have to do it early). For most of the quilts in this group I wanted the bindings more subtle and just a complimenting Christmas color, so if the quilt is red, I'm doing a simple green. And in the case of Cardinal's Christmas Wreath, I felt so many prints were on the right and left side borders that a solid or almost-solid was called for. 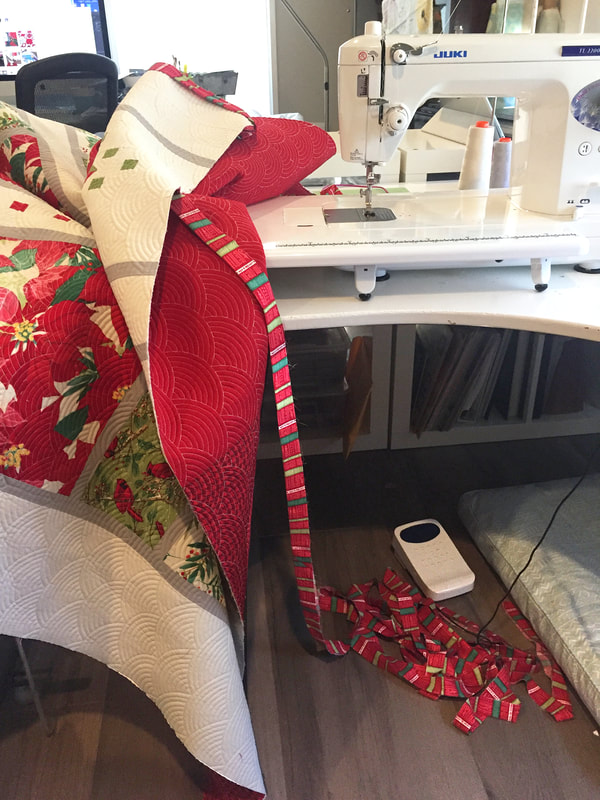 But when it came to Jubilant Song I had picked the striped fabric for binding and boy, do I love it! Now I wish I had picked a striped binding for Joy and Delight. But my green strips are cut and they are attached to the front, awaiting the hand sewing to the back. I am not going to rip off a whole quilt's binding at this point. But note to future-self, be bold with the stripes!! I recently posted some scrap bags of Splendid fabric in my online shop. There is a limited quantity so when they are gone, they're gone. And I'll be getting a few quilt kits of Joy and Delight up soon too! But for today, a-binding-we-will-sew!  Can you imagine a meadow with hearty, deeply colorful blooms like the red and pink sunset colors across the sky? This is what I thought of while I visited my mother last summer and we walked through the gardens. The coneflowers were in full bloom in the warm summer sun with their plump centers drawing in the bees and butterflies. 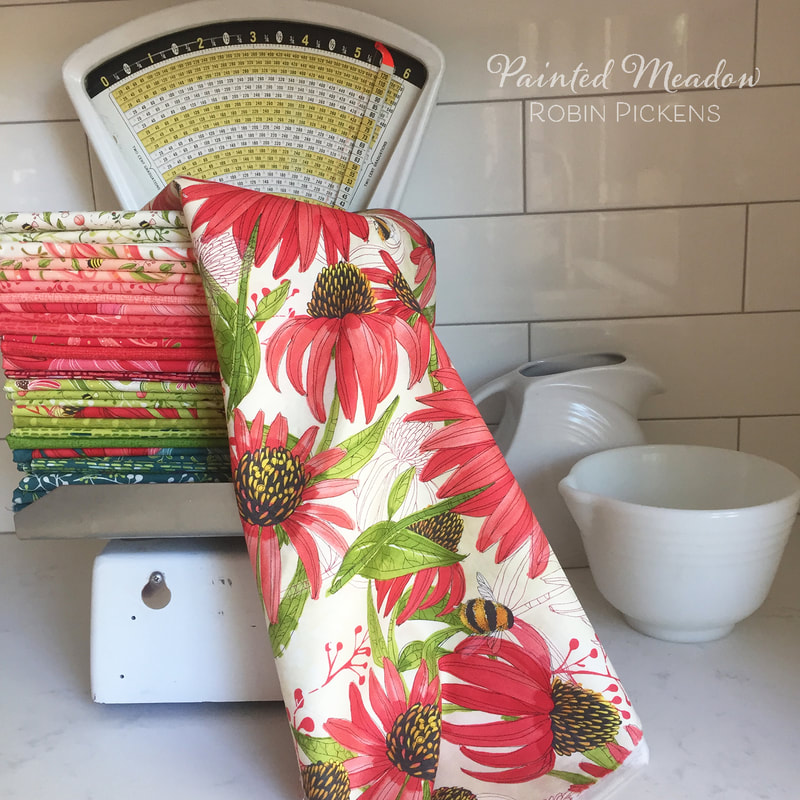  I love the proportions of coneflowers and those big full cones, full of nectar, and colorful petals that hang down with a lovely curve in warm red, fuscia and rich sunset shades. The flowers seem as if they are always looking up to the sky in anticipation of the happy sun or as a welcome for the bumblebees. 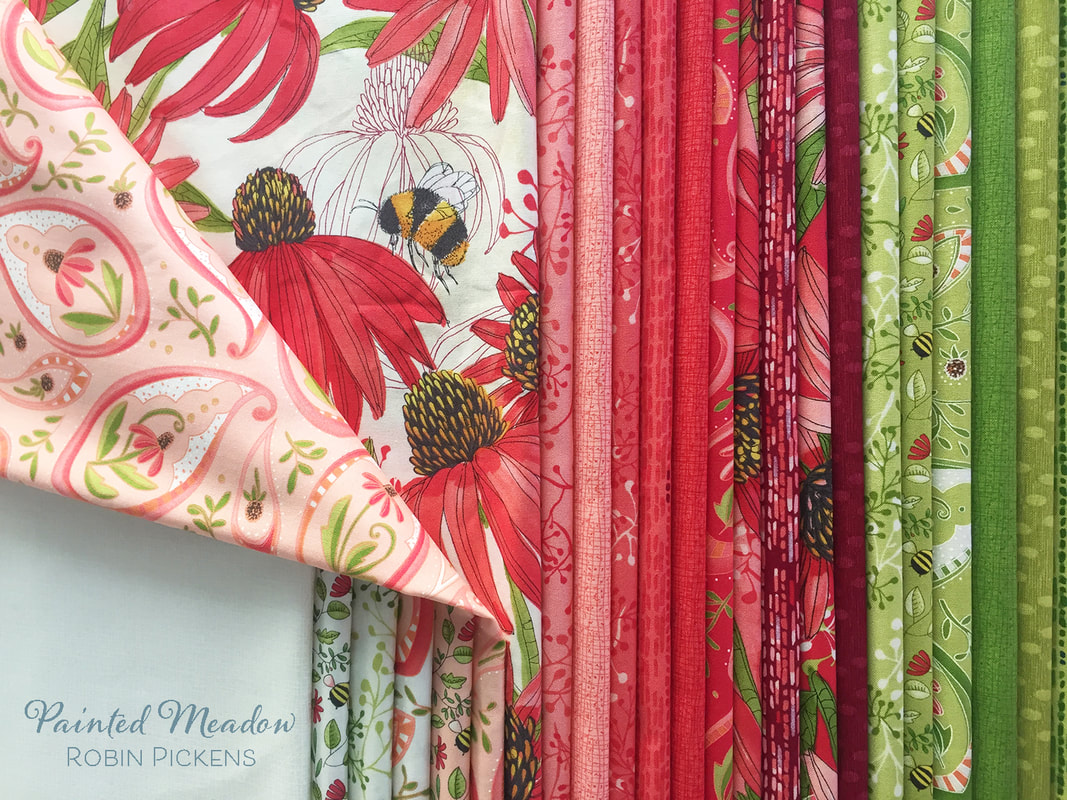 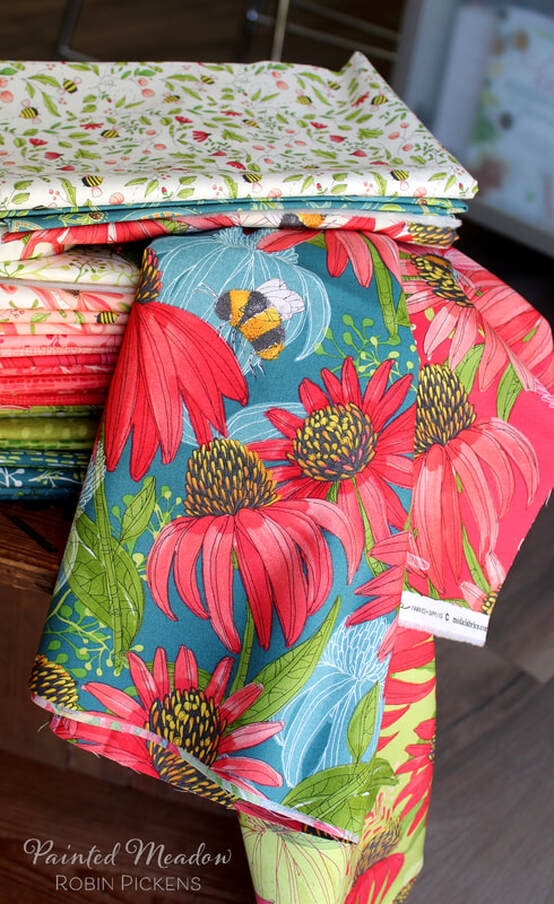 The beautiful shape of the coneflower inspired this collection and I couldn’t resist adding in those bumblebees- so plump and fuzzy, just like the flower centers! The fabric group also includes little drawings that show the coneflowers and bees in sweet illustrations or dancing within paisley shapes. Watercolor textures, sprigs of plants and sketchy oval dots compliment the lively group. 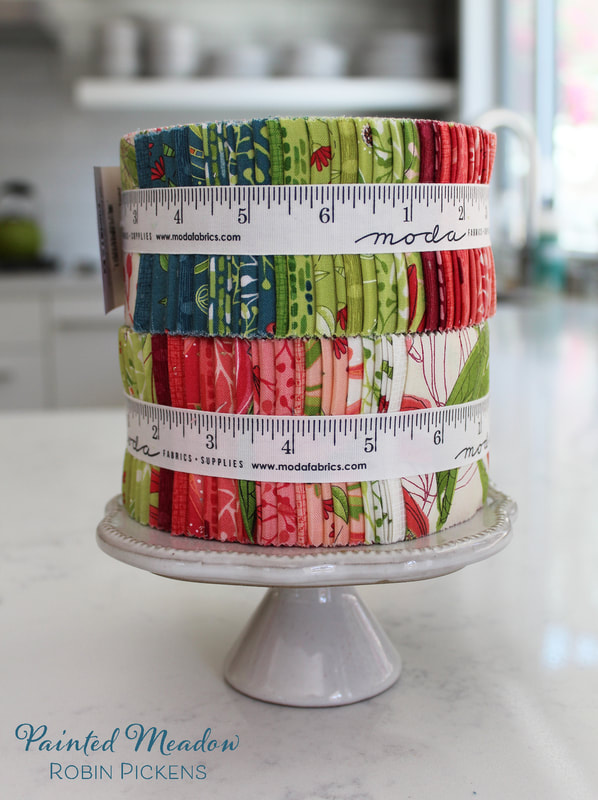 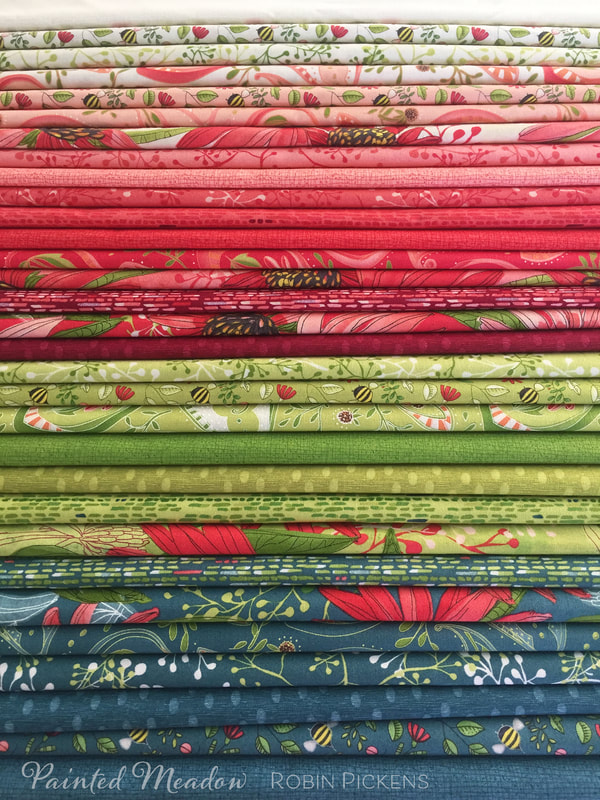 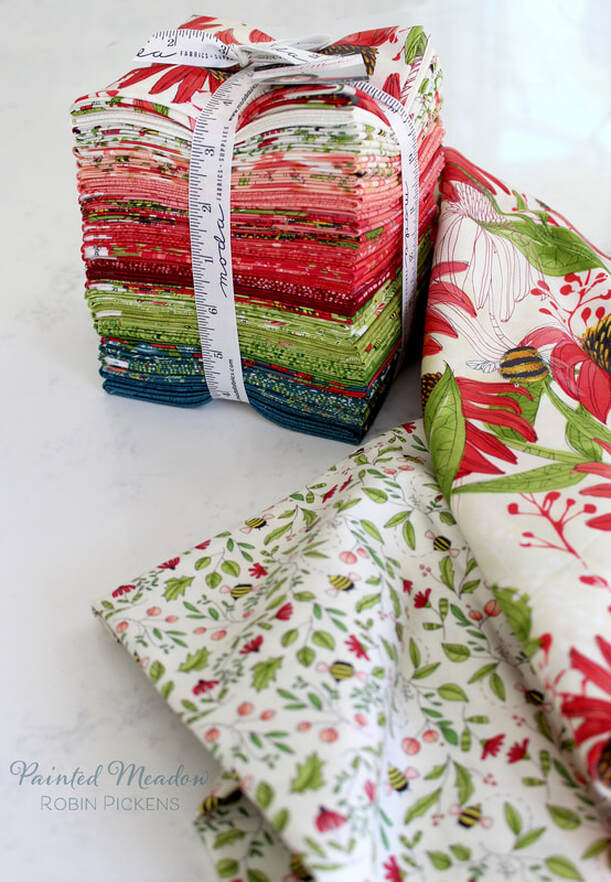 Painted Meadow has 4 colorways of cream, pinks, green and teal. It is available in precuts of Layer Cakes, Charm Packs, Jelly Rolls, Fat Quarter Bundles and Mini Charms. It was shown at the Kansas City, MO Quilt Market 2019 with Moda Fabrics and will be shipping to quilt shops in October, 2019. 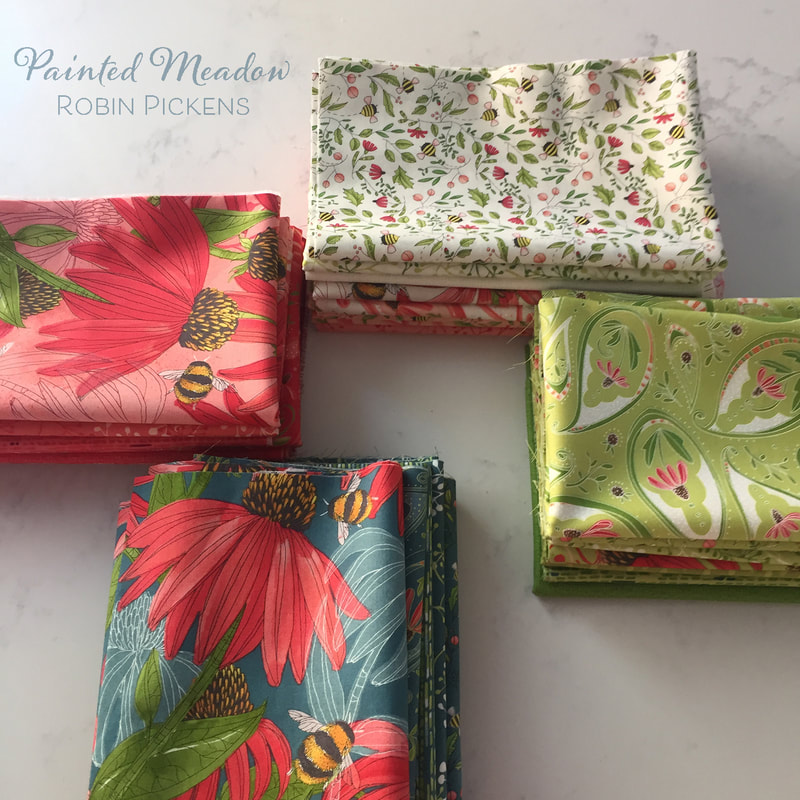 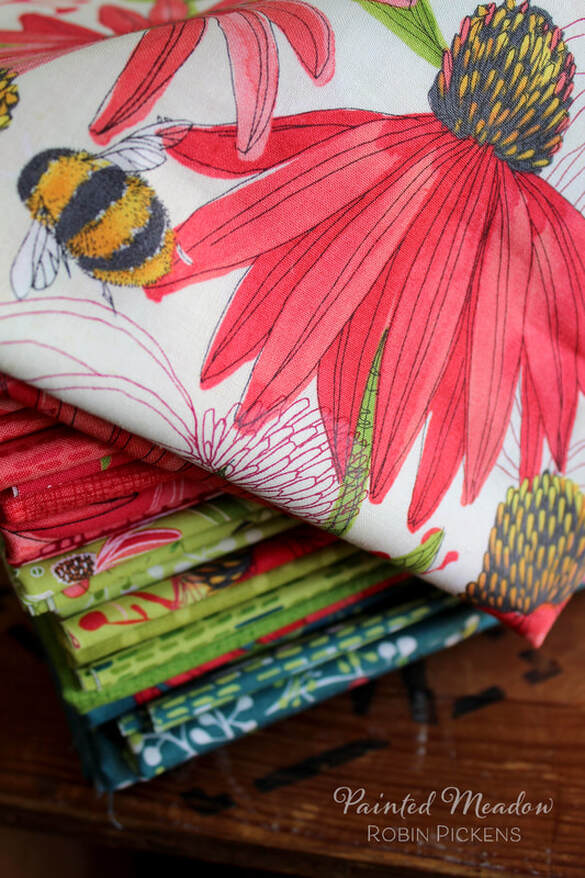 Enjoy the sunset colors of Painted Meadow with coneflowers and the buzzing of plump bees as you feel the warm summer sun… 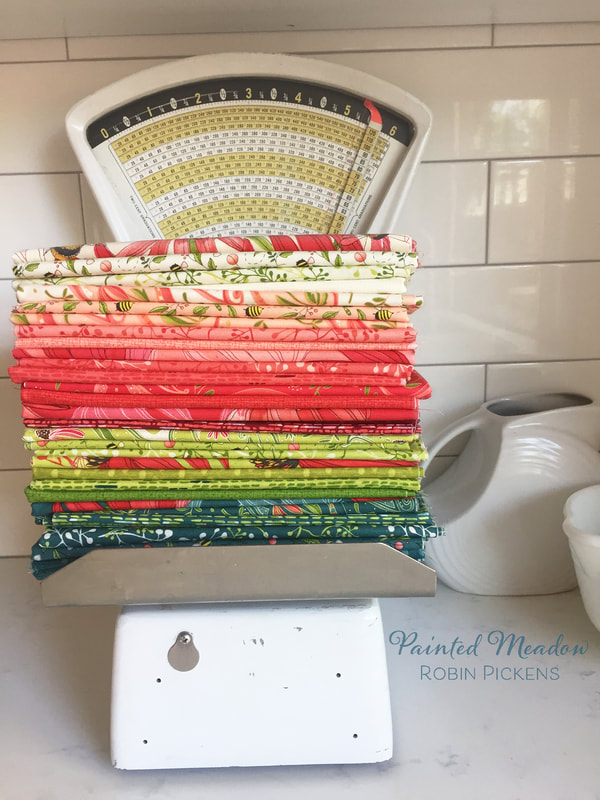  I've never been to Kansas City so I was really looking forward to visiting a new city, and being there with my husband and enjoying some BBQ and time away from the daily routine. Market requires numerous weeks of preparation so by the time we get there, I'm ready for a the excitement of the show and seeing lots of quilt people! And did I mention BBQ? Plenty of good eating on the trip! A whole day early (and no missed flights this time!) gave us time to rest, explore the city a little and get some sleep before the big set-up. Yup- barbeque was on the menu and it did not disappoint! braised and bbq'd everything and enjoyed the ambiance of the Power and Light district. 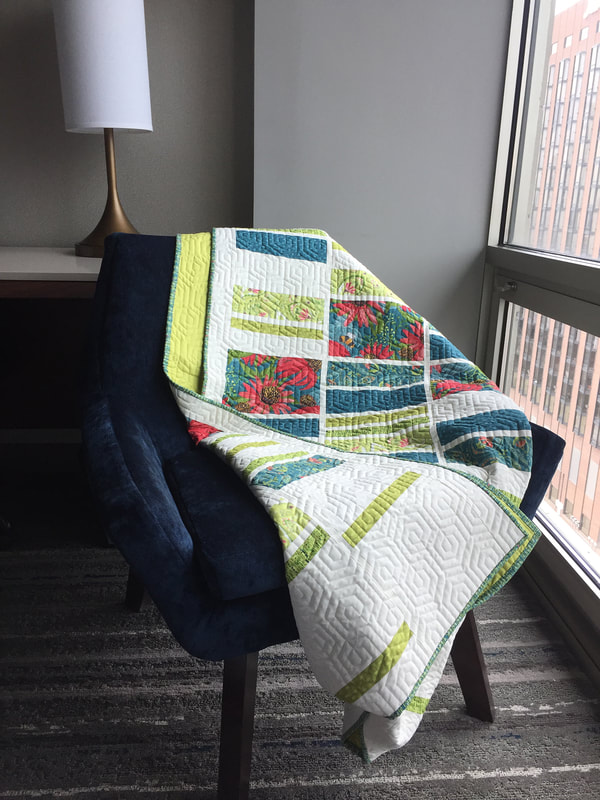 We stayed at the Marriot near the convention center, across the street in the older section that was renovated (the former Muehlebach Hotel). The rooms were lovely and renovated and the lobbies were elegant. I loved that we had the top floor so the ceilings were really high and the light was great! I had a great time taking photos of some of the quilts in the room before set up.  So what can you fit in two suitcases? Turns out you can fit: booth fold up boxes, seed packets, 6 quilts, 6 hangers, a quilted tote, promo flyers and clothes and toiletries for two people for 5 days. Not bad. 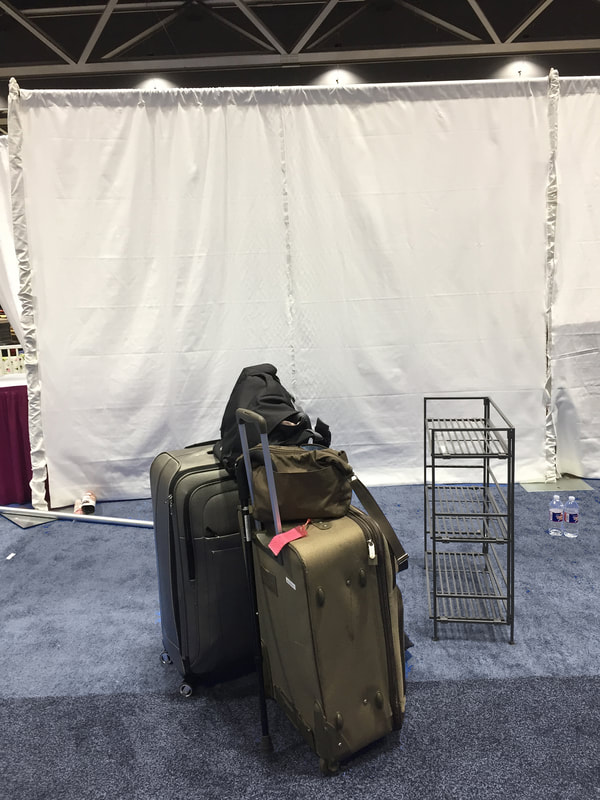 From a blank canvas to a quilted world! I had my three new quilt patterns, Beanstalk, Kyoto Steps and Picket on display, made up in my new fabric line, Painted Meadow. The three main quilts on the wall and left quilt ladder were longarm quilted by Marion Bott. Don't you love the textures? The Kyoto Steps on the ladder in teal and the pink and green Picket (seen in hotel room) were longarm quilted by Sally Corona at Corona Quiltworks. 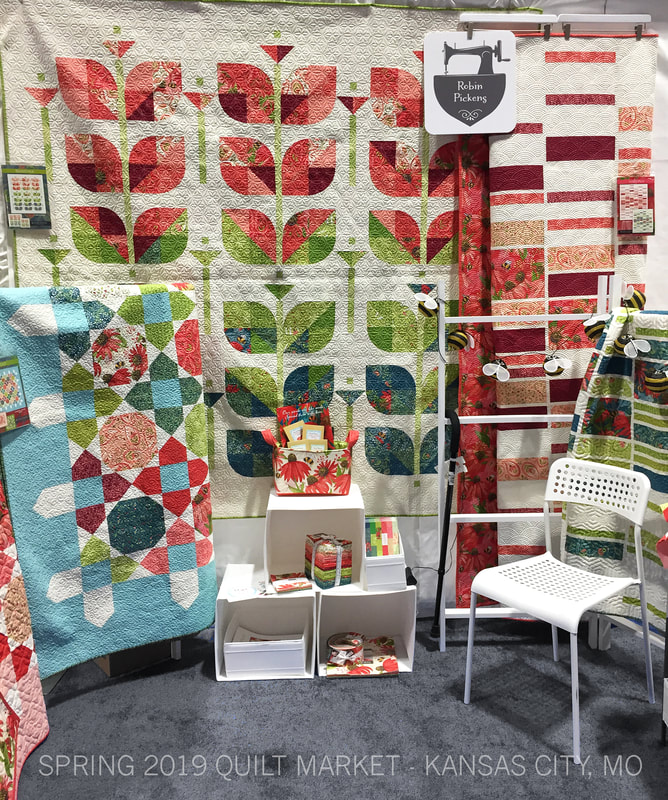 For a little giveaway this time I got coneflower seeds (did I mention my new line Painted Meadown is based on coneflowers??) and made up seed packets. I hope the seeds made it all over the globe and into fresh dirt, ready to grow and bloom! 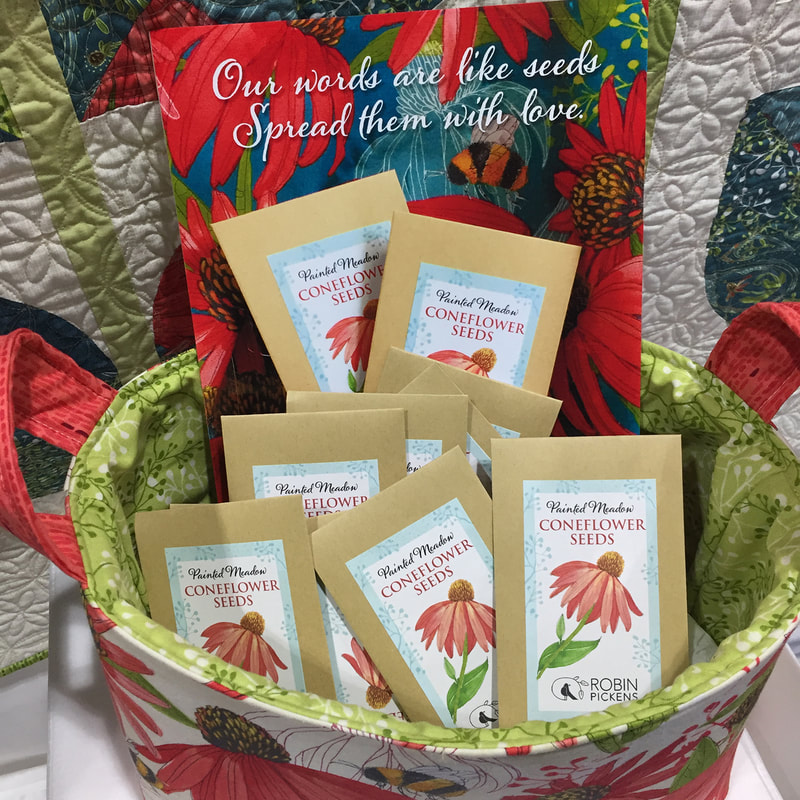 Sarah Huechteman made up a sample of the Beanstalk quilt for Moda and she made me a little gift with some of the leftovers of the Painted Meadow fabrics! How adorable is this little Bitsy Box?! The pattern is from Ticklegrass Designs. Precious!!
 What really makes market amazing for me is the time I have with the Moda people and the other designers. I am so grateful to have this experience and company to work with!
I had a great time seeing shop owners and visiting at the Moda party. Another market done and now its time to plan for the next one! Oh! And if you are wondering, Painted Meadow will be shipping to quilt shops in October 2019. |

About ROBINDesigner of colorful florals for Moda fabrics. Modern to transitional quilt designer. Illustrator, sewist, crafter. I am proud to be a designer for Moda Fabrics!


Shop Robin's Designs
 I am an affiliate for Fat Quarter Shop and may earn a small commission through my links. Thank you for your support!

Check the March 6, 2017 Episode!
Categories
All
Archives
February 2024
© Robin Pickens Inc. All rights reserved. No images may be reproduced without permission.
|
 RSS Feed

