|
Block #7 is GAME BOARD from Lisa Bongean of Primitive Gatherings. Visit Lisa's blog for the free quilt block pattern that you can make in the 4.5" or 9" size. Along with Lisa's blog at lisabongean.com, you can also follow her at instagram @lisabongean. I was surprised to see this block from Lisa since I usually expect a LOT of little half square triangles from her but she has delighted us this time with adorable little squares. This game board gives a center space for good play with color and twinkling checkerboards. I realized the borders can be a single color surrounding the checkerboard or maybe they are a continuation of the rows and lines from the center blocks. Broken color bands, 4 corner quadrants or straight across horizontal bands. Keep the center it's own distinct place or let those blocks share background color to make the perimeter more flowing.  Two color families here with pink play in the borders and randomly placed orange squares in the center. Or split it vertically half and half by color groups. The bottom two have more controlled block arrangements in the center with the last one forming a square within a square by darker squares. 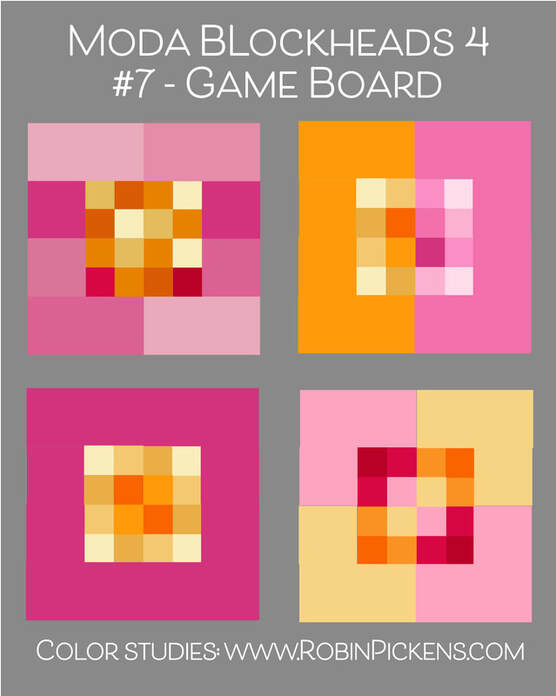 Thatched rainbow, light to dark and dark to light. And that last one is like a little butterfly or insect buzzing on its merry way. 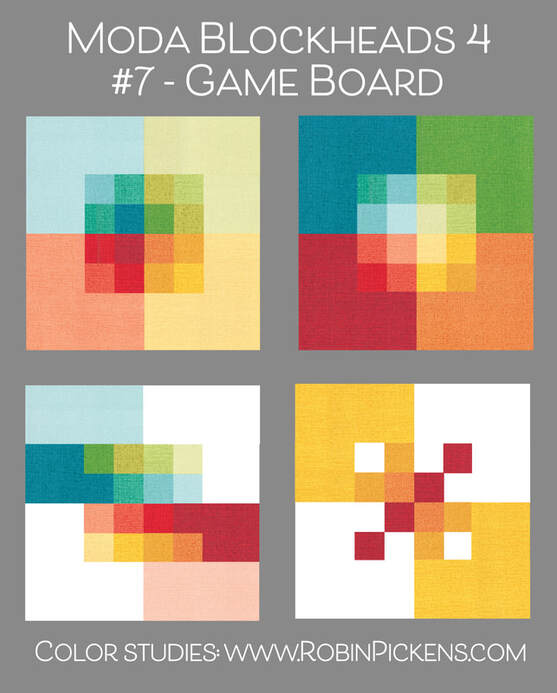 This week my block is a 9" pink version and I chose to make my 4 corners each a different print of pinks. I also used some of my new DOTTY THATCHED from the Tulip Tango line! I am loving the little dots and how whimsical and lighthearted they feel on the Thatched texture. Tulip Tango has this Dotty Thatched on cream, washed linen, princess pink, lighter pink, cranberry, chartreuse and medium and dark gray. 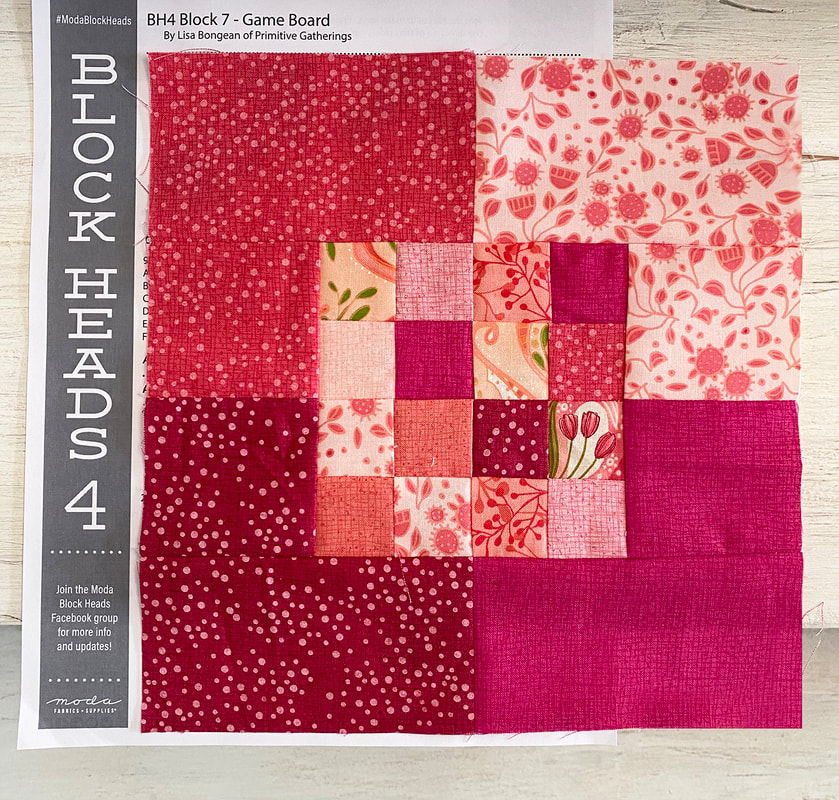 Ah, pink and vibrant...I love deep cranberry and that energy of fuchsia. What will next week bring? More orange, more yellow, more pink? We will have to wait and see. Until then, happy sewing! 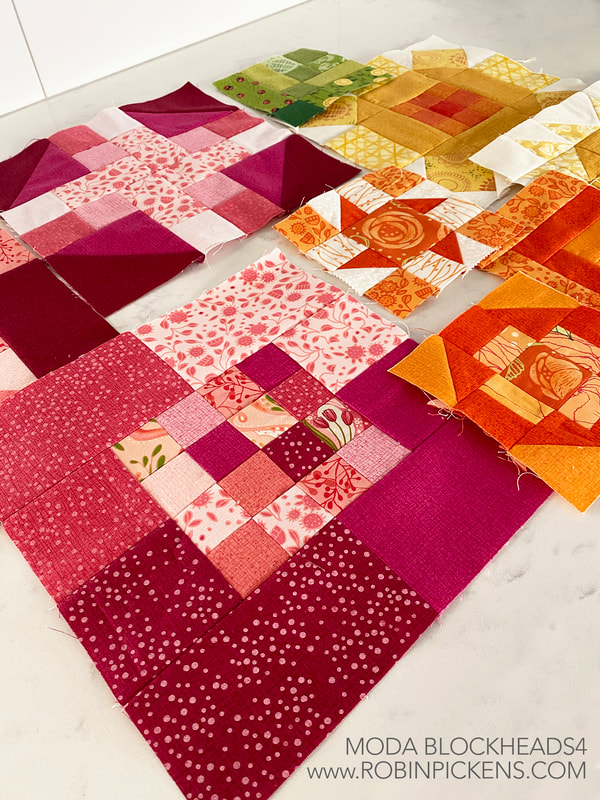
0 Comments
Linzee Kull McCray brings us block 6 called "Spinning into Spring" and you can find the pattern through her blog at https://linzeekullmccray.com/blog or click the bar right below: The half square triangles on this block can be shown with light and dark sides to get that feeling of a propeller in motion. They can also mix with the background color to make larger triangles. The plus sign inside is part of the windmill, or bars on large T shapes. The four side rectangles can define space by boxing in or blending into the center. 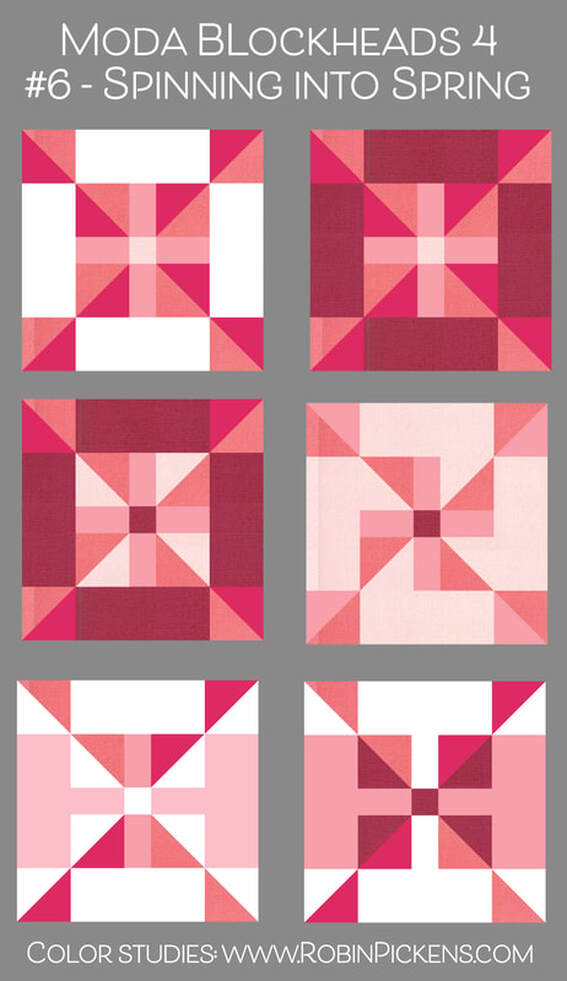 The rainbow versions plus one blue/green combo. I think of these as "Spinning into the Color Wheel" and like how the center plus almost glows out in ones with all color surrounds. 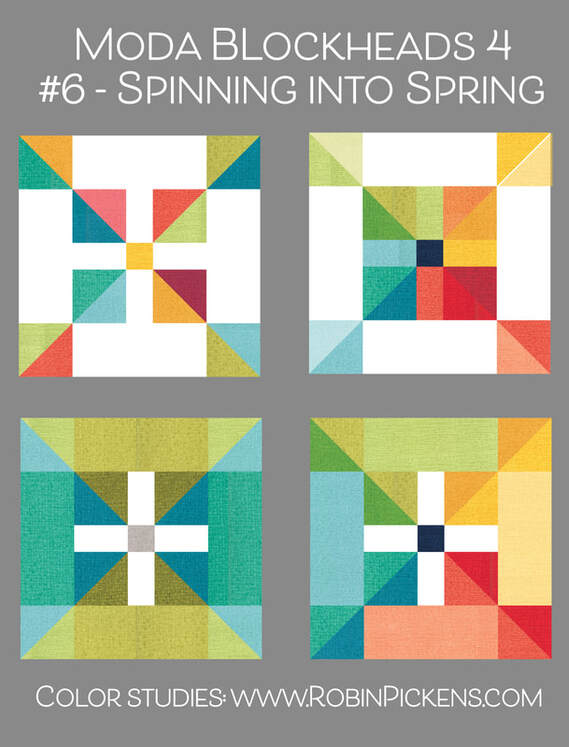 This week my block will live in my large pink border. I also made both of the bonus blocks we have received so far. I did turn one side of "Mix and Match" to have the bars go in opposite directions, thinking of leaves as they branch out from their center stem. 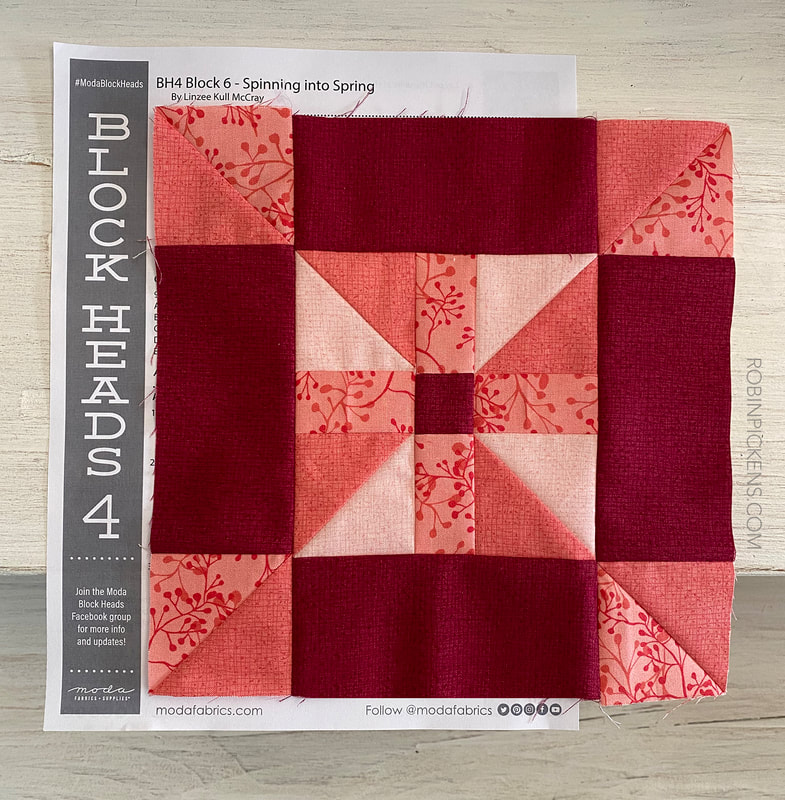 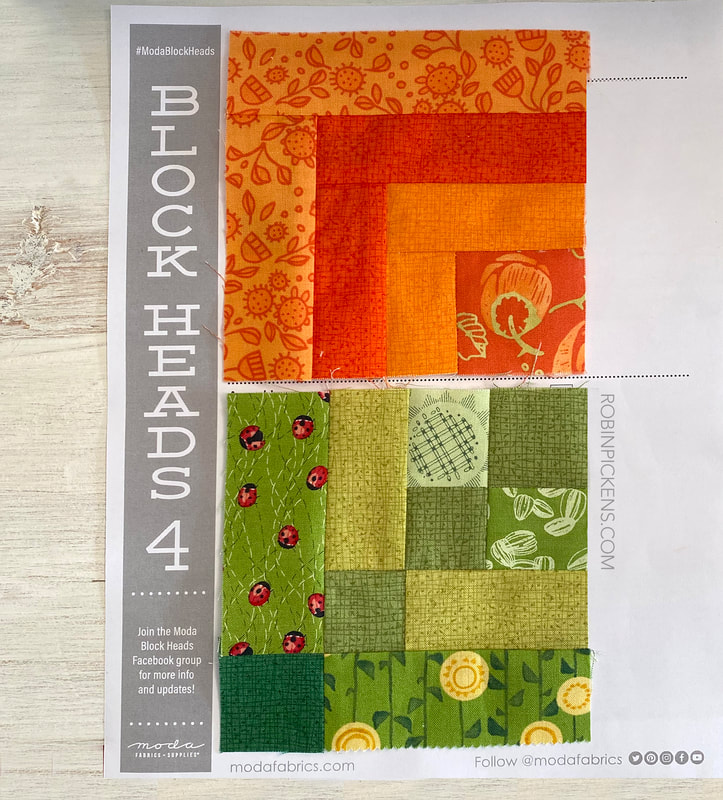 Here are all my block so far! Summery colors and happy vibes! It feels like a summer party. Happy sewing! 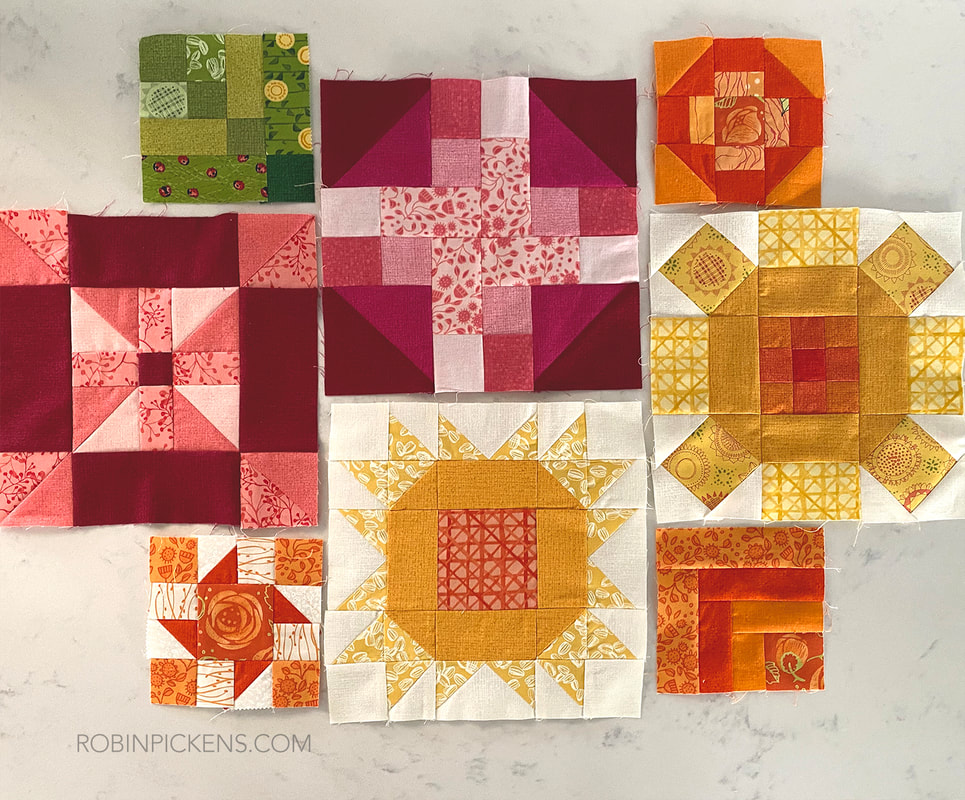 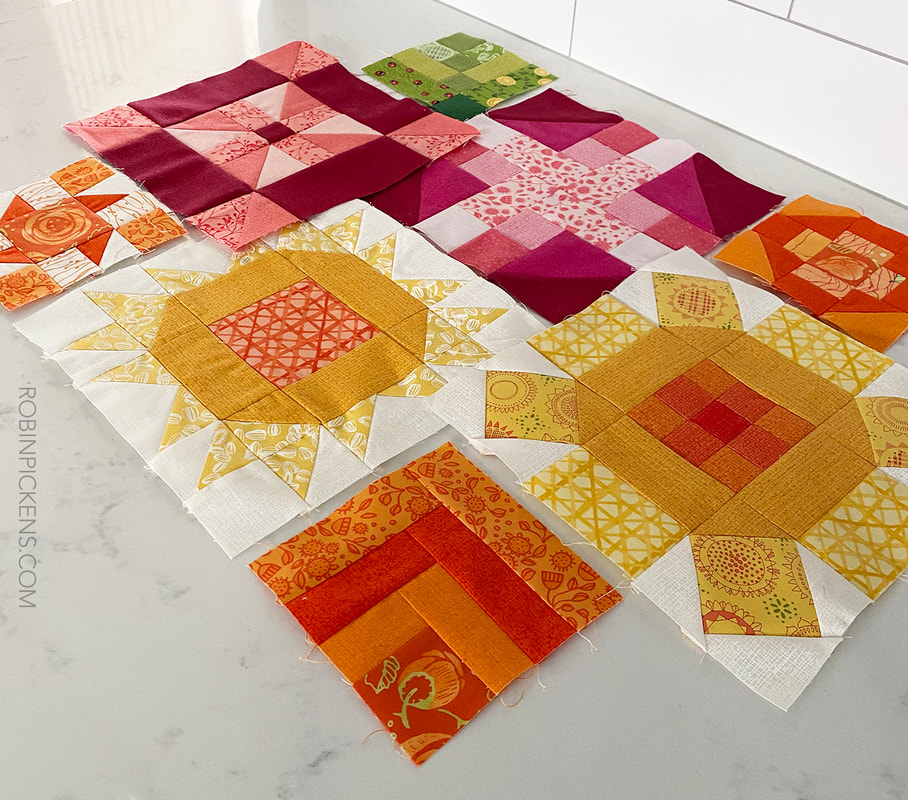 Week 5 and Barbara Groves of Me. & My Sister Designs brings us "Two of Five". I think of this as a Churn Dash but like how those HST corners can give the feeling of rounded corners, leaf points, candy in a twisty wrapping, or framing for a plus sign. 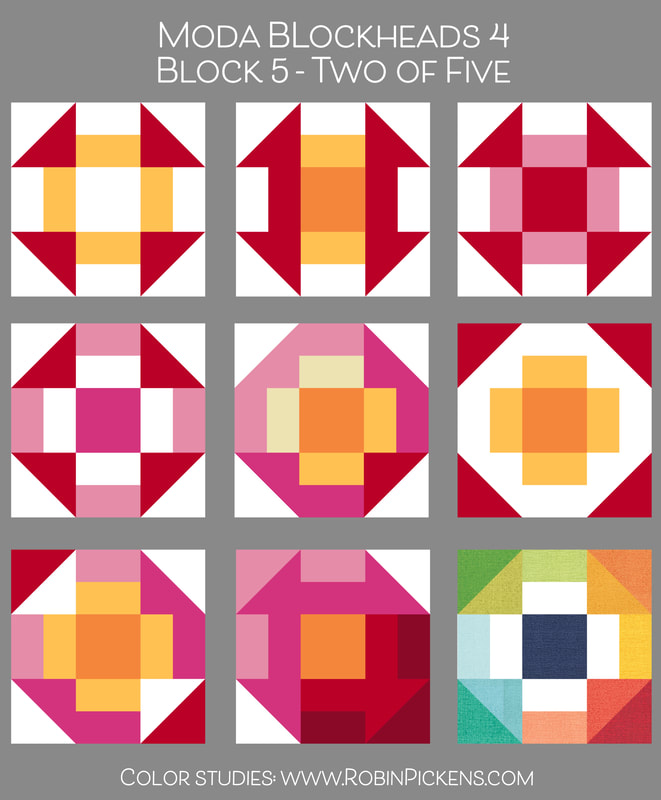 To see more of Me & My Sister Designs creativity and quilt projects (and books and cool new work space), visit instagram at https://www.instagram.com/meandmysisterdesigns/. And to get your copy of "Two of Five" pattern visit the MODA blog today in the resources section or click the bar below to be taken there: Another small one for me this week for my smaller orange ring of blocks. Still having some fun with Abby Rose and Thatched. I think my favorite of all the Thatched oranges is still this darker Tangerine. 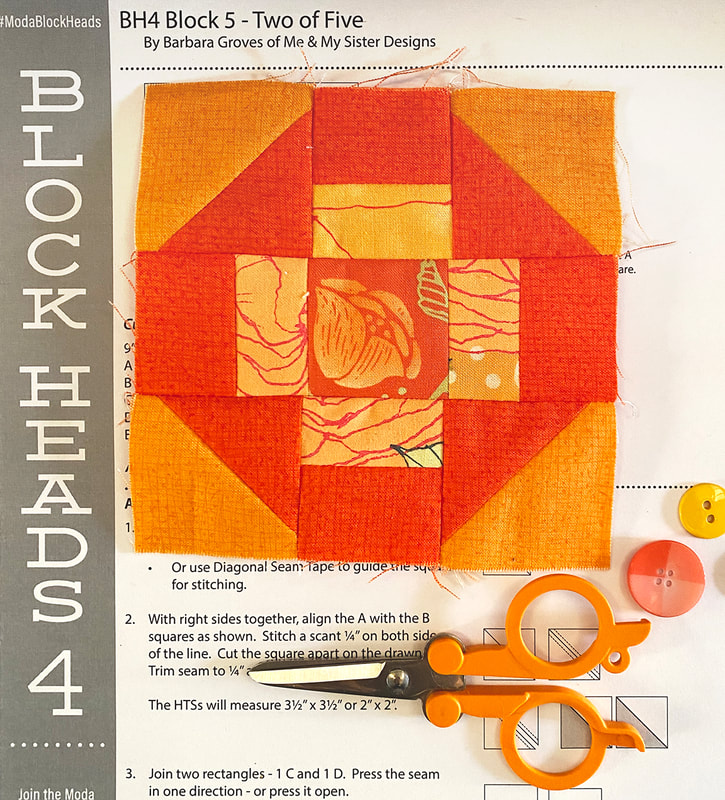 Now I'm hopping back to my secret sewing. I've got a new fabric line to show next month and two new patterns so I'm deep in sewing and pattern writing.
Till next week... happy sewing! Anne Sutton of Bunny Hill Designs supplies this week's block "Spinner." Visit Anne's blog for the pattern. You can also follow her on instagram @bunnyhilldesigns. Have you seen Anne's latest applique quilt project called "The Flower Farm"? It is SO sweet and charming! This block is pieced, and not applique, but I bet the center would be a lovely place to add an applique. 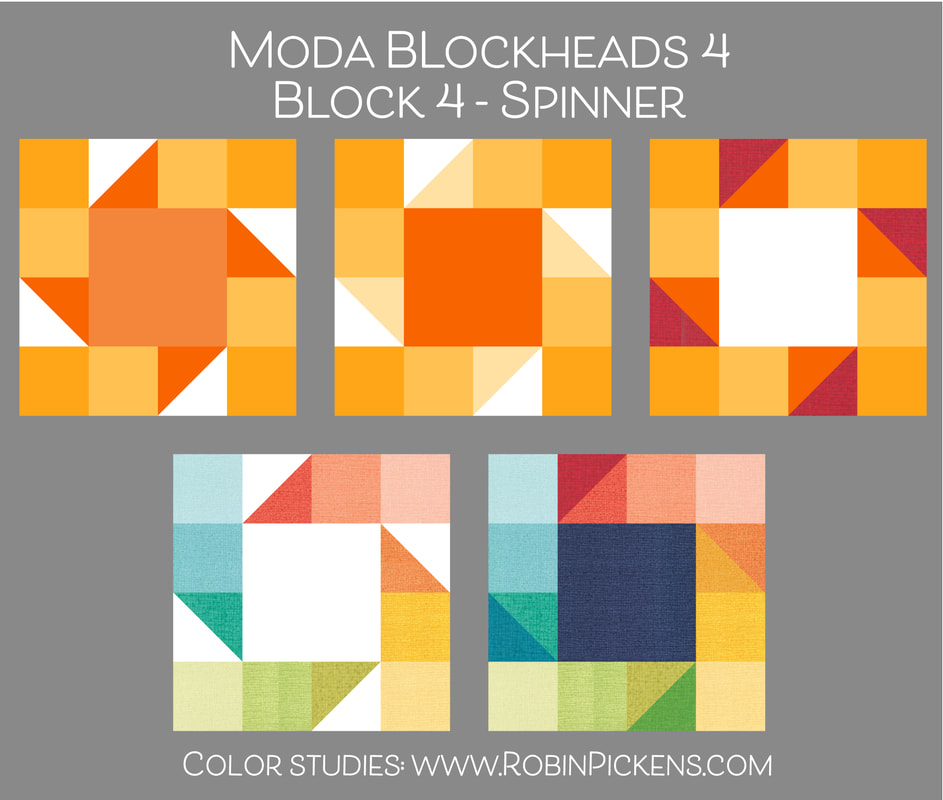 You can see the spinner shape showing up with the blades around the center square in the half square triangles. I thought it might be interesting to make the outer small squares in graduated shades of a color to give that feeling of motion or try a white center (assuming a white background fabric overall) and making the emphasis on the outer ring of blocks. Then I tried my rainbow mix of sides with both white or dark center. Another version that Moda showed on the instructions as an alternate is with 4 patchwork squares in the center vs the one large square. I used some of my above ideas with the 4 squares in center and like how a continuation of color emphasizes the blades and the additional pieces can lend nicely to a feeling of transparency. 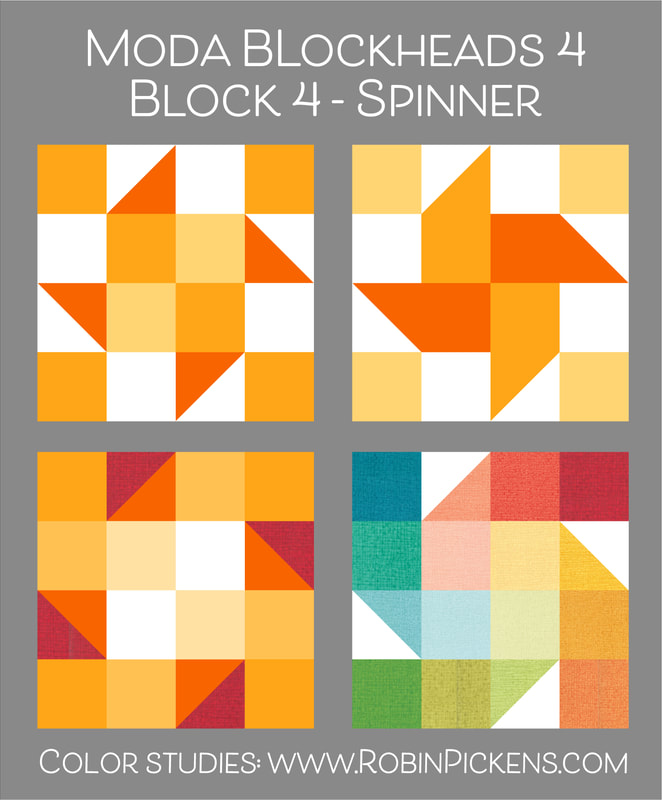 I made the 4 1/2" block so I kept my center as one piece and showed off a Bramble Rose from the Abby Rose collection in it. Oranges play in the outer pieces. This block will live in the middle small ring of blocks on my quilt. 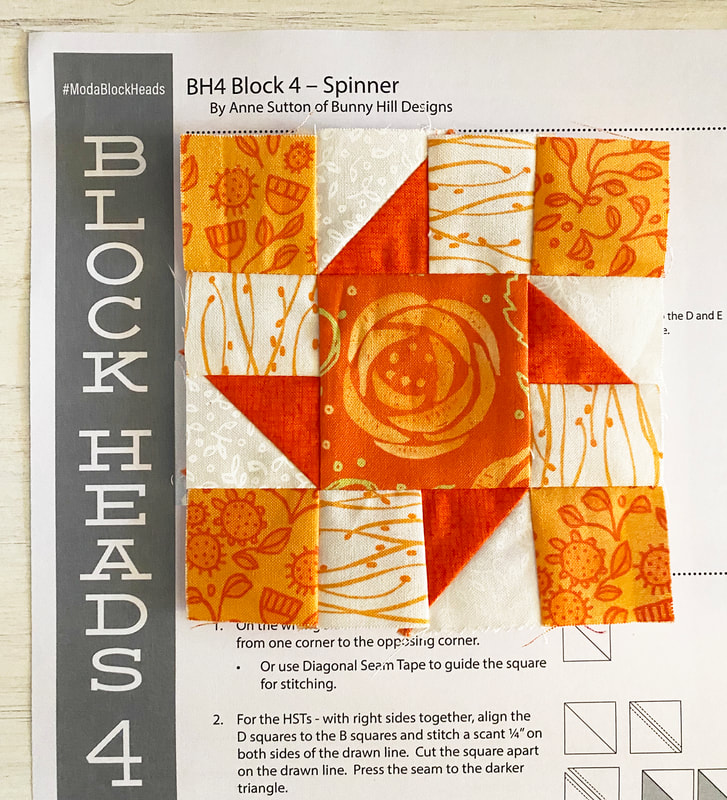  Four weeks down! I still plan on making the bonus block from last week. It will be another one of the small sized blocks. The 4 1/2" size is quite sweet. Thanks for visiting and sewing along! 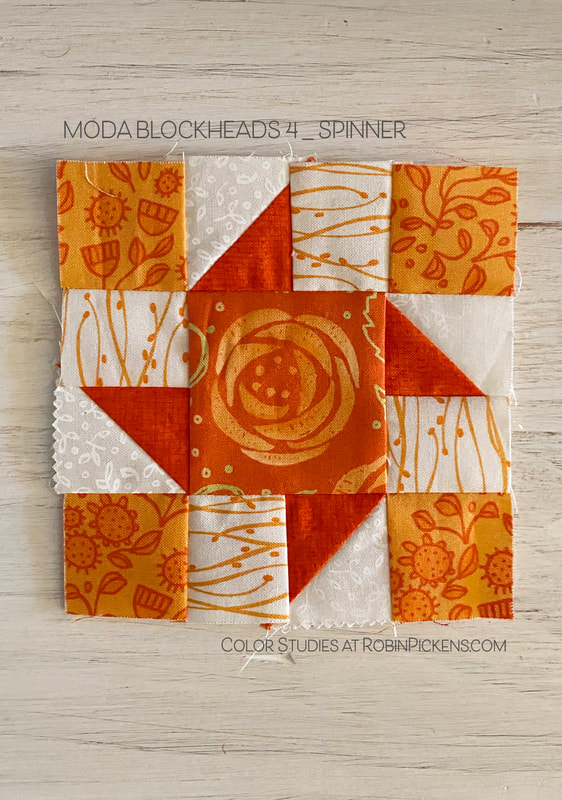 My week with my second SEWCIALITES block is here! Celebrate "ABUNDANT"! I've got some variations and a fun project you can make with more blocks! 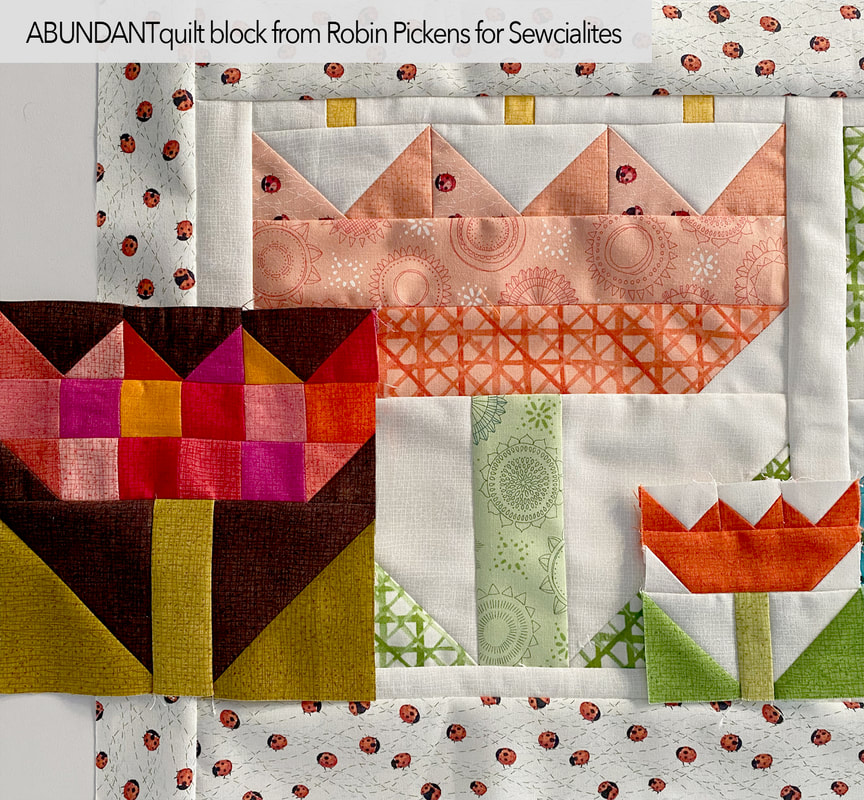 I've made blocks this week from all three of the sizes- the 9", 6" and 3". In honor of SPRING arriving and Easter around the corner, I've made a project for a cheery table runner from three of the 9" flower blocks. I used the Solana fabric line for the blocks and border since it felt so happy and summery and I just could not resist some of those busy ladybugs. One variation that I made on my runner blocks, was to make the flower base out of two strips of fabric as horizontal bands vs one body color. This allows you to add more dimension or prints into the flowers or you could make the bottom green and the top band the petal colors. If you would like to do this, take the finished size of the flower base, divide in half, then add your 1/2" for two 1/4" seam allowances on sides. On the 9" block you would use (2) 9 1/2 x 2" strips, the 6" uses (2) 6 1/2 x 1 1/2" strips, and the 3" uses 3 1/2 x 1" strips.   Each of my flowers for the runner use two strips for the base. I picked colors of peach, blue and yellow for the prints from Solana for my blocks. I also wanted to give my petals (made with the flying geese) two fabrics to suggest a little more dimension. To keep it looking like a cohesive unit, I chose stems and leaves in similar fabrics for all three flowers. If you are making the flower base with two pieces as shown below, I suggest joining them first, then add your stitch and flip corner to the joined unit. I find my seams will press flatter this way (vs corner first then joining the two strips). 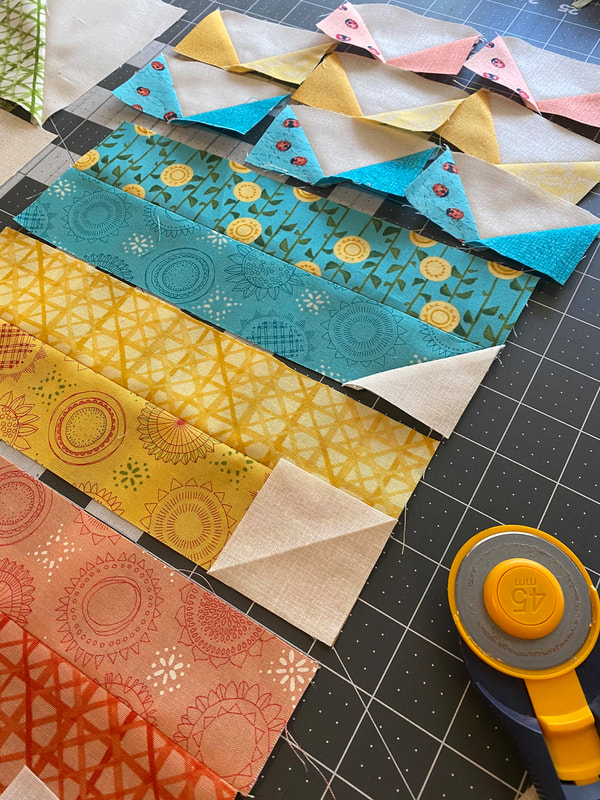 My runner also adds little pollen dots on top of each flower. The pollen pieces are made from 1" squares joined by background strips and that row is placed on top of the flying geese. To balance the flowers and make the bases and leaves line up when flipping, I've also added a 1" strip to the bottom of the flowers.  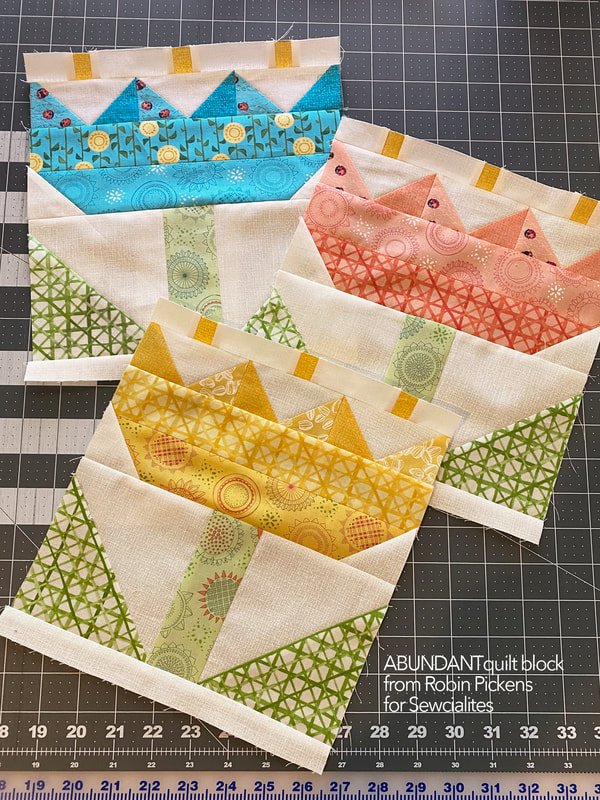 Each of the flower blocks are joined, side by side, with 10 1/2 x 1 1/2" strips to make the body of the table runner. A 2" border surrounds the group. 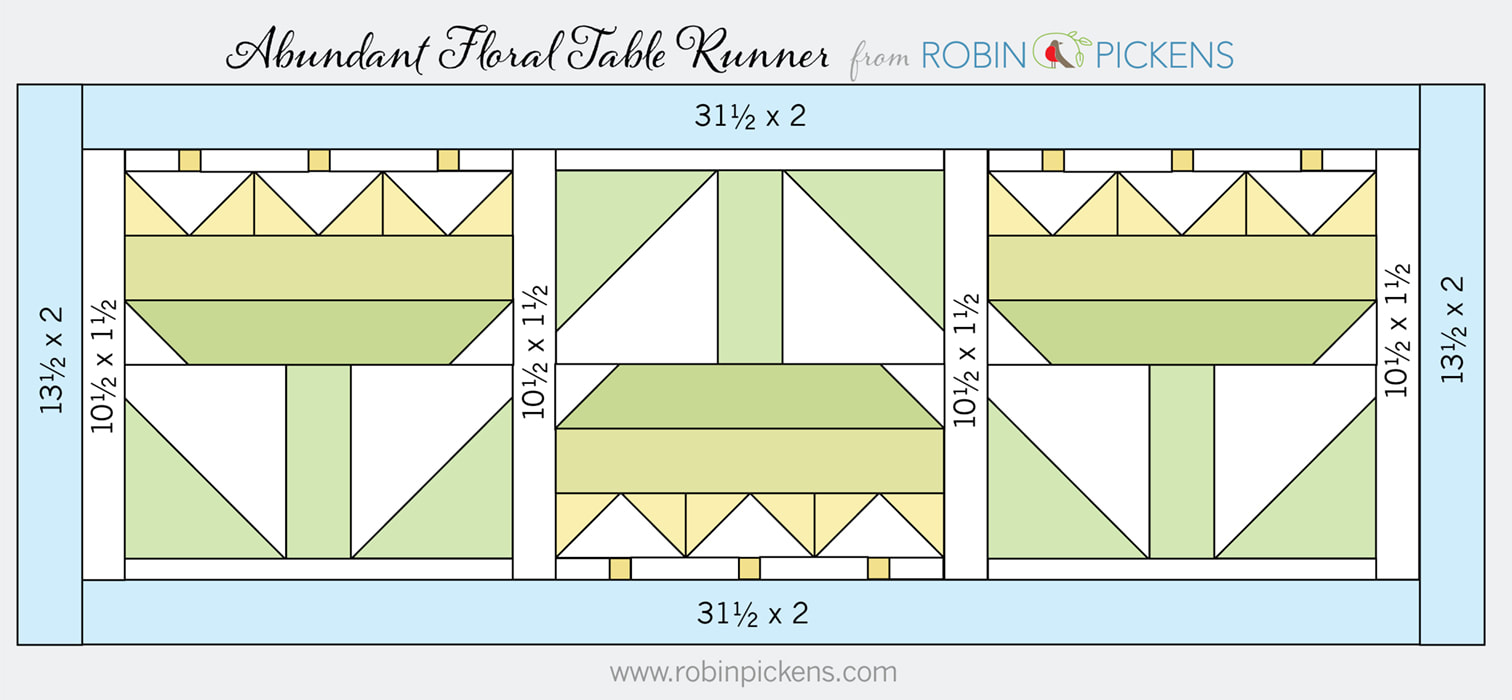 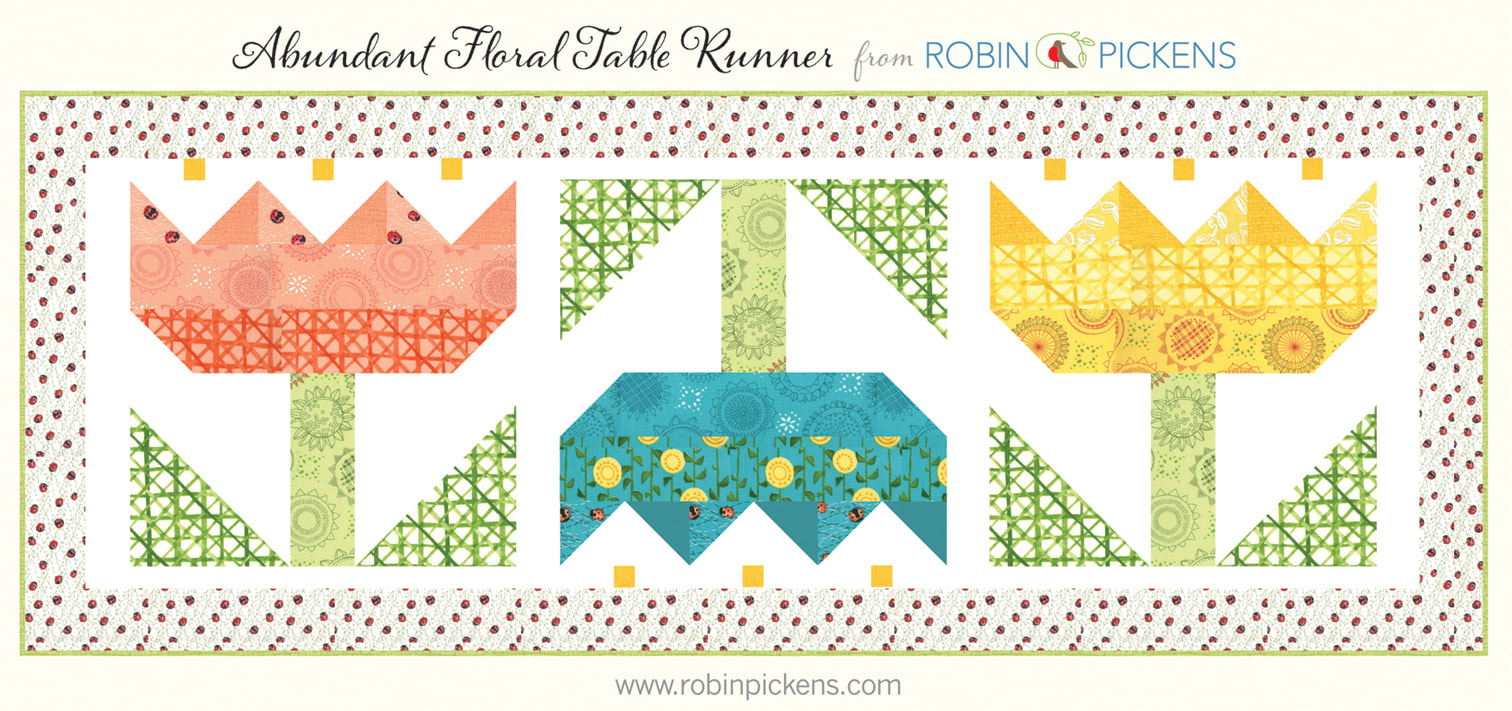 Here is my pieced top. It still needs quilting and binding but I can get that done by Easter. It adds a pop of spring to the table. I'm planning on binding in the light green Thatched from Solana. 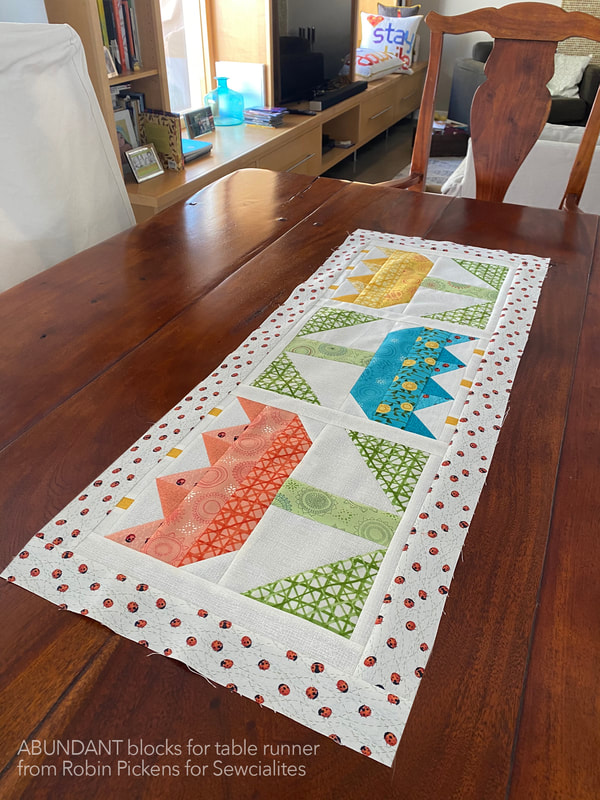 These could be so cute as white or light colored flowers on a dark blue, dark green or purple background. Or play around with string quilting pieces in the leaves? 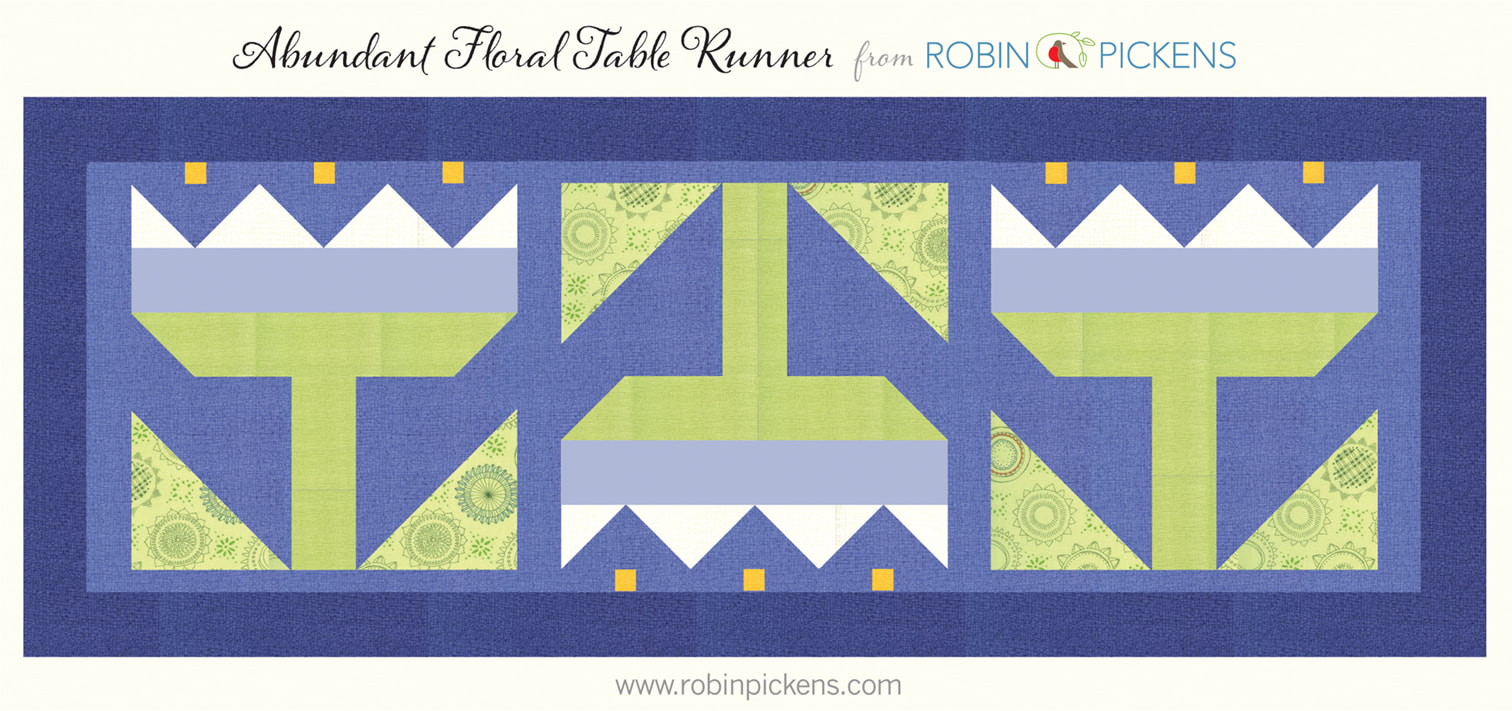 I also think a longer runner with more flowers that drapes over the edge of a chest or table could be nice! 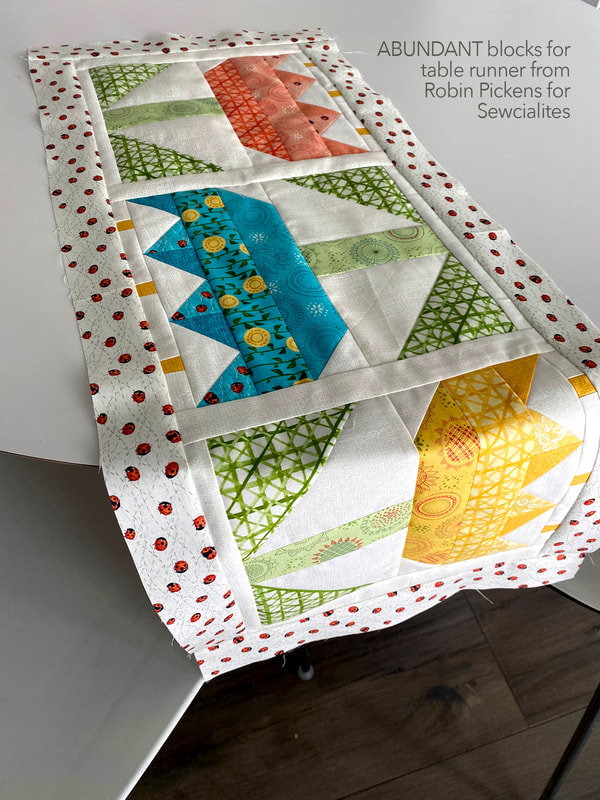 But I'll just enjoy this Solana version this spring and maybe make another one later! One more variation idea for this Abundant quilt block. I wanted to try patchwork squares within my flower to get a mix of warm pink, orange and red shades. Using the same formula for figuring out the horizontal bands for the flower body works for size of squares. This shows if you keep one a solid band on the underside of the bloom vs all patchwork squares.  This 6" sample is done with some of my new Thatched colors! The background is Chocolate Bar and the leaves are Green Curry and Olive. The flower uses Peach, Pink Grapefruit, Sugar Rose, Fuchsia, Apricot, Tangerine, Rose and Crimson. The Fat Quarter Shop is carrying the Thatched colors, including the new additional range, as well as Solana fabrics. 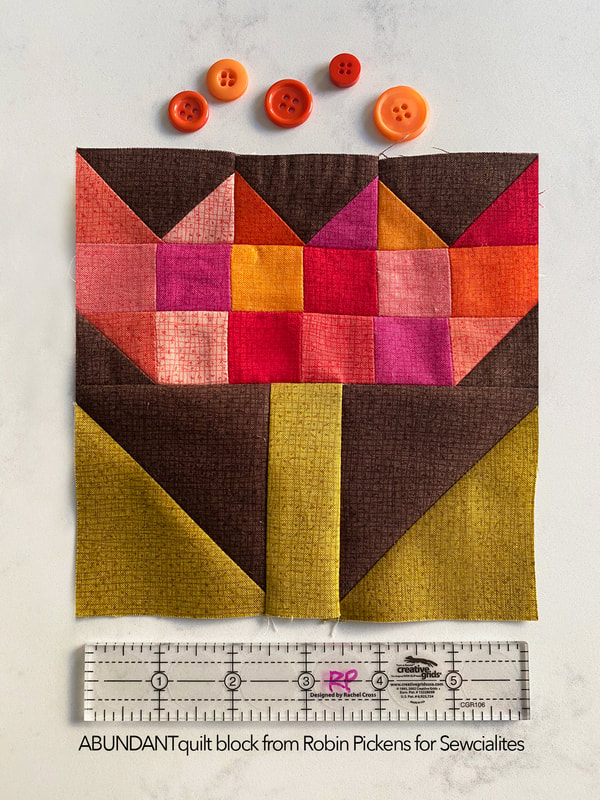 If you want to make patchwork squares, use 2", 1 1/2", or 1" squares for the 9, 6 or 3" blocks. 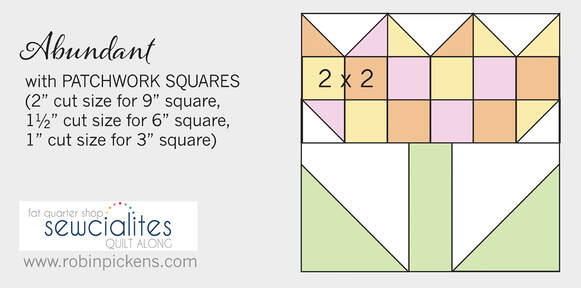 My overall Sewcialites quilt is made with 3" blocks in Thatched in grays with three of the blocks in color. For this quilt with the small blocks, Abundant is one of the color ones! The other is the heart block from Corey Yoder and the third one will be the sewing machine from Lori Holt. 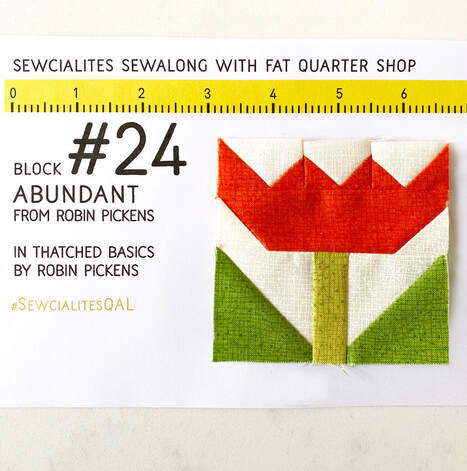 Want the FREE pattern for the ABUNDANT block? It is on the Fat Quarter Shop page about SEWCIALITES! I hope you have as much fun with this block as I am having. Keep it simple or add to the blooming delight! And thank you to the Fat Quarter Shop for organizing this sewalong and thank you for including me. Happy sewing everyone! 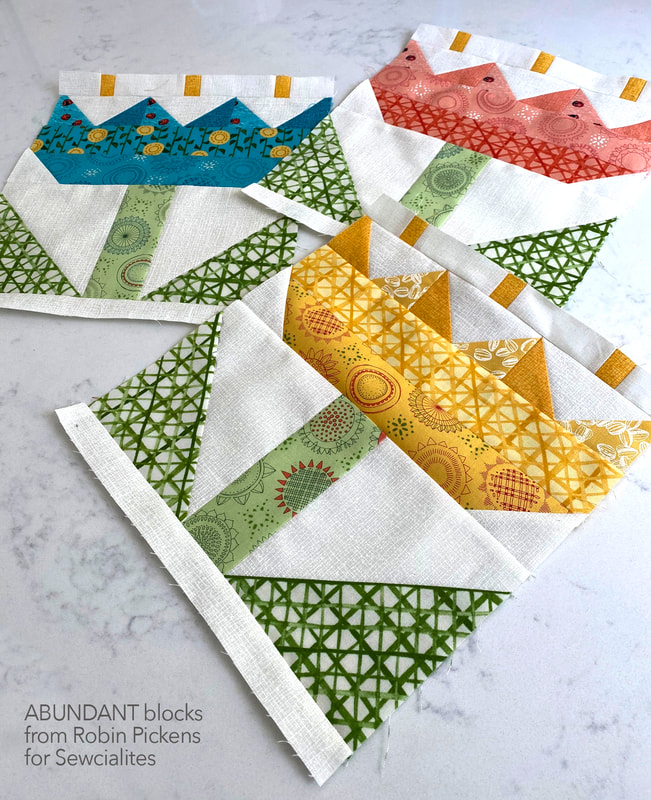
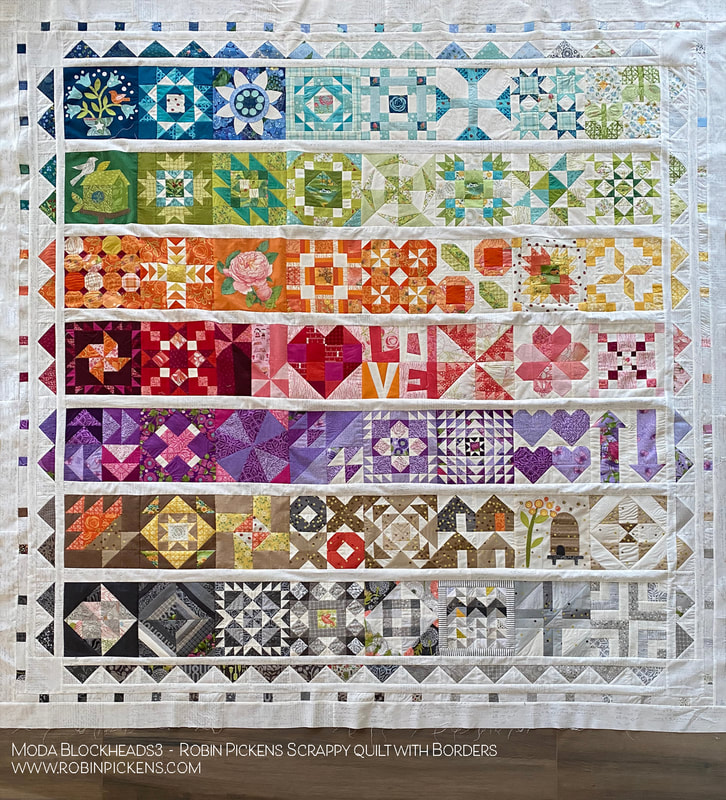
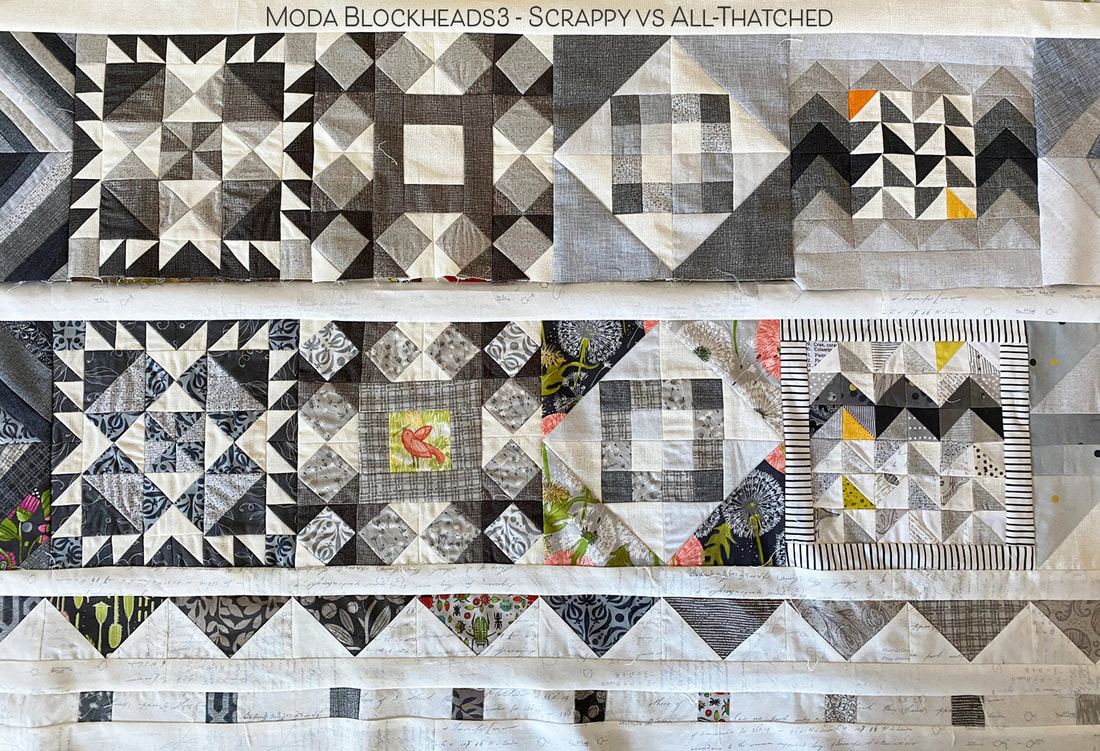
After joining my Moda Blockheads quilt tops, I felt like the scrappy version needed something a little extra and fancy to go with all those prints and prettiness. I thought a border based on flying geese and little squares provided a nice "fringe" to play off the rows and colors.
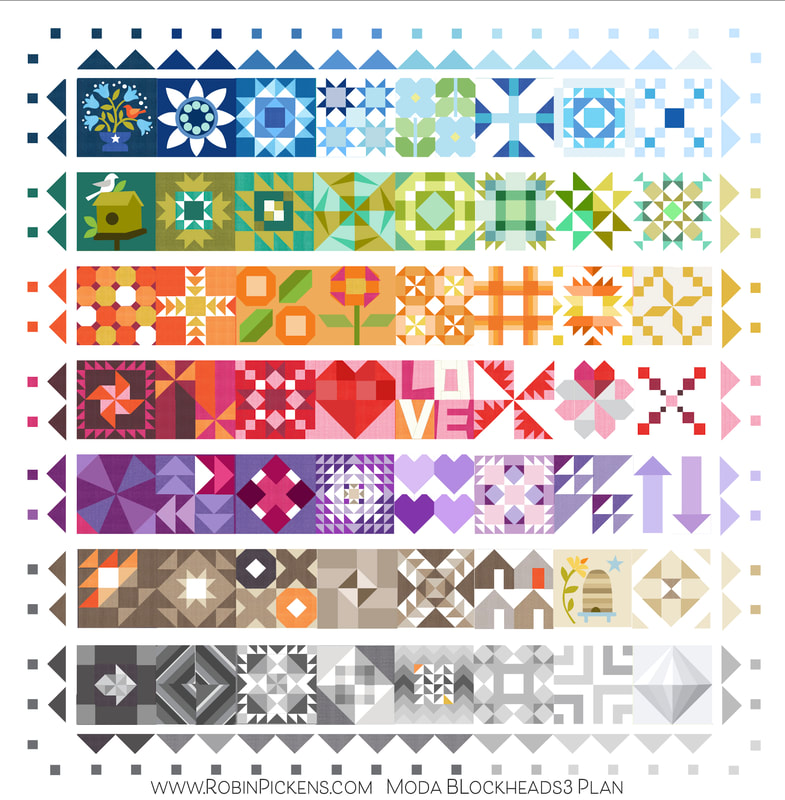
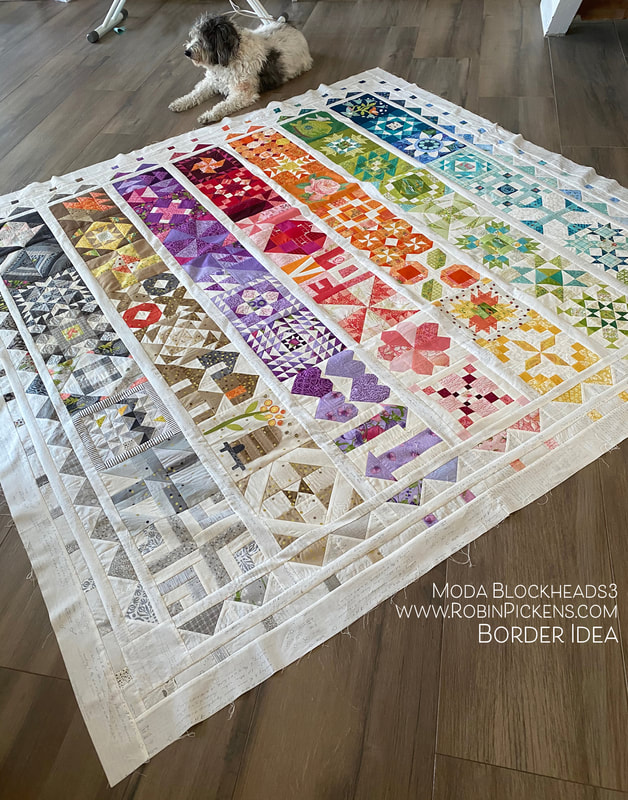
From computer plan to quilt top, I think it went pretty much as planned. I wanted to follow the dark to light scheme and reflect that in the flying geese and squares. I've changed colors as the rows have changed from blue to green to orange and so on.
The flying geese on the sides are in pairs with the same sashing width between pairs. Along the bottom, as the blocks are side by side with no sashing separation going across, so are the flying geese.
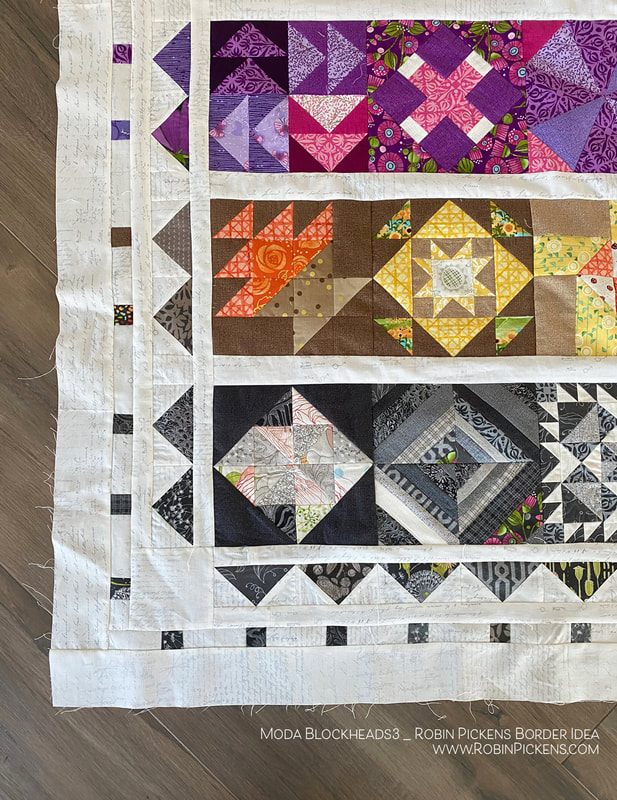
My blocks were the 8" size. Therefore my flying geese are 2 x 4 finished size. The spaces between the 1" finished squares are 3 x 1" and with the sashing spaces on sides, those are 1 x 41/2". 4 x 4" squares go in the corners and 2 1/2" borders line the outsides (all finished sizes. Cut sizes are marked on diagram as well).
The flying geese with 1" sashings are added to quilt top first. The bottom and tops have the 4 x 4" added when attaching those. Small squares with background rectangles and outer border are added next. The fabric I have use for the sashings and borders background color is Modern Background Paper 1581 11 by Zen Chic. It is such a nice low volume background fabric. 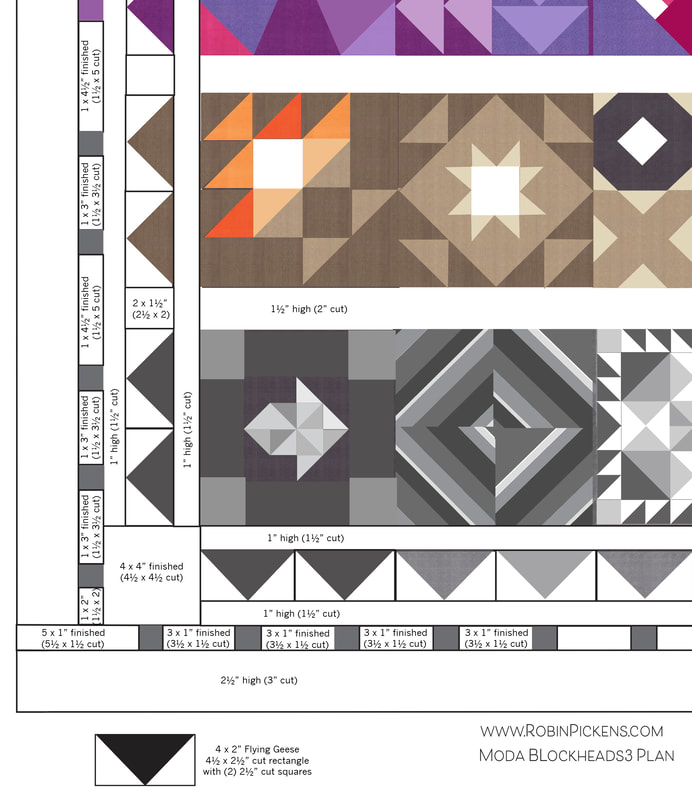

I like to see the difference of how the little squares and flying geese look in the darker values vs the lighter shades.
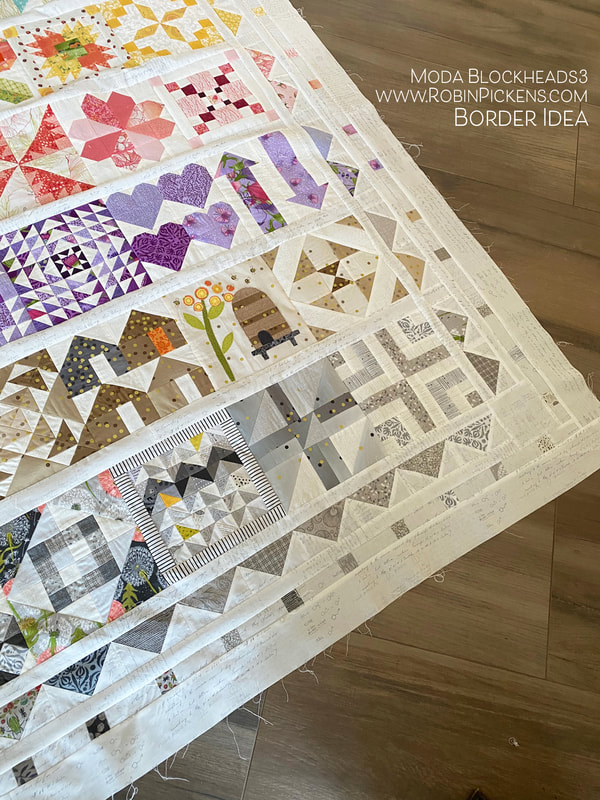
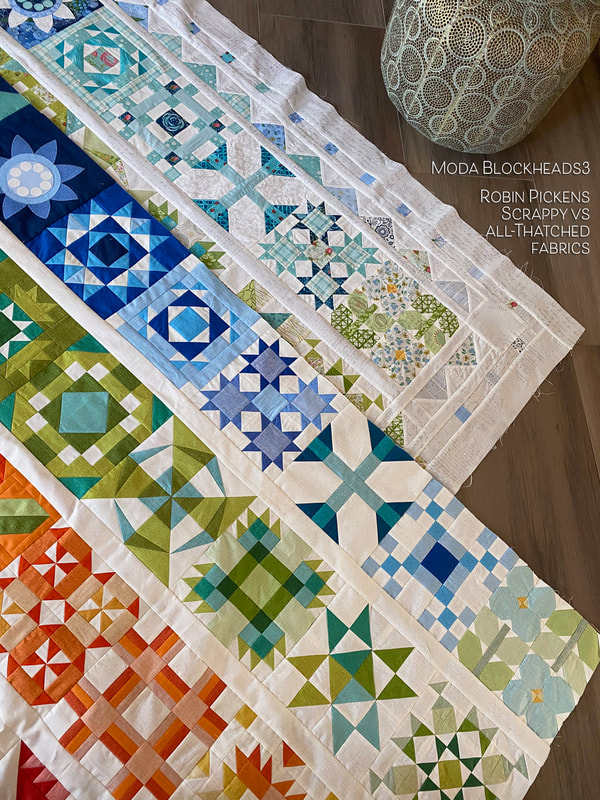
I also like to see the differences in the scrappy fabric quilt top vs the all-Thatched version. I think the border on one and not the other will help to create differences between the two, as well as different quilting. Another change between the quilts is I used piecing for most of the applique blocks on the all-Thatched version. The scrappy quilt used the applique designs. Notice the darkest blue and green blocks have the original designs for flowers and birds and birdhouse. The Thatched quilt has pieced blocks from Joanna Figueroa of the tulip, house and posie (which replaces the applique rose that I used Abby Rose fabric for).
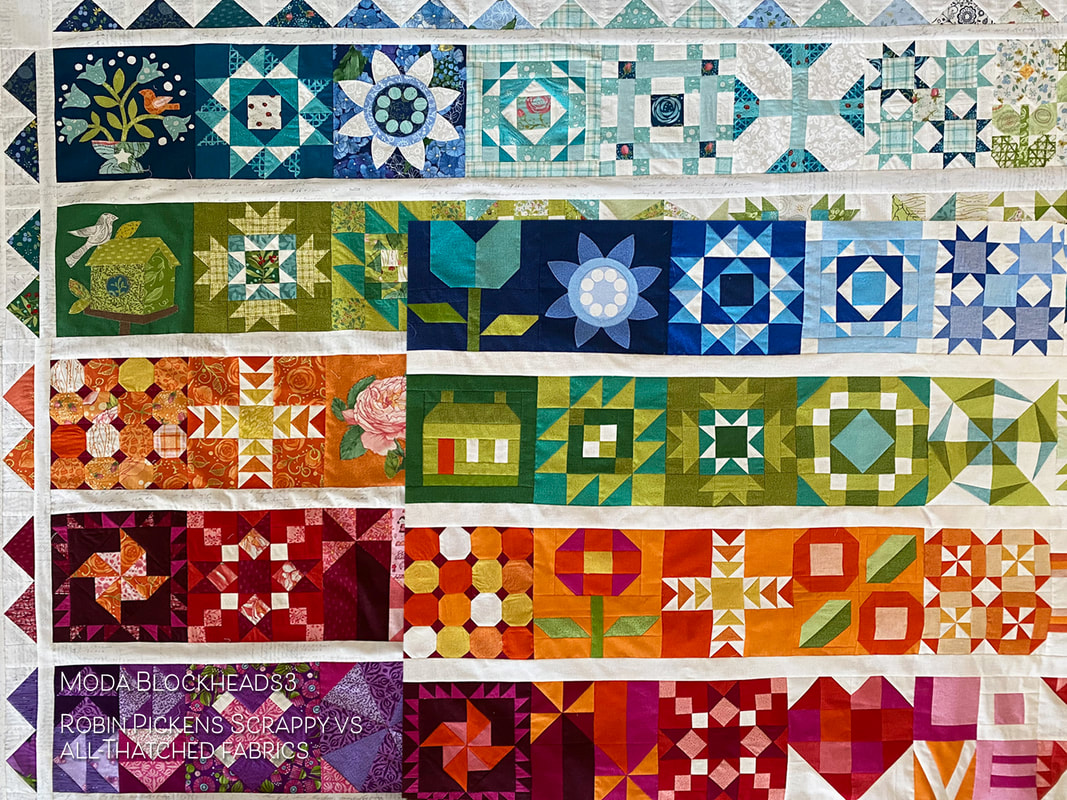
Sometimes the fabric choices for scrappy provided a different mix of light and dark so I rearranged some blocks within rows between the two types of quilt tops. The blue row especially flipped positions of some blocks.
I liked adding the little bird in the center of the Fixer Upper block from Vanessa Goertzen. Small peeks of color help to tie the gray blocks in with other rows.
Time for quilting on these tops. The finish line is in sight! Hope you are having fun with wherever you are in the process!
To celebrate the new colors of Thatched basics that are joining the group, I've got a FREE mini quilt pattern to share! Here is "Radiance Bloom"! The pattern PDF to download is further down on this blog post, so keep reading. 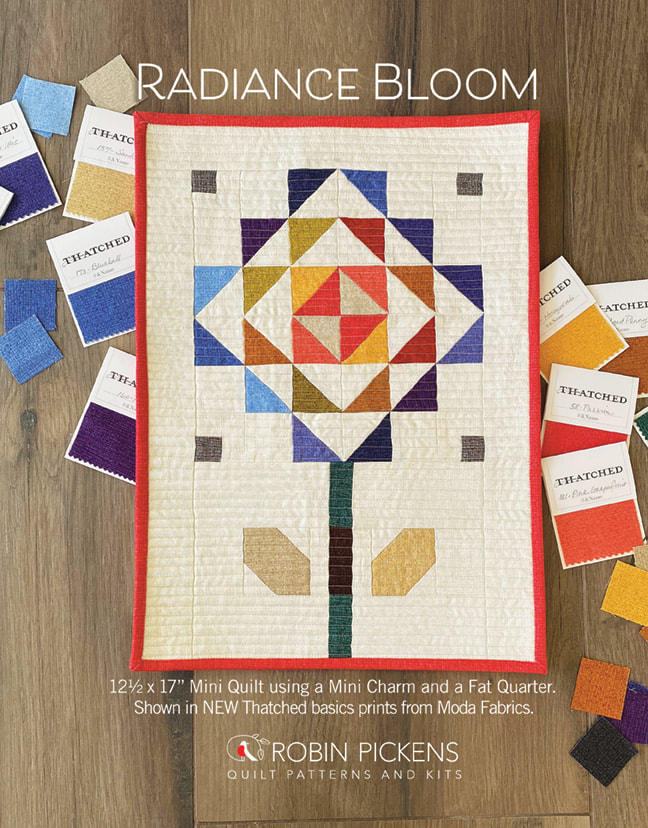 This mini quilt finished at 12 1/2" x 17" and is made from a MINI CHARM PACK and background of one FAT QUARTER. Add another fat quarter for the binding and one for backing and you have a fun flower ready to bloom on your wall. I called it Radiance Bloom since the petals seem to radiate out from the center. 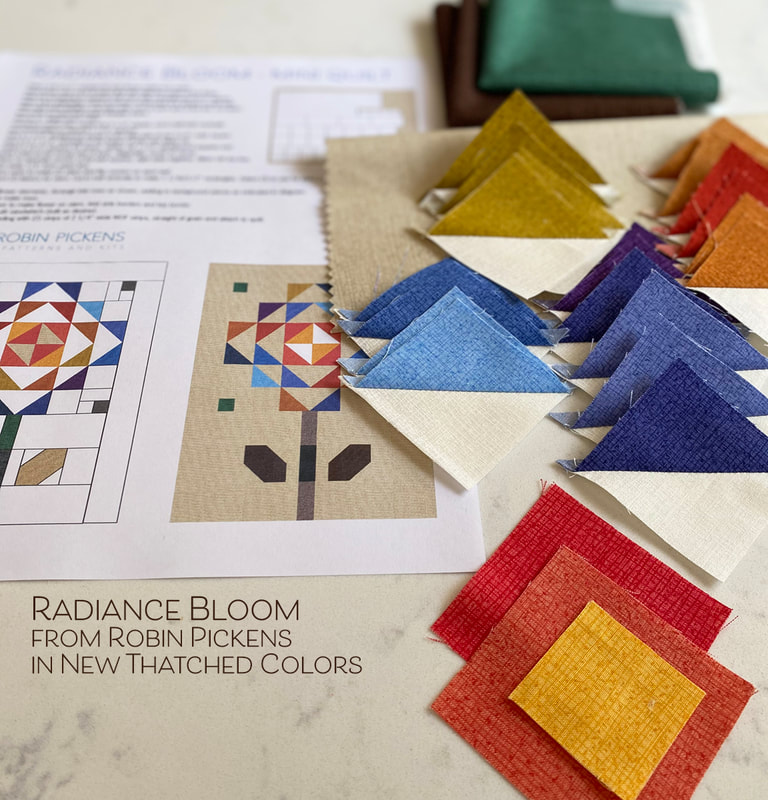 I love to collect Mini Charms with their sweet size of 2 1/2" squares. When paring them to make half square triangles, you end up with 1 1/2" finished blocks. I wanted to show off the new pretty colors that Moda Fabrics just added to Thatched, which created a warm and spicy colored mix of petals. Since I didn't have an actual Mini Charm yet, just some sample swatches, I cut my pieces to the 2 1/2" size to start. But I love that this part would be so fast with a precut pack of those squares. 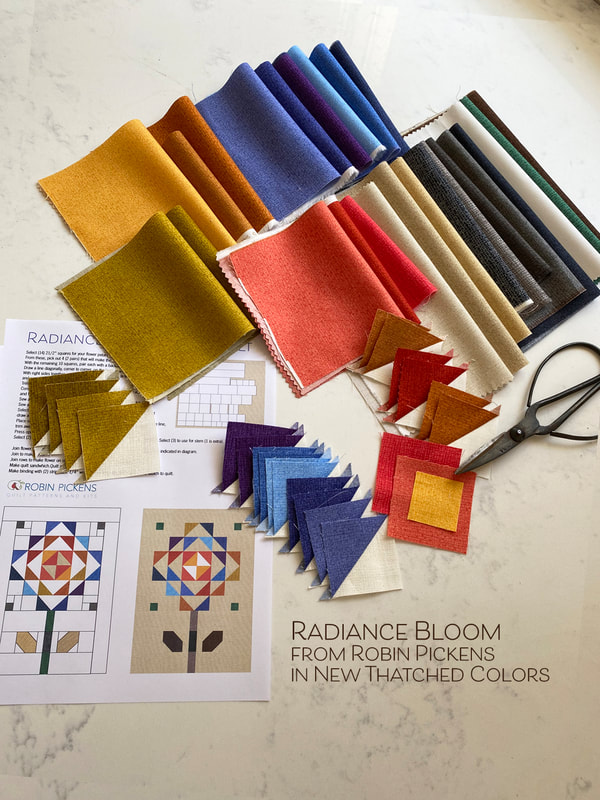 I think of these as almost fall-like colors and think it would be fun to do a mix for a spring flower, summer flower or winter flower. I love the new color called "Chalkboard Scribbles" and mocked one up on the computer using that as my background and my petals in Blizzard White, Washed Linen and Toast. This is the Radiance Bloom I will make next! I also think this would look fun with the background in Washed Linen as shown on my initial printouts. I can't wait to incorporate this more into some of my future blocks as a nice light neutral color. 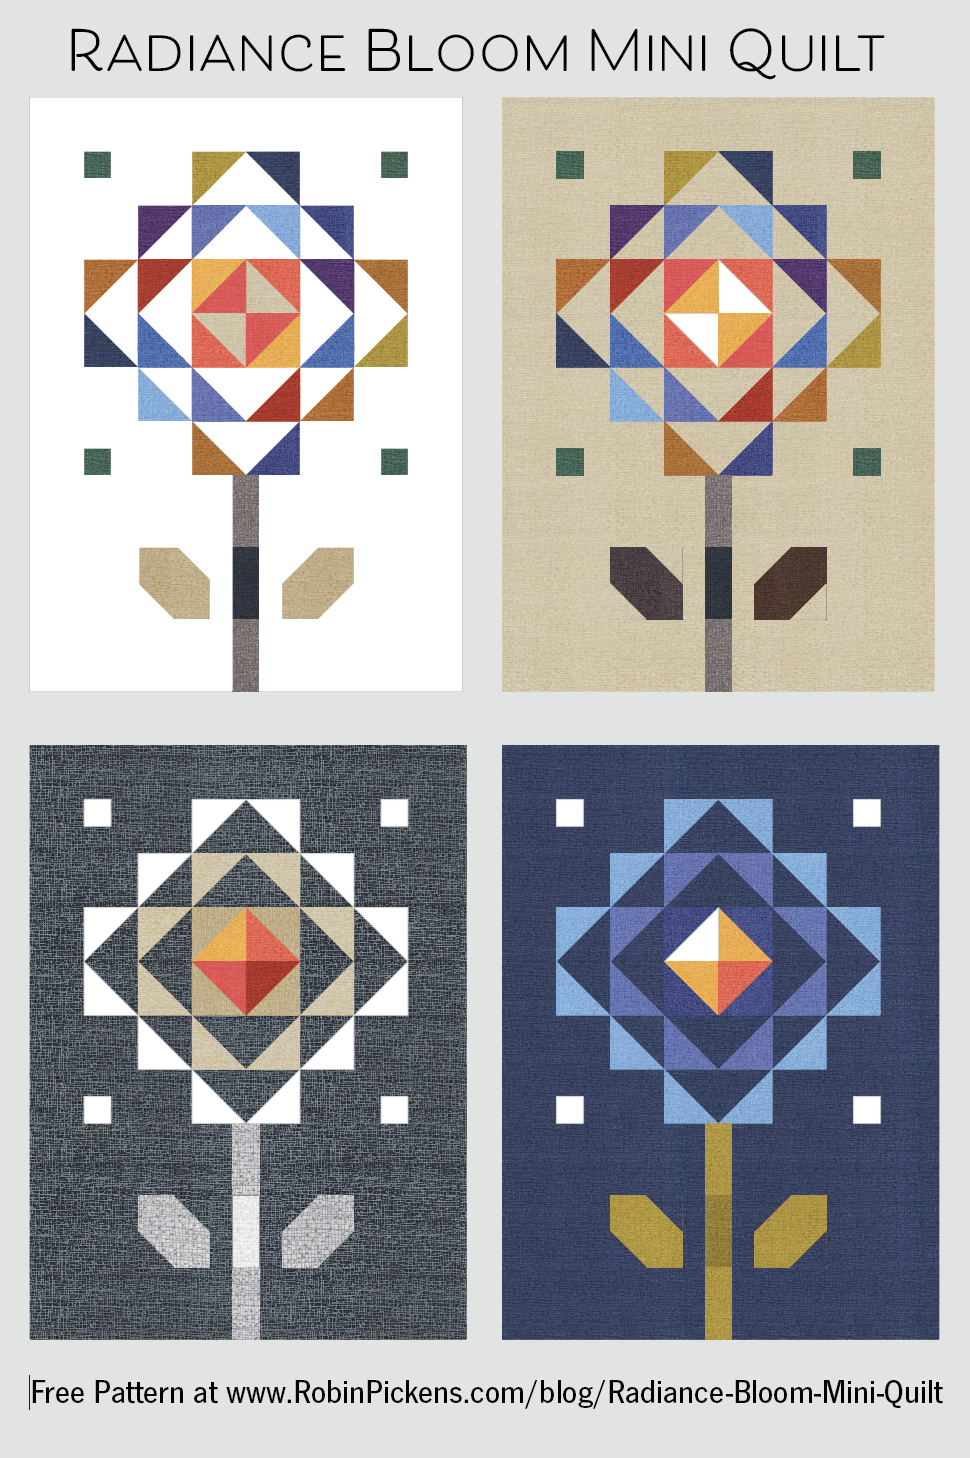 And since I'm playing with it...how about a night time blue (this one on the lower right has a background of Dark Washed Indigo) with blue petals glowing in the moonlight? The stem is Green Curry and Olive and the petals are Forget Me Not, Periwinkle and Dutch Iris.  I hope you have fun playing with this fun little free pattern. Maybe even make a row of flowers in the garden with multiple blooms! My friend Pam (from Serendipity Woods) will be sharing an adorable scrappy bloom she made too from this pattern, so check her feed on instagram in the coming days (@serendipitywoods) and I'll post my winter one as soon as that is done (@robinpickens). Plant some color, enjoy some new Thatched shades, click on the PDF link right below to get your pattern and HAPPY SEWING! -Robin
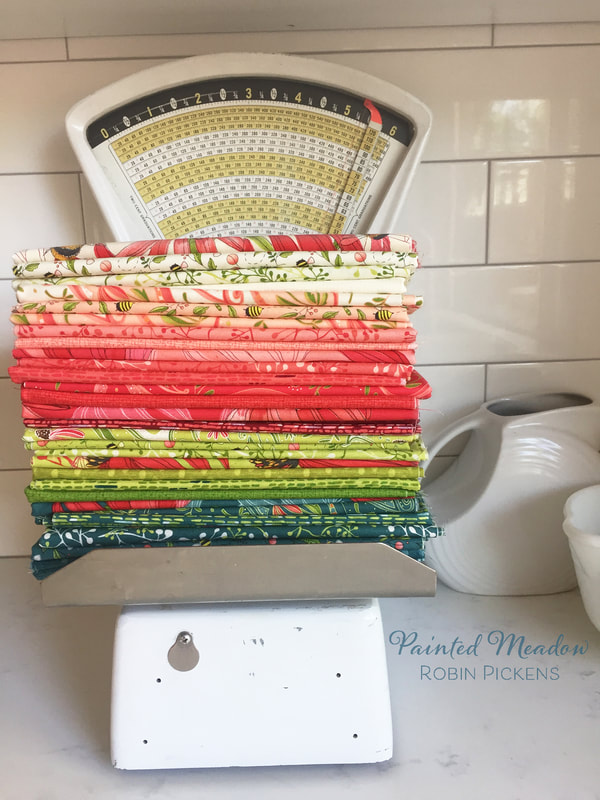
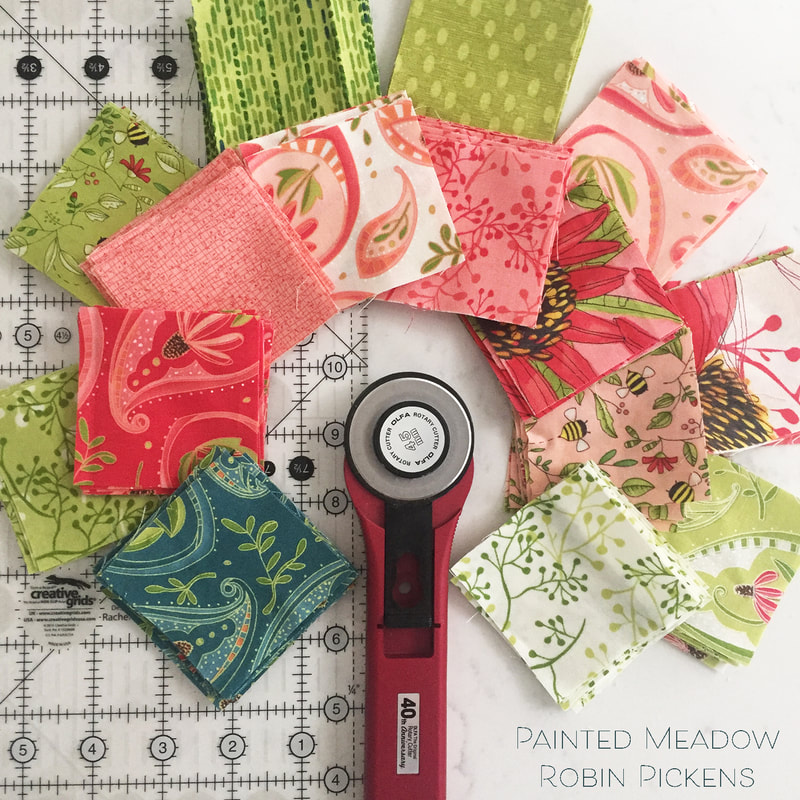
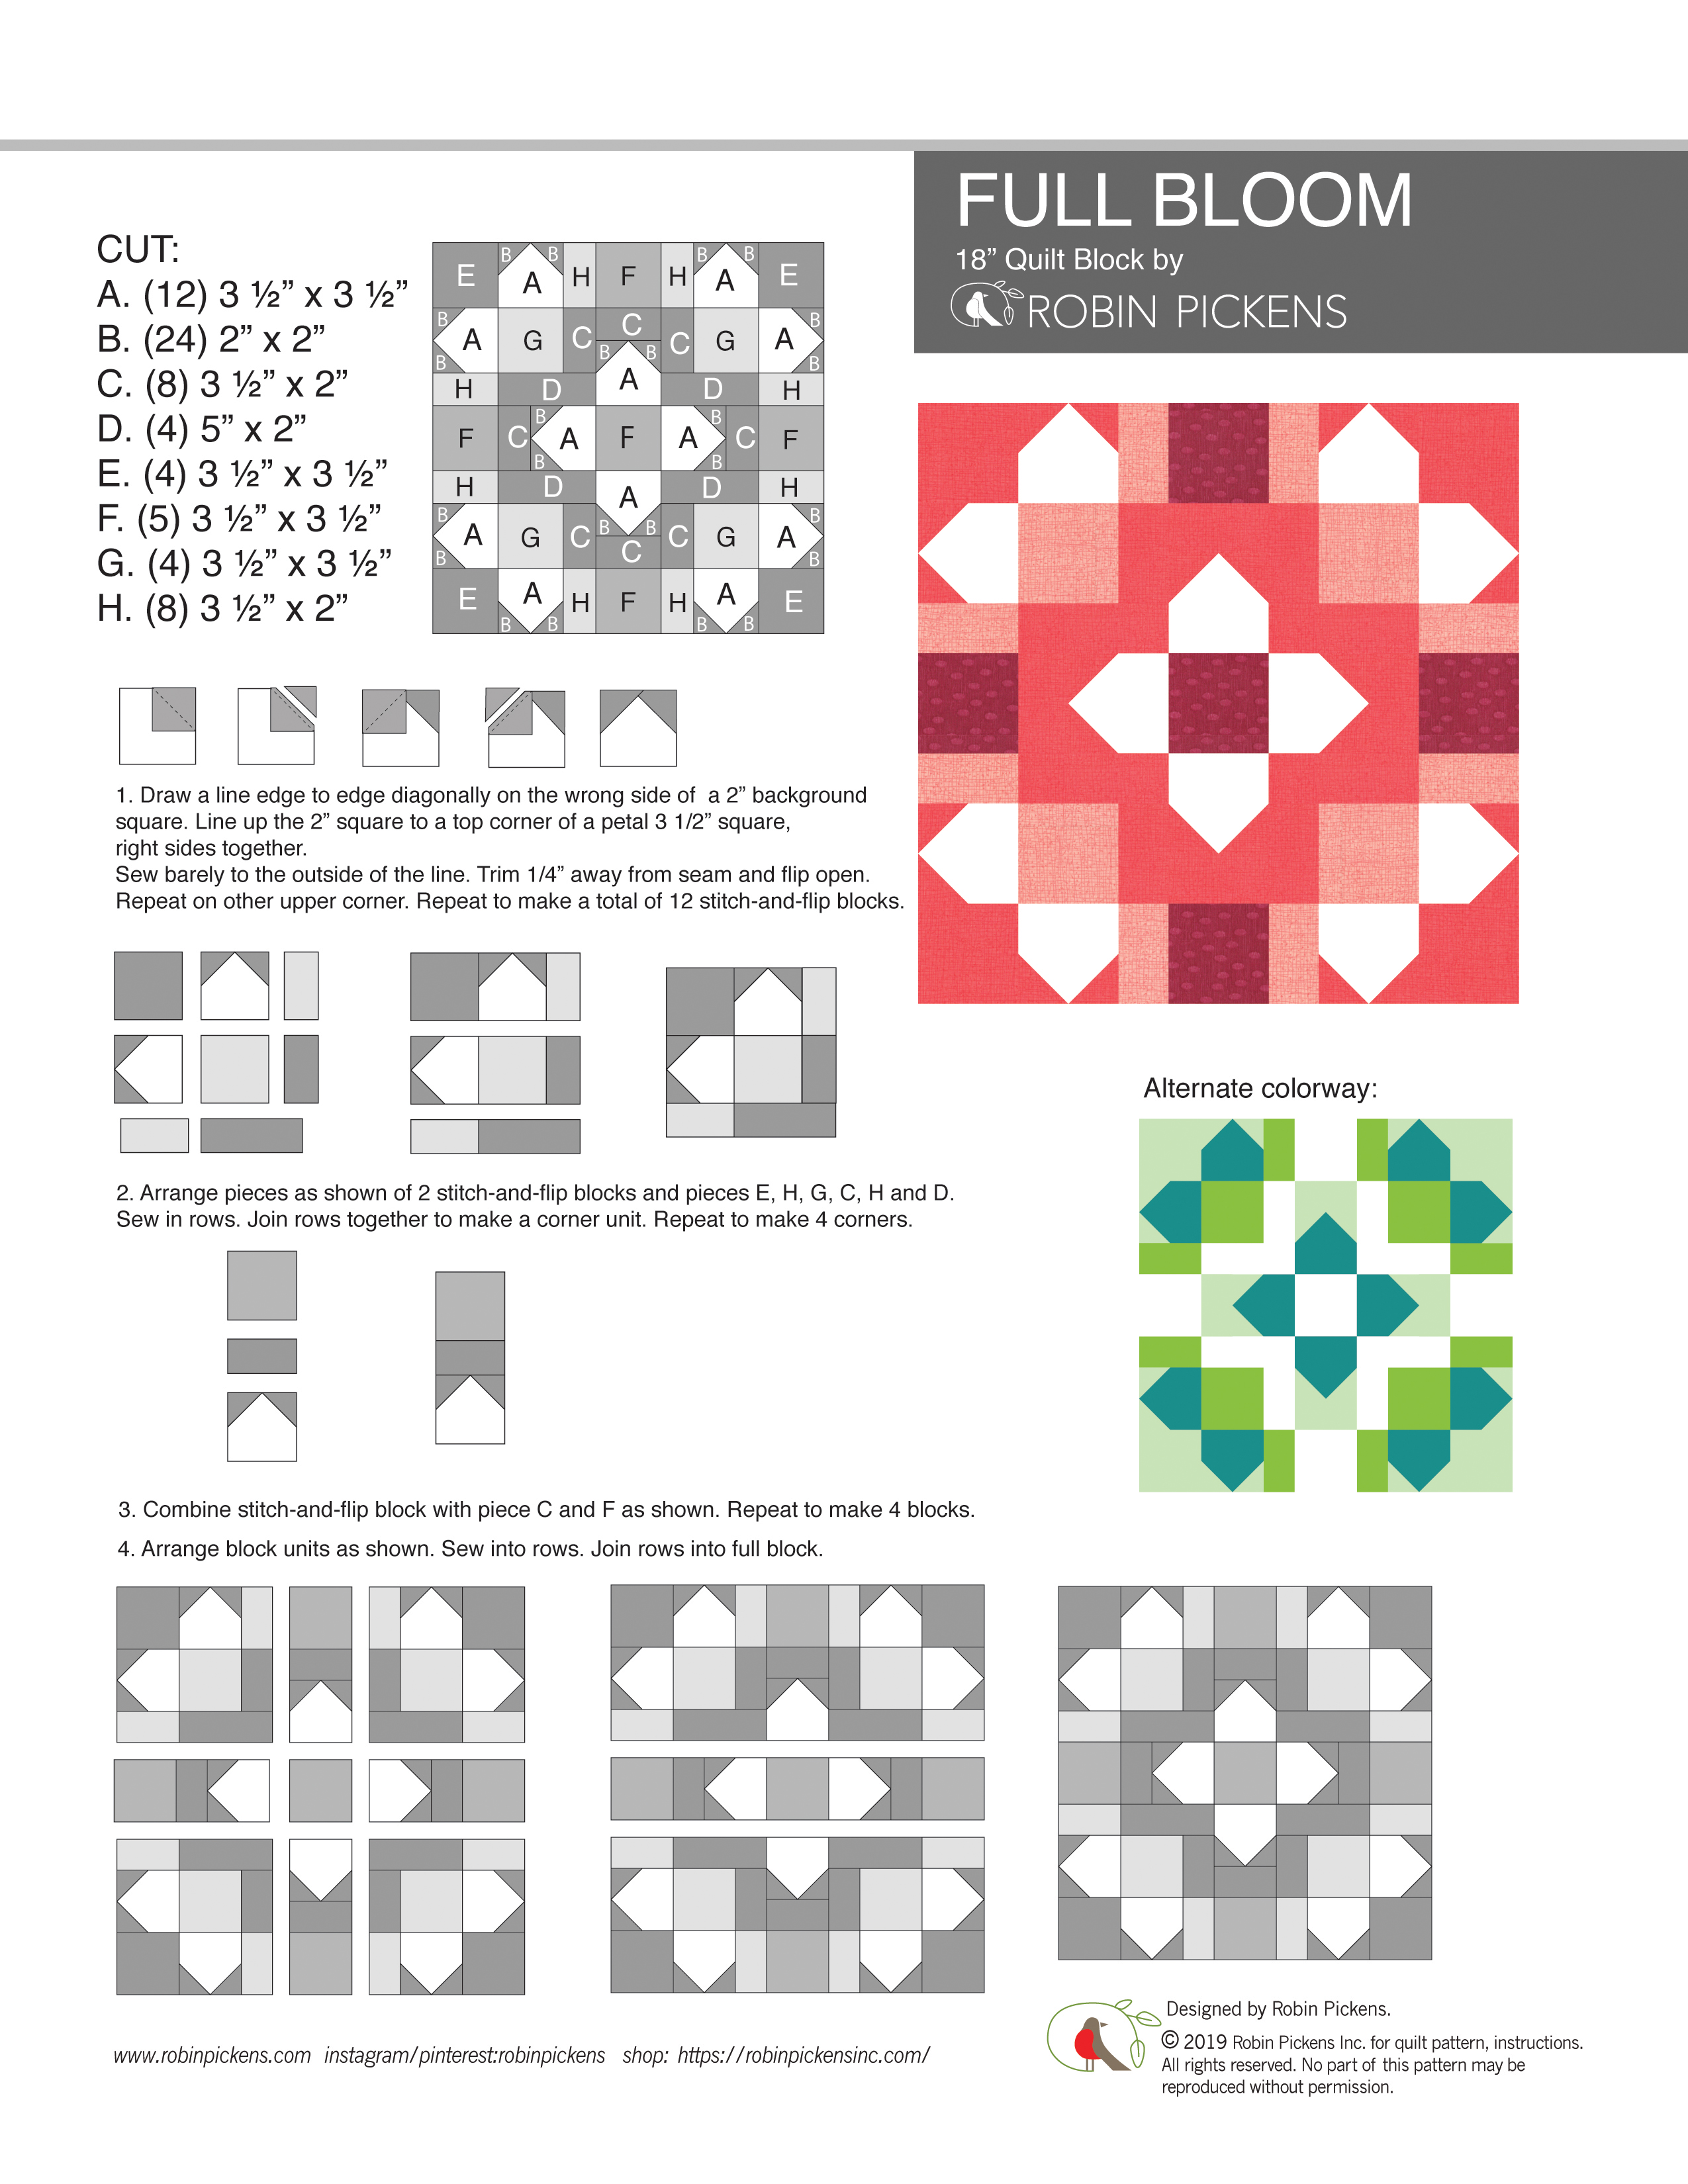
The Moda designers had a fun project for the Spring Quilt Market this year. A group of us designed 18" block patterns to give to local quilt shops to use during this National Sewing Month. 18 inches is a substantial size for a single block and leaves room to play with fabric and combine several shapes and sizes into a layered composition.  At the time of designing my block I was working on my Picket quilt with it's stitch and flip sides that make up the picket fence border around the quilt perimeter. I liked playing with this shape and how it also suggested flower petals, especially when grouped around a central square. I call my block "Full Bloom" because it reminds me of the petals in a fully open flower in a grand display. The petals are separated by sashings to give more definition and color play in your piecing while dividing the space in an interesting way. 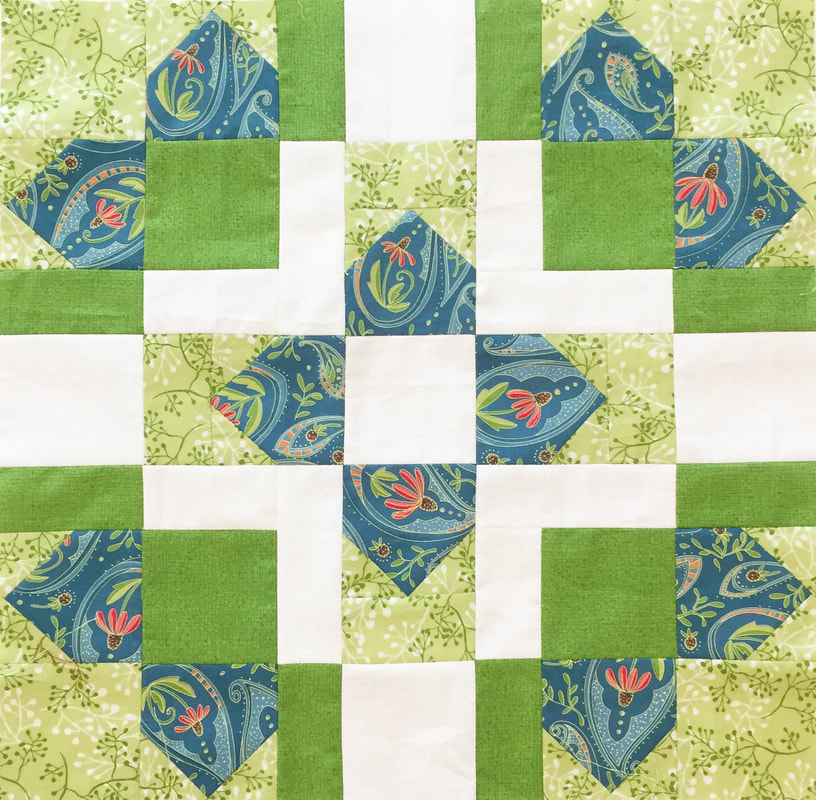 For a schoolhouse session at Market we showed our blocks. I made up two blocks using my new collection (shipping in October 2019) of Painted Meadow. Coneflowers in paisley shapes, textures, little sprigs, all make up the blocks in this composition. And I could not resist doing a little fussy cutting and making one of my fat bumble bees the center of a bloom. Perhaps this bee is looking for pollen in the center? These blocks are not quilted yet and I'm still deciding if I'm going to make pillows or work these into a quilt top. 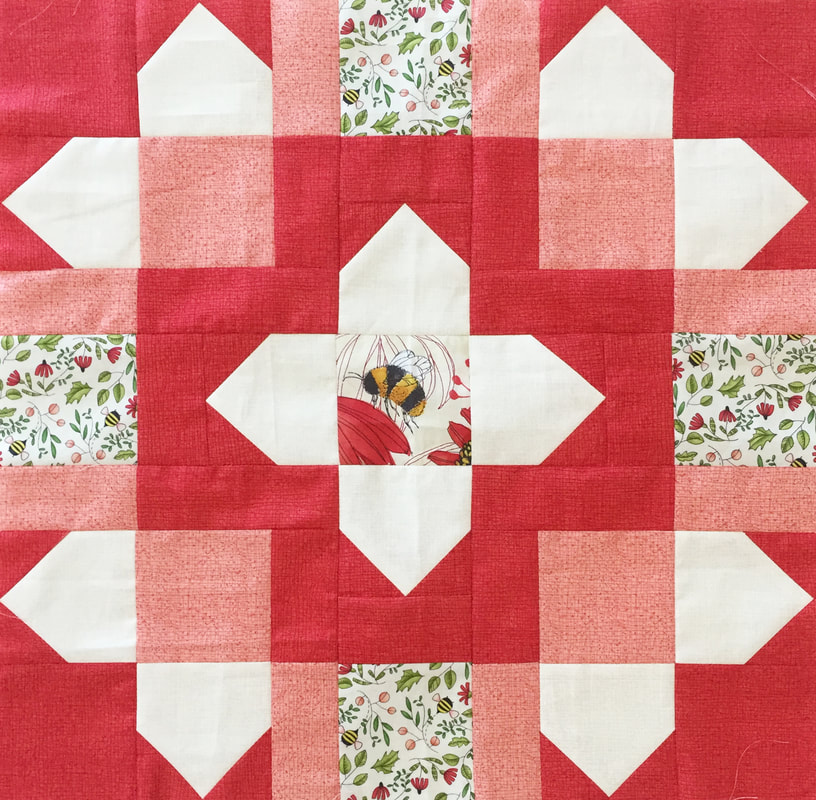 I like to experiment on the computer with the blocks and what it looks like made up different ways. With this block, the corners could be more valentine-like with hearts (like the top left image) and a hashtag center. Or maybe the center is surrounded by darker colors to set it off in contrast. Multi-colored blocks (lower left) have a different feel from monochromatic blocks that play with values of light and dark. 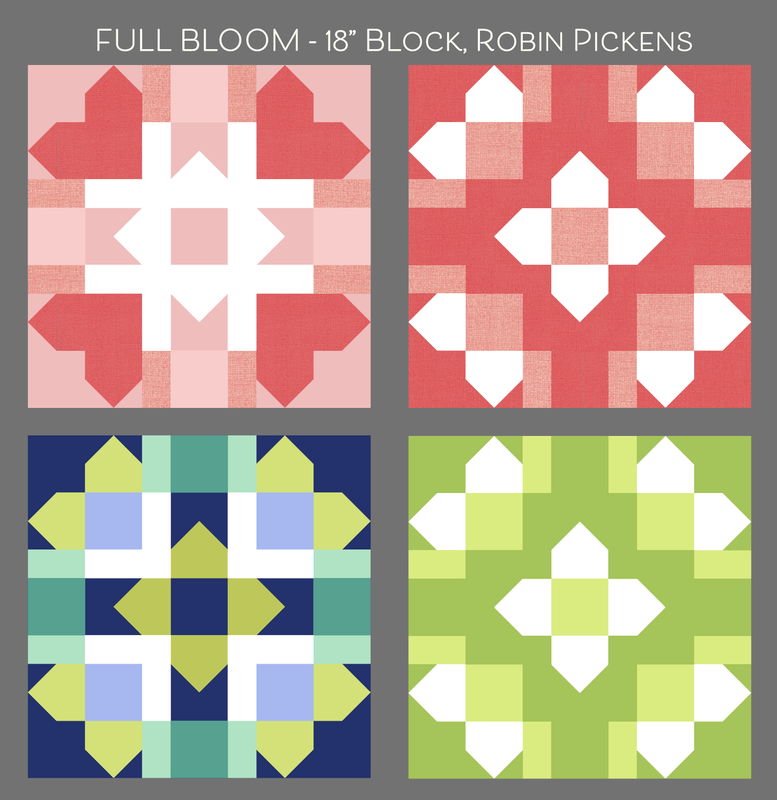 Studying what happens with light and dark values is interesting when you have all these rectangles that continue across the block. You can have mid-range tones that suggest overlap and transparency, or sashing lines that stay solid and strong. Some look like woven plaid. Others are radiating light or dark from the centers. I love the different look and feel you can get from one block with this play of light and dark. Wouldn't it be fun do do a monochromatic quilt just exploring these light and dark relationships? 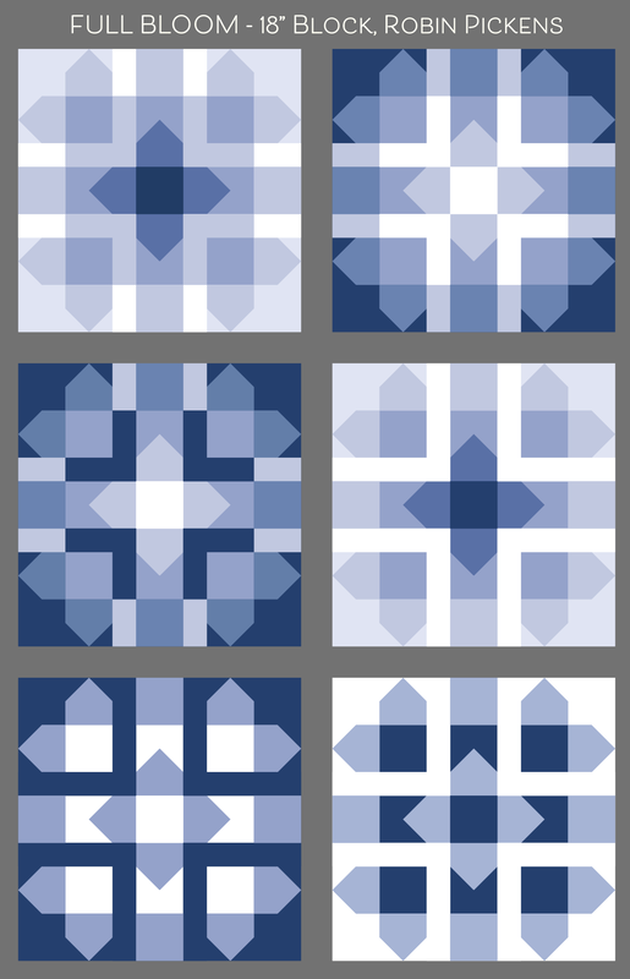 If you want to make a block with a big fuzzy bumble bee, like the one above, look for the Painted Meadow collection in October. Painted Meadow has corals, red, greens, teals and pinks. Or use solids with a range of light and dark values. Or go completely scrappy with enough room in those squares for some good fussy cutting. Whatever you make, I hope it is fully blooming and glorious! Click the blue "download file" for the Full Bloom pattern jpeg.
  Visit the previous designer's blog posts and the future posts to see more 18" block fun! Here is the schedule and links to their blogs: 9.23 - Lella Boutique and Sherri & Chelsi 9.24 - Kansas Troubles and Corey Yoder 9.25 - Crystal Manning and Me & My Sister 9.26 - Jan Patek 9.27 - Robin Pickens (me and here is the pattern!) http://www.unitednotions.com/blog_mi_KC2019_robin-pickens.pdf 9.30 - BasicGrey 10.1 - Betsy Chutchian and Lisa Bongean 10.2 - American Jane 10.3 - Kathy Schmitz 10.4 - Zen Chic and Deb Strain 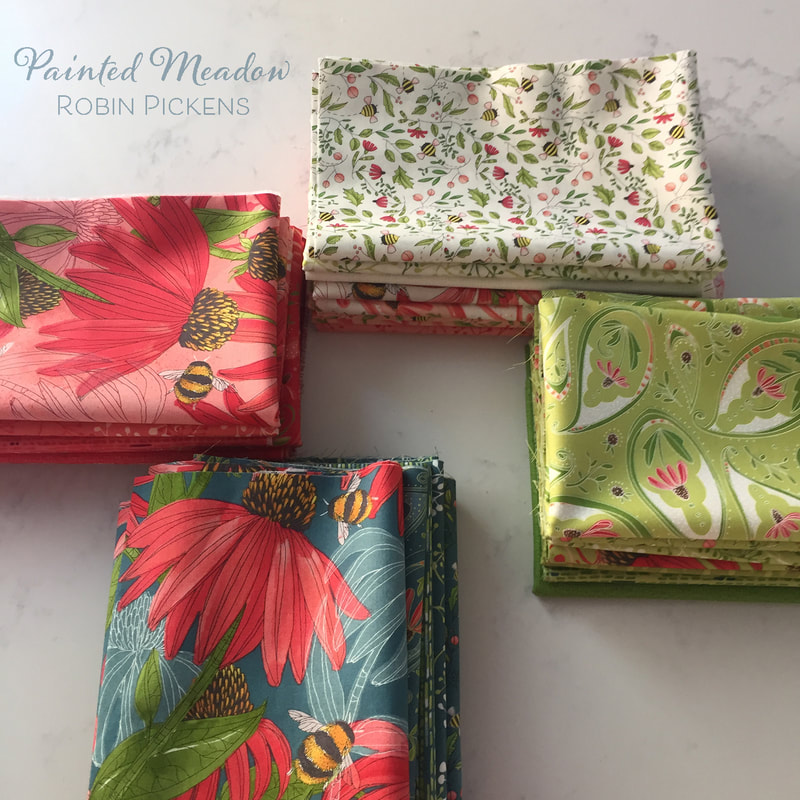 I'd love to see images of things you make with your blocks! Do you make a sampler with all the designer blocks? A table runner with a set of three or four? A pillow or mini wall quilt? Have fun sewing and share with us!
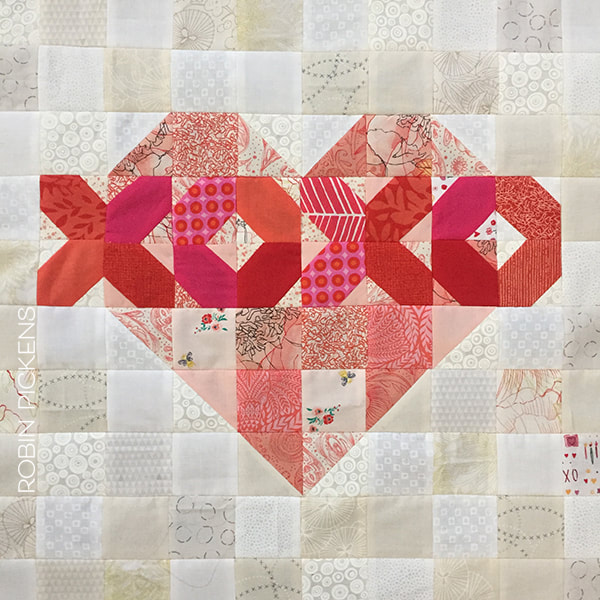
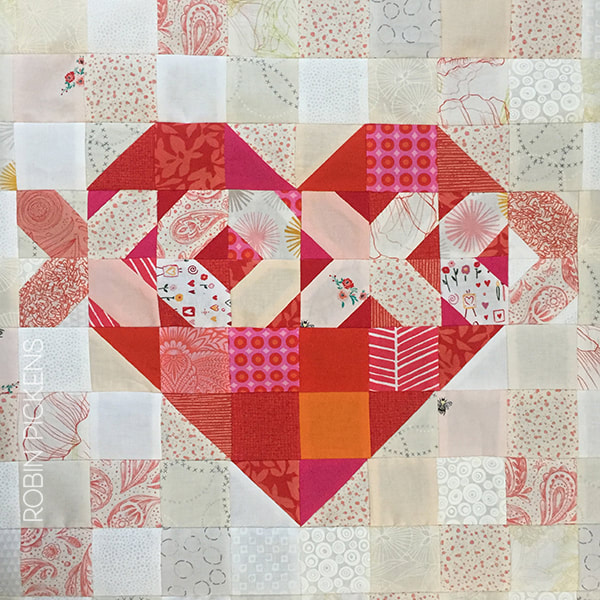
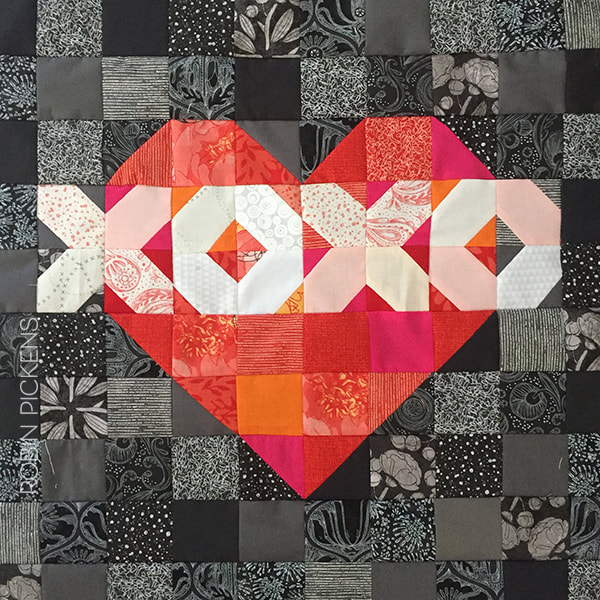
Finally ready with my newsletter "Inside Color and Quilt" with a fee pattern download of this XOXO Heart Patchwork Quilt! The quilt is a 20" x 20" size that is great for a wall hanging or pillow cover. I'll be making pillows with mine to spread some Valentines love in my home. Sign up for the newsletter so you can get your download link! There is a box on the right side panel of the blog or click this link: 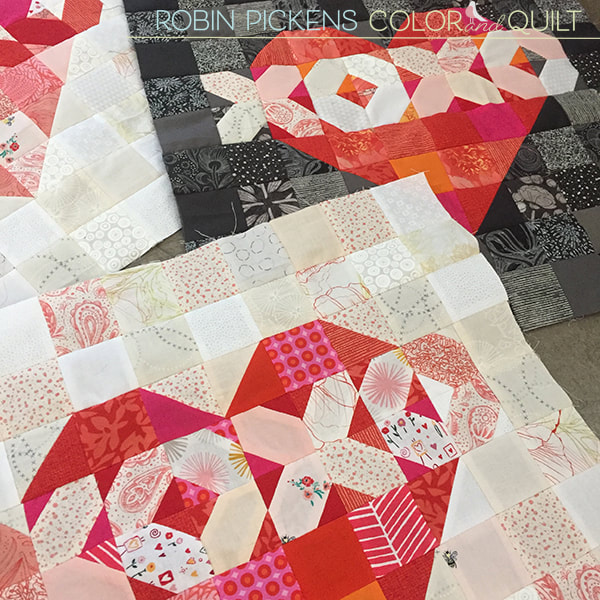 After posting pictures of my studio on instagram I got a lot of questions about my sewing and creating space. I'll be sharing some more info on that and my fabric organization in the newsletter as well as sharing color play explorations for painting, sewing and decorating.
For now, hugs and kisses XOXOXO!! |

About ROBINDesigner of colorful florals for Moda fabrics. Modern to transitional quilt designer. Illustrator, sewist, crafter. I am proud to be a designer for Moda Fabrics!


Shop Robin's Designs
 I am an affiliate for Fat Quarter Shop and may earn a small commission through my links. Thank you for your support!

Check the March 6, 2017 Episode!
Categories
All
Archives
November 2023
© Robin Pickens Inc. All rights reserved. No images may be reproduced without permission.
|
||||||||

 RSS Feed

