|
Sherri McConnell brings us STAR PATCH for block #22 for Moda Blockheads. Visit Sherri's blog for the pattern and see all her wonderful tips and quilts. The little 9-patch center can be a cute little checkerboards, a cross, radiating center. Corners look interesting in background white or carrying color out to the points. Emphasize the star points or the corners. I love the options on this block. 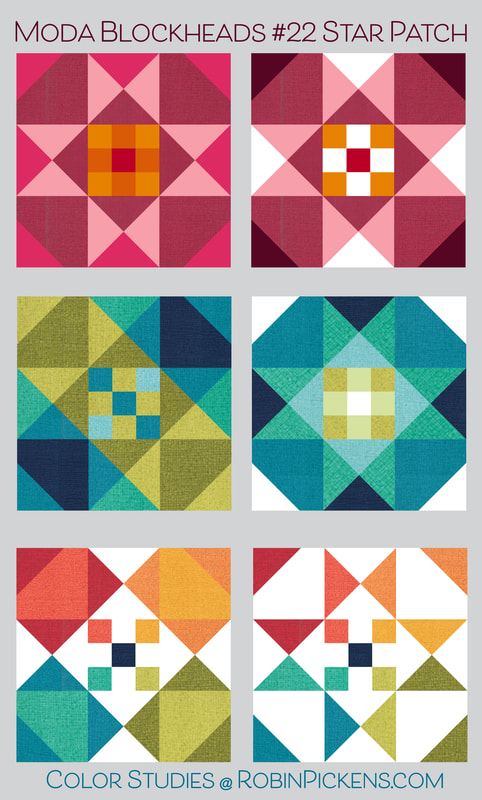 Another 9" block for the red/pink row with a little orange in the center to tie in with the orange row next to it. Painted Meadoww paisley makes the star points with fuchsia corner points. 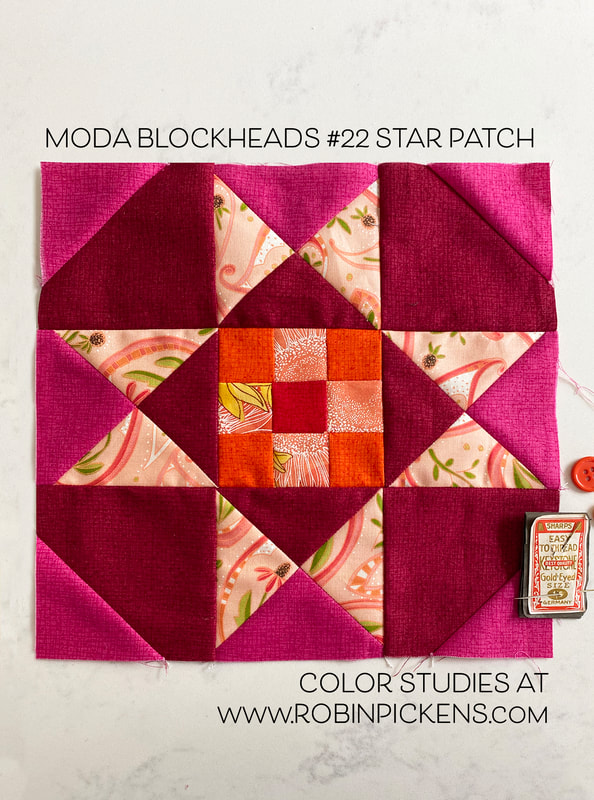 I like combining the soft pinks with those stronger cranberry and fuchsia colors. A little print, a little Thatched and some Solana in the center. 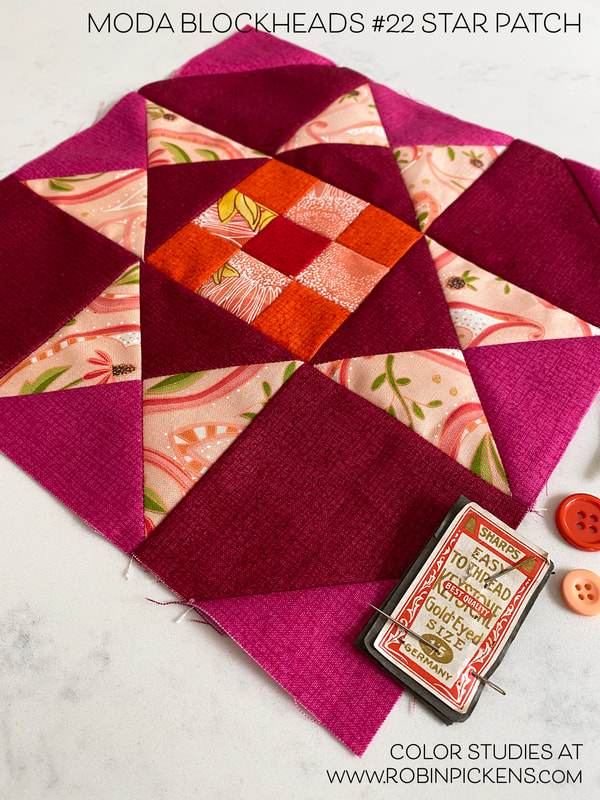  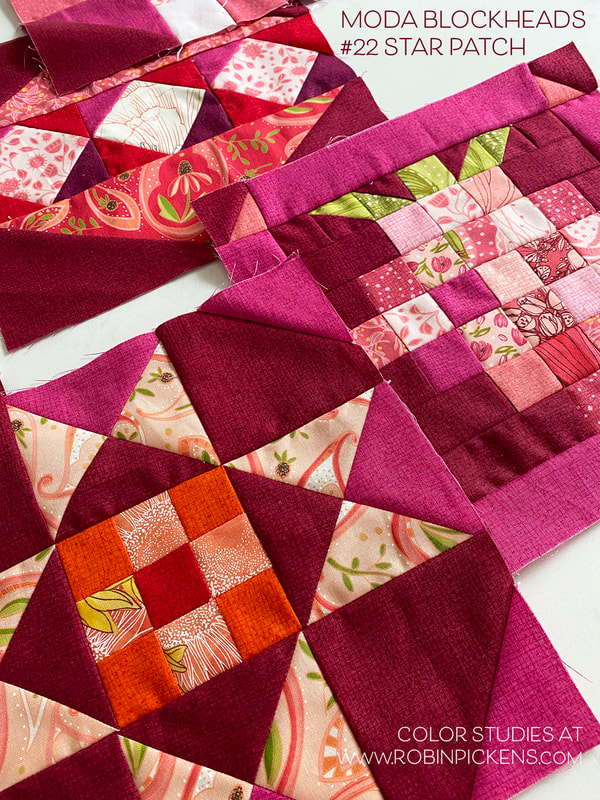
0 Comments
Baubles, ornaments, pretty shiny things that twirl and spin...hello week 21 with "Shiny Bauble" from Janet Clare! Some paper piecing helps to make the top and bottom angles. Get the pattern through Janet. I just played a little with the bauble this week and tried different colors for corners of interior blocks or making them the color of the top and bottom. Maybe a dark light combo like the last ones to look like a shadow is cast.  Red row for me with a 9" block. I went for scrappy happy energetic reds. 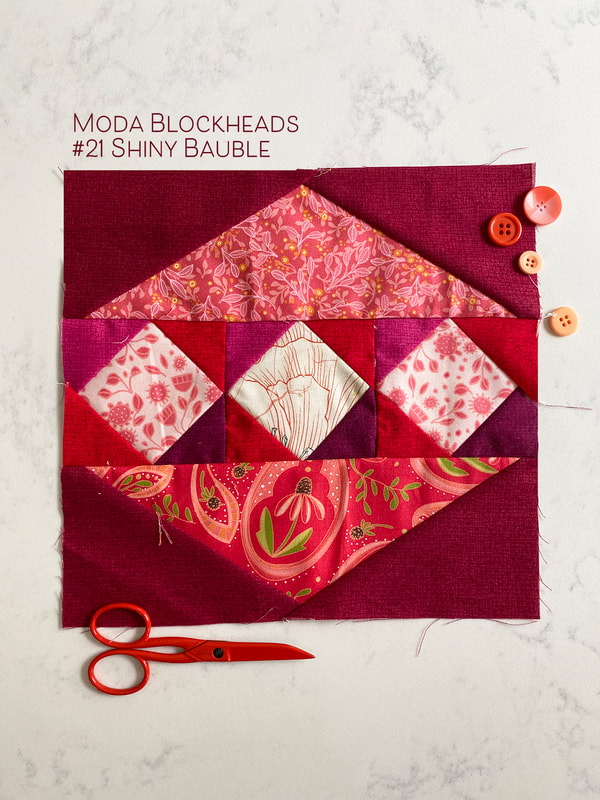 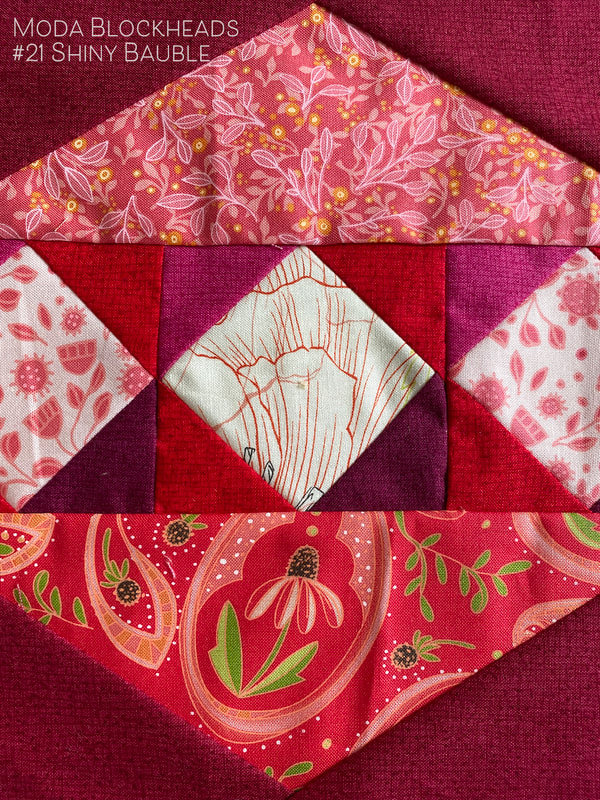 Will you make holiday ornaments? Or a court jester's playful object? Or colorful kid's top? Have fun with Shiny Bauble. We are nearing the end...keep on sewing!
"Stop Go" from Stacy Iest Hsu for this week's Moda Blockheads. This block feels so playful and fun. I love the little extra squares in the middle of some of the stop signs. Switching up some of the corner colors starts to make some star-like corners or checkerboard QuarterSquare Triangles where they meet. Play with colors in rows or make all the color play about the little corners with a random mix of party colors. 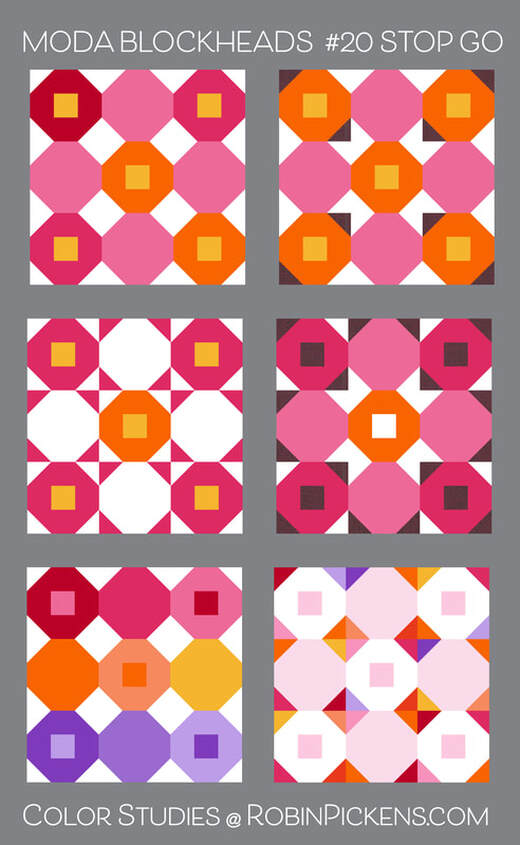 My block this week is for my large pink/red row. Those squares are a great place for using a scrappy mix of pinks from Abby Rose, Dandi Annie, and Painted Meadow. Since my theme is garden inspired, little yellow centers felt like the centers of flowers. 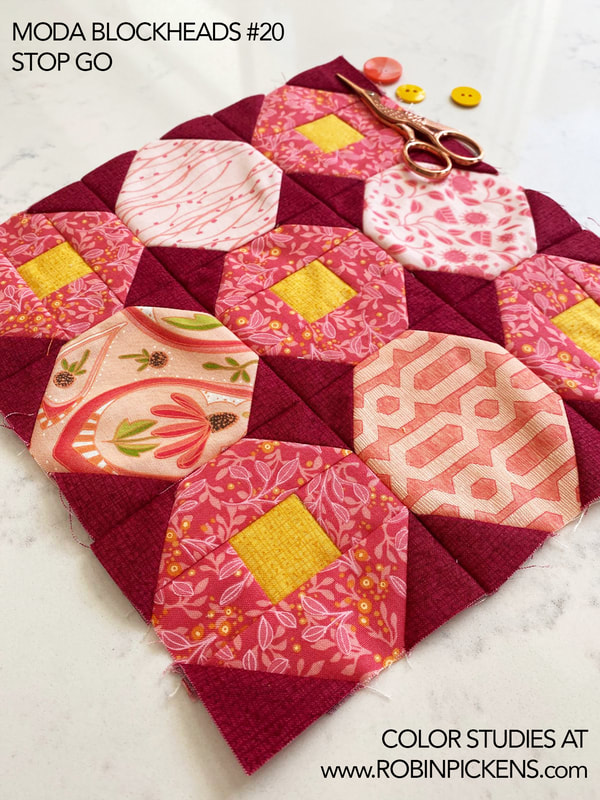 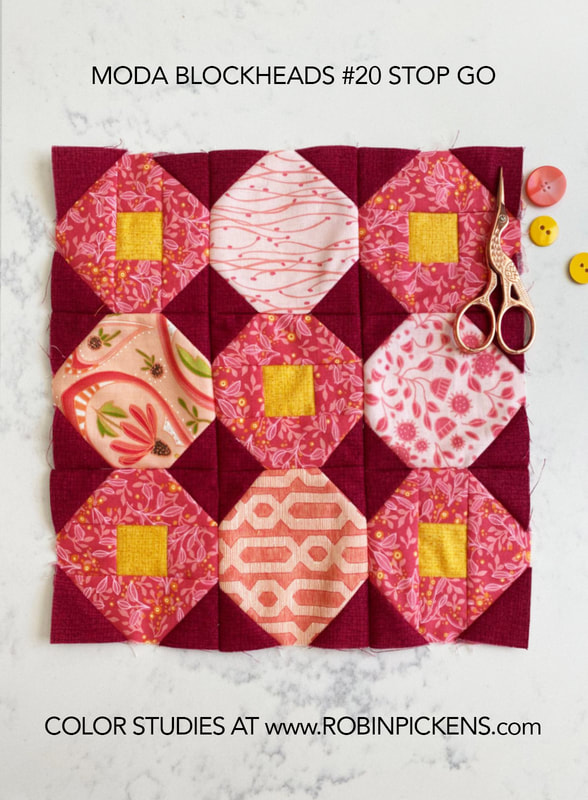 Need the pattern? Visit Stacy's blog: https://my.modafabrics.com/webfiles/bh4_20_stacy-iest-hsu_stop-go.pdf Or visit the Moda PDF page here: Here is the plan so far! I've been making my blocks and might rearrange once I see them together but this is probably pretty close to the arrangement. Have a fabulous week with sewing fun! 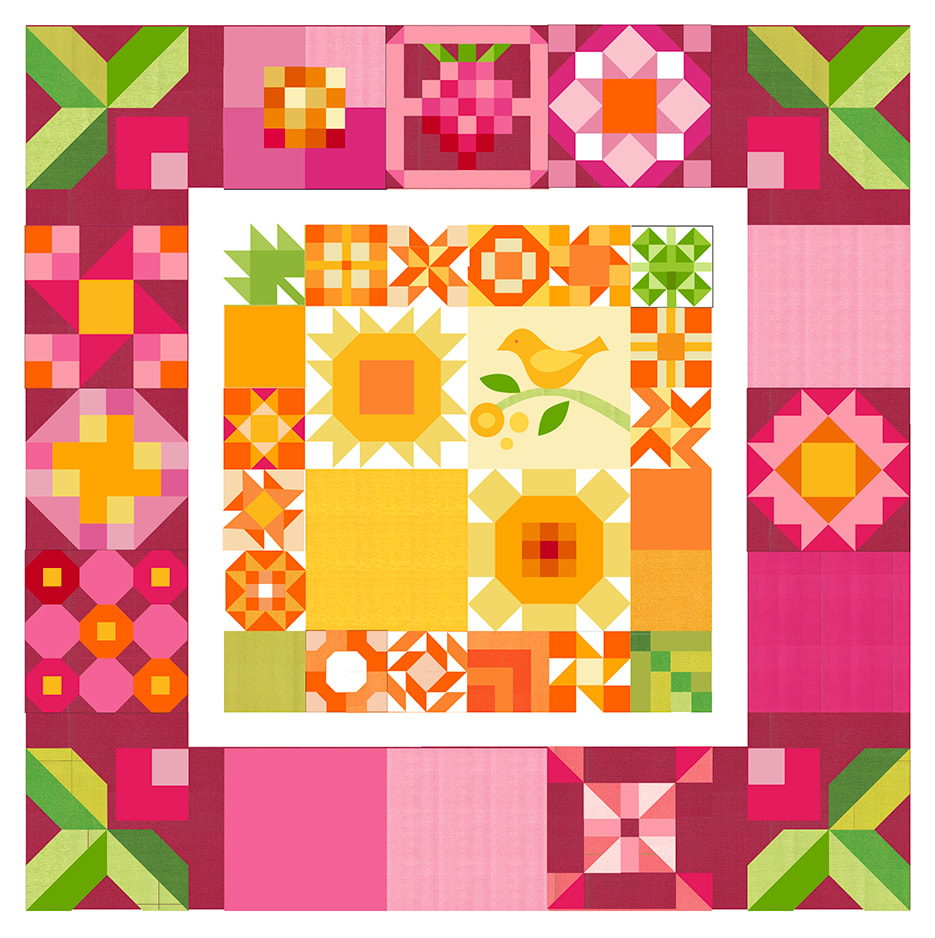 Last week was a visit with my lovely Mom for her birthday! So the blog didn't get done right on time. Sometimes life is like that, right? CROWNING GLORY is from Betsy Chutchian and can be found at her blog (https://betsysbestquiltsandmore.blogspot.com/) or through Moda's archives. I did my color studies for the facebook group and got to posting here today! 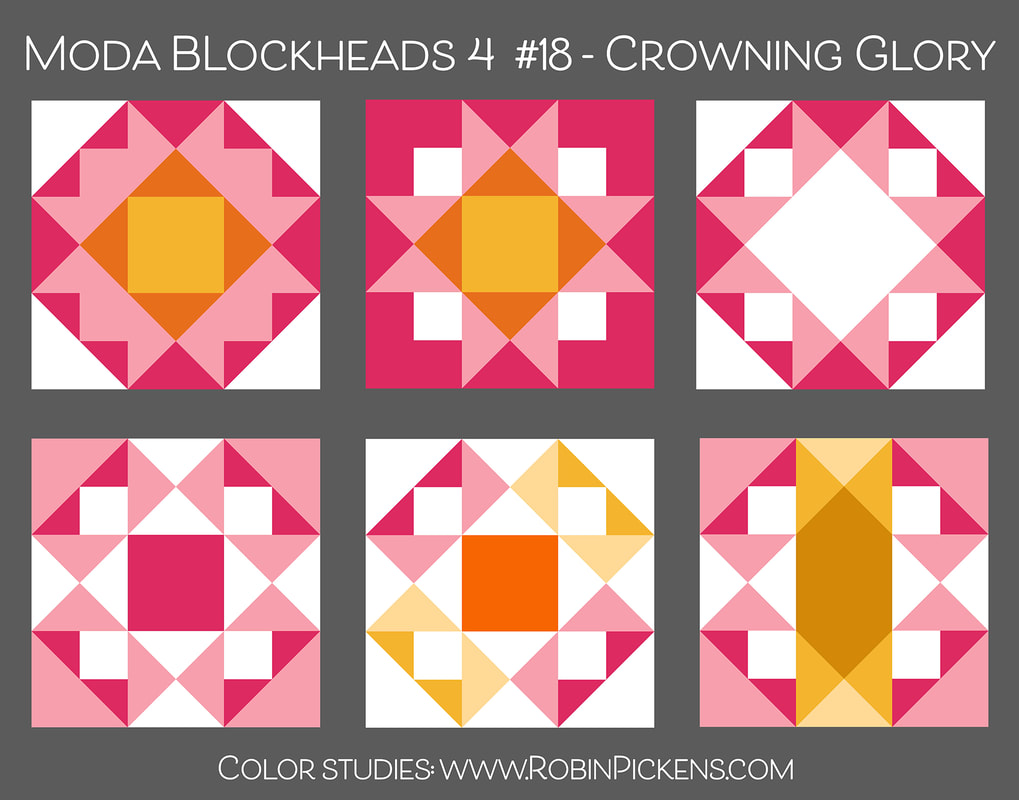 My sewn block uses Painted Meadow, Abby Rose, Tulip Tango and Thatched. I love a good scrappy mix! 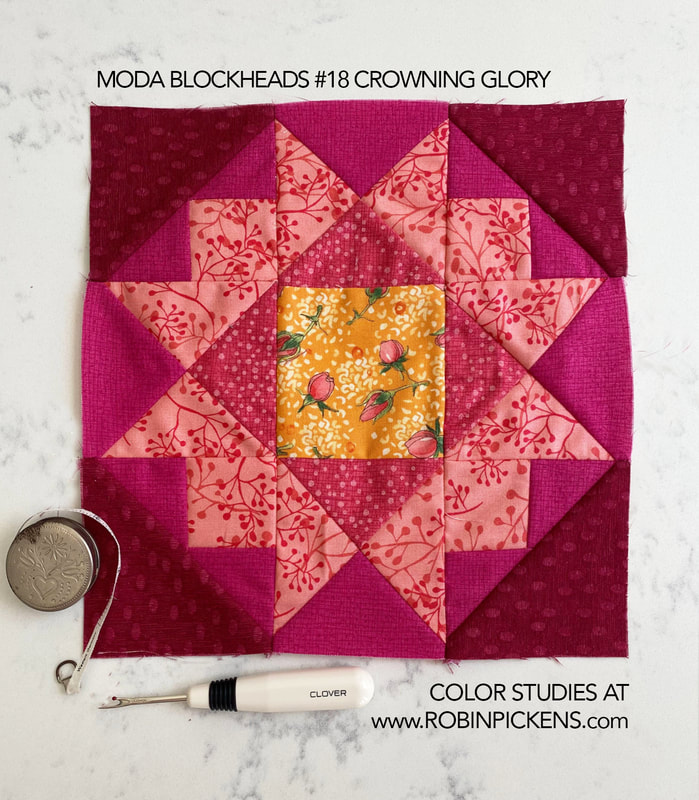 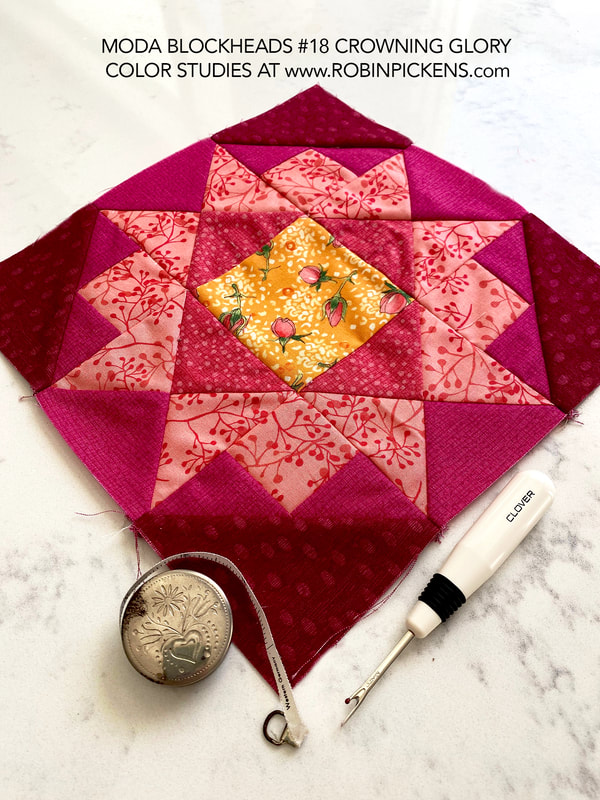 The NEXT block will be from me! So tune back in on Wednesday July 27th for more sewing fun.
Camille Roskelley of Thimble Blossoms brings us block 17 for Moda Blockheads. It is called SHORELINE and uses half square triangles and stitch and flip corners to make a beautiful block. You can visit Camille's blog with the link below to get the free block pattern: I like the star in the center and seeing it with color or reversed to background white. Corner squares can blend into a triangle shape for the block edges or the corners can stand out as contrasting squares. The darker pink can outline the center like a ribbon defining it or be mixed with gold to have a sparkly, almost kaleidoscope look. When we break up the colors by quadrant or sides it emphasizes the kaleidoscope feeling even more. Don't the last two look like light coming through a faceted or beveled glass window? 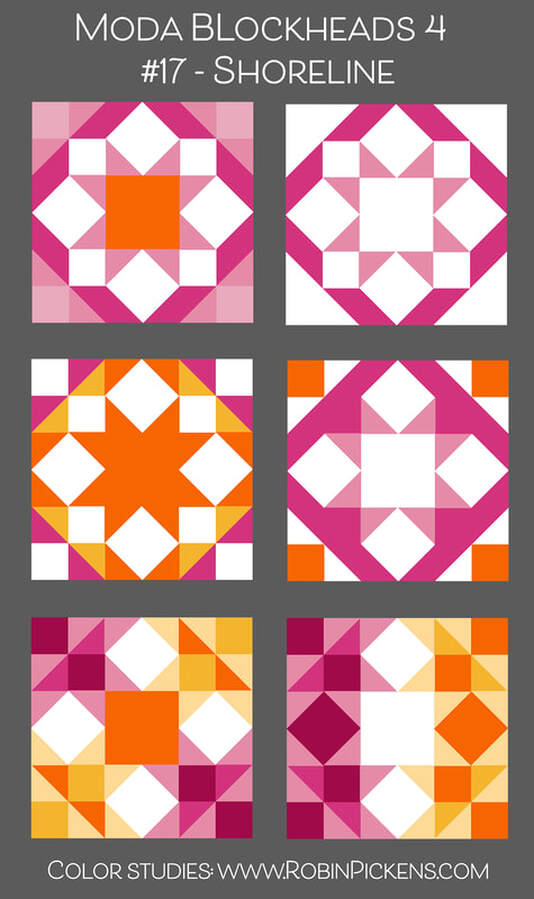 I used Thatched and Abby Rose for a rosy block that feels like it is a blooming pink flower. I'm tying in some of that Fuchsia that goes with the corner bud blocks for my quilt setting and keeping the Cranberry darker red to go with the background on those outer rows. 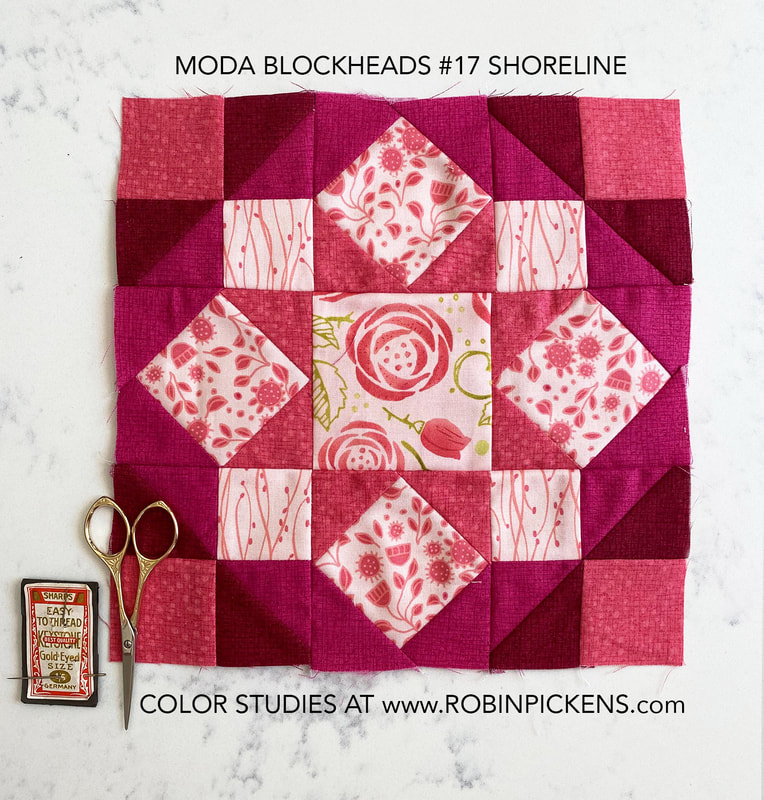 I love seeing the blocks on the Moda Blockheads facebook page as they pop up each week. One of the most interesting things about sewalongs is the sharing of our blocks and the fun fabric and color combinations we get to see from others. I hope you are enjoying it as much as I am! 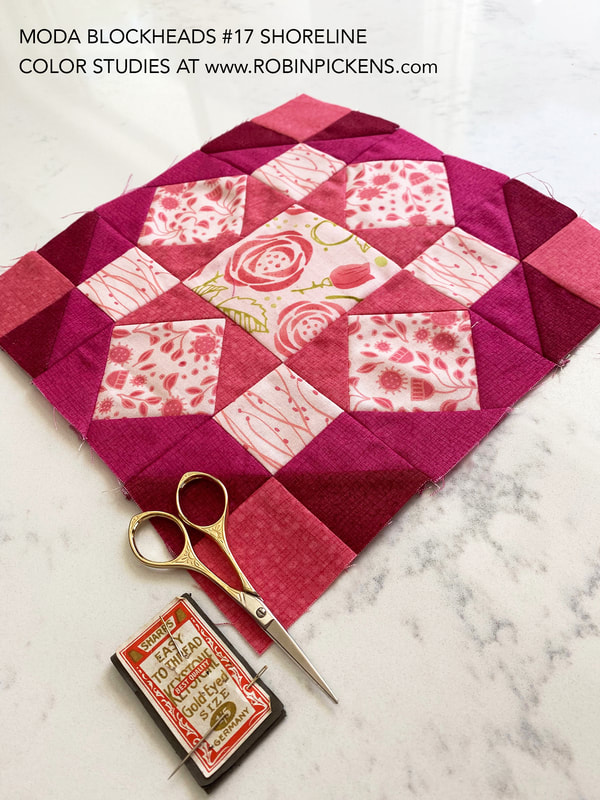 Tammy Vonderschmitt, also known as @nithaystack on instagram (from a shop she used to own), amazes me with all the projects she does! She is always sewing something new and has all kinds of great ideas. I had the pleasure of getting to know Tammy a little more when exhibiting with Moda at Road to California before all the pandemic stuff hit and she is such a treasure! This week's fun block "Indiana Puzzle" is from her. You can find this week's pattern from Tammy in Moda's blog- in the section on Blockheads archives. my.modafabrics.com/tags/block-heads Patchwork checkerboard corners pair with half square triangles to create a spinning motion. Extend the triangle color into the smaller squares in the corners to make a fanning out shape or even arrow heads. Or separate your rows by color, or make twisty arms that bend into the corners. 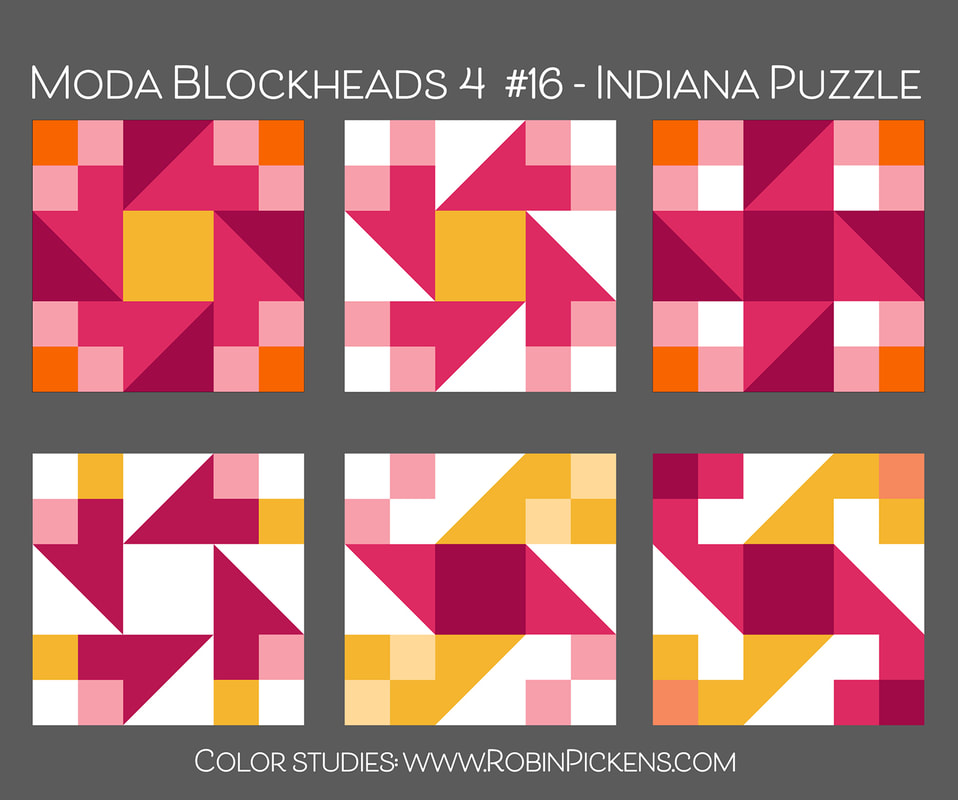 I had fun mixing some pinks from Abby Rose and Sweet Pea & Lily with some little fuchsia squares to tie in with my pink corner buds. I am bringing in yellow from Solana to coordinate with the center blocks and little orange corners to look harmonious with the small orange blocks. 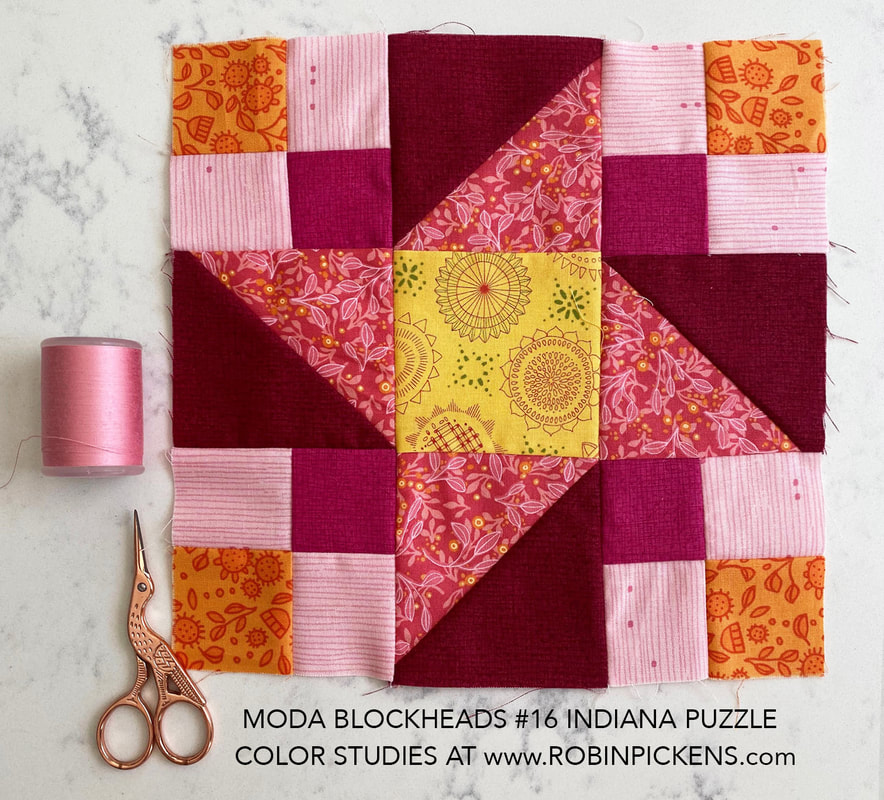 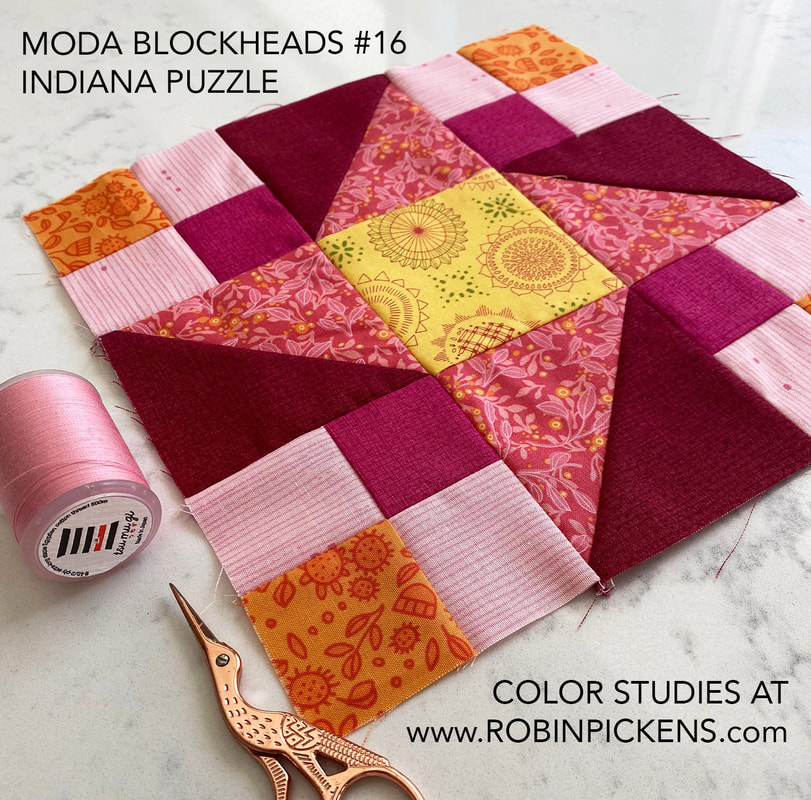 I was also able to get two of the bonus blocks done this week too. I've made Wheat Field and Sharply Dressed in small blocks for the orange rows. 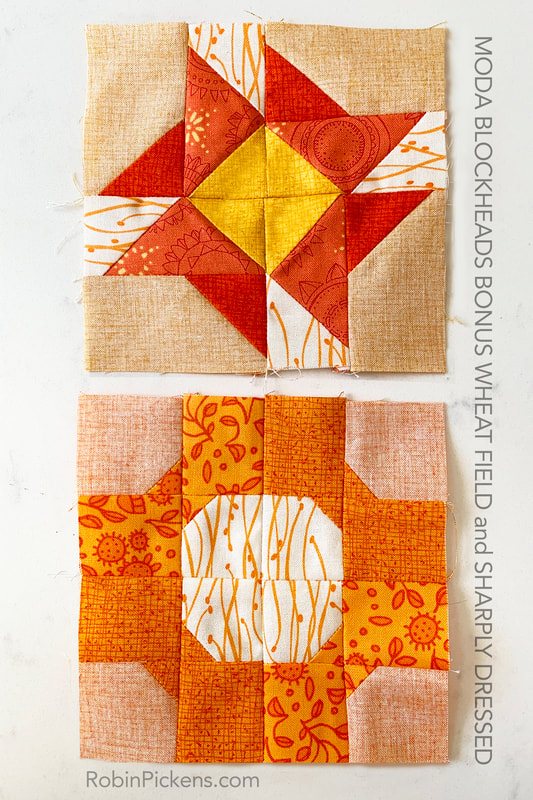 Progress. My Surrounded Square Garden is growing! 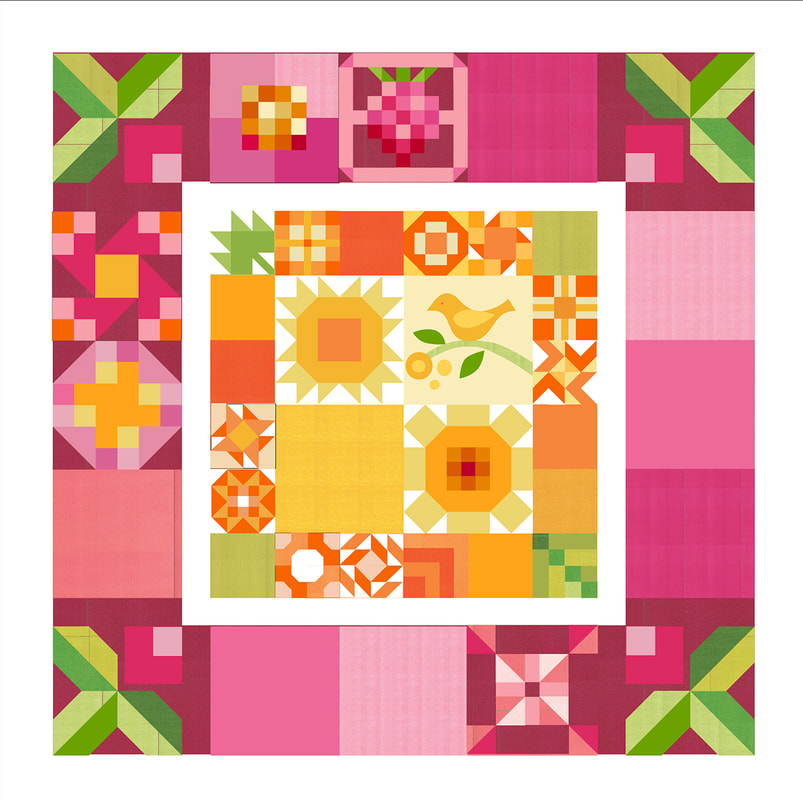 I have really been enjoying Crystal Manning's blocks that I see pop up in the Facebook Moda Blockheads group. Her fabrics have such color and energy and the mix of them together in her blocks is just stunning! I was thrilled to see her using her Garden Society collection with those adorable crickets and the table topper she showed on her blog! Visit Crystal's blog for a look at those lovely pictures and the pattern for HIGHLAND PLAID. Plaid blocks offer a great opportunity to play with those bands of light and dark. I love that this Highland Plaid has the thinner rectangles running through the middle to give contrast to size of the "stripes". I've tried simple light/dark studies in the gray version with dark center going out to light corners or the flip with darker corners going into lighter center. The third one mixes that gradation with white center lines and black center. For the color versions, I was thinking of a band of pink running down vertically through the orange, splitting the block into pink and blue (with a horizontal line of purple from the mixing of pink and blue), a ramp of lighter to darker and thin sashing and perimeter squares fading away to just leave the bold squares. 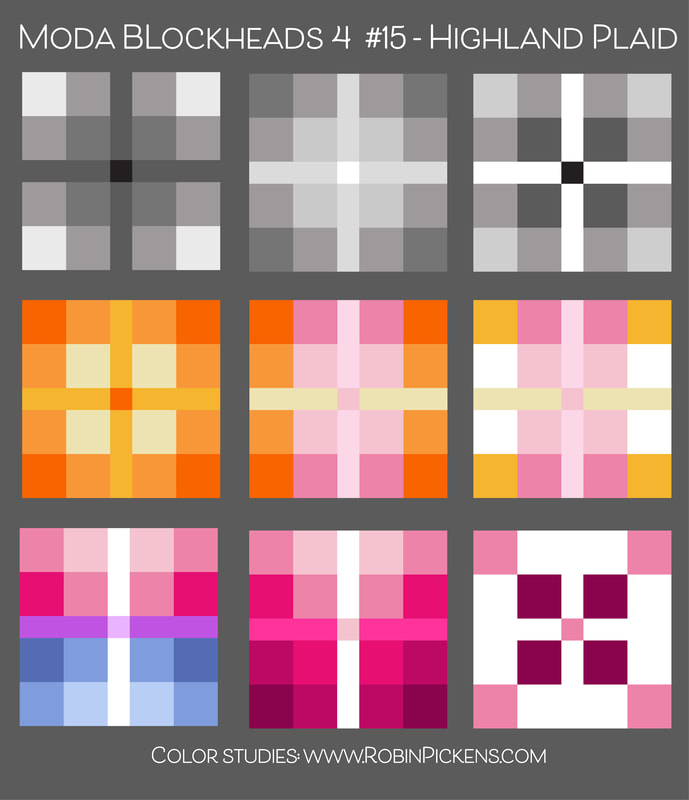 However you weave your squares together in a plaid, it is sure to be a versatile and enjoyable block. Thanks Crystal! For my own block, it is living in the small orange row. I have used all Thatched fabrics with the exception of the tiny center...its from Abby Rose. The touch of yellow thin strips will help to tie it in with my yellow center blocks. And speaking of tying in colors...did you get a chance to read the blog post I did for Moda last week about COLOR? Here is a link to it and hope it explains a little more of how I approach color with my quilts. https://my.modafabrics.com/inspiration-resources/playing-color  Yellow lines are not perfectly matched...but close enough...right? 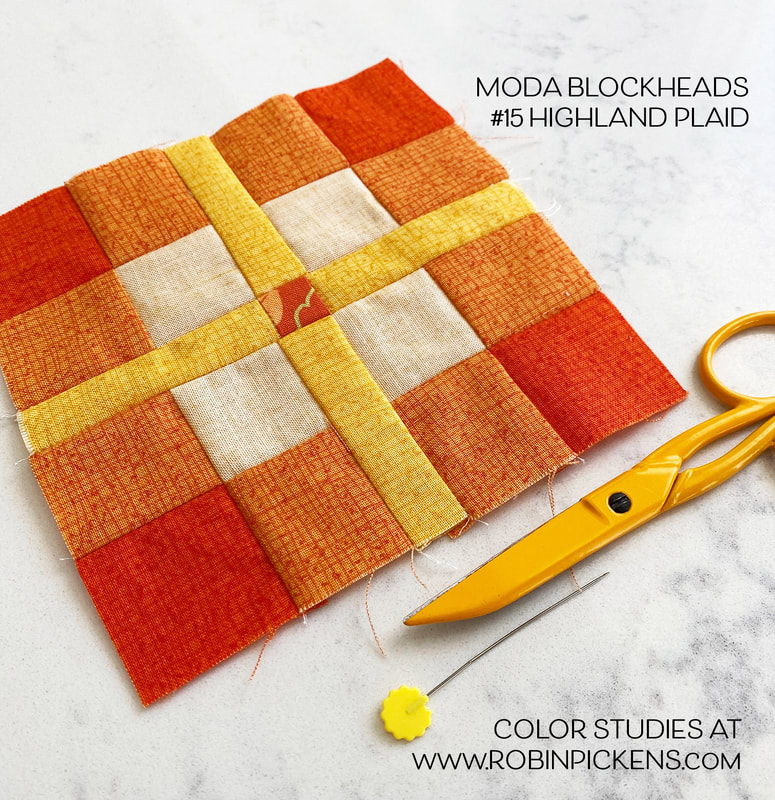 That lightest color is the yellow Thatched flipped to the backside for a subtle light shade of the color.  Happy sewing. Hope you have a colorful week!
Jan Patek has flown in with a cheery applique this week. This "Bird on a Branch" is a curvy bird with a couple leaves and a berry or bud, and it looks sweet in pretty red or a peaceful white on a blue background. Since I'm not playing with changing a lot of light and dark pieces this week I thought I'd just envision some little additions, like a button eye with all kinds of pops of colors on circles. You could make a a little change to the background by making an arch that mimics the arch of the branch. Or try framing in the bird as I did on the last one. 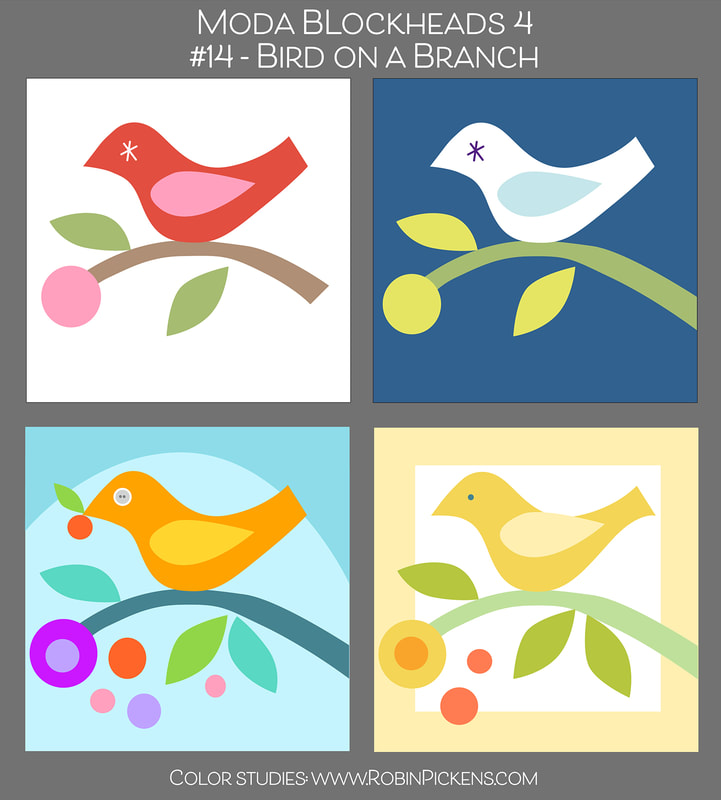 I wanted my bird for my center yellow blocks but wanted a little extra structure, which is why I added the framing in Thatched reversed to the back side. This makes a very subtle buttery color. An extra leaf and treating my circle like a flower with an orange center. 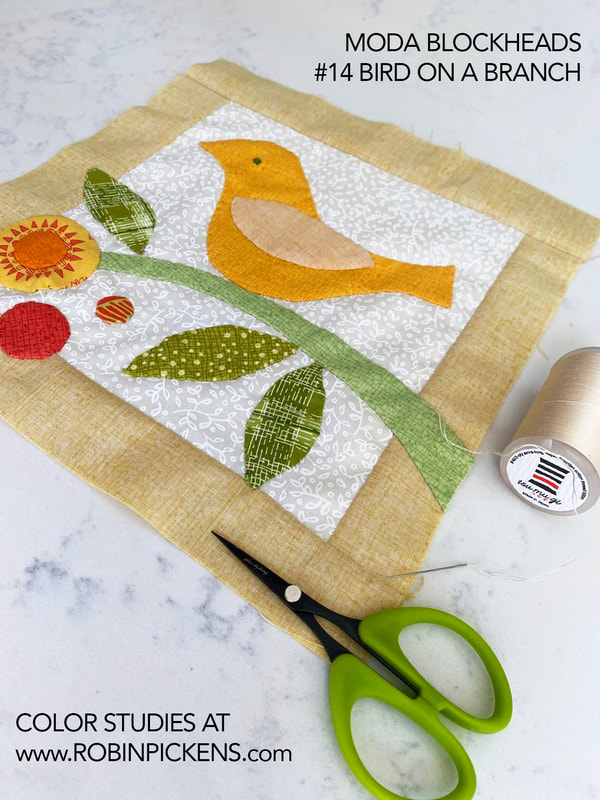 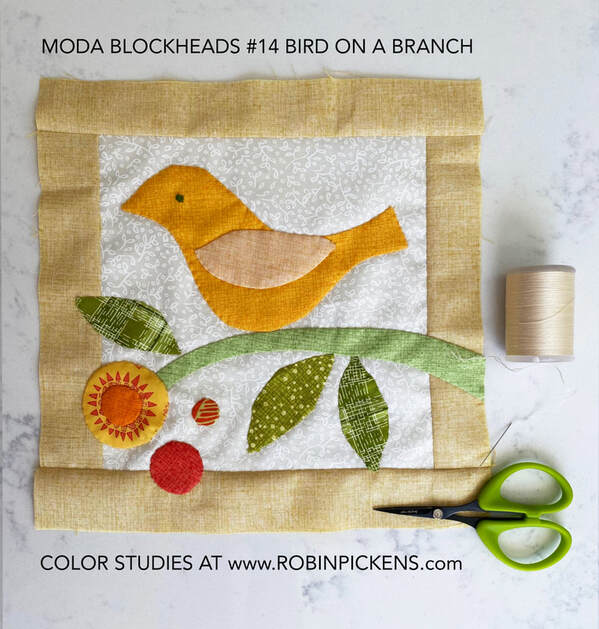 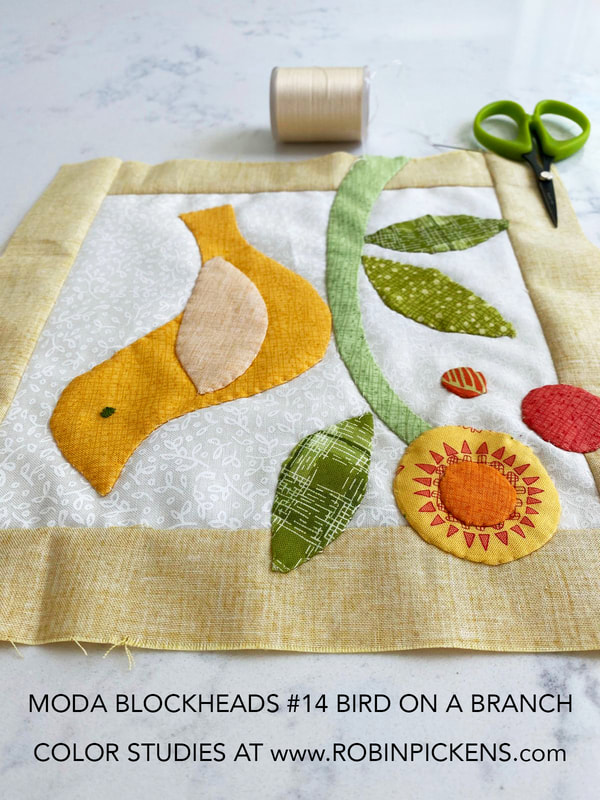 I also added a couple extra orange dots for some more accents of color. I've used the Solana fabric on my bigger flower so the rays poke out from the center as flower petals. The little white on white print is from Carolina Lilies and gives a little more texture to the light background. I made my bird eye with a little embroidery. For my circles I used Applipops and was very impressed with how they work and the range of sizes for circles. I think I may have some more circle applique experiments to try! 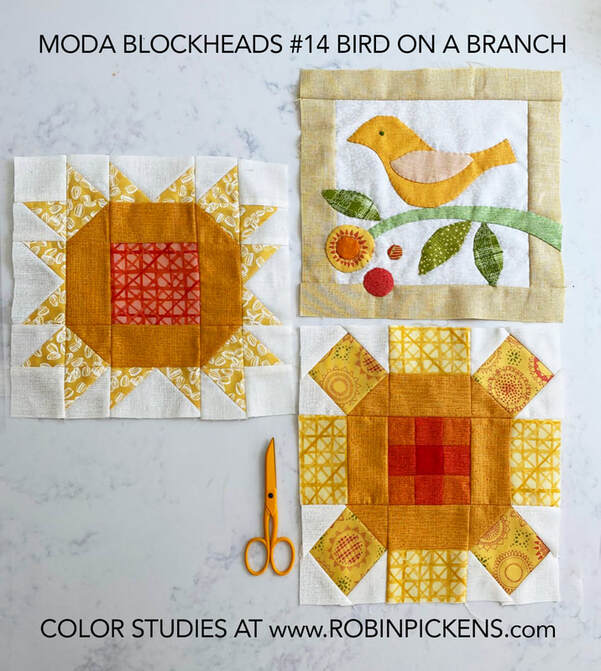 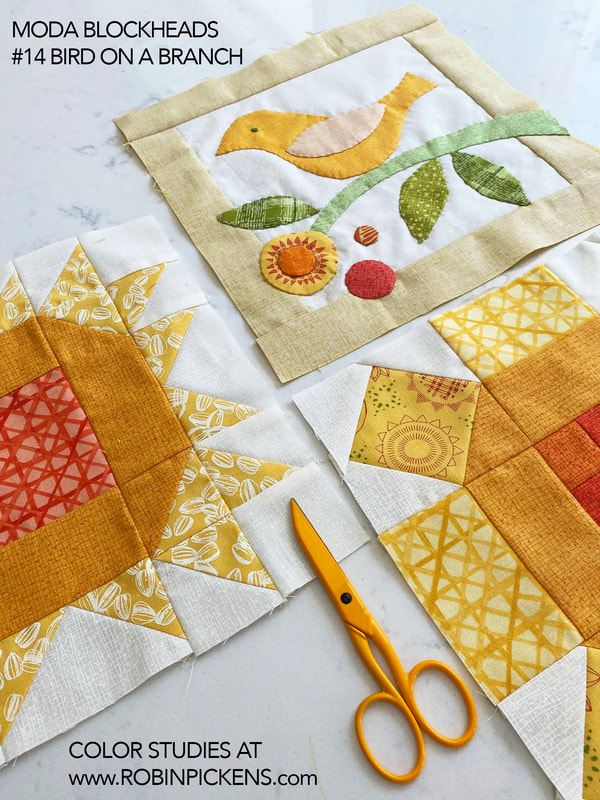 Have fun making your flying friend for this week's block!
This is about the half way point on Moda Blockheads 4 and a good time to share my setting directions and the pattern for my corner blocks. If you visited my blog post at the very beginning of this round of Moda Blockheads, you might have seen my initial plan for my "Surrounded Square Garden" setting. 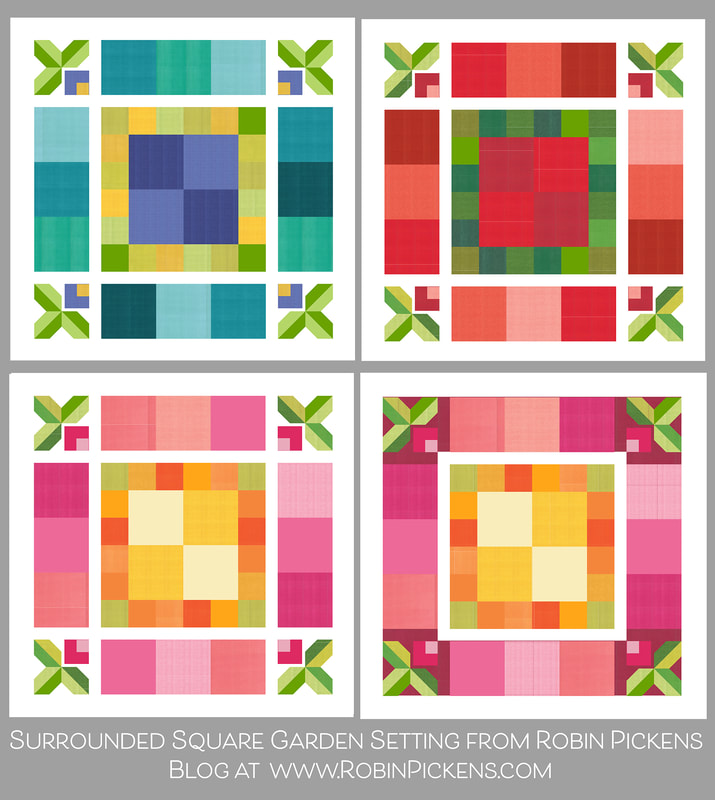 I wanted to make both the 9" size blocks and the smaller 4.5" blocks and combine them in a square structure, with each ring/row of the blocks being a consistent color family. These were some ideas with blue/green and a touch of purple or periwinkle. Or a Christmas palette of reds with green accents. Or the happy summery palette of pink, orange and yellow. I decided on this palette as my direction and I am making the very last image with a Cranberry Thatched for the background on that outer square. Here are some of my blocks so far: 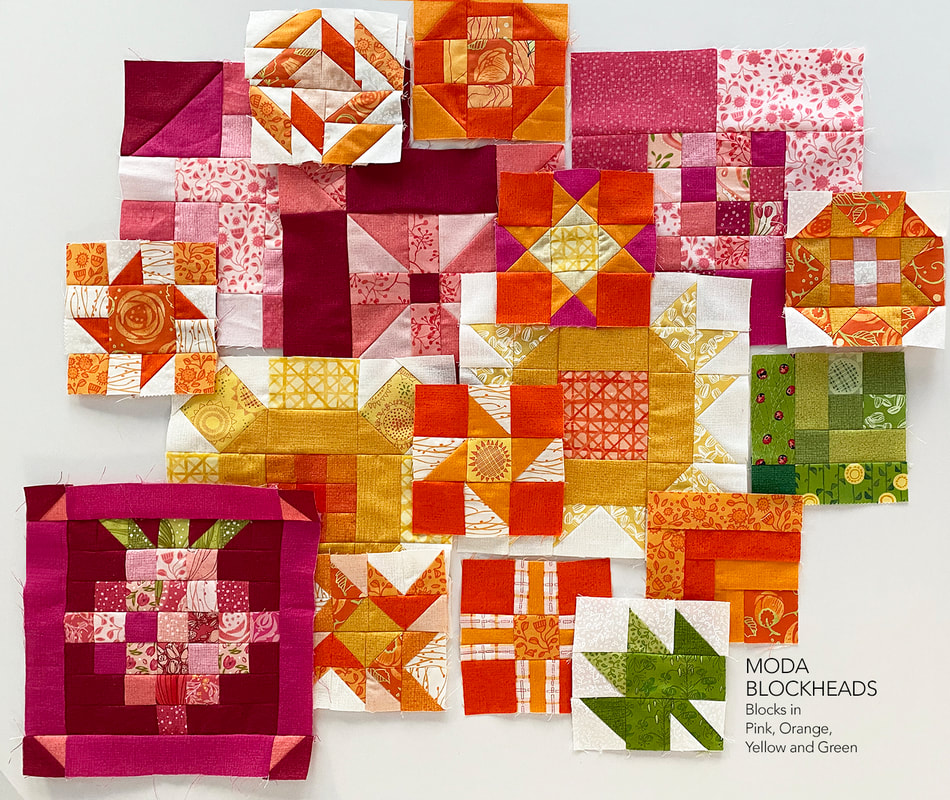 I am making small green blocks for the corner of the inner small row, just like my outer row will have leaves in each of my big outer corners. I thought my garden of blocks would be structured nicely with those consistent corners, plus it would give a pop of a few of the row colors with a blocky bud in the inner corner.  Since my outer row has a Cranberry background, I used cranberry in the background piecing for my corners. For most people, if you are using a white background, I'd assume you would want those background pieces as white for the leaves and but to stand out against.  I used scraps of fabric I have from past collections. For the leaves, look for 5.5" squares to start making your half square triangles with. You can have your leaves all go in the same direction, or do as I did and make them fan out from the center point. Because I had planned to use this Fuchsia pink in my buds, I made certain to weave the color through some of my 9" pink sampler blocks. This pattern is up at my shop at robinpickensINC.com in the freebies section. There are two patterns (block and setting) but combined into one PDF document. The corner blocks are called "Blocky Bud and Leaves" and the overall quilt setting is the "Surrounded Square Garden." This bar below will take you directly to the shop Freebies section! Look for the image of the corner Blocky Bud with Leaves! For the sashings that separate the rows and the very outer border, you will need about 2/3 Yard of background or sashing fabric. This setting makes up a 53.5" square lap/wall quilt but feel free to add more outer borders to increase your size. 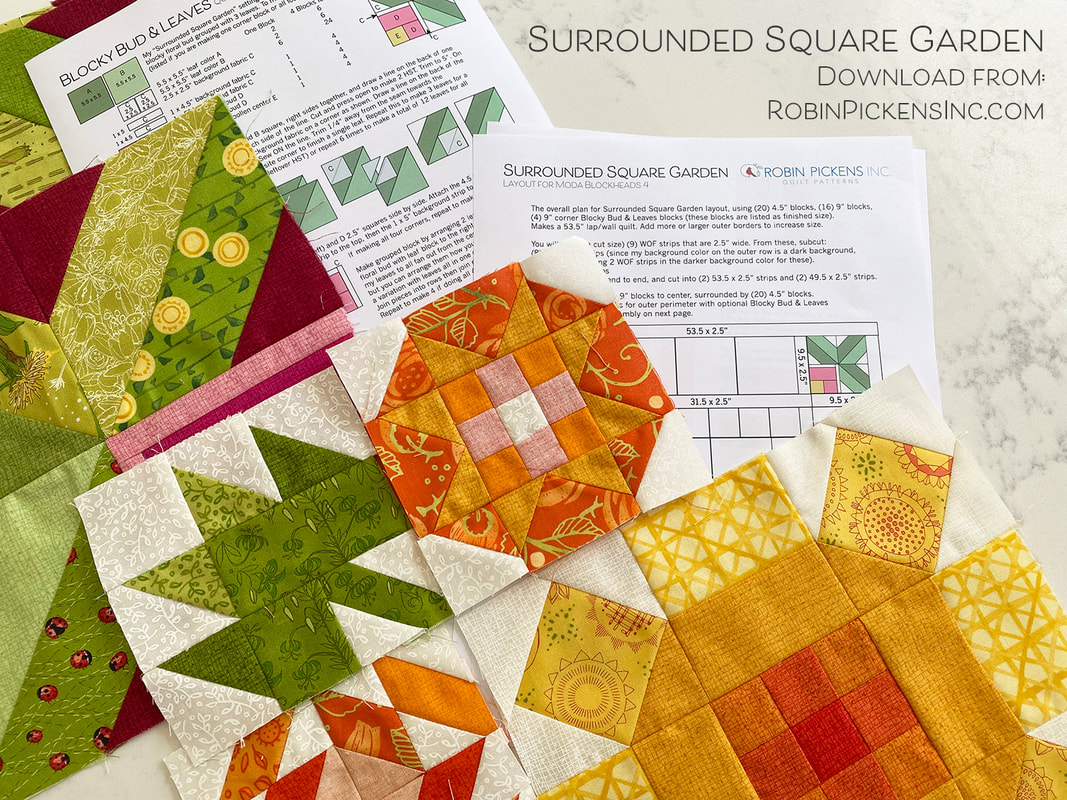 Here is where I am at so far with my progress in terms of where these will fall within the color rows. 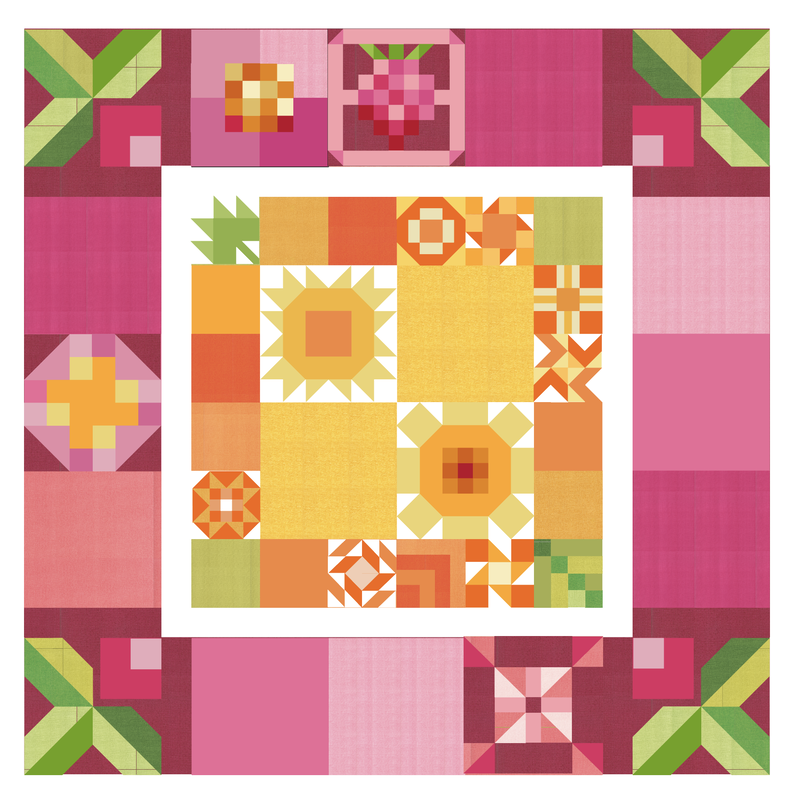 Over at the Quilt Emporium, my local shop, they are making one in the blue/green/periwinkle/purple color family and I love to see their blocks evolve each week! Lisa made up some bundles if you like these color groupings. The red/green with a touch of turquoise was with Christmas holidays in mind. This would make such a fun Christmas quilt! You can visit the Quilt Emporium website if you are interested in their bundles. 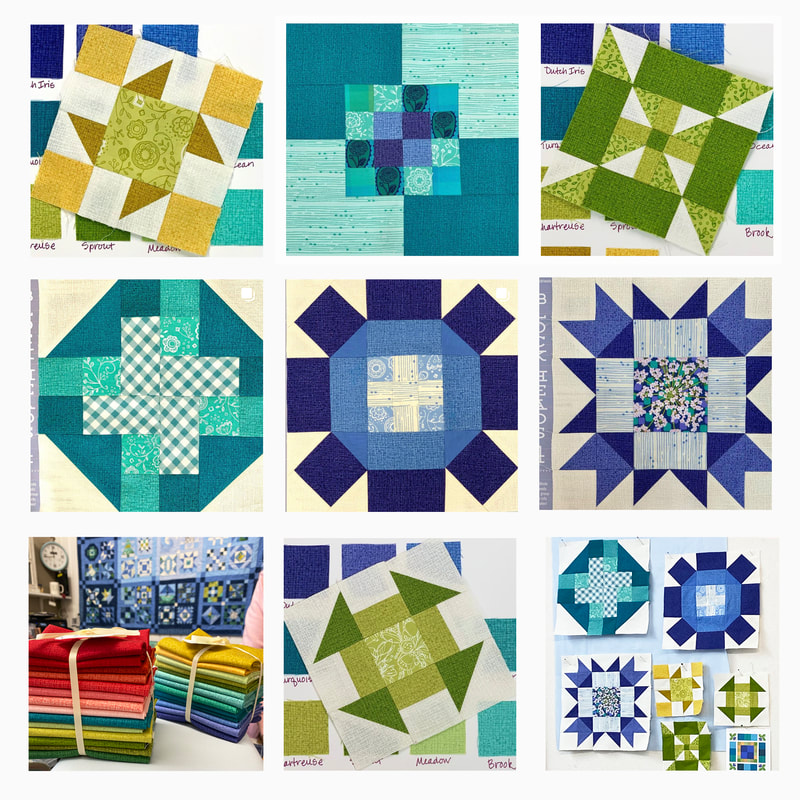 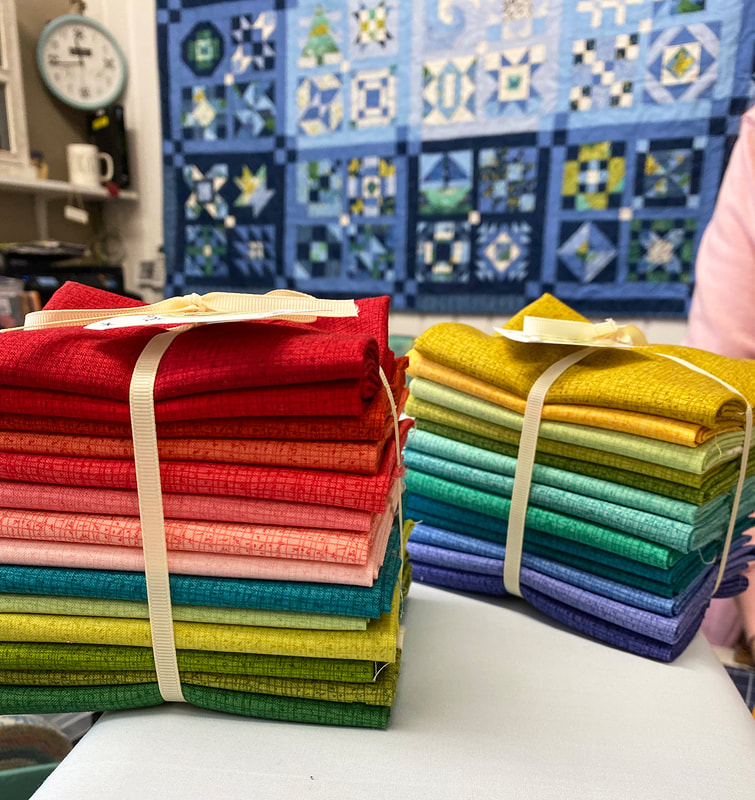 I hope you are having as much fun making blocks with Moda Blockheads as I am! If you are interested in more color explorations, I am going to be at the Quilter's Gathering in Berlin, Ohio this August, doing 2 half day workshops "playing with color" and it should be a fun time to explore color together!
Happy (colorful) sewing!! Are you ready for Evening Delight? This lovely block is from Debbie Maddy of Tiori Designs and can be found at her blog: Quarter-square Triangles make up the North, South, East, West parts of the block. If the background color continues from the center into the sides of the QST, like on the right image below, then it gets more of an oval center by visually expanding the middle vertically. 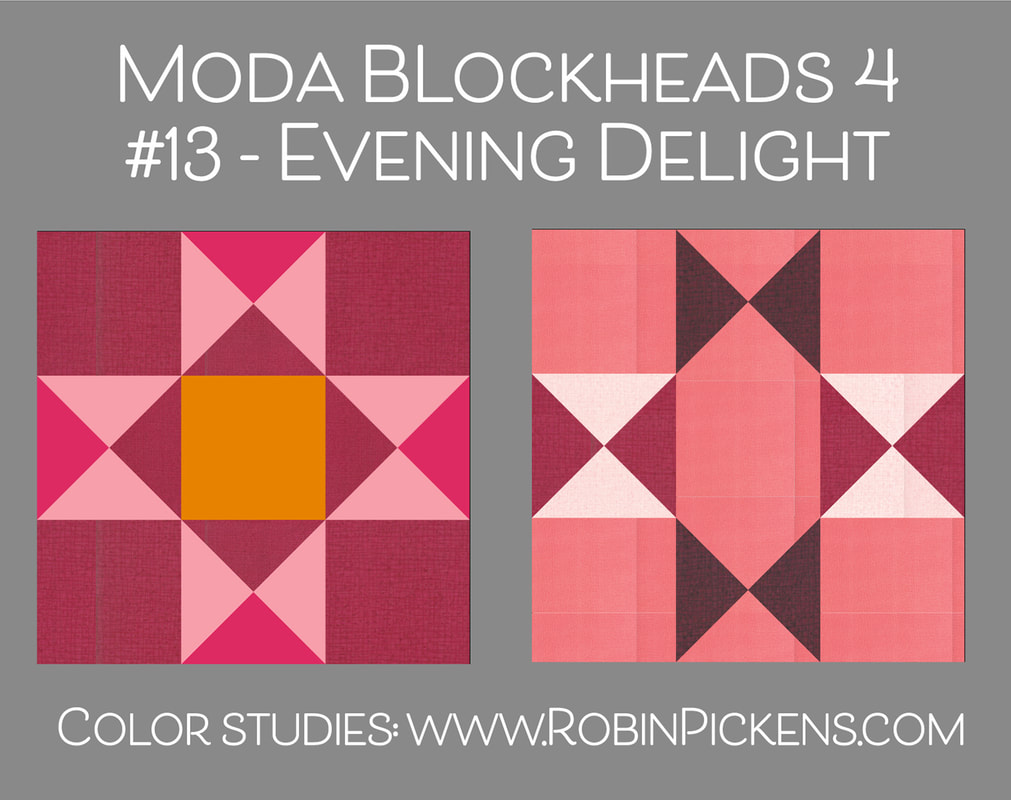 These rainbow colors would need a little change in construction. after making the first half square triangles, you would normally place two, right sides together, and sew 1/4" to each side from the diagonal center. Then you would cut them apart. With the top tow rainbow images before you would make the initial half square triangles, CUT them in half on the diagonal, THEN pair them into the new groups and sew together to make the quarter square triangles. The cutting stage is earlier so you can pair them up with different pieces. 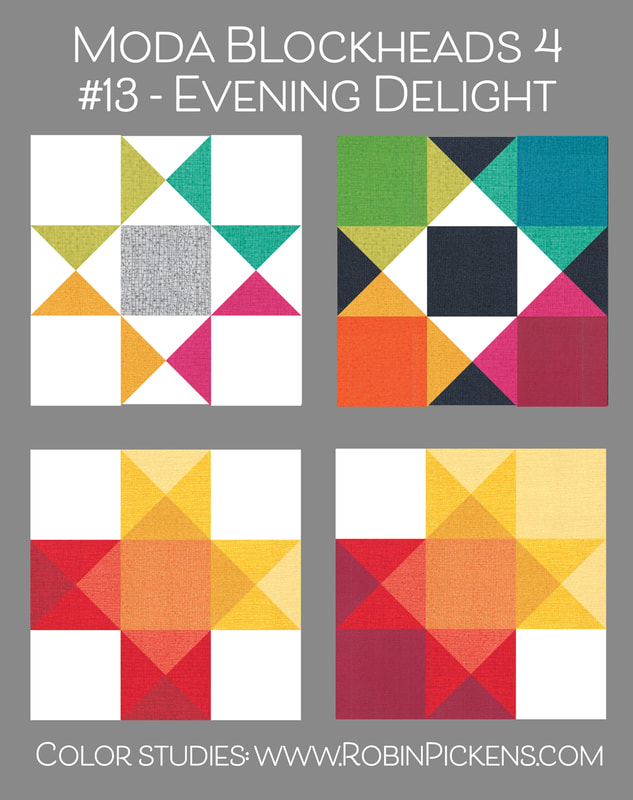 I like how adding colors into corners makes a different feel with the block. If you are making a couple quarter square triangle units with some corner colors, you can also rotate them so the background blends in to the shape to again extend the shape. I think of these as the retro space stars. Blending the corner background colors into the sides of the quarter square triangles makes this a visually more horizontal. 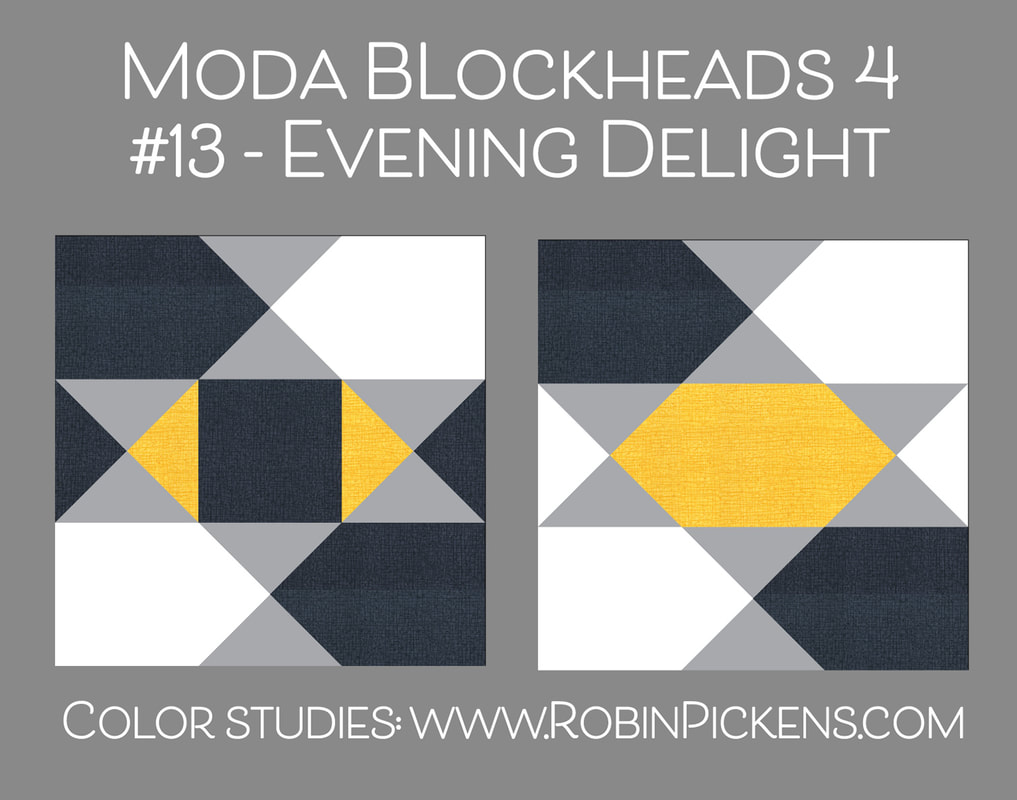 I have done a small block for my orange row but wanted to bring in a little of the pinks as accent and ties it into the bigger pink blocks and a little yellow to tie into the center blocks. 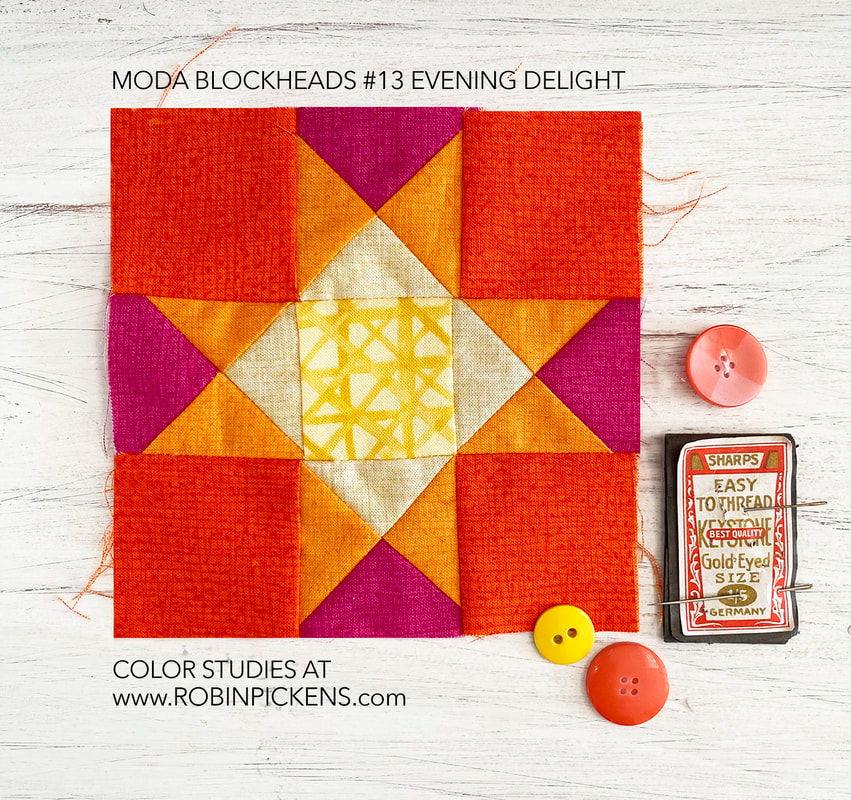 Summer colors of warmth and energy and fun! Have a lovely time with a little summer Evening Delight! 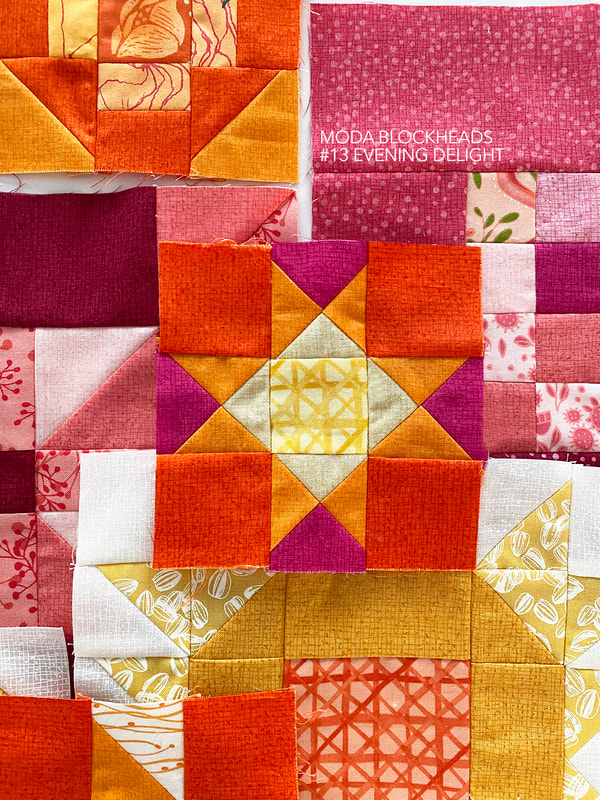 |

About ROBINDesigner of colorful florals for Moda fabrics. Modern to transitional quilt designer. Illustrator, sewist, crafter. I am proud to be a designer for Moda Fabrics!


Shop Robin's Designs
 I am an affiliate for Fat Quarter Shop and may earn a small commission through my links. Thank you for your support!

Check the March 6, 2017 Episode!
Categories
All
Archives
November 2023
© Robin Pickens Inc. All rights reserved. No images may be reproduced without permission.
|
 RSS Feed

