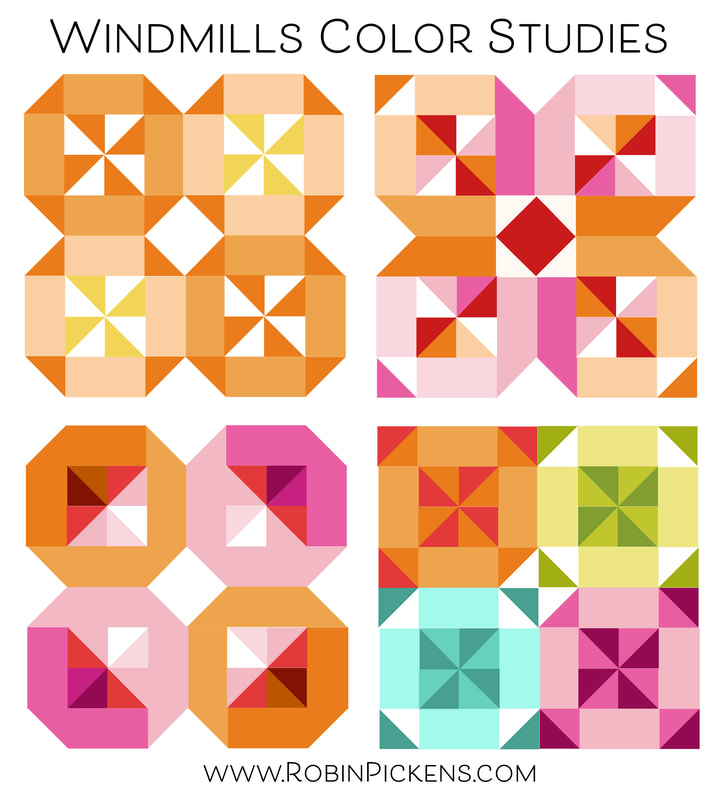
 Happy Moda Blockheads Wednesday! Janet Clare brings us this week's block "Windmills" with a fun pinwheels in a group of 4 blocks. I like how the block can be rounded off forms around the pinwheels or emphasize those corner points to change that outer shape. The second one reminds me of ribbons running through the center of the block with sparkly quadrants. The third one has depth in the corners within the 4 centers from the dark and light focused to the outer corners. The last one is a colorful party of windmills! 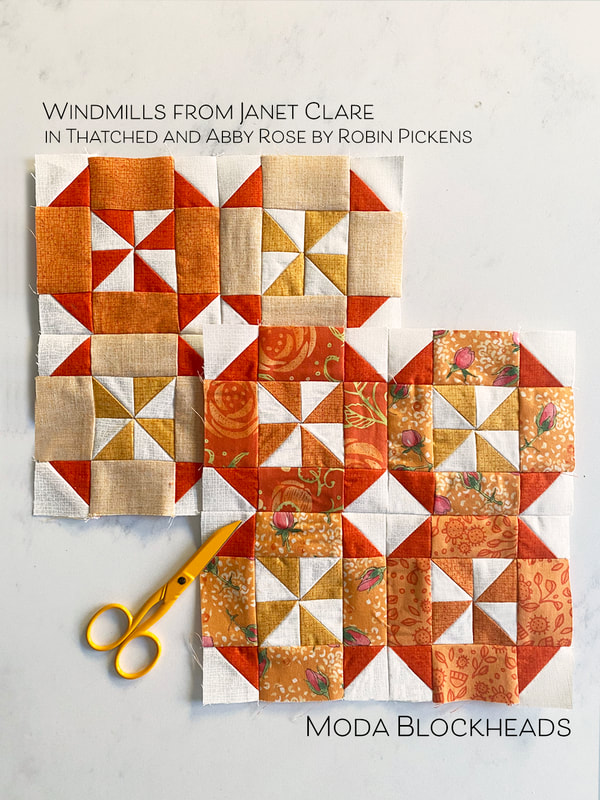 My blocks were cut out before I did color studies so I stayed pretty close to the original layout. This is the last one for my orange row and I wanted to mix in some yellow for the lighter range, and dark Tangerine for the darker range. 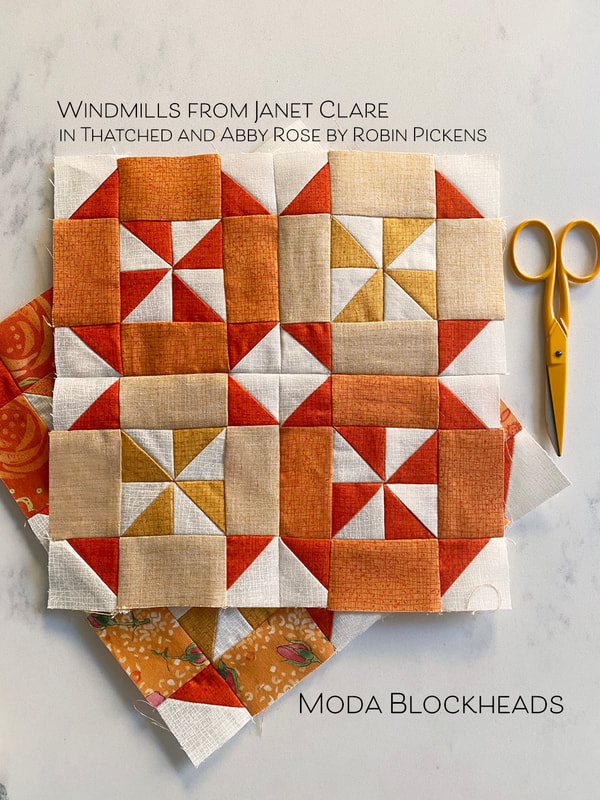 My Thatched fabrics show off the flip side for the pale orange rectangle sides. I used triangle paper for making my HST. With 32 HST per block, and 2 blocks, it seemed best to simplify my colors for those elements and use the papers so I didn't have to do extra trimming. 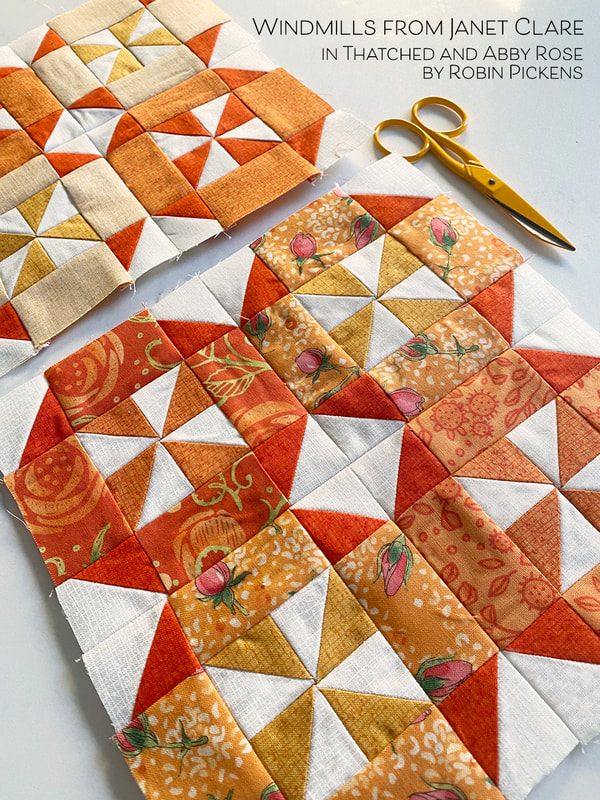 Fabrics from Abby Rose bring in the orange prints on my scrappy block. I stayed with consistent orange/yellow HST from my first block to be most efficient with the HST making. The rectangle sides were the place to swap out prints to play with my Thatched fabrics. 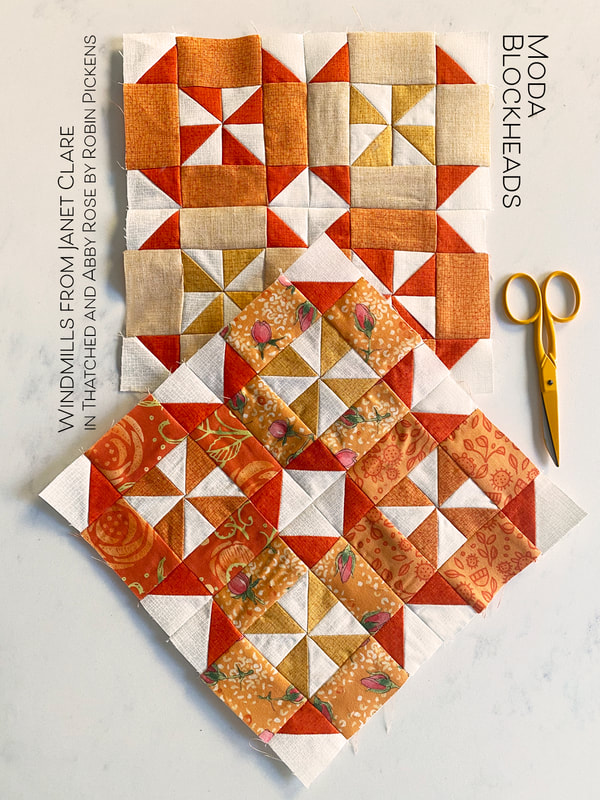 Hop on over to Janet's blog for the pattern this week and have fun with windmill motion and HST fun! 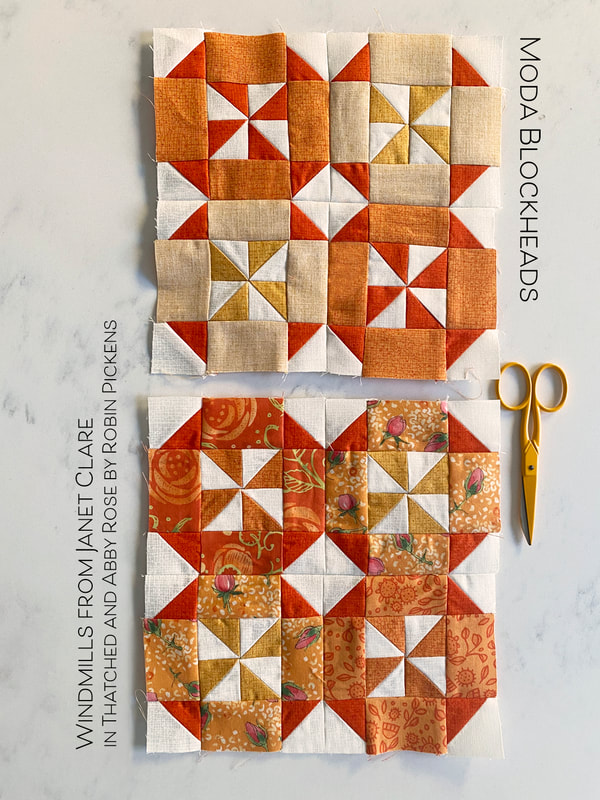
1 Comment
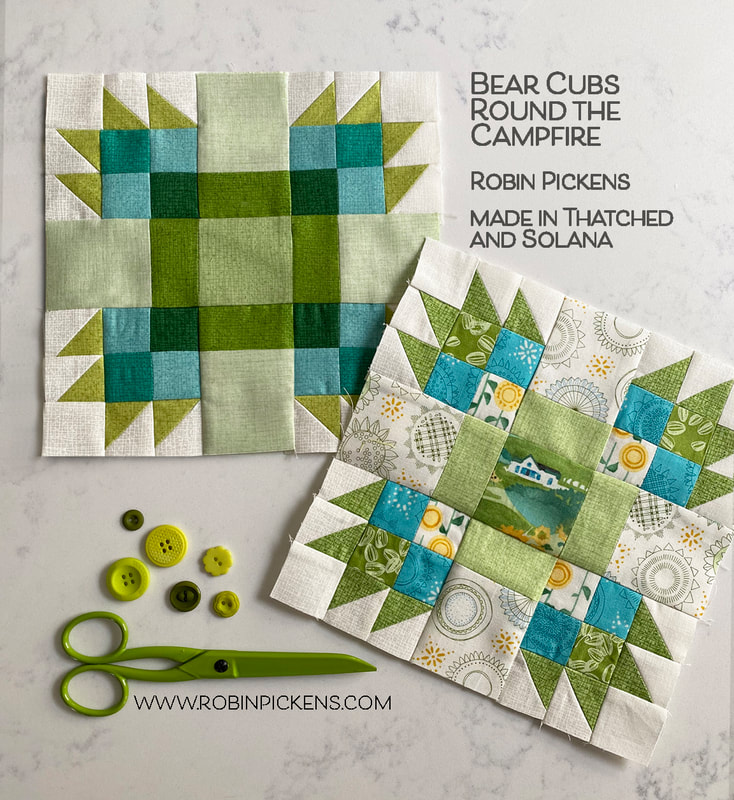 It is my week for the Moda Blockheads quilt block and I am feeling a little sentimental that this is all wrapping up soon. I have had such a good time! Last year I sewed the sampler but was not one of the block designers. This year, the excitement of sharing blocks I've envisioned has been a highlight to my months. The connection through online communities and sewing has been more important than ever with the changes we have all been going thorough with quarantines and working from home. In weeks that have blurred into other weeks, one thing has been steady...the fun and creativity of Wednesday block releases for Moda Blockheads. Thank you all for being a part of this quilt journey and community! I hope you are excited with your evolving quilts. And for this week's addition, block 53 is "Bear Cubs Round the Campfire." I've been enjoying some projects with Bear Paw blocks and liked the idea of a simpler corner with a small paw. With all four corners surrounding a center block, it felt like smaller bears, or little bear cubs, sitting around the fire pit or campfire. I have actually been camping when a big, tall bear came into our campsite. He/she smelled the food cooking and we banged the pots and pans to scare the bear away. For this quilt block, I envision these bears to be smaller and so much more friendly! 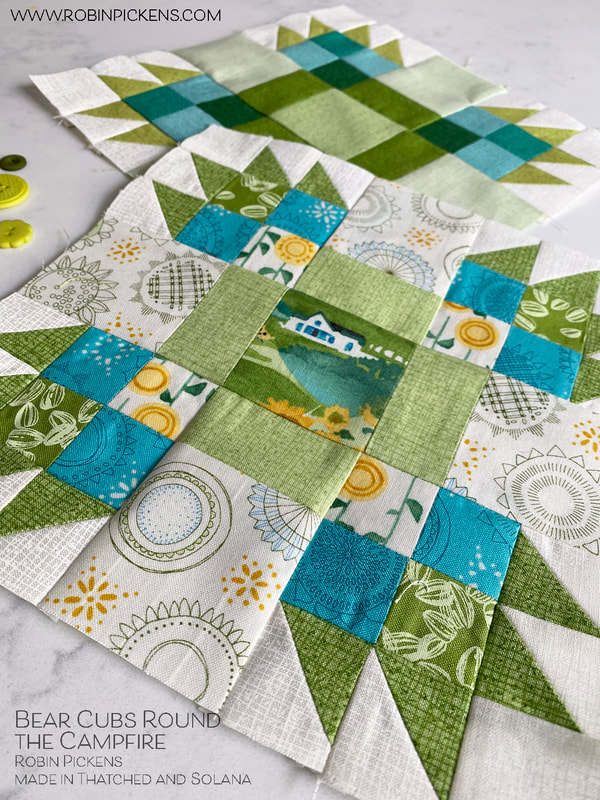 I took the opportunity to put my little farmhouse from Solana into the center square on my print version. Greens with a little pop of blue is my theme and the farmhouse is warmed up with some happy sunflowers. For my all-Thatched version, I've got greens from Painted Meadow, Solana and Abby Rose, along with the original basics Pine and Chartreuse. I used the flip side of the Solana light green to get the lightest outer shades. 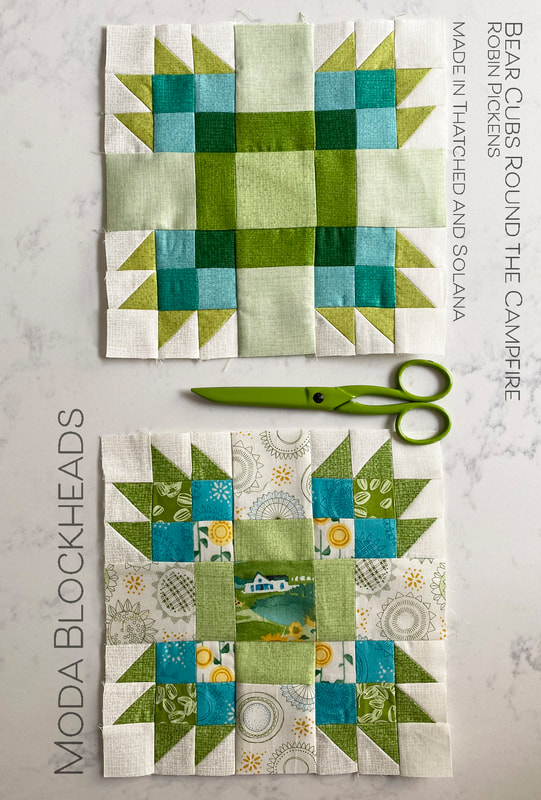 Speaking of Thatched...I recently announced that Moda is releasing another 25 colors into the basics line! It will be shipping either this month or February. I am thrilled to have more colors to play with and can't wait to experiment with more color combinations. Check back to my blog in the next few days because I will be releasing a NEW FREE mini quilt pattern that uses a Mini Charm. I'll have it as a download on my blog. I've got it shown in the new Thatched colors and I am loving the spicy warm colors and new periwinkle/cornflower blues.  But lets get on to the COLOR STUDIES! And of course the pattern and then, please enter to win a layer cake of SOLANA (enter on the Facebook Moda Blockheads page on my announcement post with the picture of my sewn blocks). The pattern is here - just click the gray bar right below this paragraph. But to see mockups and learn more about the GIVEAWAY, keep reading... When first planning this block, I had a red center square for the "fire" but as I played with it and realized it was going to live in my green row of the quilt, I switched out center colors and added more subtle bands of color in the middle of the sides. I also liked looking at this with warm colors on a dark background, and again tried those bands in a different value of the lighter brown. 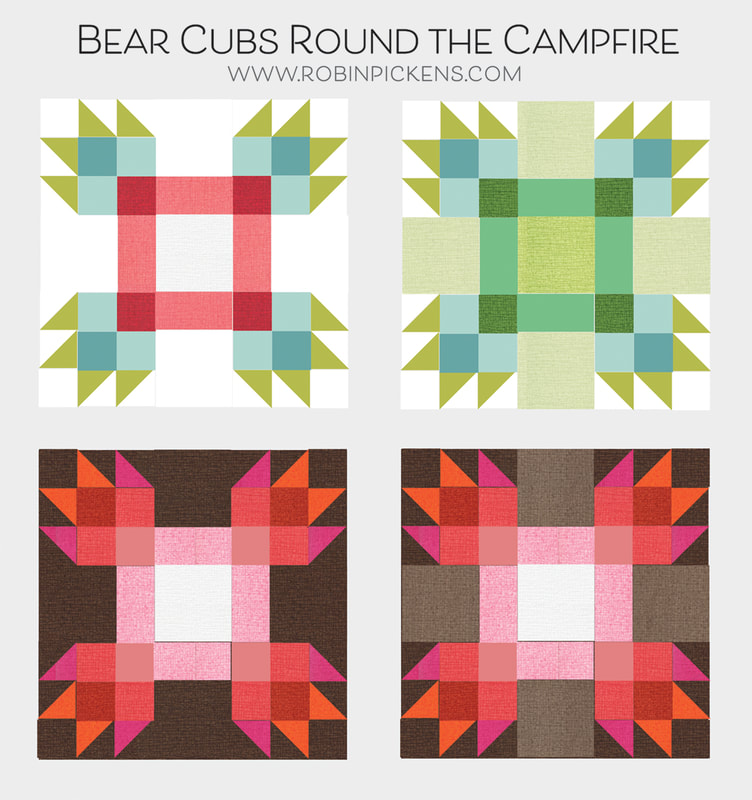 Next I tried emphasizing the squares in the middle, either through light and dark or a highlighted color. On the last one I dropped out the corners on the inner box so it reads like a big chunky plus sign. 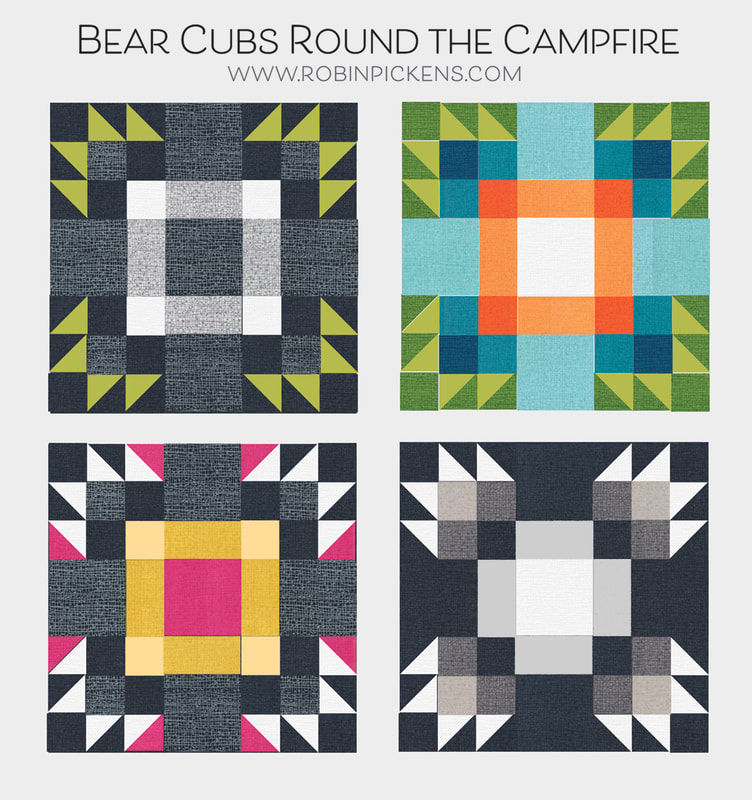 The facets of cut glass? 70's supergraphics? More continuation of color from piece to piece and the illusions of lines turning corners. It is exciting that this doesn't resemble a bear paw any more. 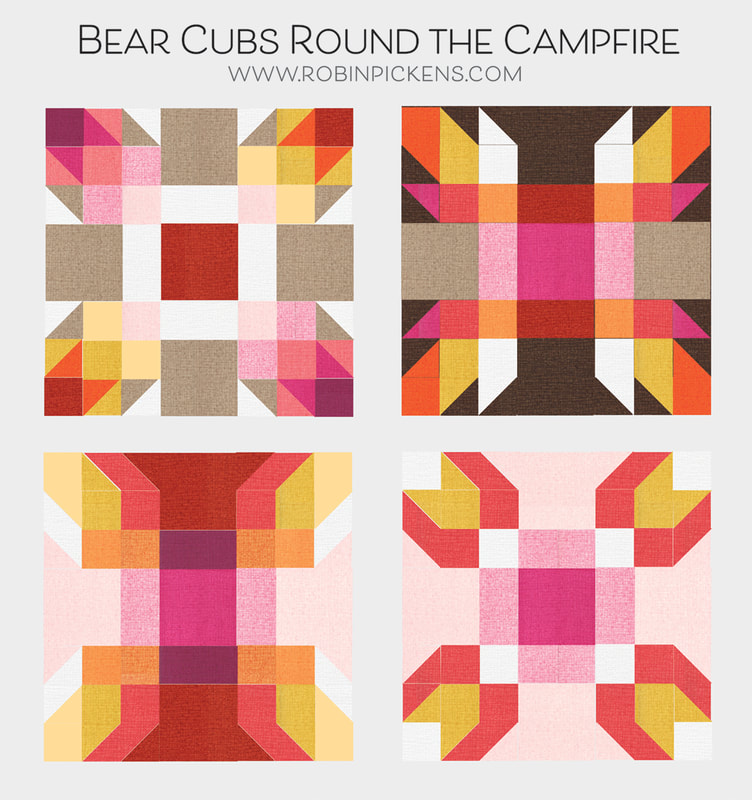 And finally, a little rainbow love with a color wheel of color showing up in those corners. I like these as a pair with the light and the dark background. 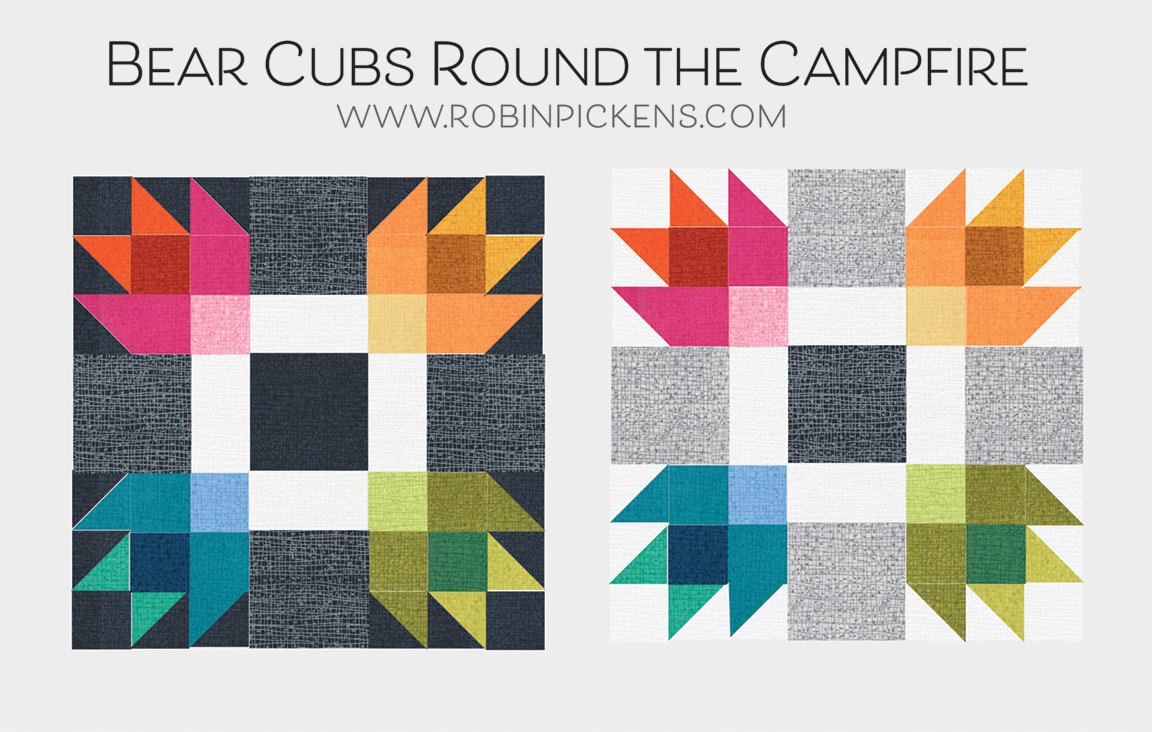 So of course I had to stay up late and make these! I didn't have good enough light to photograph last night so I added these to the post later. I did these as 12" blocks (my green ones are 8") and I think that adding some extra borders would increase the size to nice pillow covers. 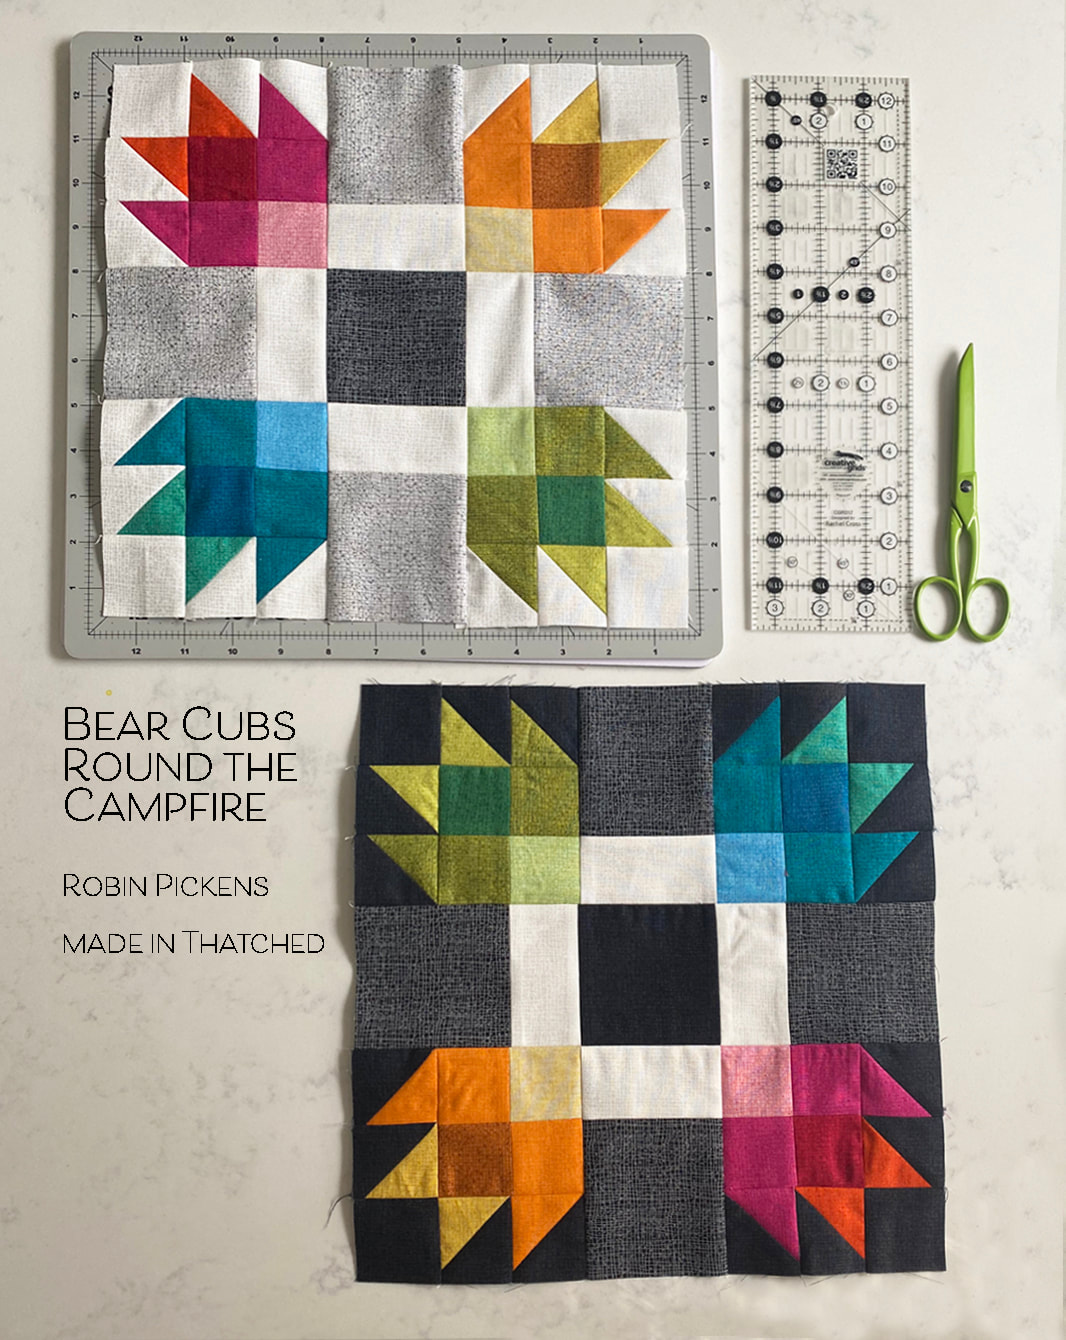 I've used some of the new Thatched colors in these. The background below is so fun to try out! It is called Chalkboard Scribbles and is basically the reverse of Heather from the first group (grey lines on white). There is a crisper white on white called Blizzard and deep and dramatic tonal Soft Black. 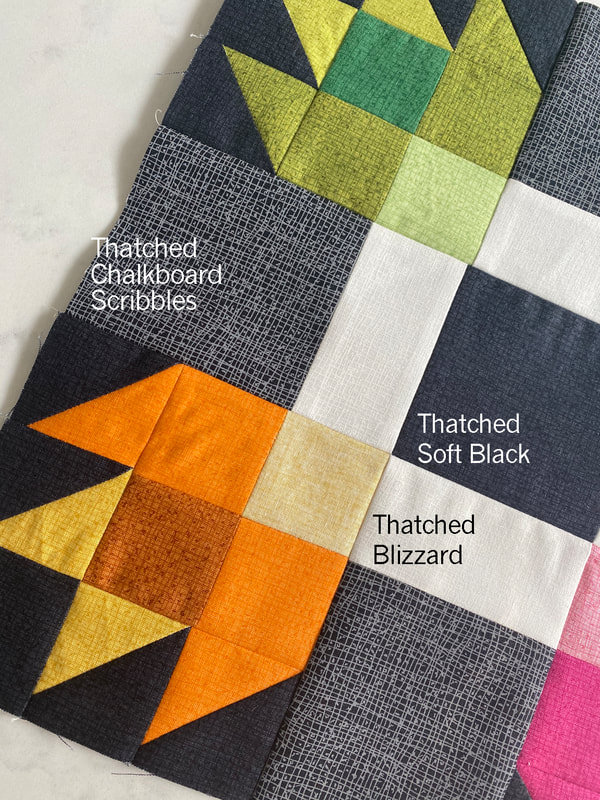 Thank you for all your lovely comments about the color studies over the weeks! I have greatly enjoyed doing them and sharing the mockups. GIVEAWAY INFO: I'll be drawing a person to win a Layer Cake of SOLANA fabric. Please enter by commenting on my post in the Moda Blockheads FACEBOOK group (my post with the photo of these green blocks, not the color study one) and tell me what flowers you would like to see me do on a future fabric collection. I'll be picking a winner next Tuesday the 19th. 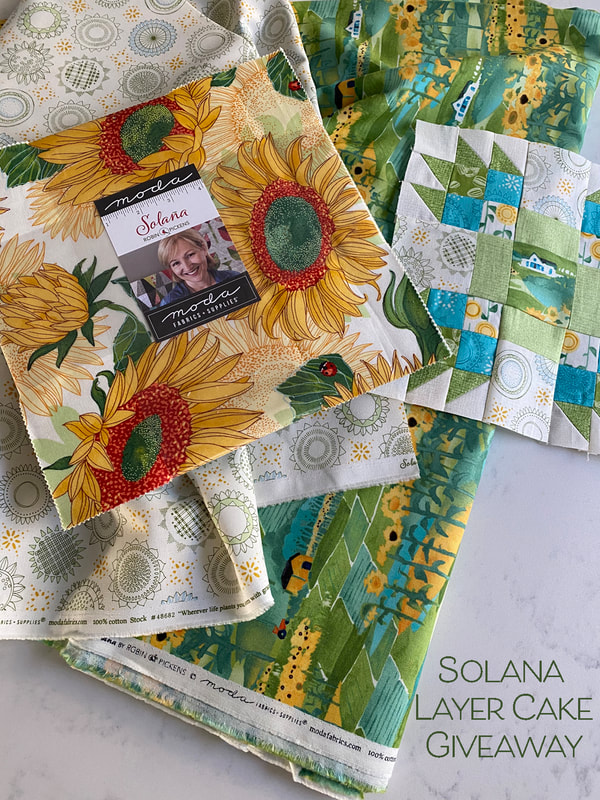 Thank you all for sewing along and may 2021 bring health and happiness to everyone! 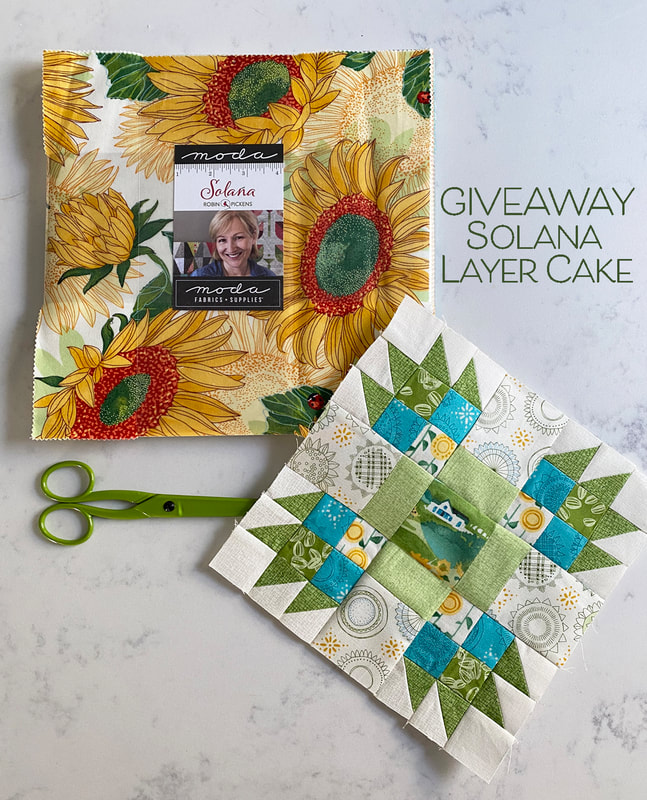  I usually start the Moda Blockheads posts with my color studies. But today I want to share a time-sensitive thing first...a giveaway! Yes, in honor of 2021 starting in a couple of days, I am doing a calendar giveaway on instagram @robinpickens. Just comment in the giveaway post and I'll be selecting 2 winners on January 2nd (just in case some of you are already celebrating and haven't seen the post yet!) 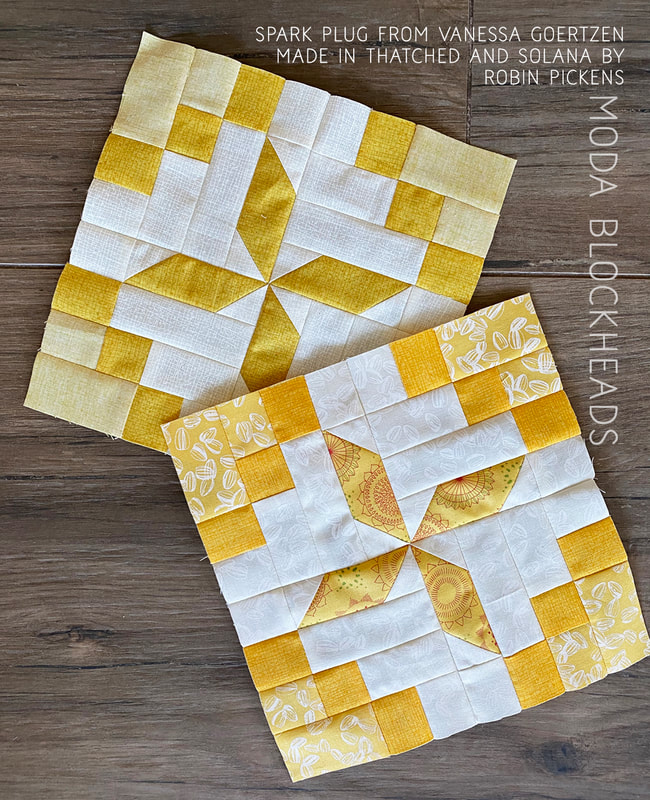 Vanessa's SPARK PLUG block this week is a fun one and I wanted cheery energy with some yellows. They are yellow fabrics from my SOLANA collection that is in shops now. I used the white on white tonal sunflower seeds as my background fabric in the print block and I love the subtleness of the hinted texture. I really enjoy the "varietals" coordinate in this collection and used that for the center rectangles. 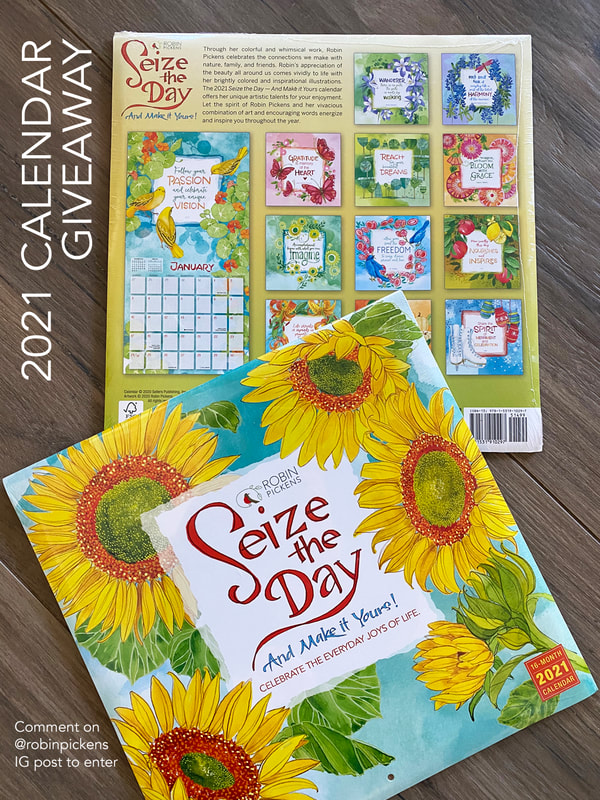 It was perfect timing to have the cover of this next year's Seize the Day wall calendar be the same cheery sunflowers that I used in the SOLANA main prints! I really hope this year brings more sunshine and happy days in a spirit of optimism and progress. And, just in case you are wondering, the Seize the Day calendars come in wall, daily and checkbook sized formats. I just saw some recently at my neighborhood Barnes and Noble. 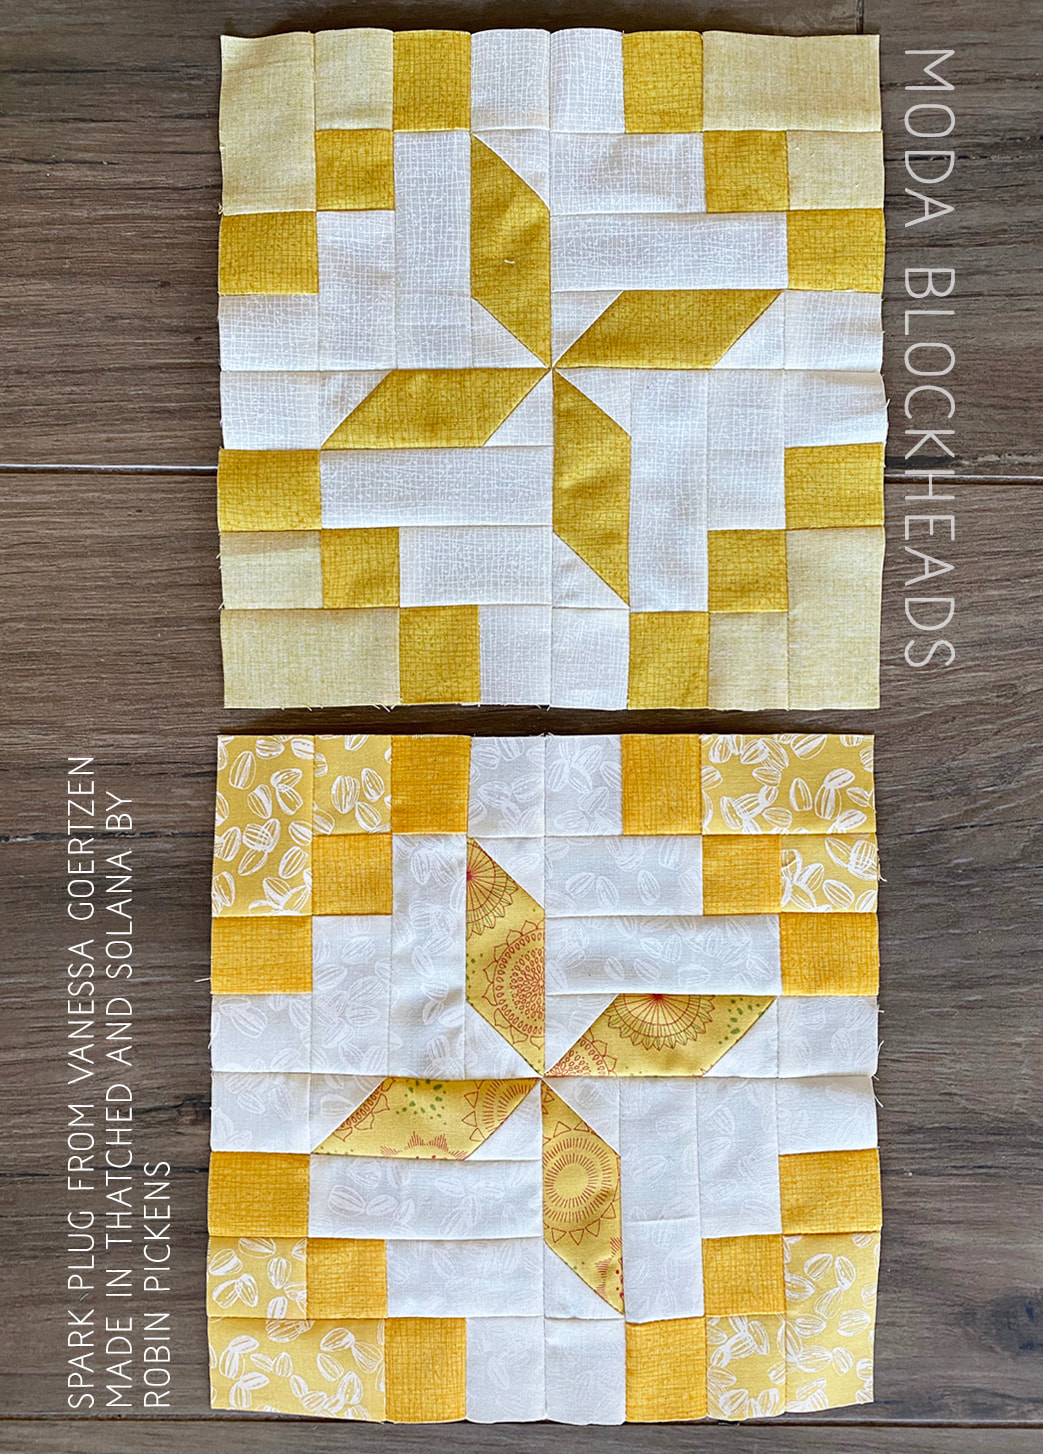 But back to quilt blocks...for the Thatched version I used the Maize color and got that lovely soft light yellow in the corners by flipping and using the back side. Stay tuned for some news very very soon about Thatched (hint, hint, I hope 2021 will be more colorful) 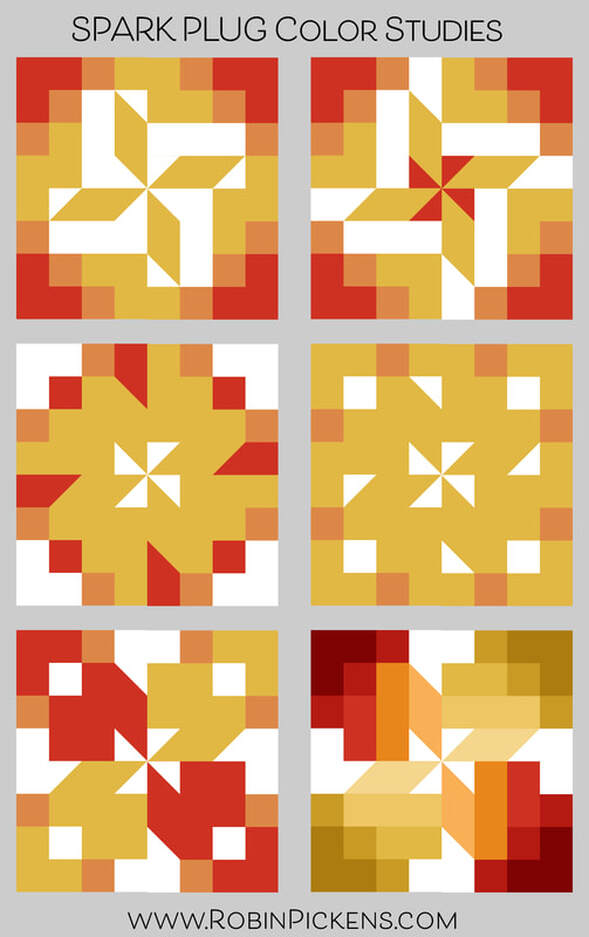 And now...COLOR STUDIES! I stayed pretty true to Vanessa's layout when making my blocks. But when playing on the computer, I had a little fun playing with a variety of shades of color. I find it especially interesting how the shape looks almost flower like on that middle left one. Or I notice the surrounding box shape on the one to the right of it. And I like all the color gradations on the last one and having some different color families in the corners. Hop on over to Vanessa's blog for the SPARK PLUG pattern and enter her layer cake giveaway on facebook in the Moda Blockheads group. 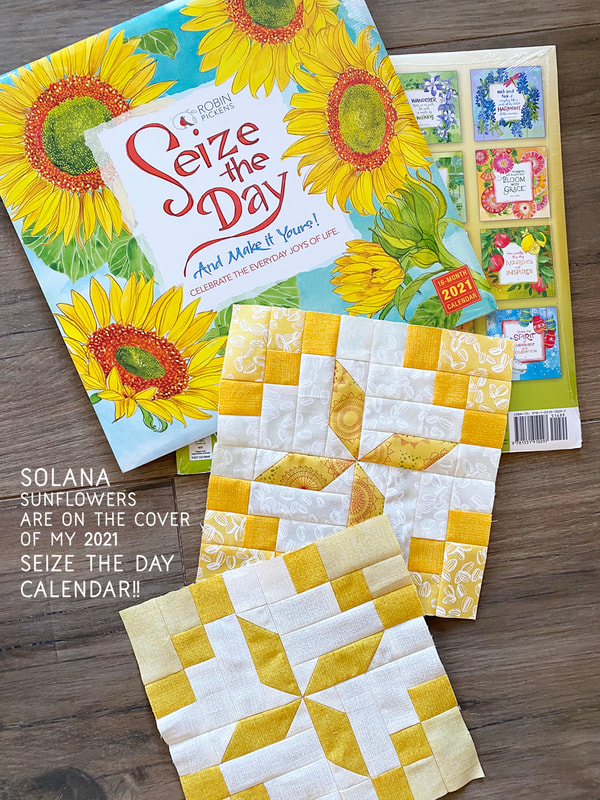 And a Happy New Year to you all and may 2021 be filled with fun sewing projects!
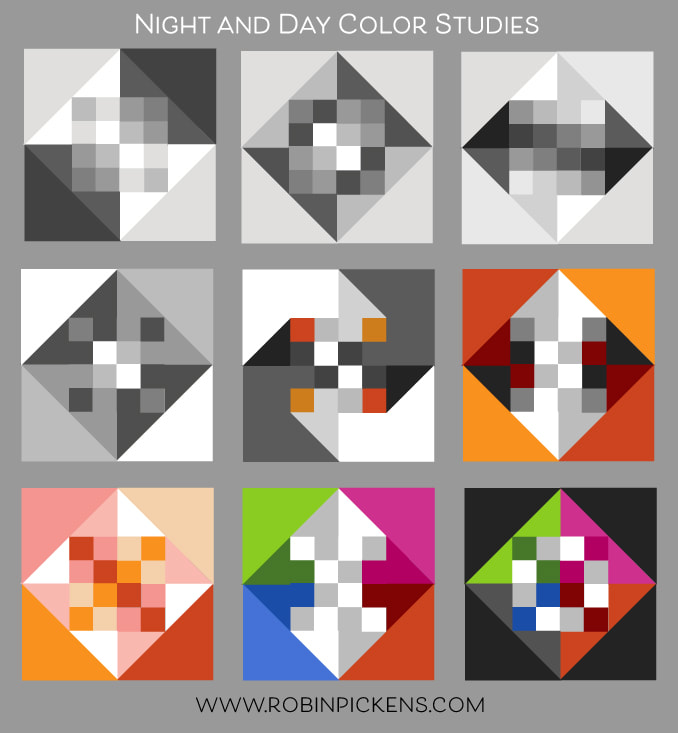 Within the structure of "Night and Day" the inside grid can be a simple checkerboard or gradation of colors. I like how the little squares can form a new perimeter around the center or can work with the middle triangles to make arrows. The outer triangles can frame the diamond or play with colors dancing around the shape. 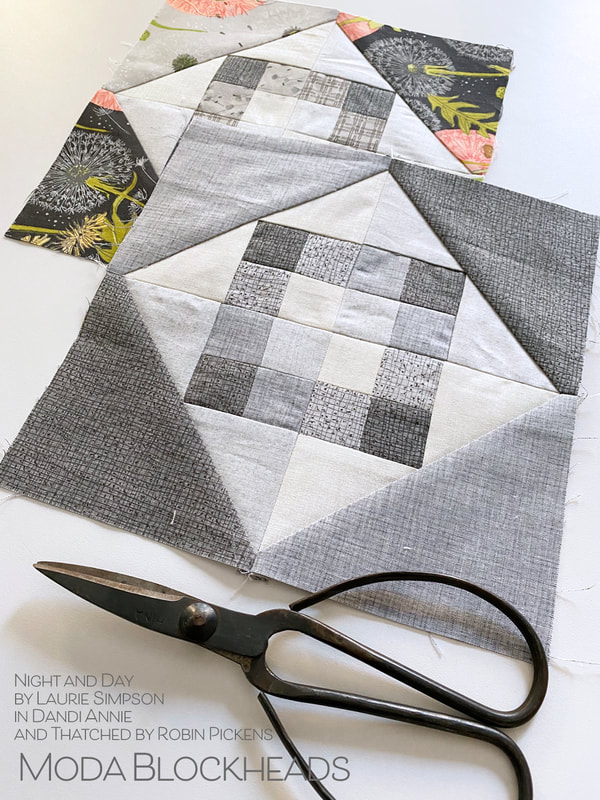 For my blocks I used Thatched in grays, using the backsides as well to get those lighter shades and subtle gradations. I wanted the effect of the checkerboard squares in the center to be very whispery and to highlight the structure of the box surrounding it more. 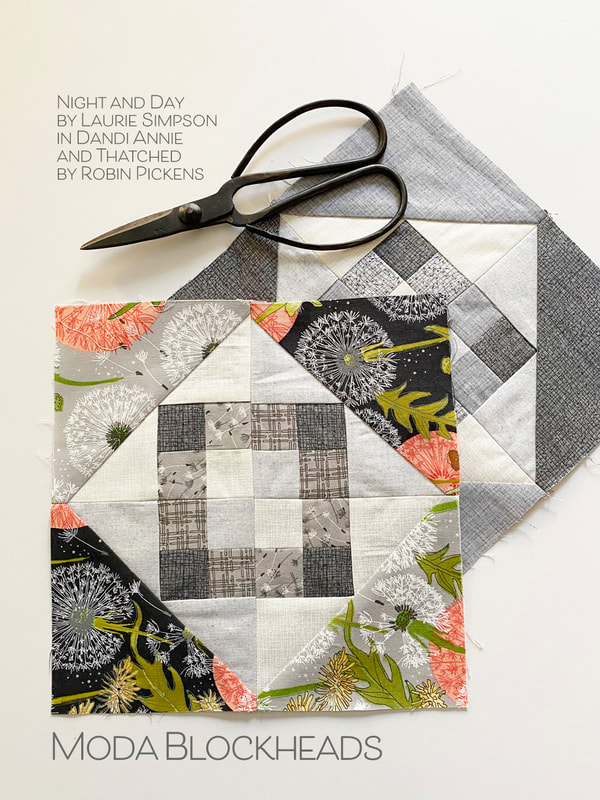 Dandi Annie became my fabric choice for prints. I forgot how much I love working with these big puff balls of dandelion seeds! I kept the structure of the center box outline and the darker corners on two opposite sides. I'm still debating if I need to rip out and line up those medium gray squares better, but honestly, it is the week of Christmas and I think I'd rather be baking cookies over ripping out seams. So it is staying I think. Sometimes we need to say "it is good enough" and allow ourselves to love the imperfections.  Hop on over to Laurie Simpson's blog for the pattern! And she is doing a layer cake giveaway on instagram! Happy sewing and happy Moda Blockheads day!
X Marks the spot by Lissa Alexander! I wondered what it would look like with a different color on the bar ends? Like little white cat's paws? 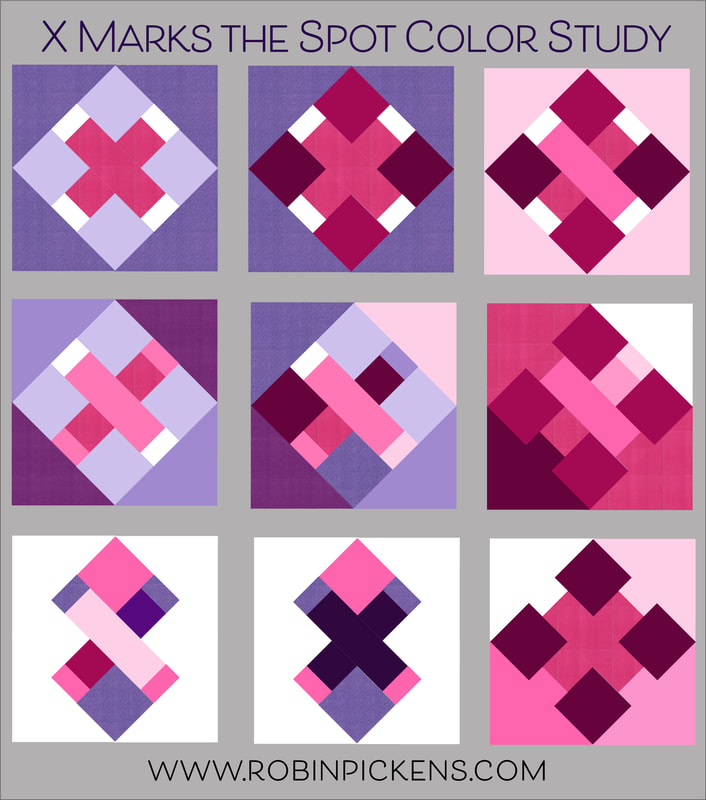 How fun to play with switching corner colors and making the background "disappear" by using the same color for some corners as the big background. I think the one on the lower left looks like it is twisting. And the very last one makes the corner squares almost float. Can you see the white arrow in that one? 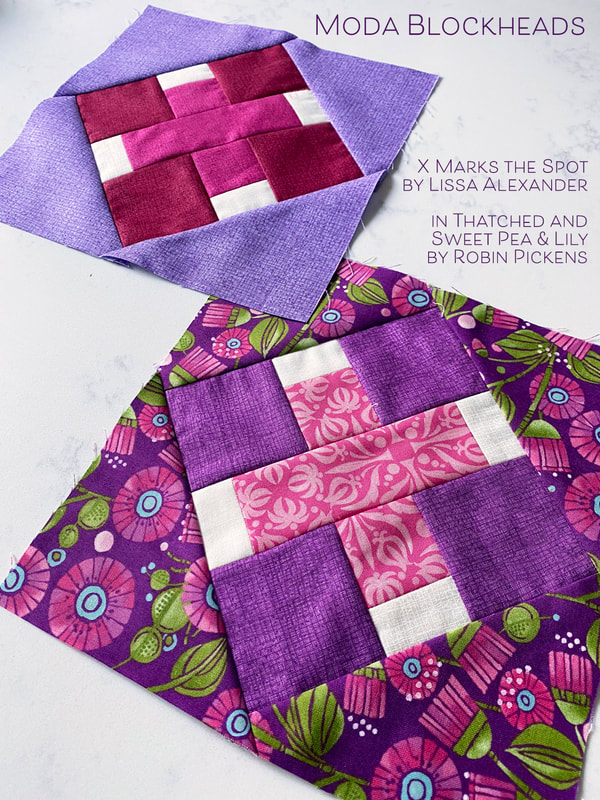 Looking for the pattern? Hop over to Lissa's blog and see what she has as a giveaway too!
 Lisa Bongean blocks usually have lots of options for what to do with those half square triangles. This week did not disappoint! I love to see how the larger half square triangles on the inner corners make an octagon shape or a chunky plus sign on point. You can treat the outer HST as a fringe or a bears paw entire unit. Play with the corners in different contrast of light and dark? And what a fun V shape in the centers of the perimeter on the last one! Visit Lisa's blog for this week's pattern: 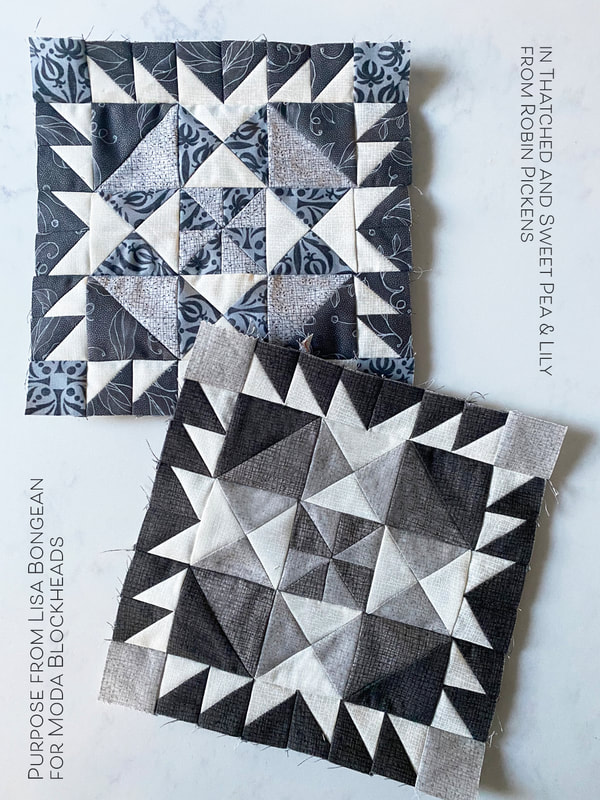 Each week I take stock of where I have spaces left in my overall layout and look at balancing the more intricate blocks with the simpler blocks. This block will end close to middle/ middle dark on my gray row. 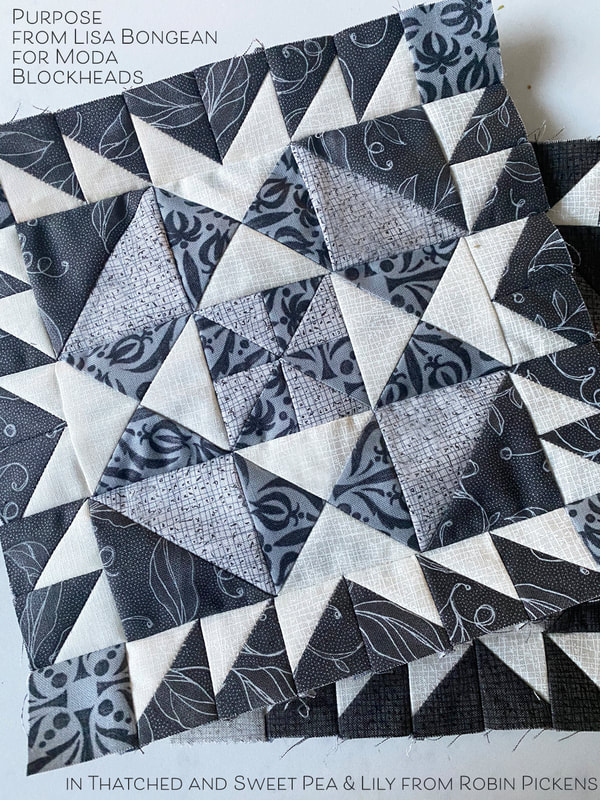 My print pattern block is using Sweet Pea & Lily grays. The Heather in Thatched is a cooler gray is works nicely with the stronger prints here. On the all-Thatched block, I am using slightly warmer grays. In both my blocks I have used triangle paper to make the half square triangles more efficient and reduce trimming time. 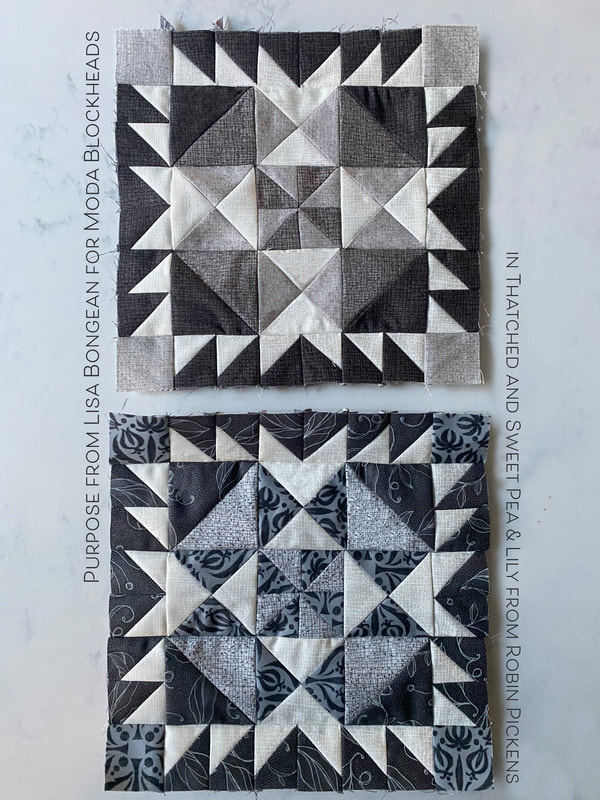 Enjoy this lovely block and happy sewing this week!
This is block 42 and we are 3/4 of the way through with this sewalong! Next week begins our last cycle of blocks from designers. This week it is Joanna Figueroa of Fig Tree and Company with her Starburst block. 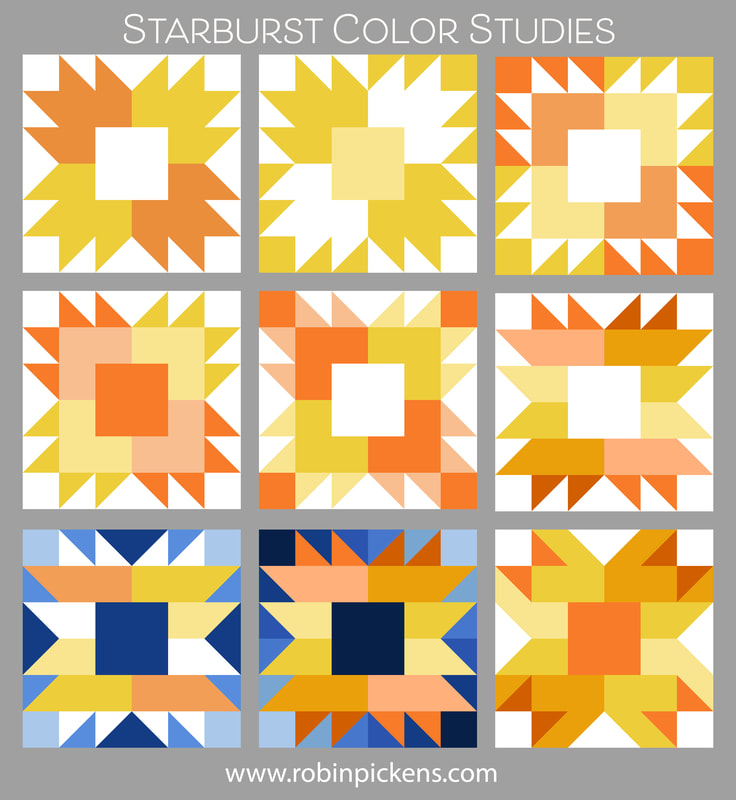 You can treat the quadrants in this block as one piece/color or make the half square triangles a different color. I have also played around with making my pieces that make up the big square pieces as rows of colors vs a single color. I like how it can look striped by trying doing that. The last one makes little bows in the corners! I am making all my blocks in the 8" size so I tried out some border options. Making a 1" border (finished) around the whole block makes it 8" and I also envisioned adding some of the same squares and half square triangles to bring those same elements out into the borders and creating additional shapes. 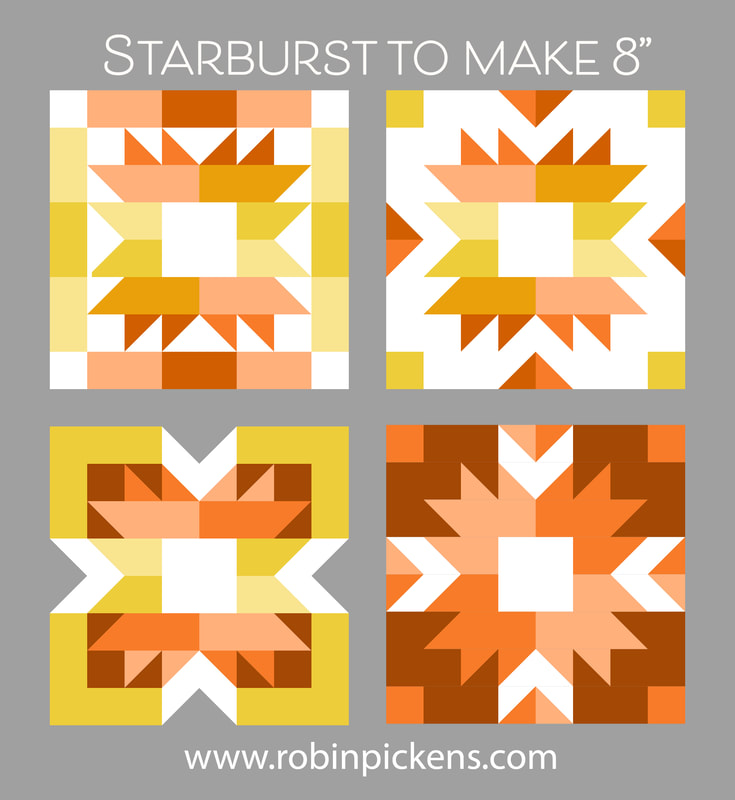 If you want to make the version with the HST in the center of the strip and squares in the corner, follow the same directions for making the half square triangles using the 2" squares. The other pieces are 1 1/2" square and 1 1/2 x 2 1/2" rectangles. 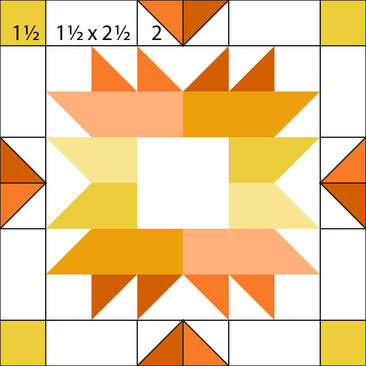 This week I decided to make my print block in SOLANA since it is shipping to shops now! I've used the little tractor and barn in the scenic print for my center with coordinate prints from this sunflower line. My outer border is using my happy, busy ladybugs and gold varietals corner squares. 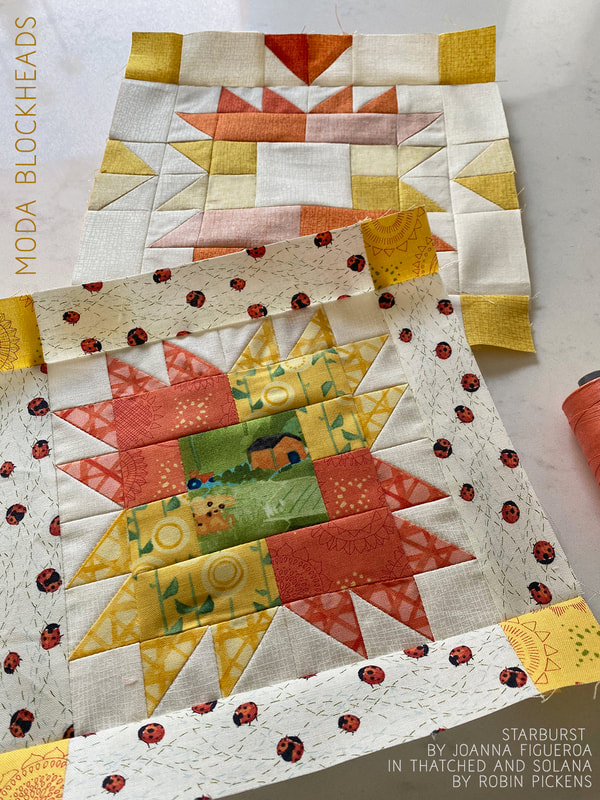 My all-Thatched uses yellow and orange on the front and flip sides to get those lighter shades. For being such happy summery colors, this still feels calming with those paler shades of the colors. 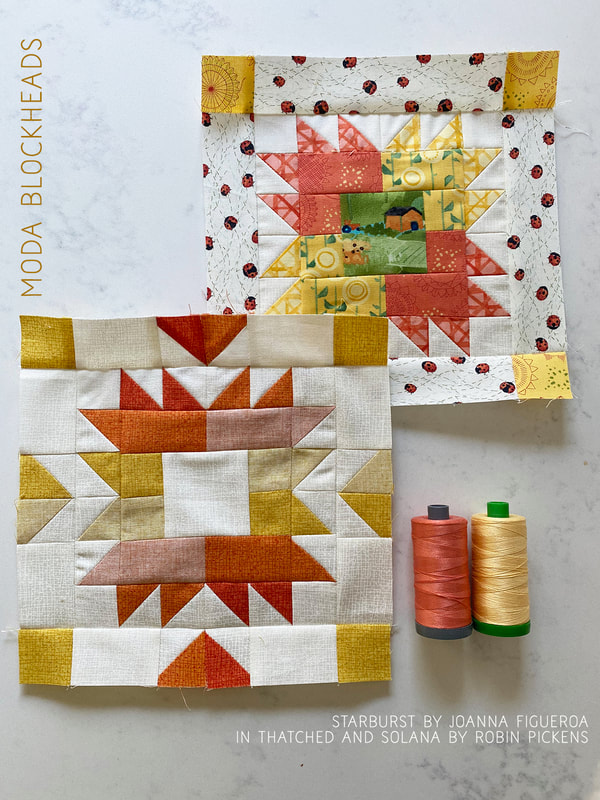 Enjoy this happy, bursting Starburst block and visit Joanna's blog for the pattern! 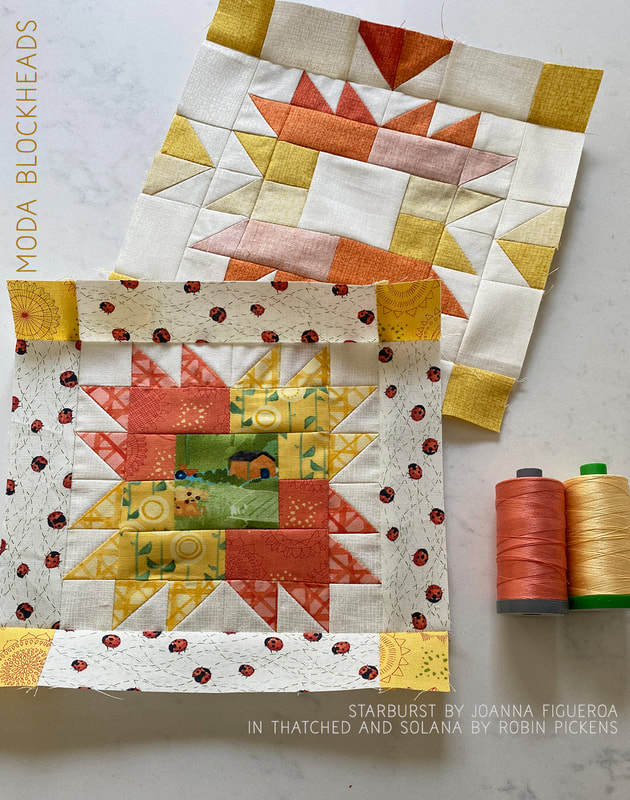 Get ready for round 4, our final round of patterns, starting next week. I think this week I am going to try to catch up on any blocks I've missed so far. Happy sewing!
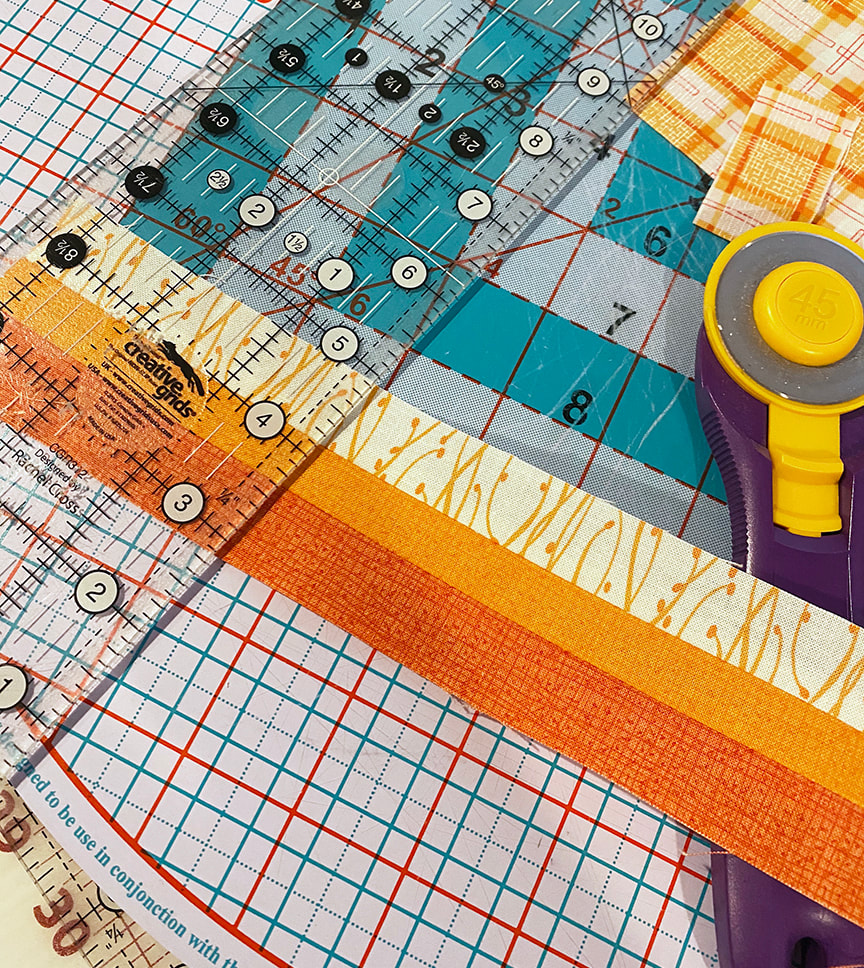
Robin Happy Moda Blockheads Wednesday! Well, its actually Tuesday night but I am going to post this early so I can go to bed!! On blockheads days, when it is my pattern, I stay up till crazy late night/morning hours to make sure my post goes up, etc. Tonight I'm trading that for sleep and you all can get this pattern a little early! Win-win! Read a little further down to get your link to the pattern (link in the gray bar). AND for sharing this week, it would make us all happy to see YOU with your block so snap a selfie for your posting! 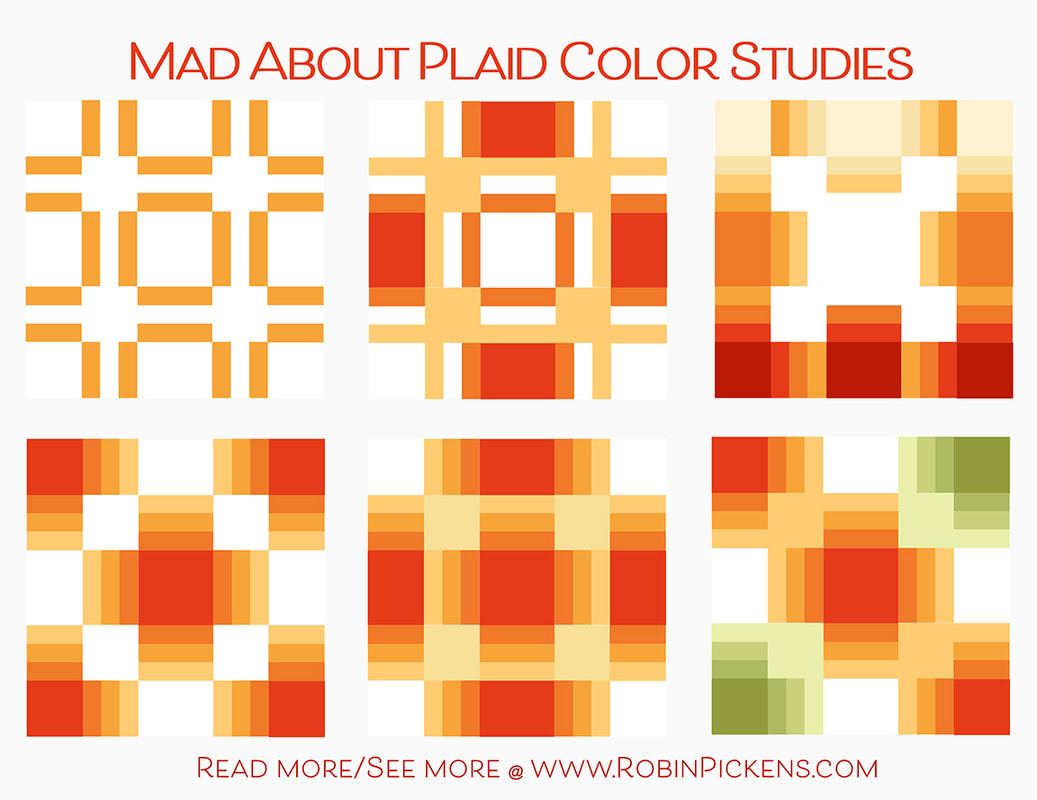 This block is called MAD ABOUT PLAID and explores some lines that intersect in solid squares, both horizontally and vertically, to make a plaid-like block. You can take it very straight forward and do simple rectangles and two color combo, or play with those stripes more for gradations and accents. I wanted to have a block with lines and some simplicity to balance out the more complex and intricate blocks in the sampler. When I design a collection of fabric, I have the focal print with big florals, but the line also needs small prints or some kind of stripe or plaid to balance out the group. You can see that simplicity doesn't mean boring since there are still plenty of options for interpretation. (Also can you believe you have two weeks in a row with NO half square triangles or flying geese??) My first block is clean and simple and just as much about the negative space as the colored bars. As soon as you enter color within the big rectangles it starts to change and have more depth. Play with gradation and lightness? Background color within the squares where the lines intersect can make that recede or come forward. The last one plays a little with different colors on the corners.  What if you wanted the colors of the rainbow? Carry a color all the way through the lines, horizontally and vertically to make it feel like continual stripes. Or, the middle and last one show the rainbow moving around the shape and being specific to the corners. I love how the colors look as accent to the black and gray version. 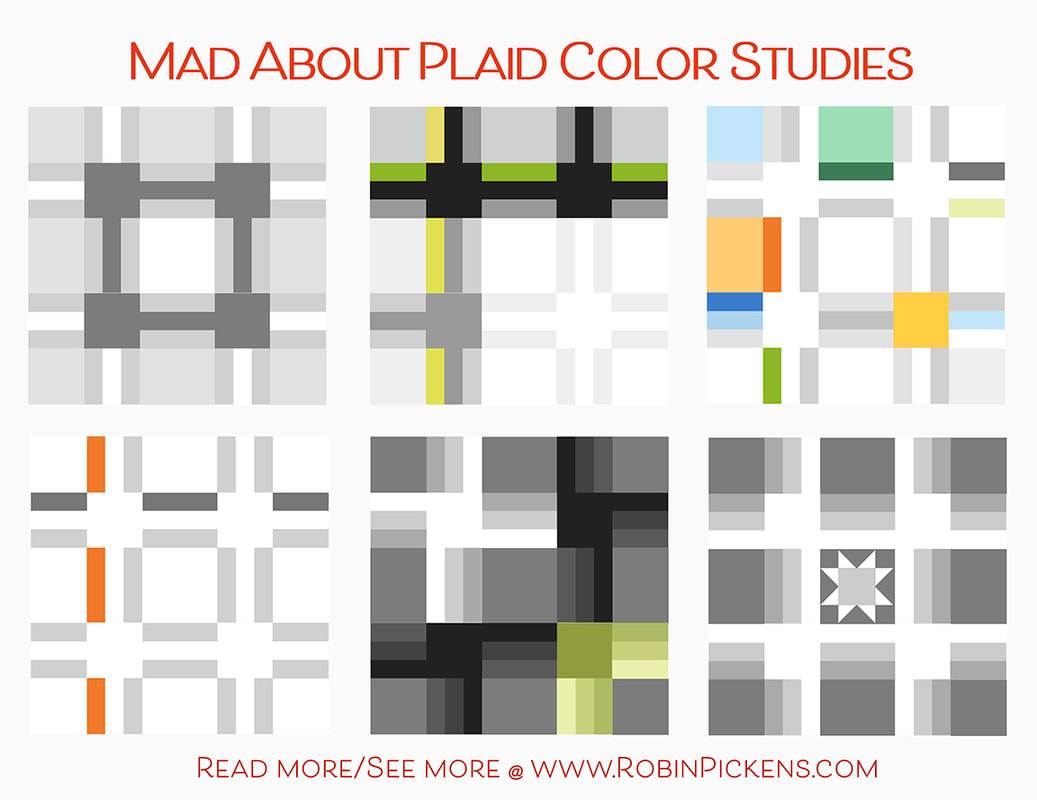 Focus on the center by just emphasizing the squares and one row of rectangles, making a central square. Or take a completely different and asymmetrical approach with more random placement or focus on a side or corner. I like how this can be a framework for more improv work. The last one shows that even if plaid is not your thing, you can still use this as a framework around a baby fancy block. If you make the 12" block, you would need to make a small 3" finished (3 1/2" unfinished block) for the center. That little 3" size is cute in the center! Okay, you made it this far so you can get the pattern!! I hope you will keep reading (and see me in my work-from-home no-makeup glory), but in the meantime, your pattern is here. Click this bar for the link to the pattern info: 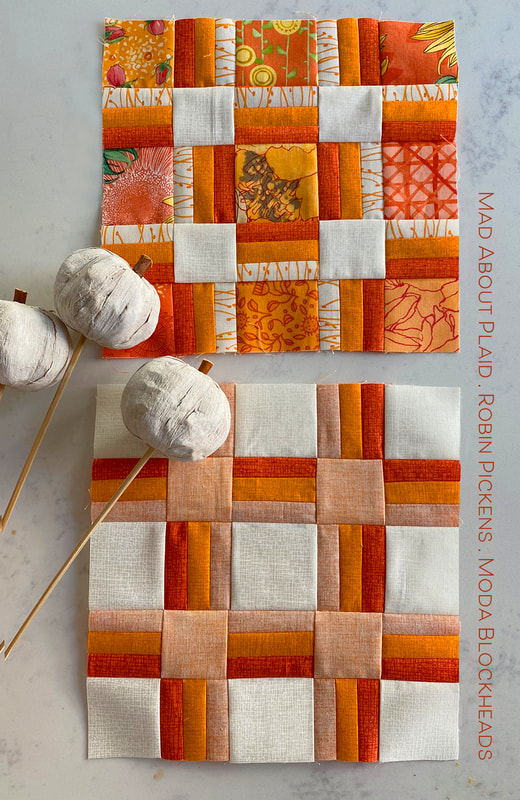 Want to know what I made this week for my actual blocks? It's October so I'm in that Halloween ORANGE mood. I made two 8" blocks- one all Thatched, one with a mix of prints- in the orange family. For my prints I used a mixture from Blushing Peonies, Solana (which should be shipping later this month!!) and Abby Rose. On the all -Thatched, I used Tangerine, Apricot and the backside of the orange from Solana. I love how soft an orange that is on the backside! And of course Thatched Cream. 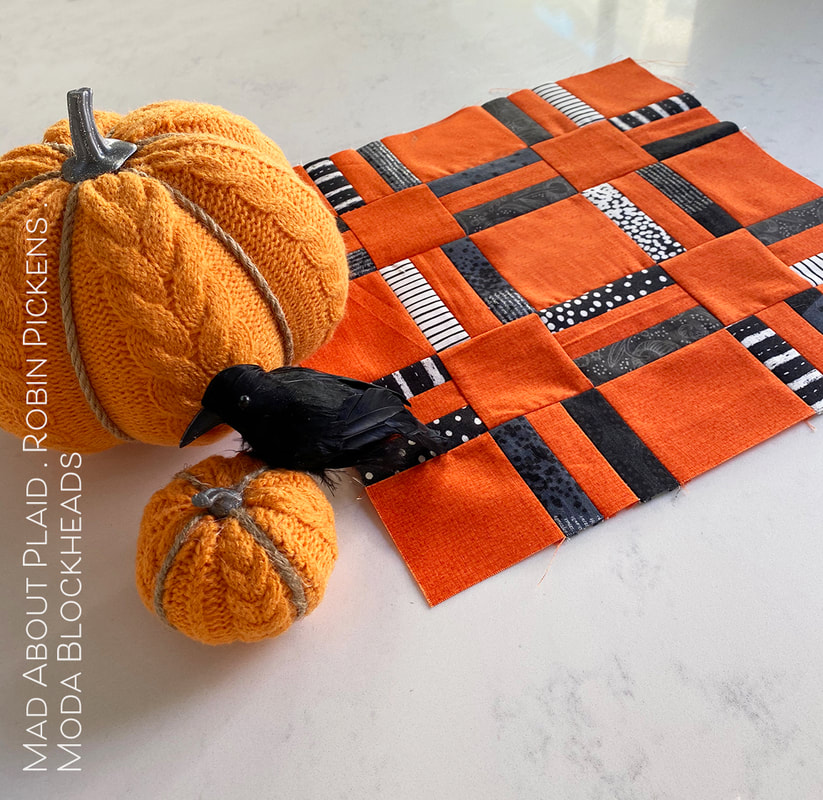 But it is Halloween this month and I've just been getting the fall decorations out with my daughter. So I also made a 12" in Tangerine and a fun scrappy mix of black and white fabrics for the bars. If I make this into a pillow cover I will either make more to make a set of 4 or add a border around it in another shade of orange. I could extend those lines out into the borders like I did on my FRINGE quilt, pictured below. That quilt was actually the inspiration and starting point for this block design. 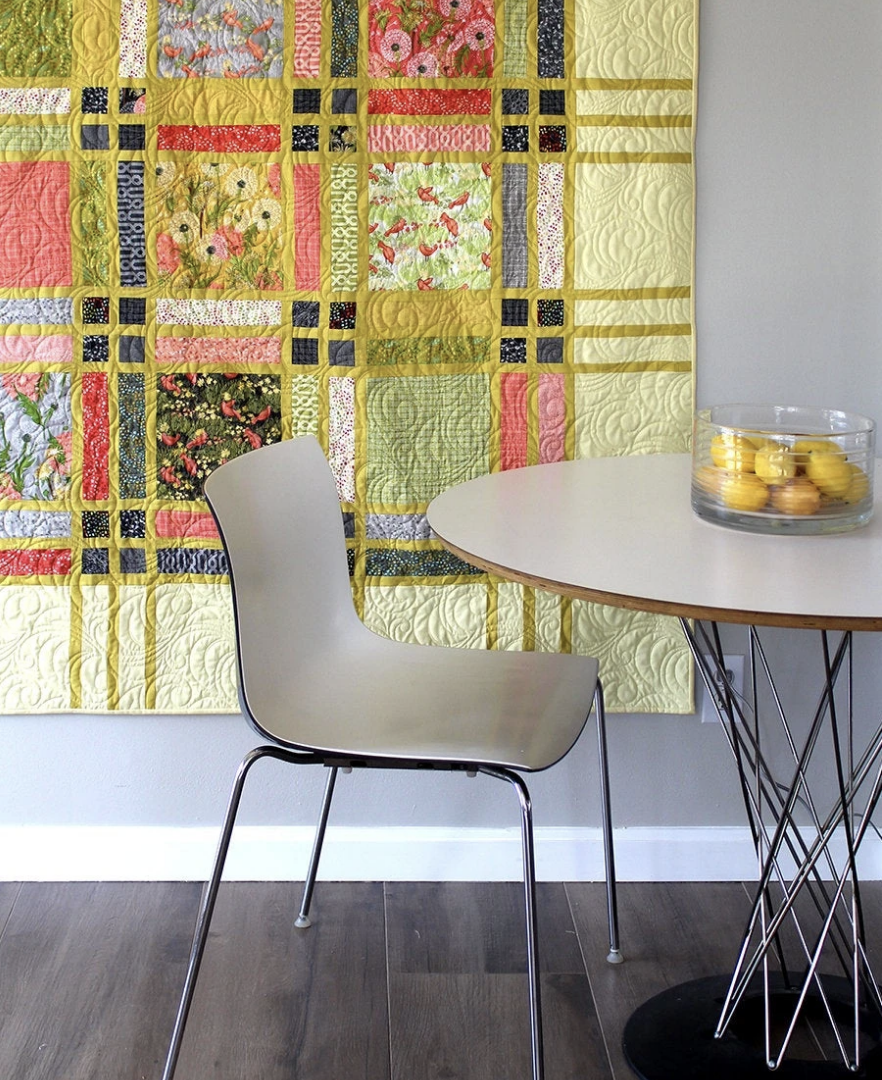 Are you feeling MAD ABOUT PLAID yet? I hope so and I can't wait to see what you come up with for this block. Oh, one more thing...those squares could be really fun for some cute novelty fabrics and fussy cutting! Think of little lines connecting intersections of cute prints or some little treasure in each square. 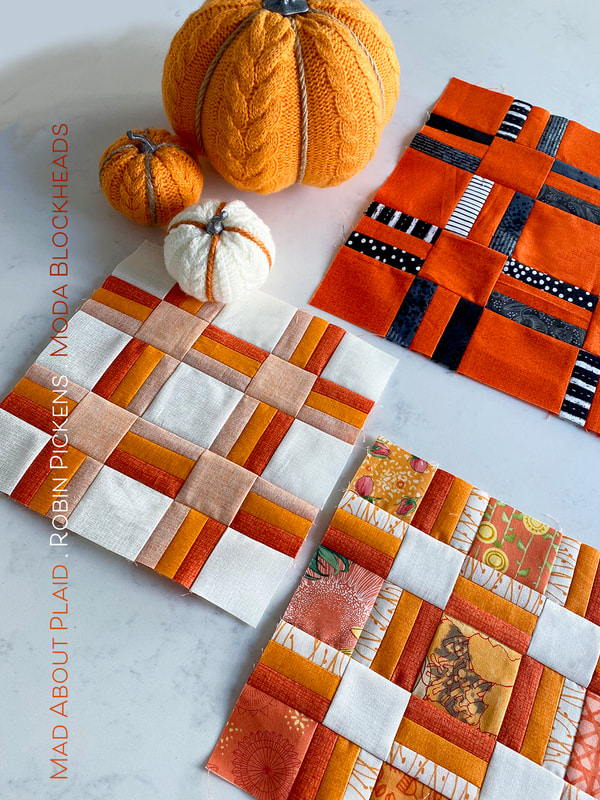 When I'm making a block with the lines/rows in the same fabric in multiple sections, I sew long rows of my strips then subcut them down to size for the smaller sections. This makes the construction go much faster! This week we thought it would be fun to see a little more of each other so it would be lovely if you felt like taking a picture with your block. We love to see a face with the maker and get to know you a little more. So snap a selfie or see if your cat or dog is talented enough to take a photo of you (they are probably thinking 'leave me alone but scratch my belly first'). Let's see your smiling faces! 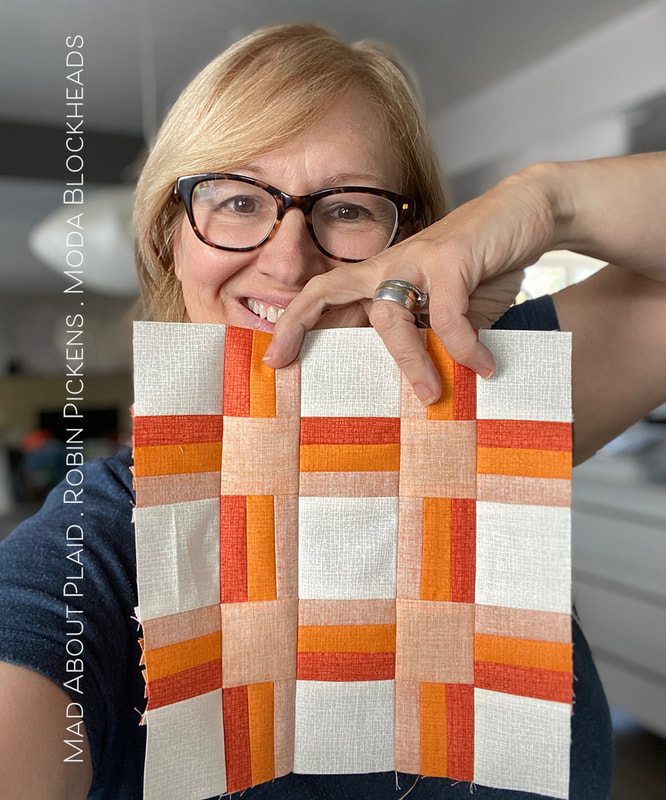 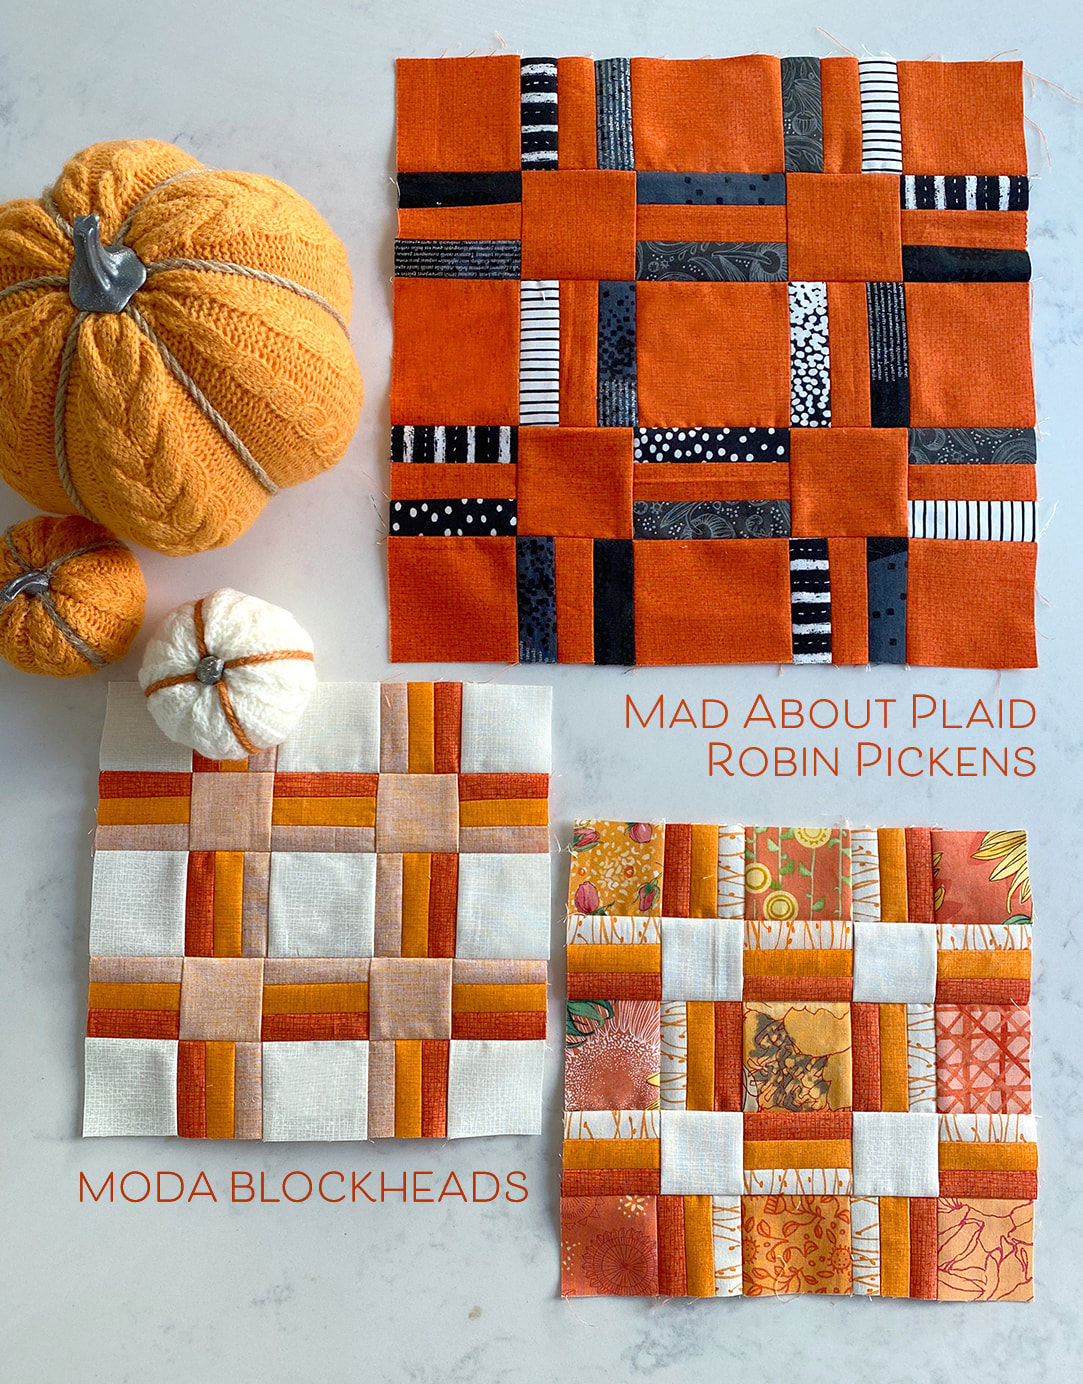 All this orange is putting me in a fall mood and I'm ready for a pumpkin latte! Happy sewing everyone! 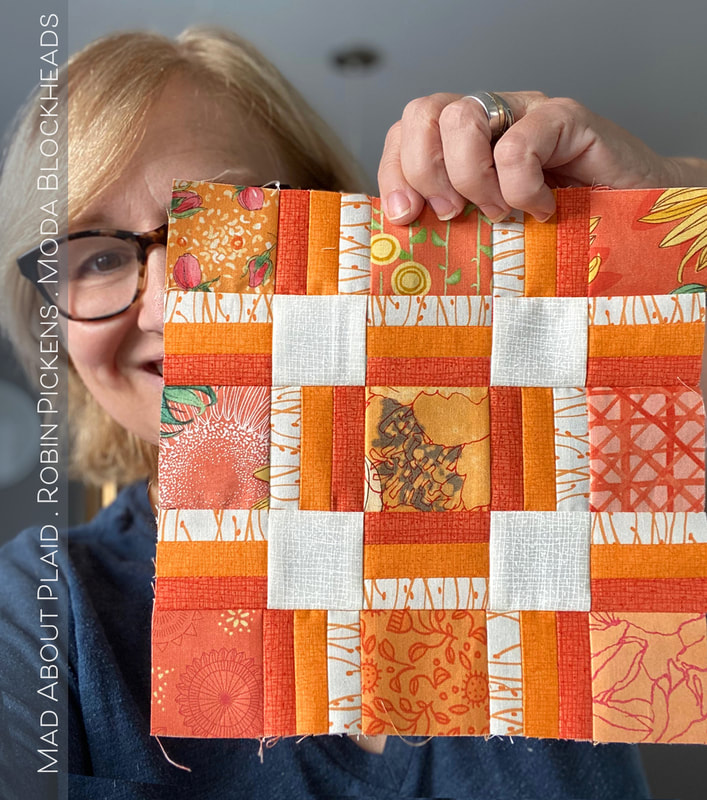 Visit my fellow Moda designers for more Blockheads fun:
Corey Yoder - https://corianderquilts.com/ Sherri McConnell - https://www.aquiltinglife.com/ Betsy Chutchian - http://betsysbestquiltsandmore.blogspot.com/ Jan Patek - http://janpatek.blogspot.com/ Brigitte Heitland - https://www.brigitteheitland.de/blog Lisa Bongean - https://lisabongean.com/ Lissa Alexander - http://modalissa.com/ Laurie Simpson - http://minickandsimpson.blogspot.com/ Vanessa Goertzen - https://lellaboutique.blogspot.com/ Stacy Iest Hsu - https://www.stacyiesthsu.com/blog/ (next week is Janet Clare!) Janet Clare - http://janetclare.co.uk/blog/ Jen Kingwell - www.jenkingwelldesigns.com/blog Joanna Figueroa - https://blog.figtreeandcompany.com/ 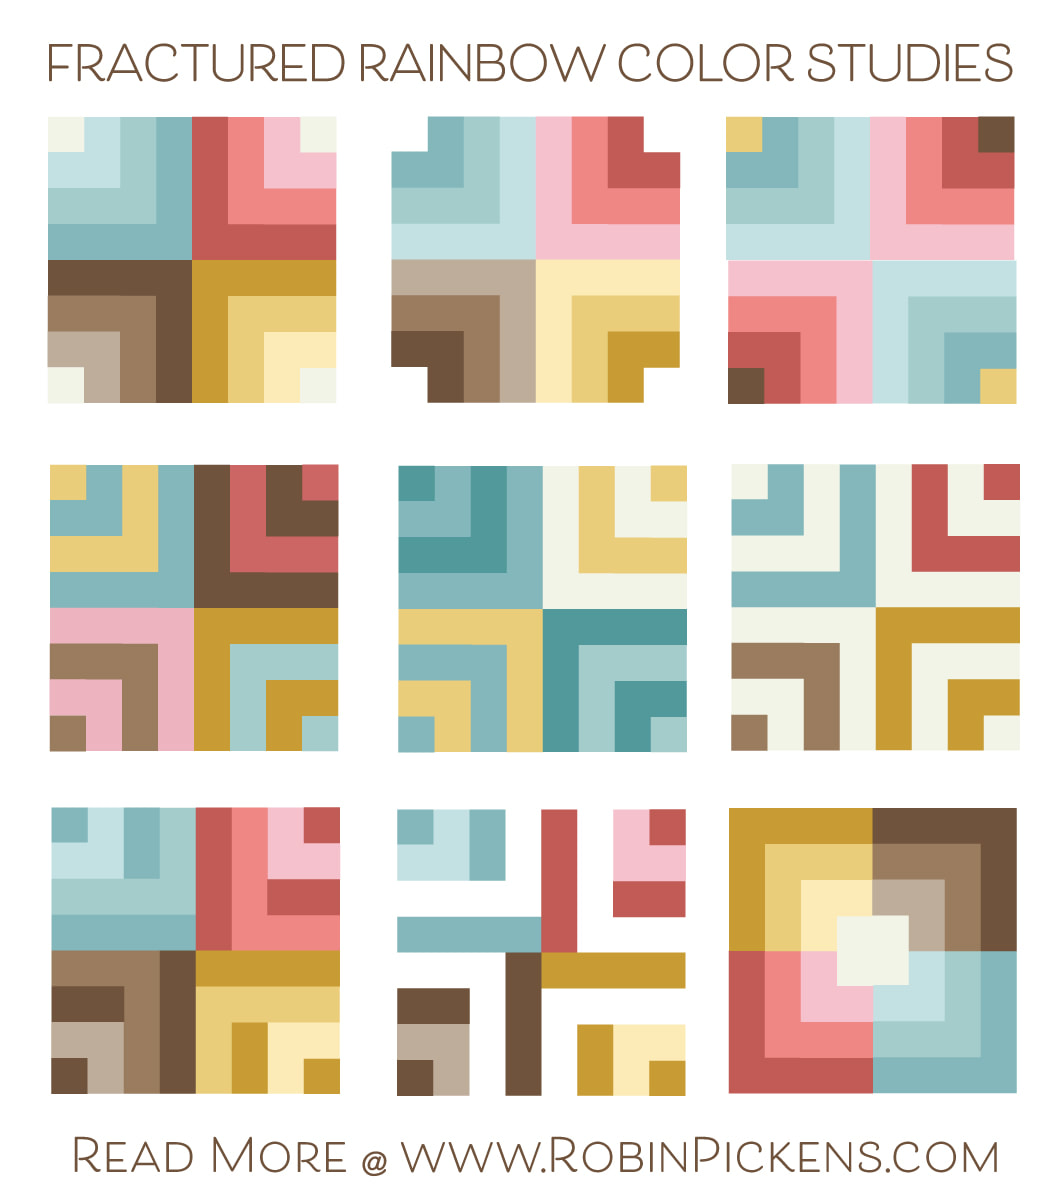 Stacy Iest Hsu said this block was inspired by her love for the log cabin block and that the first quilt she made was a log cabin quilt. This makes me smile since my mother loves log cabin blocks and she too made her first quilt using a log cabin design. It was a quilt that was in yellow and green and was for me! I still have it. Who knew that years later, she would still be loving the process of making quilts and that I would be immersed in this world as well. Thank you log cabin blocks!
I've started this week's color study with Stacy's version and in the colors she showed on her instructions. I thought it was a lovely palette! If her block radiated darker colors from the center going outwards, what if I flipped that to light on the inside? And maybe light little corners to make those edges fall away? Or just two color families with a little extra color pop in 2 corners? On the next row it is all about stripes and color on color or color stripes with cream. The bottom looks at changing up the color darkness with a dark single piece offsetting the "L" shape, almost creating more of a pinwheel center. For the very last image I switched up the placement of the blocks. Each week I stay within the exact placement of the pieces with this exception...I just could not resist how rotating the corners of the block quadrants made it looked like shades of boxes within boxes (so a little cheat!). Have fun sewing and if you need the pattern, hop on over to Stacy's blog for the download. I'm busy sewing with a new fabric collection that I'll be showing very soon! Hopefully I'll catch up on Blockheads soon but for now I am excitedly sewing away at a rather frantic pace to make some videos for Fabric Forecast. Oh, and stay tuned because next week is one of my blocks for Moda Blockheads! 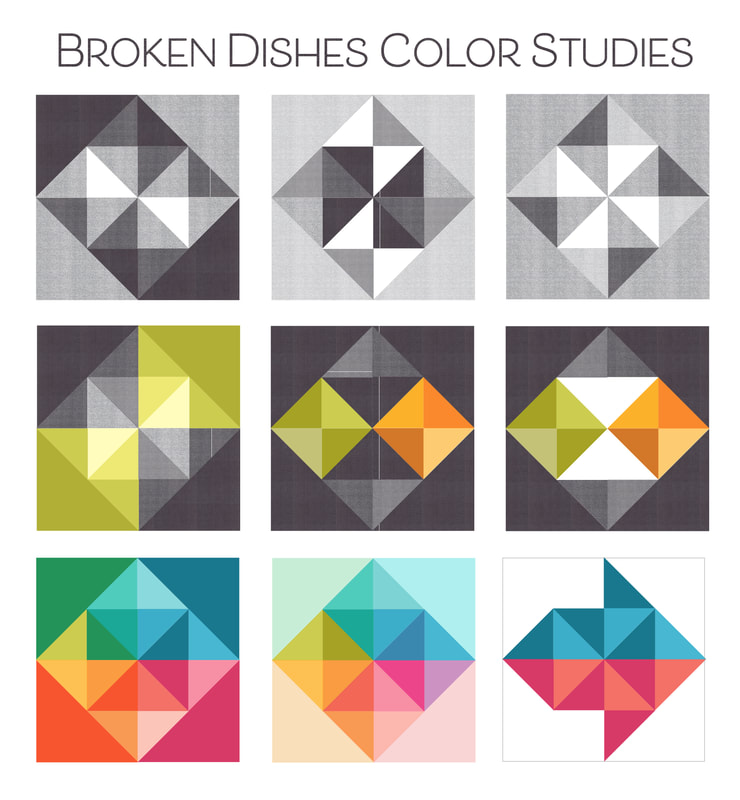 Happy Moda Blockheads day!! Time for a few color studies of Laurie Simpson's Broken Dishes block. Started out with simple black and white and shades of gray with dark corners to make an diagonal direction. Then pinwheels and more playing with introducing color to give the feeling of color transparency (can you imagine a transparent film of color over the corners on number 4?). You can play up the diamonds within a bigger diamond or emphasize the middle band as a horizontal pointed shape. In the last row I tried more of a spectrum of colors and love how the very last one becomes an arrow by using the background color to make a couple triangles disappear! I've been working on 8" blocks for this project and this week I was busy on another project with smaller blocks. I forgot I was doing the 8" for this and ended up making a 4" one! I'm debating adding a border or remaking it and I'll post the blocks after I do my scrappy one too.  Did you know it's National Sew A Jelly Roll Day on Saturday?! September 19th get your rolls ready for a day of sewing those long strippy beauties. A couple of my jelly roll patterns that I wanted to share are Definite Plus and Showering Stars. Both quilts can be made large with Jelly Rolls or smaller with Honey Buns. I recently made Definite Plus in Abby Rose and I'm hoping I can get to longarming it on Saturday. That's still working with Jelly Rolls, right? Equalizer is another pattern that works with Layer Cakes or a Jelly Roll and has a clean modern look. Pair your prints with some solids to create that gradated look to lighter color to create the feeling of movement. Whatever you pick for your project for the day, I hope you have fun sewing! 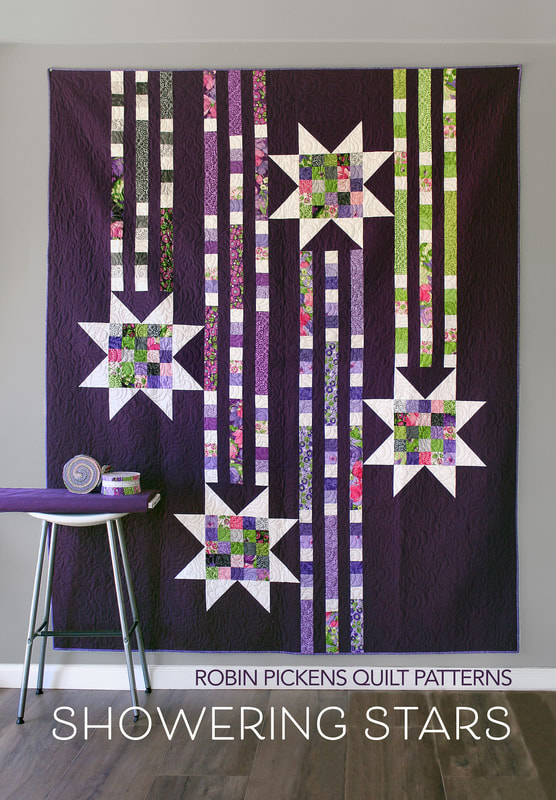 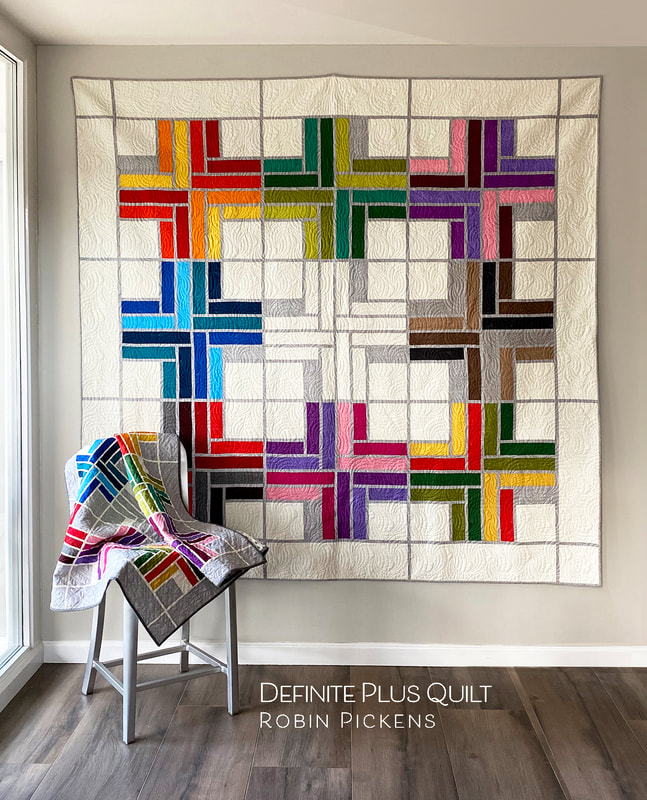 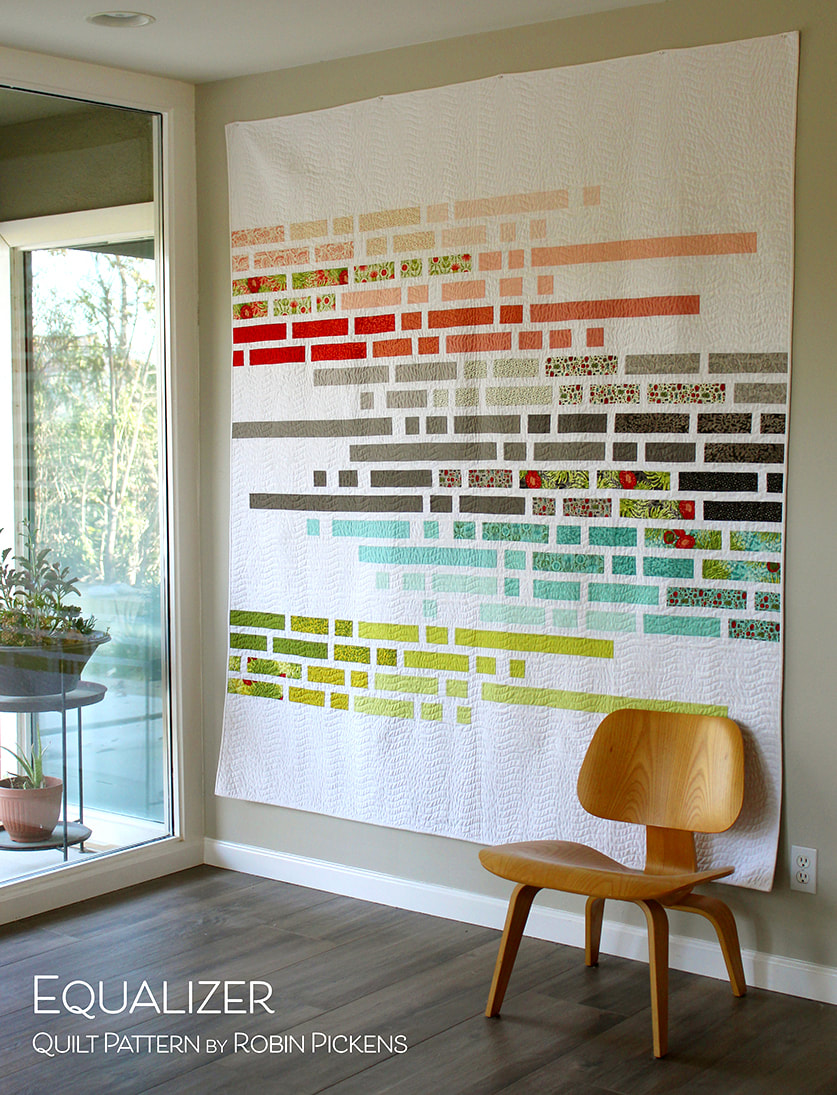 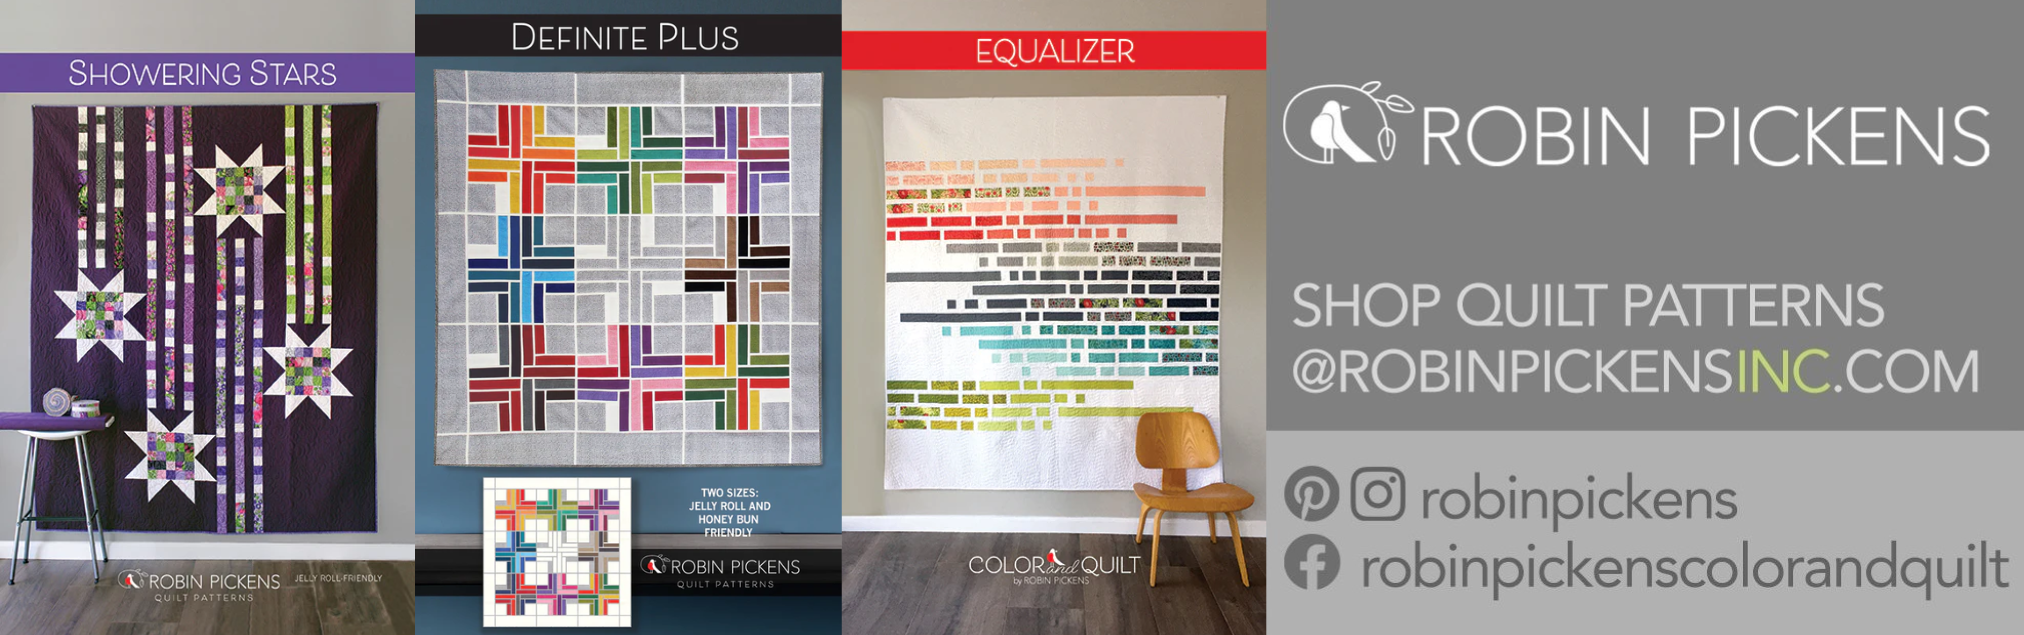 |

About ROBINDesigner of colorful florals for Moda fabrics. Modern to transitional quilt designer. Illustrator, sewist, crafter. I am proud to be a designer for Moda Fabrics!


Shop Robin's Designs
 I am an affiliate for Fat Quarter Shop and may earn a small commission through my links. Thank you for your support!

Check the March 6, 2017 Episode!
Categories
All
Archives
November 2023
© Robin Pickens Inc. All rights reserved. No images may be reproduced without permission.
|

 RSS Feed

