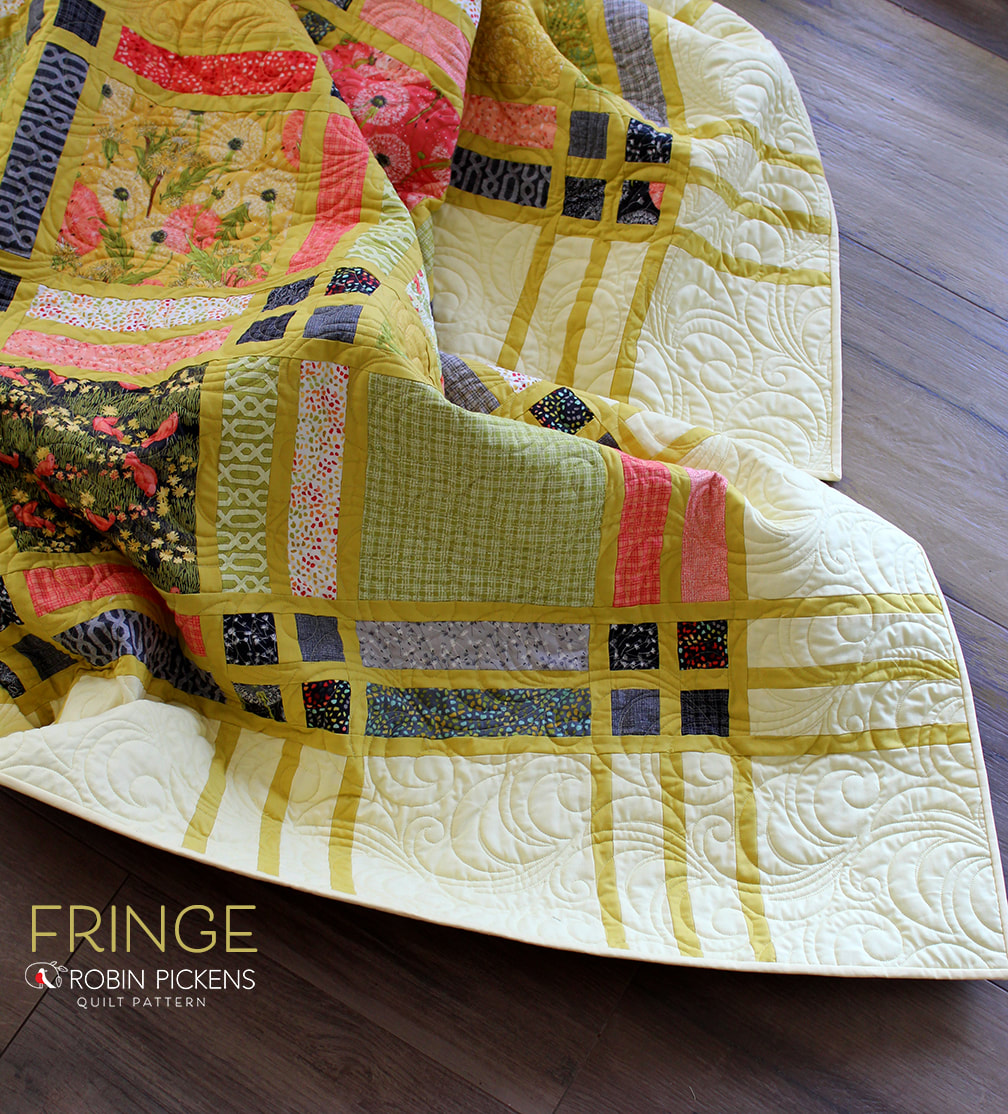
 I remember having a knit poncho growing up with colorful fringe hanging from the bottom edges. I loved the sway and free feeling of the long strands of yarn. I wanted to capture that idea of fringe- of fibers extending off beyond the edges- in my new quilt pattern "FRINGE." 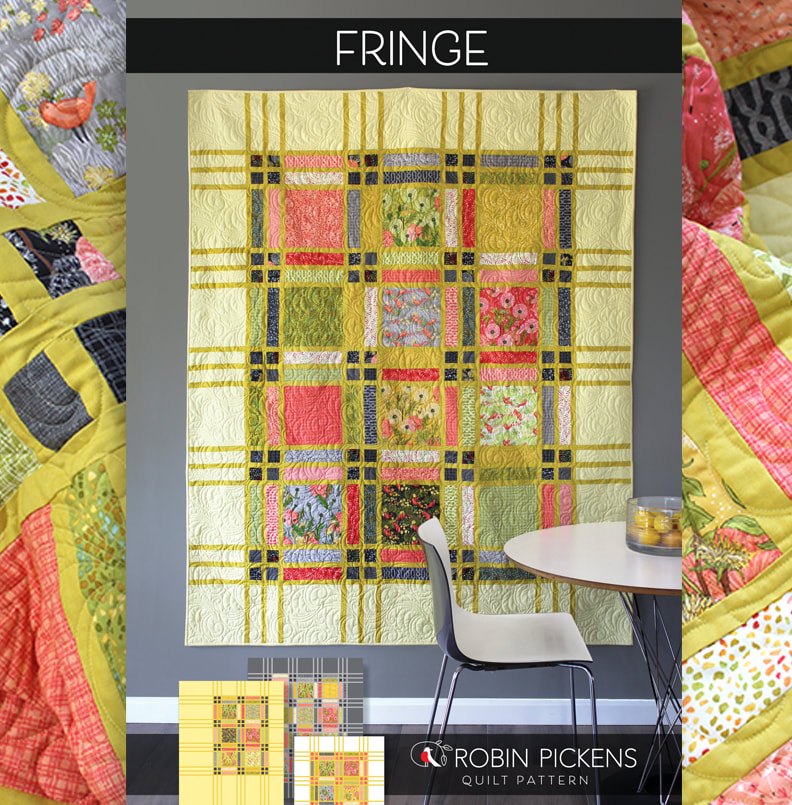 FRINGE is a Layer Cake friendly quilt pattern (but yes, you could use yardage instead of precuts). The quilt design "frames" big squares with small squares and lines in a grid structure that is easily scaled up or down to make different sizes. The pattern is written to a Twin or Lap/Wall size but could work as well on a Queen or King bed by adding more columns of blocks. 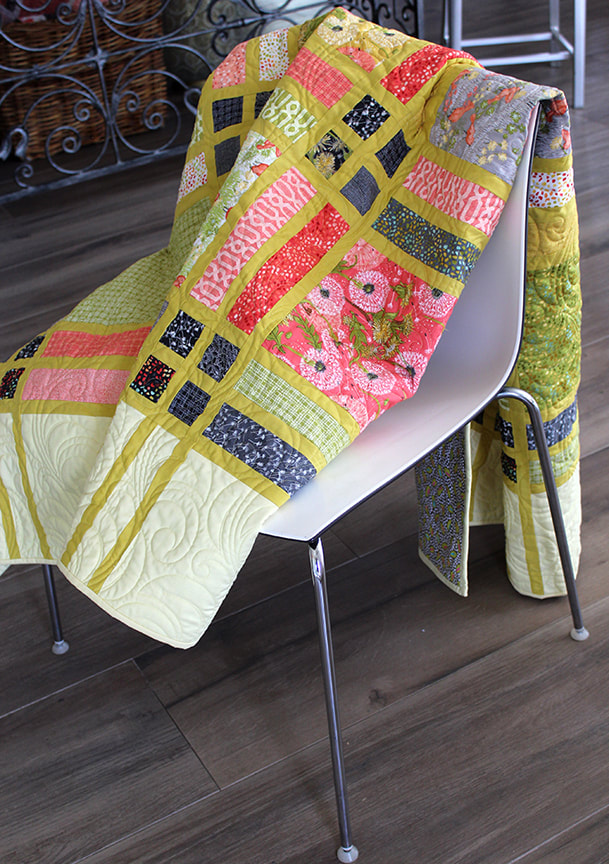 I like designing big florals so I also like having some quilts that can showcase larger blocks to show them off! Fringe gives you great squares for doing just that. I decided to use mostly dark charcoal fabrics in the small corner squares to make those pop nicely and be a cohesive color story. 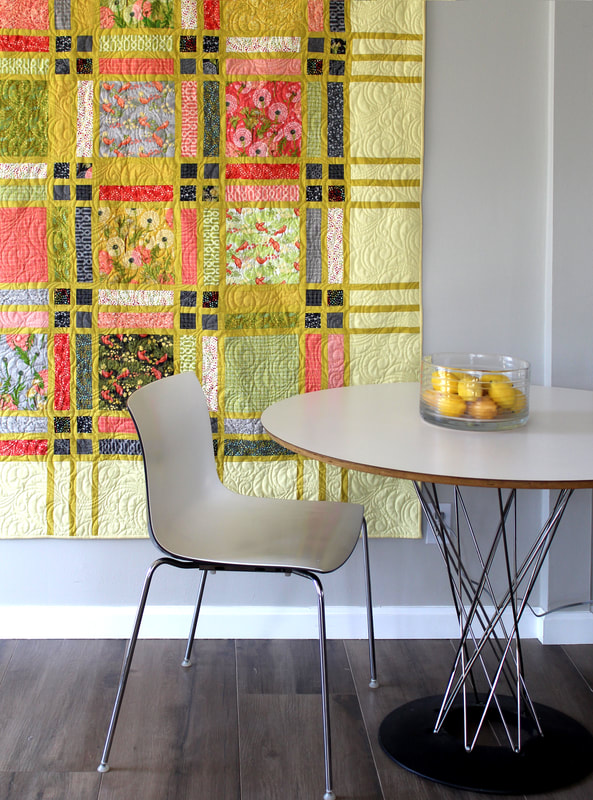 I wanted to combine yellows with my Dandi Annie fabric collection to emphasize the warmth of the fabrics. I love how the quilt looks so sunny and happy! I've used Moda's Bella Solids Baby Yellow 31 and Maize 273. Maize is one of my new favorite colors to work with! 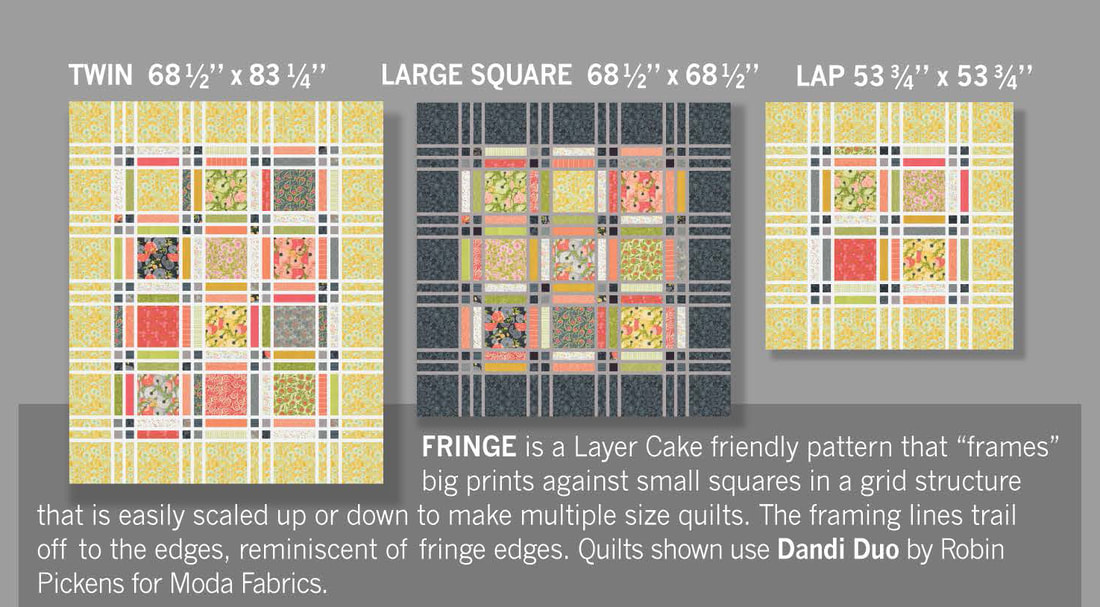 There is an alternate twin quilt with the pattern where the "fringe" is longer. I wanted to play with an asymmetrical layout to emphasize the fringe borders and give them even more length and space. The larger borders would be a great place to do some custom quilting sewing. 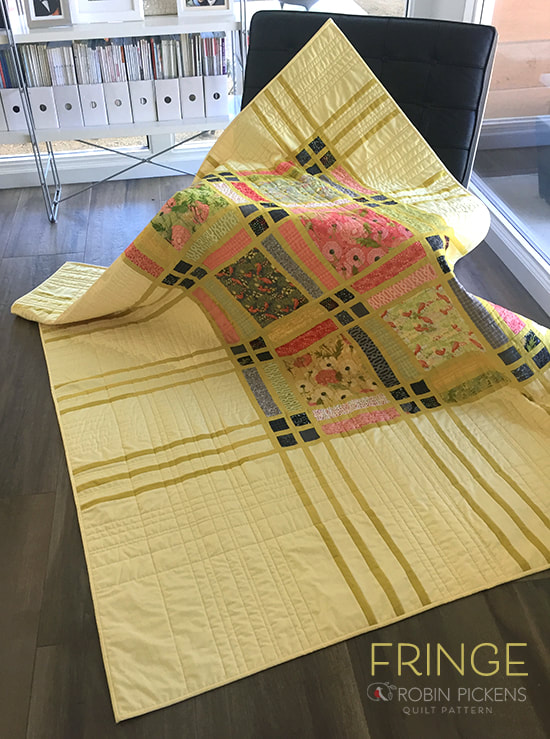 Sally Corona from Corona Quiltworks did my longarm quilting and for the asymmetrical alternate twin we opted for straight line quilting to mimic the direction of the fringe. The regular twin uses a wonderful swirling design to create a different type of texture and feel. I like to see the contrast of styles and how the longarm quilting designs impact the look of the quilt.  Fringe printed patterns are shipping with Dandi Annie fabric to quilt shops in November and I hope you will check with your local shops for it. You can also find it at my store, along with other new patterns that launched with Dandi Annie - Positively Bohemian, Farmhouse Crossing, and Towards the Sun. 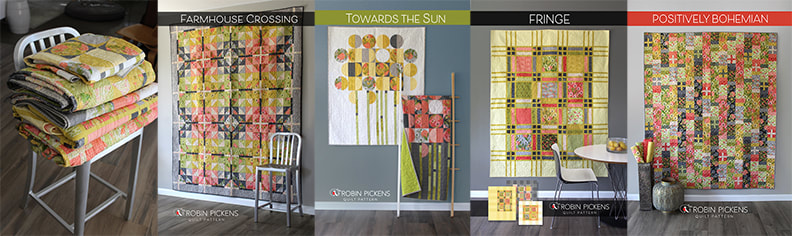
4 Comments
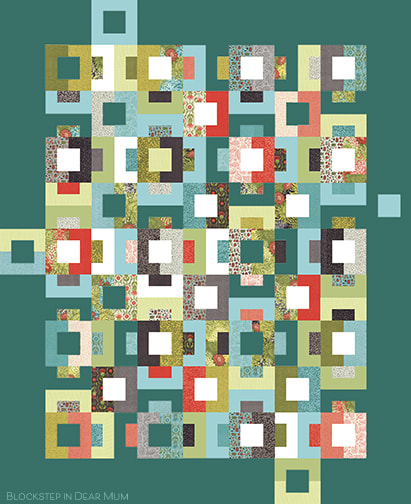
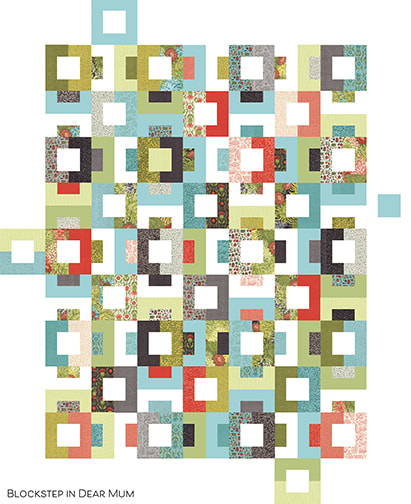
 Its coming folks! September 15th, 2018. So get your Jelly Rolls ready! I have been mulling over what I am going to make this year and I think a little computer planning and designing is in order. Last year I used my Sliding Shoji Screen pattern which uses solid Bella Jelly Rolls to divide the blocks but I flipped it so the Jelly Roll of Blushing Peonies became the strips and I used solid pink, eggshell, and the Ikat print from Amy Ellis' Serenity collection as the large panels. I loved the result! In honor of the new National Sew a Jelly Roll day coming up I wanted to share the most recent pictures of last year's project. When I got the quilt back from my longarm quilter, Sally Corona of Corona Quiltworks I loved it even more! The quilting design has a great retro mid century modern feel and lovely flow. When it is on the wall in the foyer it lightens up the space with a calm pretty feel without being overly girly. I recently got this new lamp and I'm liking the feel of these together. Now off to start planning for September 15th... 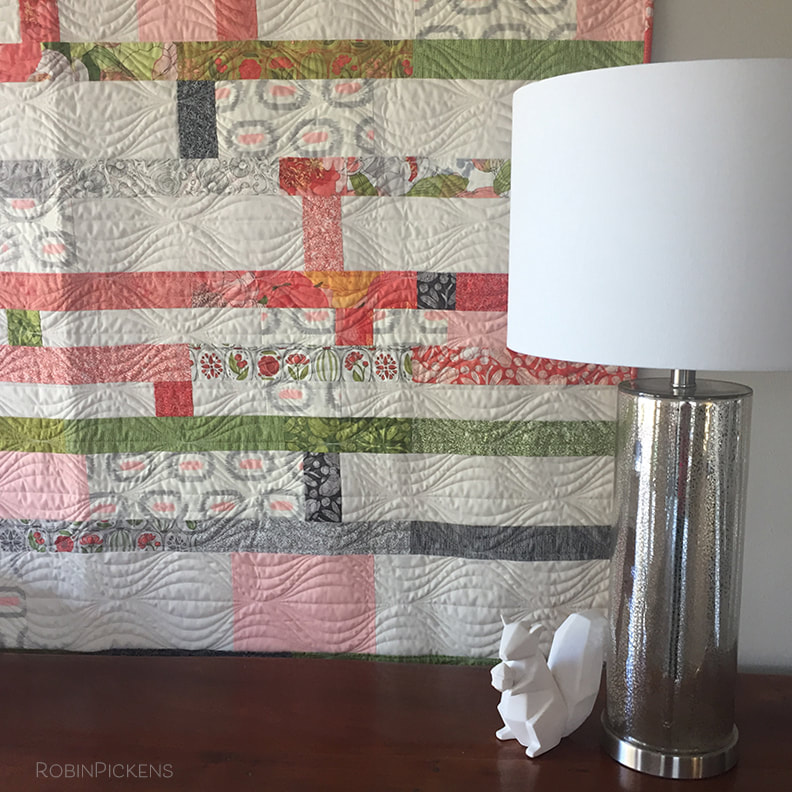 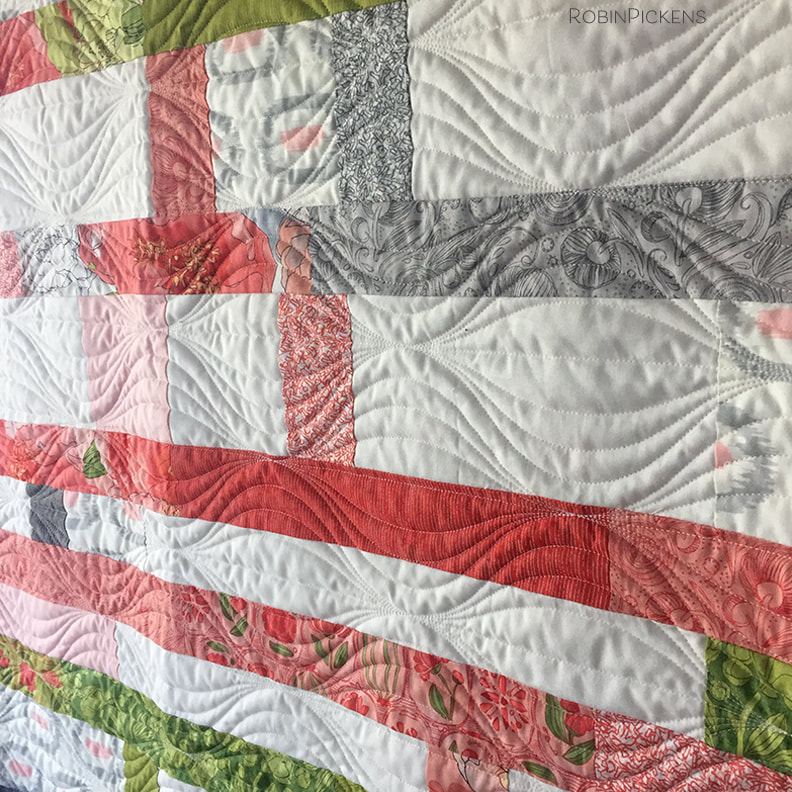 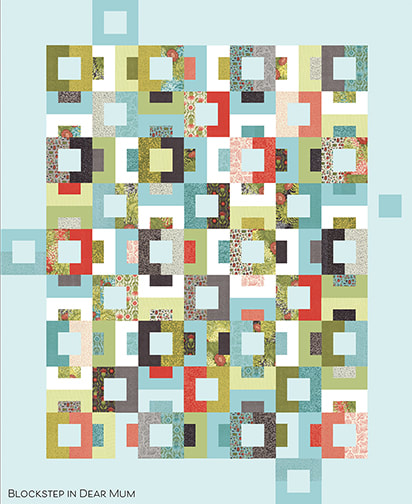 Blues, teals, robin's egg blue. Having fun trying out my Blockstep pattern in Dear Mum fabrics.
I enjoy looking at the difference in light vs dark backgrounds. The feeling changes completely when the fabrics are against a darker teal vs white. Happy color-play! PATTERN UPDATE: You can find the new and improved BLOCKSTEP at my shop at www.robinpickensinc.com.  How did I not share this earlier? I was probably writing patterns and sewing and finishing calendars. But its never too late, right? This is the overview of the quilts I launched to go with my Dear Mum collection for Moda Fabrics at the Fall 2017 Quilt Market. And Dear Mum is in shops now!! 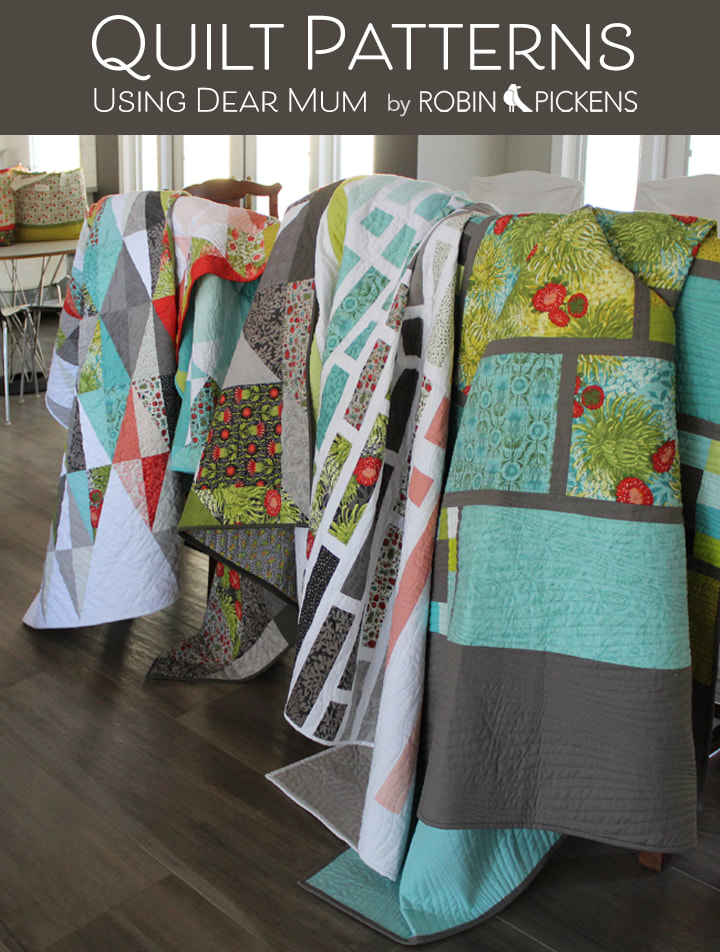 Left to right is Harlequin, Starlet, Equalizer and a refresh of Tokyo Terrace in Dear Mum. I thoroughly enjoyed working with the Robin's Egg blue/aqua color in this group and the Tokyo Terrace re-fresh was an idea I had rambling around in my head. It was a last minute decision to add that one in (because there is not enough sewing to do before market!) and I'm so glad I did. I wanted to use that lovely Bella Solid Dovetail with the mums and I love the warmth of that gray. 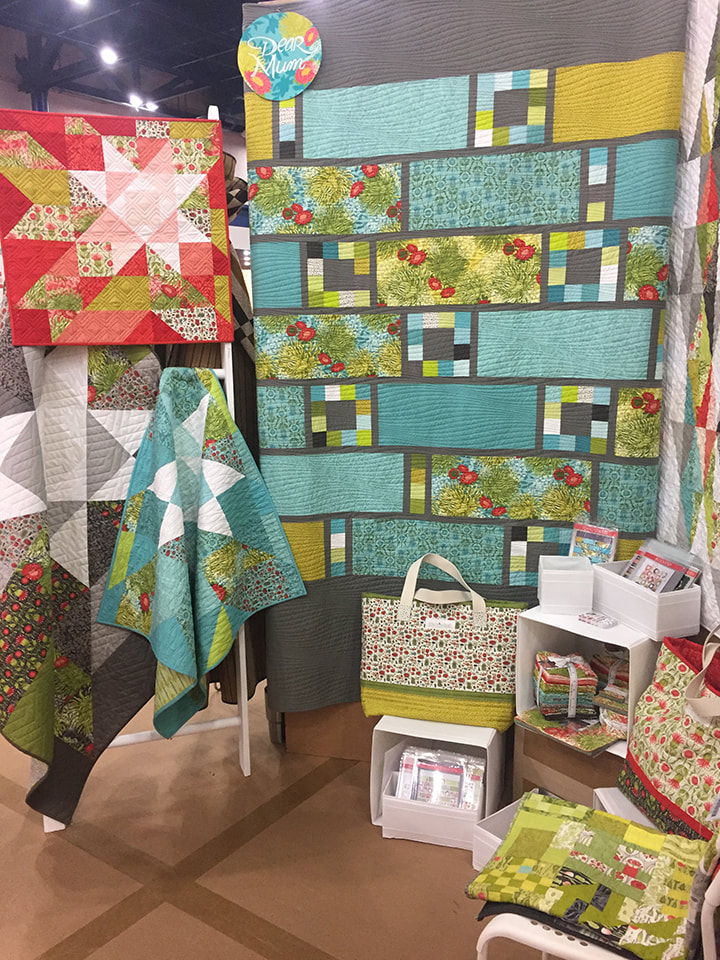 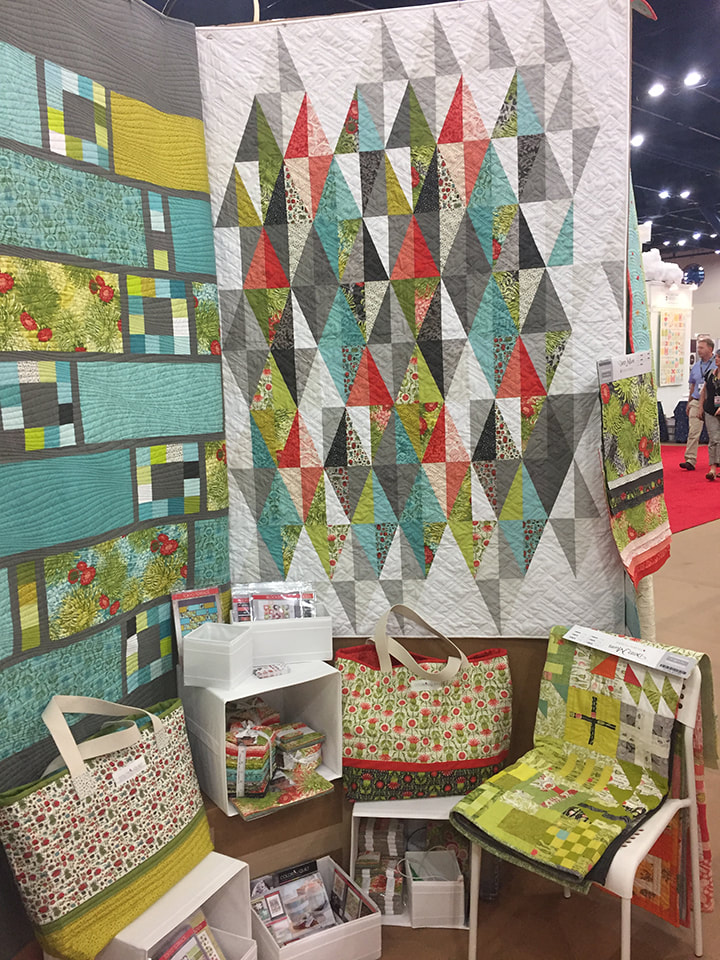 Here's my booth with the quilts I designed and the totes I made using Amy Sinabaldi's Riverside tote pattern. The quilt on the chair is from Tula Pink's 100 Modern Blocks book and I used my previous lines on it. Equalizer got to hang up in the sales area! 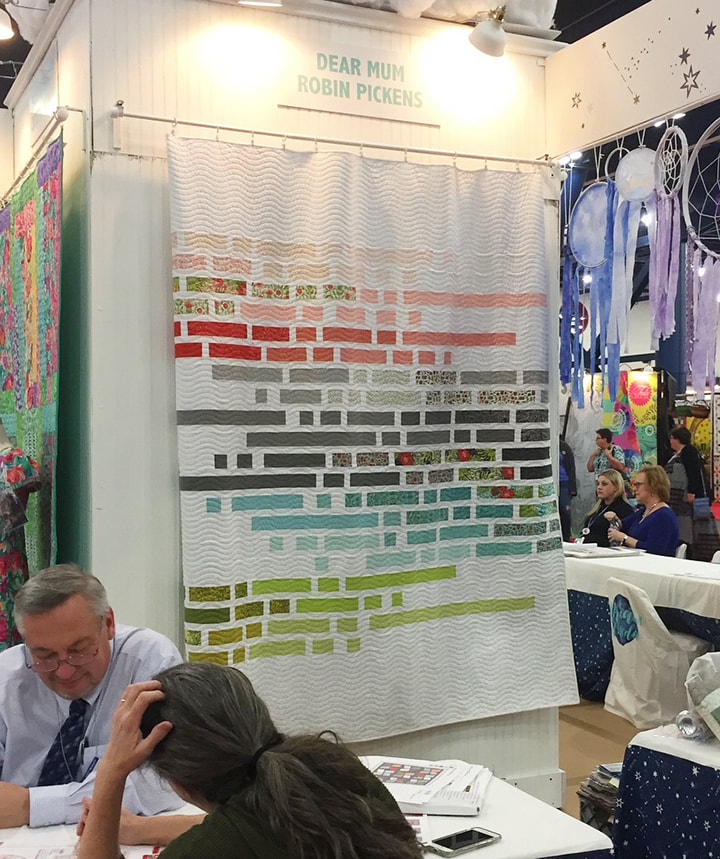 The beautiful applique quilt is by Barb Cherniwchan of Coach House Designs. She makes stunning quilts and kits. 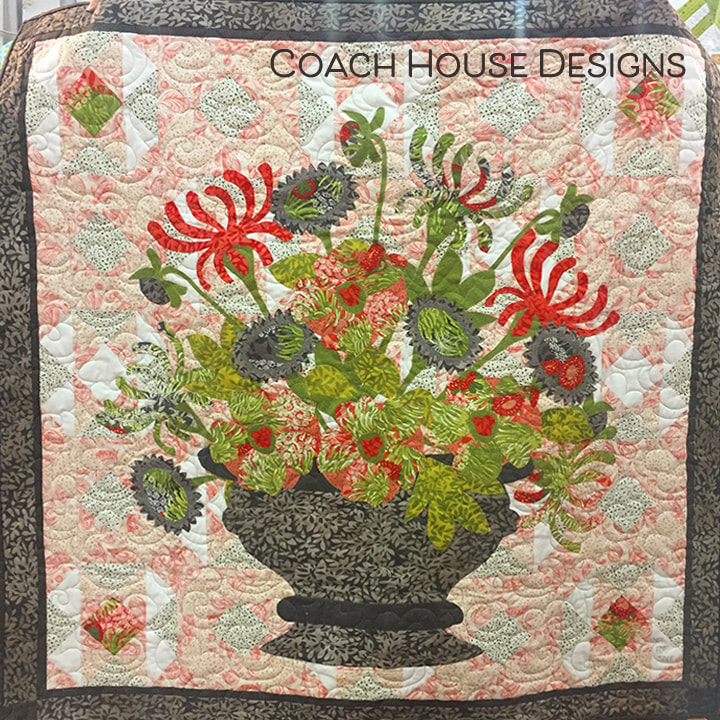 A fun moment for me was meeting Tula Pink and taking this picture with her with my version of her City Sampler quilt using the 100 Modern Blocks book she made. I'm using all Poppy Mae and Blushing Peonies on this, mixed with solids. 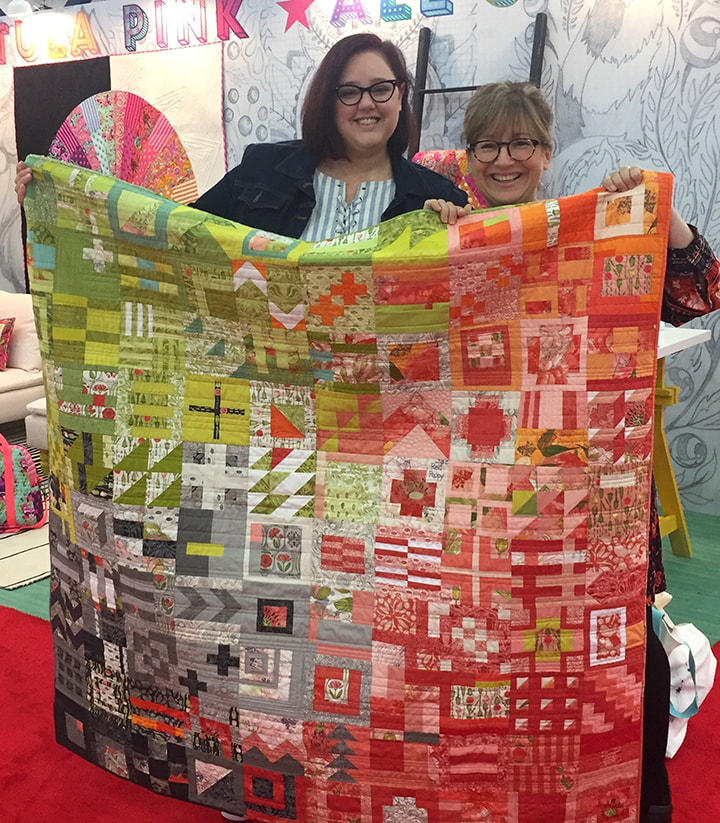 And on the last day a bit of fun playing on the APQS Millie longarm! Drawing on fabric- oh yes! Market is wonderful for seeing new things and lots of inspiration. 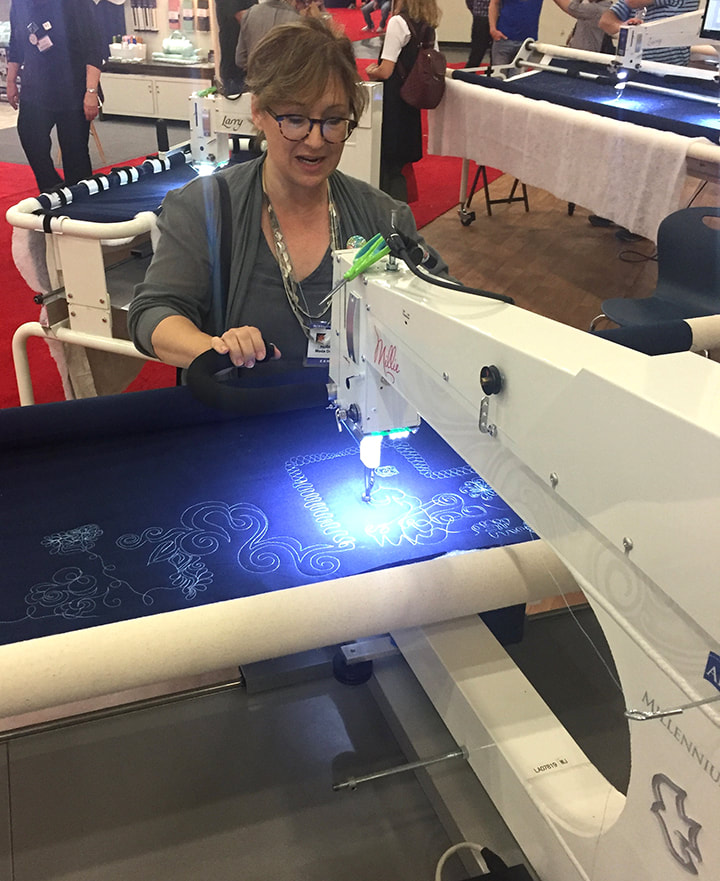  I'm deep in designing some new quilt patterns to go with my new line I'll be showing at the spring Quilt Market, but those have to stay secret for now! However, I thought it could be fun to share a little of what goes into the process of making a quilt pattern! I'm really not showing the part of making the actual quilts because you all know what it's like to make a quilt. This is the other part. I work on the computer first for my designing. Yup, nothing gets cut till I've thought it out. I use Electric Quilt 8 and Adobe Illustrator. I have used Illustrator for many years so I have the most comfort with that software. 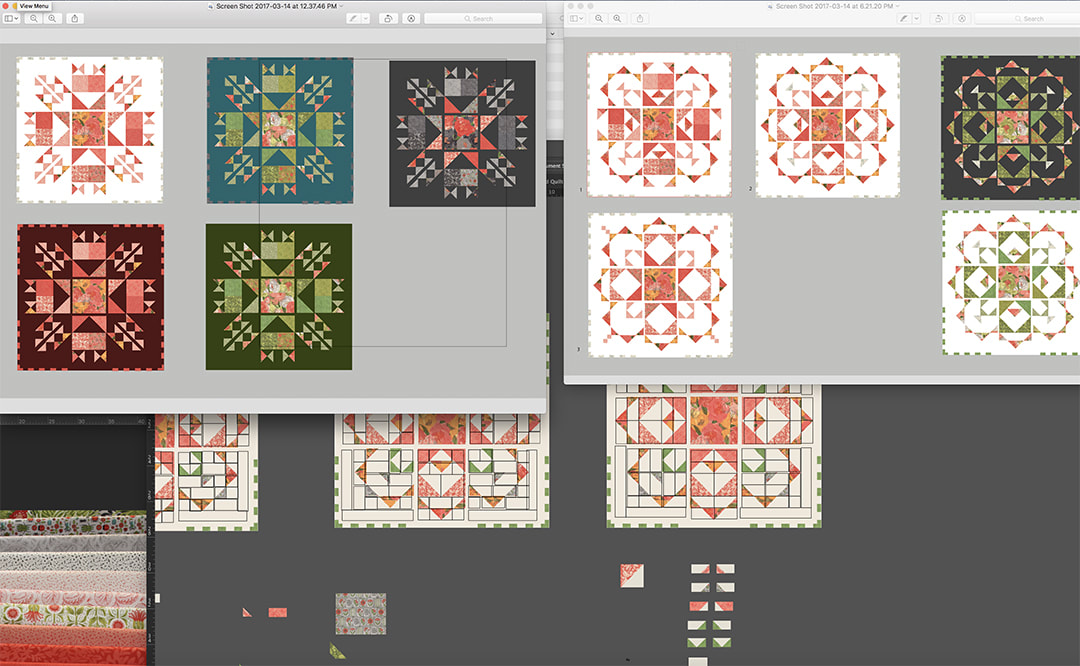 I love creating colorful florals and patterns. Each collection has a personality based on the florals and colors and I try to design quilts that go along with that in some way, either with larger panels to showcase large scale prints, or shapes of blocks that speak to some thing about the main flower. The image above shows part of the process I went through with Town Square Garden for the Blushing Peonies collection. In this case I knew I wanted to do a medallion quilt with a large center panel and started with images on the upper left. Peonies having such a beautiful rounded shape so I ended up using arcs of triangles to the outside to reference the curved softness and blooms (the images on the right). After I have the structure I like, I break it down into what blocks are the most logical to make and describe in instructions. 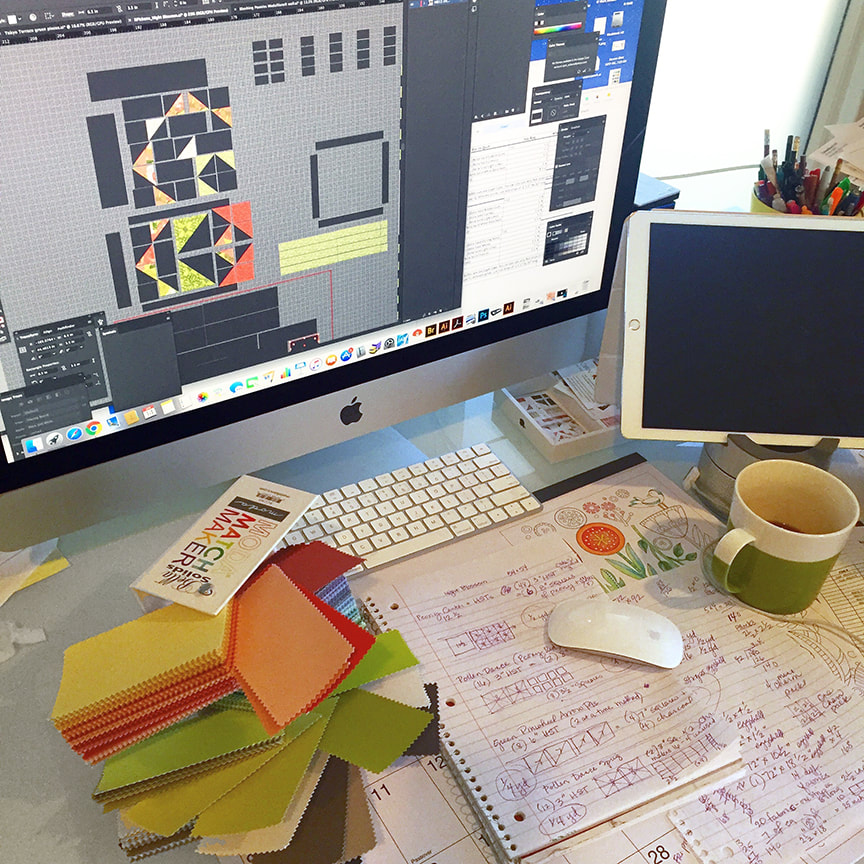 I use Moda Bella Solids with my prints and love the range of colors that coordinate perfectly. I get a lot of use out of my Bella Solids Match Maker and color swatches. The computer allows me to try new color combinations very quickly and easily. In figuring out blocks I also do a lot of drawing and scribbling in my notebooks. Sometimes nothing beats paper to jot stuff down on! 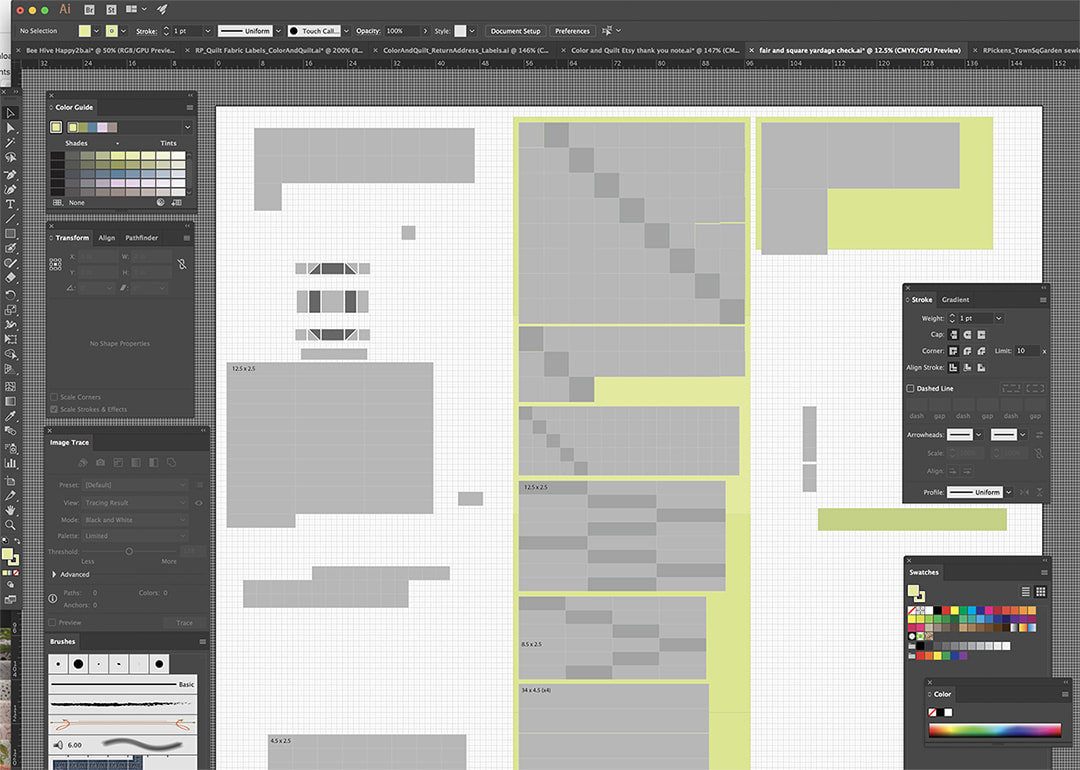 An important part of figuring out a quilt is the size, the scale, and the math of the yardage needed. I try to design some of my patterns to utilize precuts because they are such a handy way to get a whole coordinating collection with a lot of variety without having to buy tons of yardage for that much variety. If I'm using precuts, there are some parameters I stay within for piece sizes for my blocks. To figure out my yardage, I take all the little pieces I made in Illustrator and lay them out the way I would cut them on yards of fabric, as is shown on the image above. I'm sure there are faster ways to figure this out but I'm very visual in my thinking so this way works for me. Then there are the steps of making the actual quilts and finding out what doesn't happen the way I thought it would on the computer. I make revisions on instructions, finish quilts and photograph them (and that could be a whole different blog post). 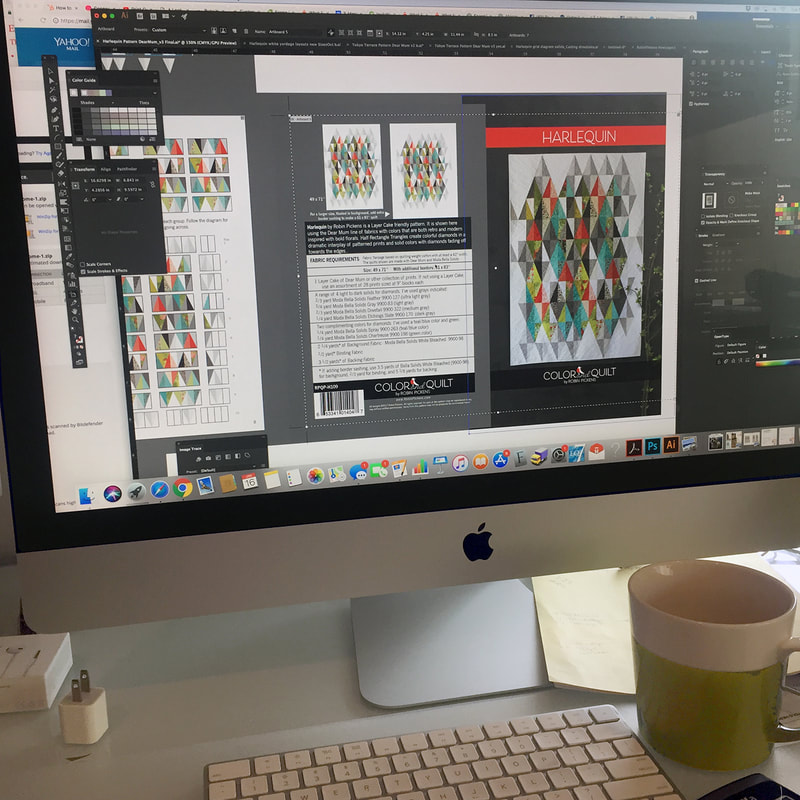 I've got a graphic design background so I handle all the diagrams and layouts myself. The writing of the instructions is often the most challenging part for me and I try to assume people have limited knowledge of piecing. Because I am newer to this, that's the way my brain thinks- simple steps please! I use a technical editor who goes over my patterns before printing and checks my instructions, terminology, yardage and math and any mistakes in my layouts. I get the layouts revised and it's off to press!  When the patterns come back from the printer my handy helper (my dear sweet husband) and I have marathon sessions bagging patterns. The dining room table, the kitchen counters, everything gets used fill the initial larger orders. And then woosh! off they go to shops and sewing rooms! 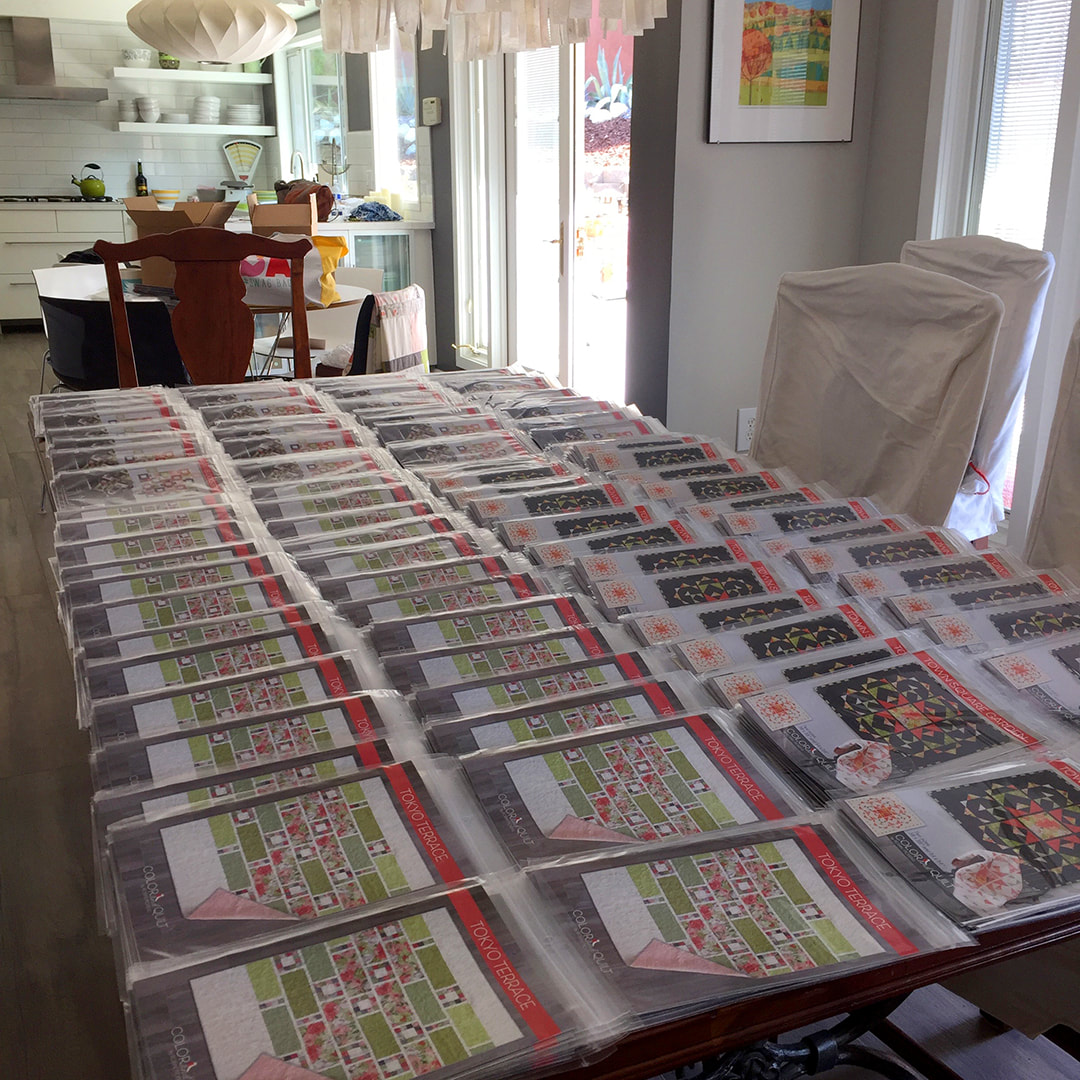  You may have noticed coffee cups in some of the shots...yes, lots of coffee when I'm deep in pattern-land! Hope you have enjoyed this little view into my process! If you'd like to check out some of these patterns they are carried in local quilt shops and on my shop. Happy sewing!! 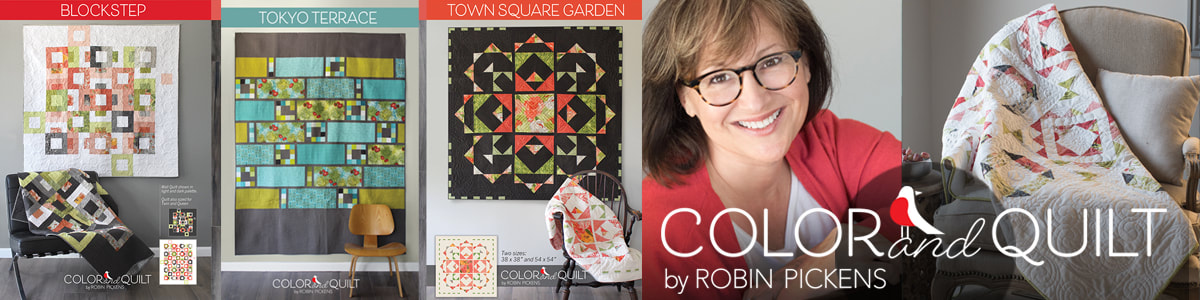 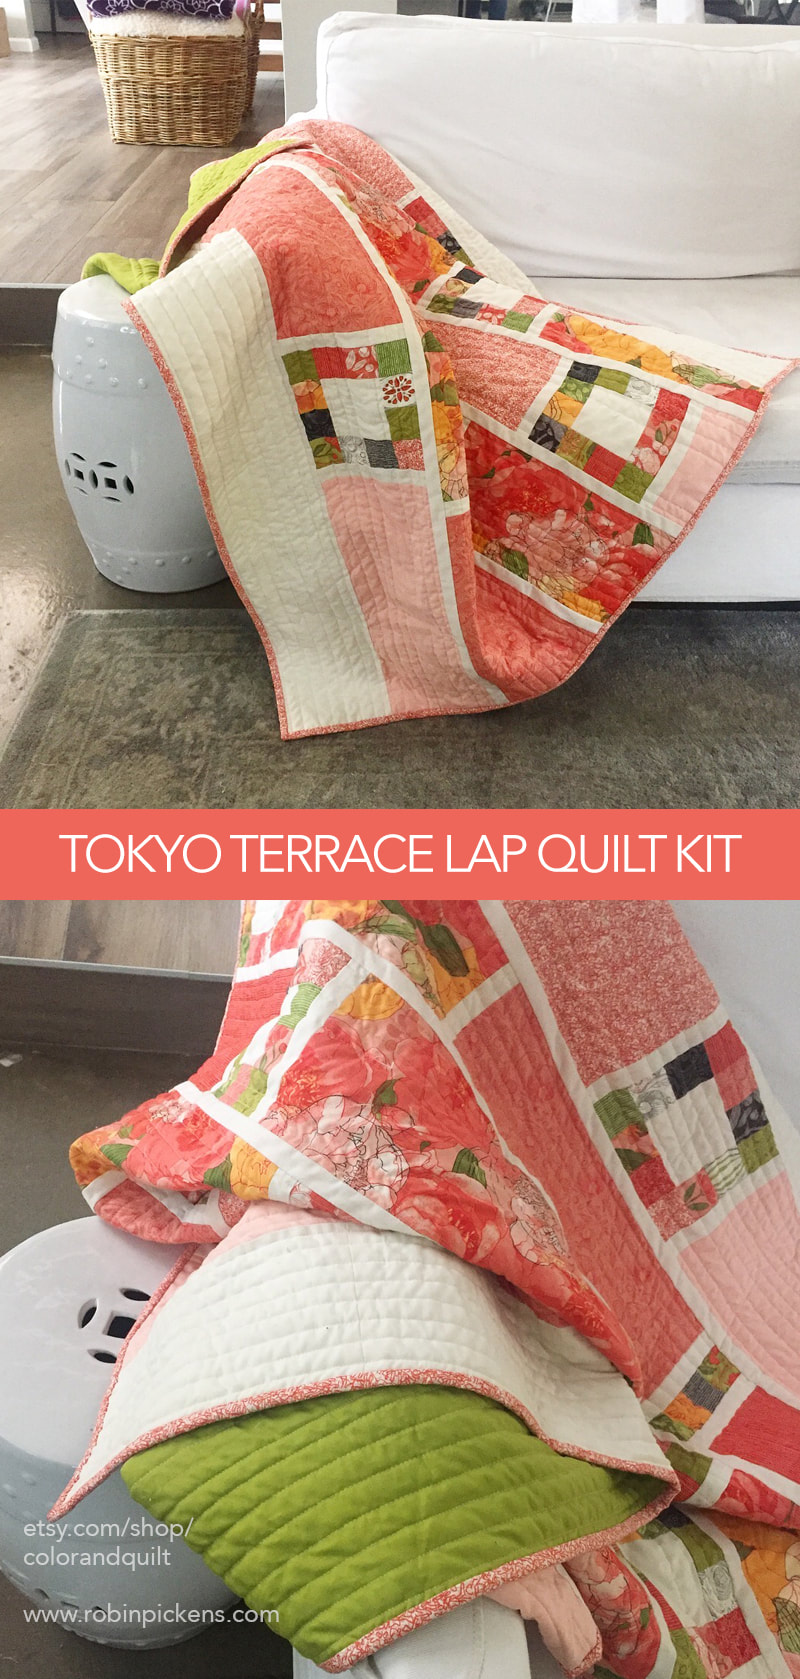 I had a request to size my Toyko Terrace quilt down to more of a lap size. I like to get feedback on my designs and I loved the idea of this as more of a lap quilt. So I resized it to 3/4 of the original size and shortened the top and bottom borders to come up with an overall size of 54" x 60". What I like about this size is I can comfortably quilt this on my home machine. Twin quilts and larger just feel too big and cumbersome for me to quilt on my home machine and they go to a long armer. This lap size I can handle. After sizing this down in the computer I decided to make one for myself. I still had not made the pink version I had originally planned in my Blushing Peonies collection so I added another fabric to the large panels for some more variety and pieced one in a weekend. I love that you can take your time with the patchwork squares or zoom through it out as a weekend project. This quilt is great for beginners. Very forgiving :) 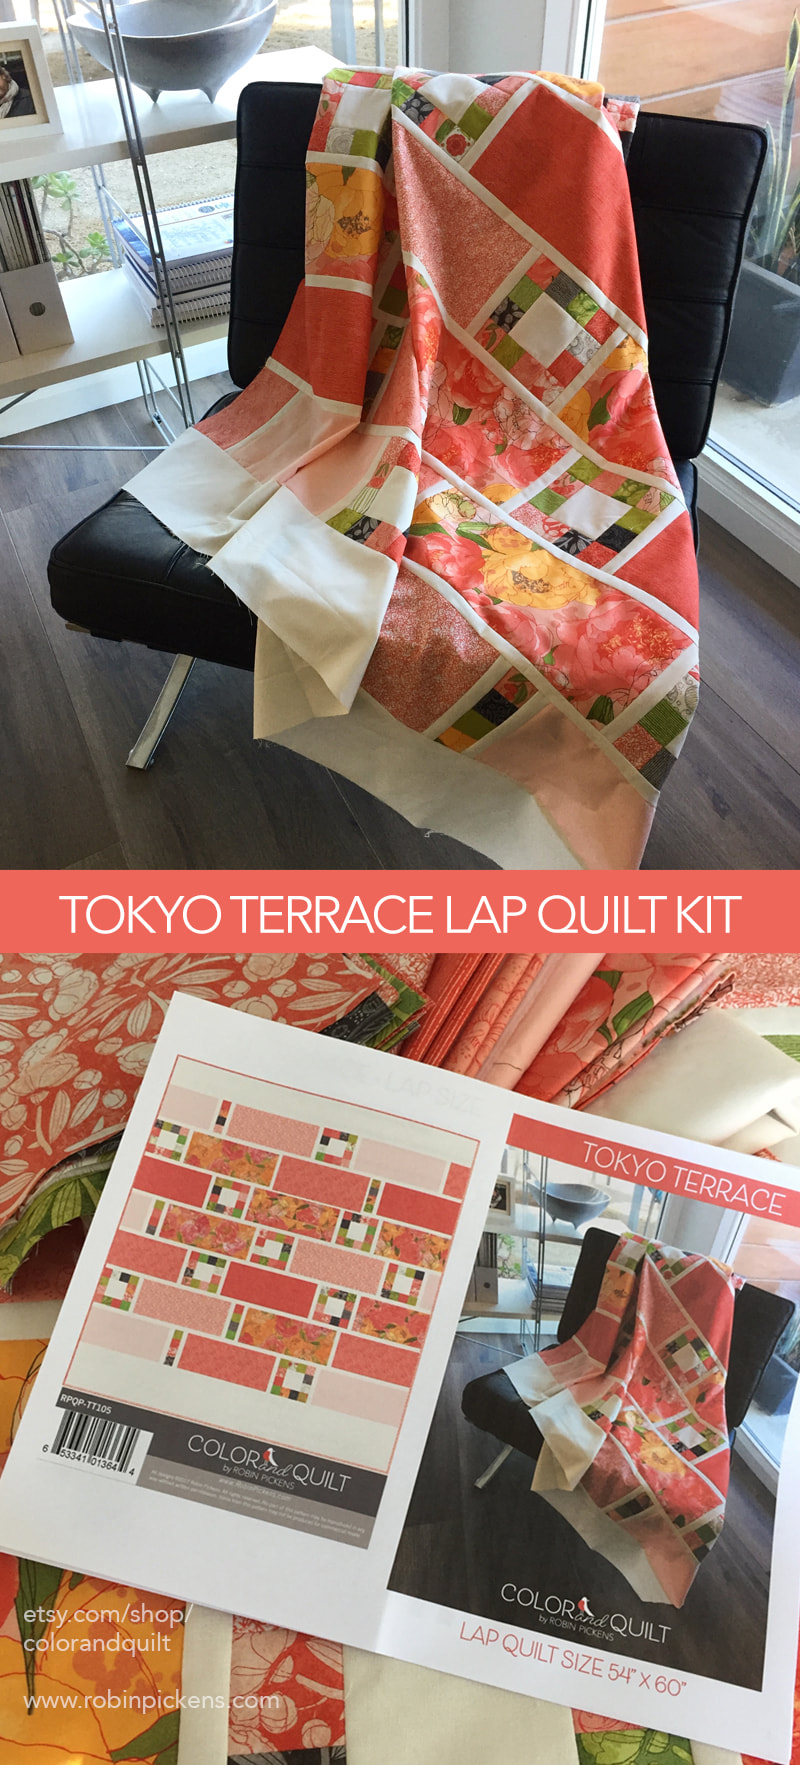 I am very happy with the range of pinks and warm colors- makes me happy! I've kitted this quilt and have it available in my etsy shop- limited quantities. If I'm out of stock just message me on etsy if you are interested and I'll make some more if I have the yardage available. Happy sewing!  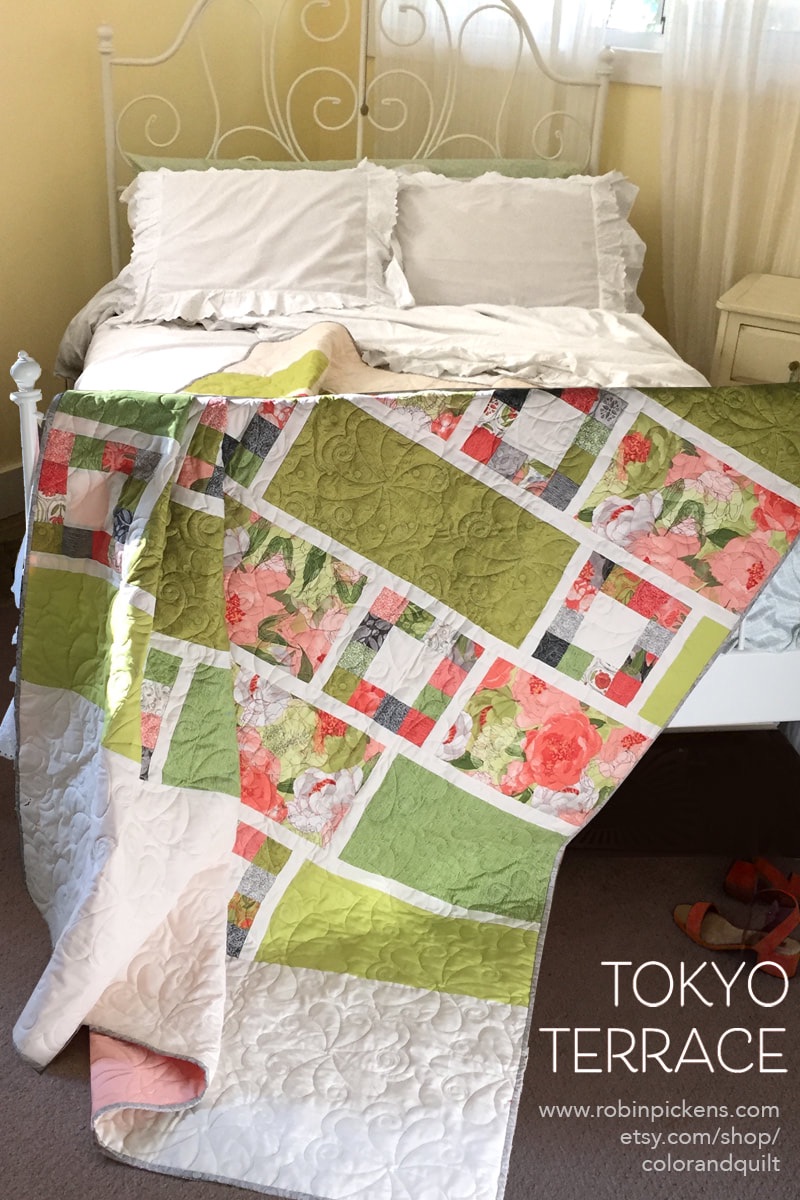 If you could see my fabric stash, you’d notice I fall in love with big dramatic patterns. I love a big statement. I like big flowers. Sometimes I really want to SEE more of that big design. That is why I also like to make some quilts that give space for a powerful print to have it’s spotlight. Think of it as a gallery wall or panel of windows. I knew I wanted to show off the large scale peonies in my "Blushing Peonies" line for Moda Fabrics. That idea inspired “Tokyo Terrace”…pockets of space to display the splendor, balconies of gardens and sunlit architectural structure. This pattern plays with the contrast between large panels to showcase a bold botanical print and small 2” squares in blocks that balance the large flower blocks. 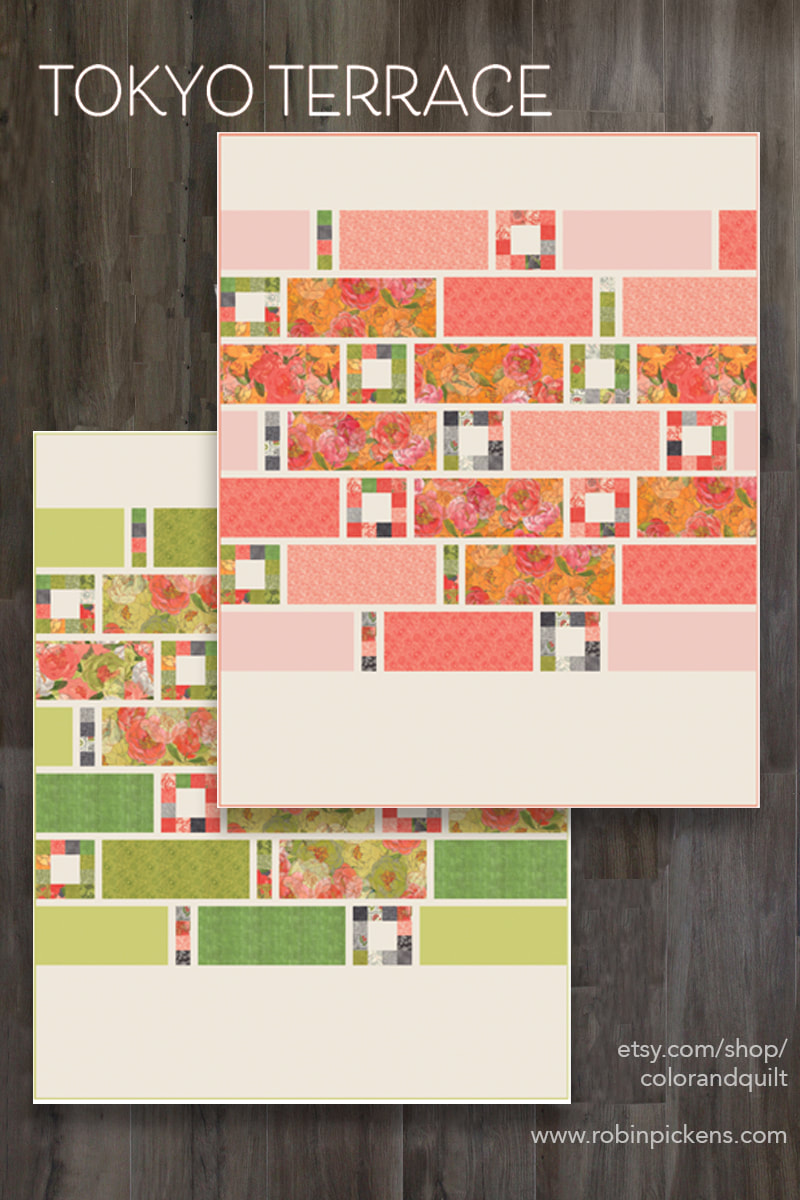 When working on this quilt, I enjoyed making the blocks of small squares and playing with my placement and balance of patterns and color. Then I love the great feeling when row after row comes together quickly with larger blocks. I pieced this in a weekend and I’ve already done another color version since it comes together so easily. Here is a computer-generated version of this quilt in a pink colorway as well as the green one I made. The above quilt was pieced by me but long-arm quilted by Tanya Heldman of Free Range Quilter. She used a lovely curved floral design that compliments the soft lines of the peonies and contrasts well with the geometric structure of the quilt. Blushing Peonies fabric with Moda is in quilt shops now. If your local quilt shop does not carry Tokyo Terrace pattern you can find it in my shop at https://robinpickensinc.com/ Criteria for Blushing Peonies Quilt #3: Something bold to go on my wall. Showcase a large central panel of floral fabric. Try a medallion that mimics the blooming of a flower. My solution: Town Square Garden.  I have a discrete group of three women I show my ideas to early on. My mother, my sister and my friend Darci. It is interesting how I will get three very similar answers or three completely different opinions. They are a great test group. With this one, it was my sister who commented that the first version was too Southwestern-Aztec looking. And it was. Okay, new challenge…use geometric shapes and suggest a more curved feeling of petals and layers. Finally I came upon this version and I have to say I am really happy with this one. I kept my big center square for the bold large scale florals to show off their colorful petals. The outer shapes mimic the open petals. But it is also reminds me of the structure of a town square with a beautiful park in the middle, blooming with life and activity, surrounded by blocks of shops and homes that radiate out. This reminds me of grabbing the picnic basket and heading to the town square to hear the band play while the park flowers blow softly in the warm sun. Evening sets as crickets chirp with the music and we lay on the picnic blanket and look up as the stars appear. It’s a small town, main street kind of weekend.  The long-arm quilting on this quilt was done by Tanya Heldman of Free Range Quilter in Los Angeles. She really had a great vision for the solid areas of the quilt. Growing vines, curves, arcs…it blows my mind how she sculpted the texture of the background. Thank you Tanya! Town Square Garden is carried by United Notions and ships to stores in early November when my Blushing Peonies collection for Moda Fabrics ships. I’m also carrying it in my shop at https://robinpickensinc.com/. Wall size here is 54” x 54”. The pattern also includes a scaled down version of 38 x38”. I am currently quilting that on my home machine and will post more pictures when it’s ready. I’d love to know…what is your preferred size for wall quilts? Garden on…quilt on…go visit the town square… 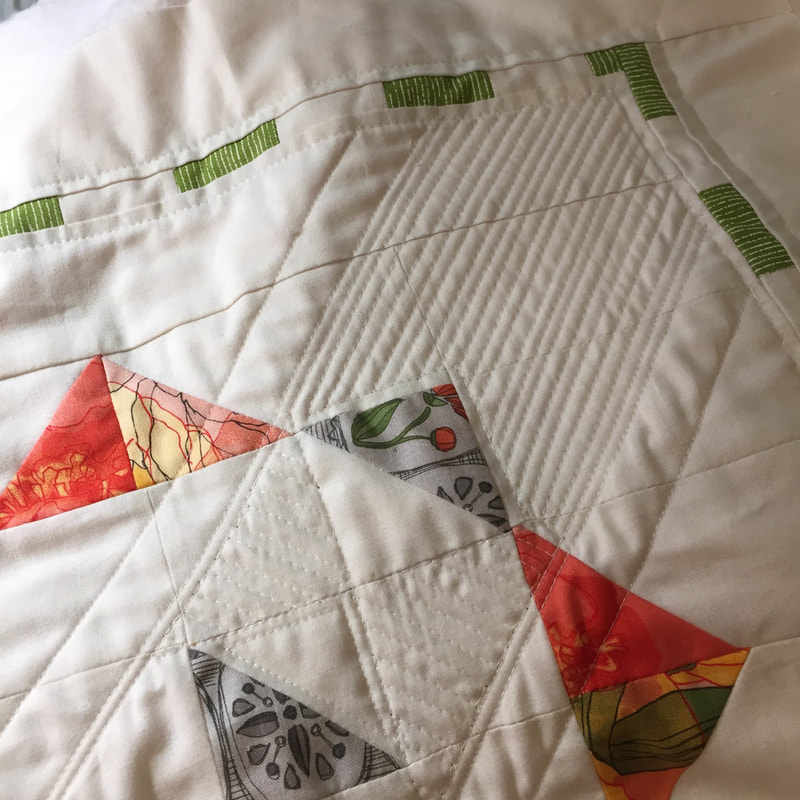  Blockstep is a flexible quilt pattern that is great for precut fabric-like layer cakes and jelly rolls or for using up assorted scraps that are at least 2 1/2" wide. The modern quilting design is an interplay of chunky square outlines and splitting them and playing with those sides, or brackets, in rotation. 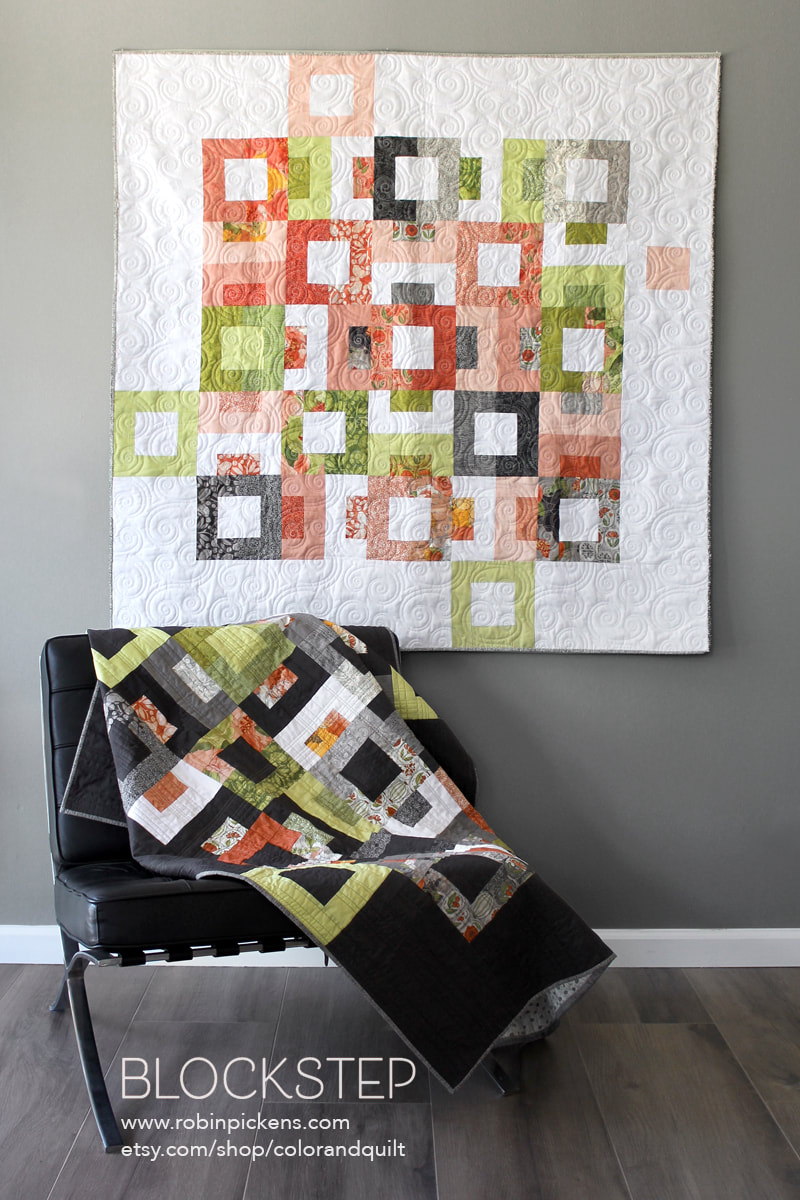 I first started playing with these simple shapes (or geometric shapes) when I was taking one of my first surface design classes at Otis College of Design. Repeats with rotation were part of the assignment, and I ended up creating this fun design. Since this design was originally artwork, I printed out this pattern to create some chic wall hangings for my home. The first wall hanging was for my kitchen, which I had done in solid colors. The colors I ended up choosing for the piece were shades of olive green, khaki, and some orange. I then created a red color-way print for the Christmas season to put on the wall. (It even ended up being printed by a company in reds and greens for some Christmas gift wrap). If you are a quilter and love modern quilt ideas or geometric quilt patterns, then you can thank my mother for this quilt. This is because it was my mother who commented that this would make an interesting quilt. I guess that suggestion hung in the back of my mind and finally came to life about 12 years later.  So, 12 years later, I am happy to finally introduce the Blockstep! Blockstep is an easy pattern that is great for beginner quilters who are wanting to try their hand at simple geometric quilting. The pattern takes square blocks and splits them and rotates them to create this ''complicated'' geometric design. However, this simple pattern is very easy to follow and takes less time to complete than you might think. Plus, the sewing pattern itself doesn't involve intricate quilting blocks or dramatic curves, which is why it's perfect for beginners or basic quilters. Now, with that being said, for all the advanced quilters out there, I would still recommend this pattern to you as well! With your sewing skill level being more ''advanced'', you will definitely have a quilt top made in no time at all. However, if you want to make this a bit more of a challenge for yourself, I recommend trying some free motion quilting on top or experimenting with different fabrics and really play with the combinations of light and dark and color arrangement. This is also a good design to take a more floral print and use it in what can be seen as a more modern arrangement, balanced with solids. I used the floral prints within the blocks and brackets and play with the balance of pattern against solid and am loving the versatility of the framework. Also, speaking of versatility, this pattern can easily be scaled up and down to create different size quilts, To adjust the size all you would need to do is add additional row of squares, either way, to move up to a queen or king-sized quilt. In my pattern, I included information for wall/lap (which could also work as cozy crib-size), twin, and queen. 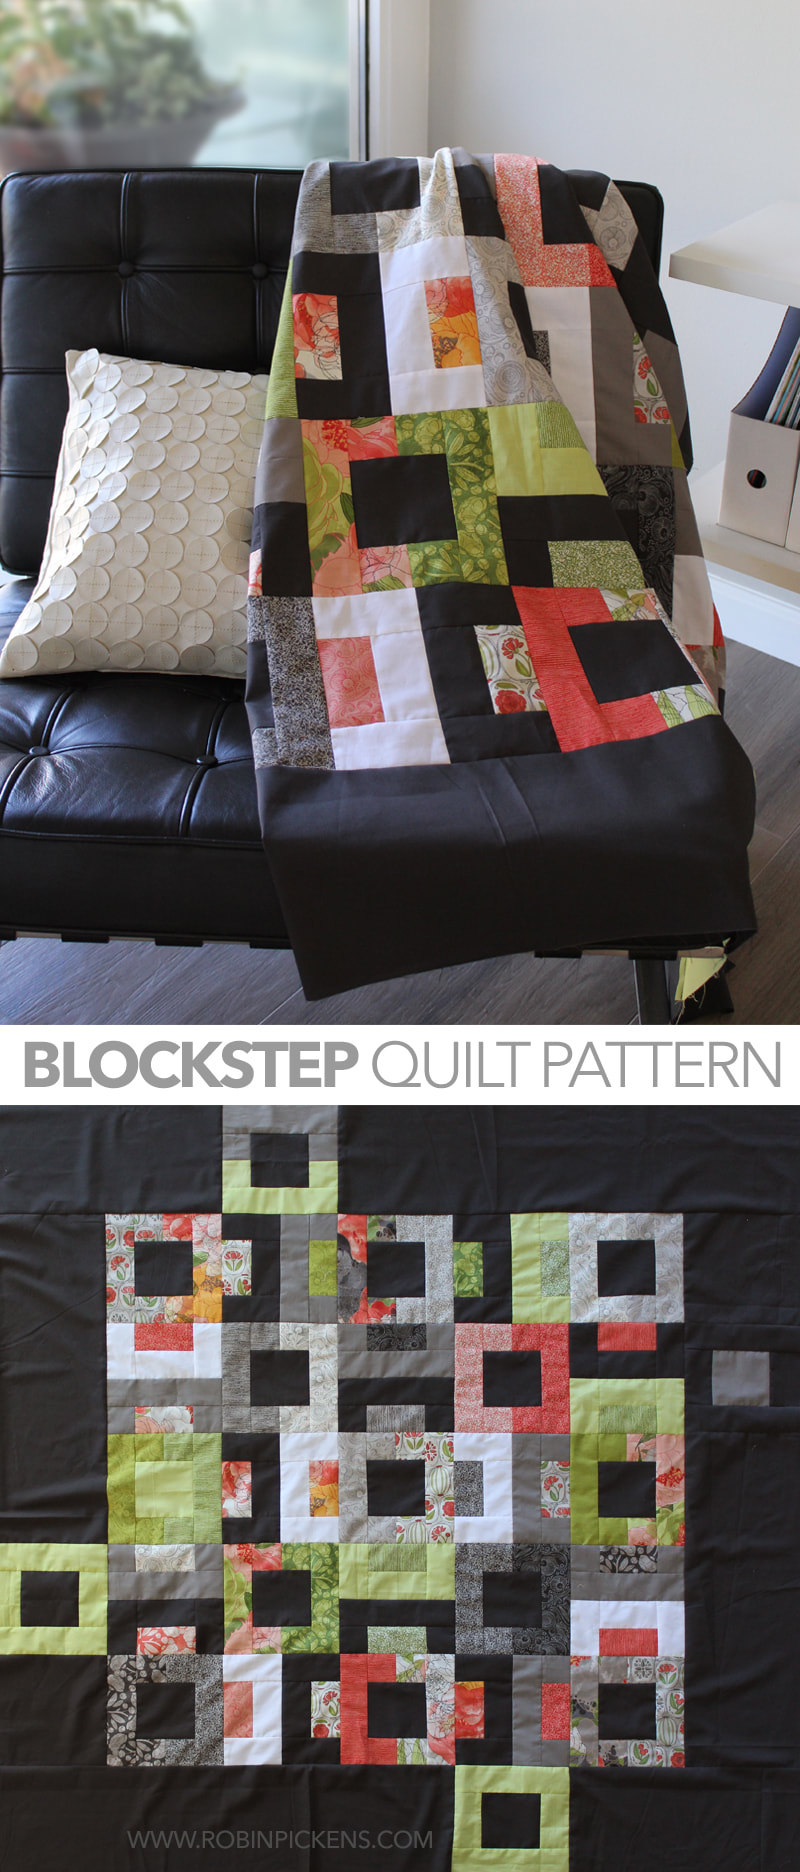 As someone who loves modern quilts, I wanted to step outside the box and try some modern techniques that you might not see in a traditional pattern. One of those modern and new techniques (at least for me) was stepping out into the borders with a square or block on each side! We don't always have to stay in the safe zone and out of the borders! Adding something extra to the borders is a great way to show off your favorite fabrics. For this dark version of the quilt, I used my own fabrics, but you could use layer cakes, jelly rolls, or even charm squares. This quilt is friendly to many sizes of precut fabrics. The fabric requirements in my pattern include yardage and step-by-step instructions to make a 56 1/2'' square lap or wall quilt, a 72 1/2 x 88 1/2" Twin sized quilt or a 88 1/2" square Queen size quilt. When I had this dark version quilted by the long-arm quilter, Sally Corona of Corona Quiltworks (the white background version was long-arm quilted by Tanya Heldman of Free Range Quilter) she really worked with the geometric structure of the quilt with straight clean lines done in random spacing horizontally. Then Sally took one section of blocks lined up vertically and quilted them with vertical lines in lime green which added high contrast to the other gray threads. I love it!! 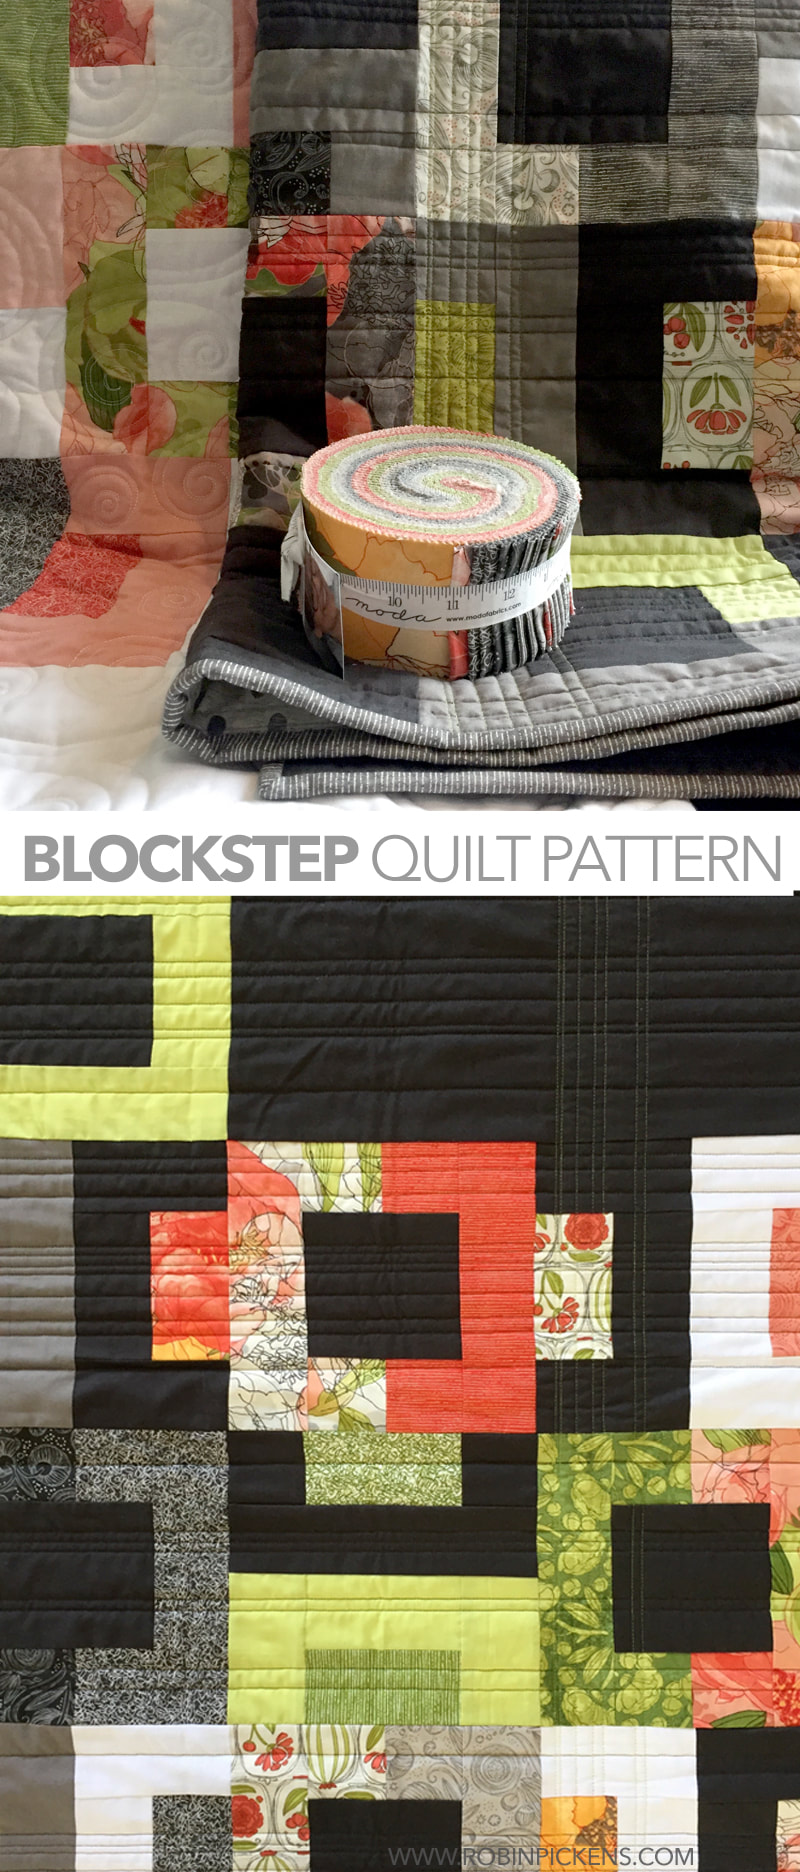 Step this way, turn that way, have some fun with Blockstep. PATTERN UPDATE! This pattern was updated with the release of Carolina Lilies fabric collection to make the cutting with accent colors a little more even. You can find the new and improved BLOCKSTEP at my shop at www.robinpickensinc.com. I showed three new quilt patterns with my Blushing Peonies fabrics for Moda. They are BLOCKSTEP, TOKYO TERRACE, and TOWN SQUARE GARDEN. 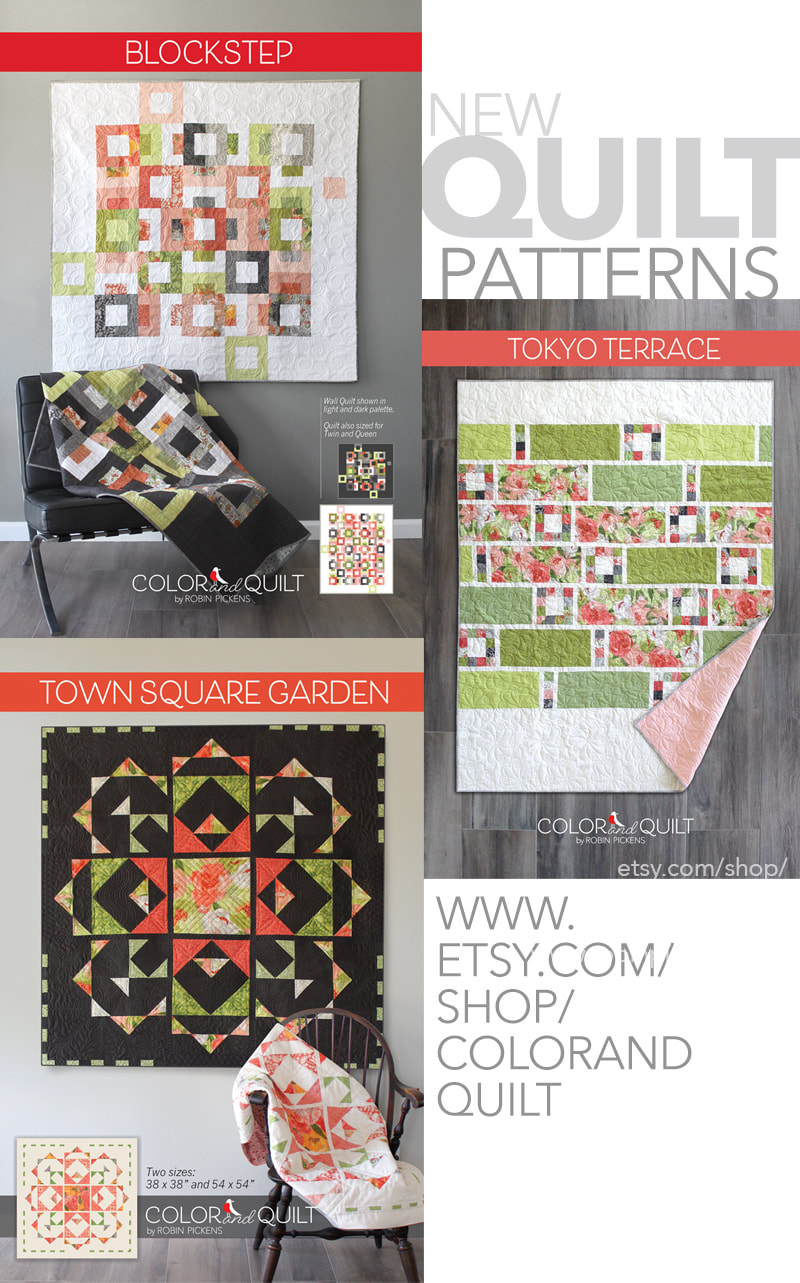 BLOCKSTEP can be made with precuts of a single Layer Cake or a Jelly Roll for ease of coordinating your print fabrics. Precuts can also give you a shortcut on TOKYO TERRACE by using Mini Charms for the small patchwork blocks that are interspersed between the larger rectangular panels. I like doing at least one quilt with a collection of fabrics that has larger panels that make it easy to showcase larger scale motifs. I like to do large-scale florals and show them off! TOWN SQUARE GARDEN is my first medallion quilt and it was a lot of fun to do. I'm currently doing quilting on my home sewing machine with my walking foot on the smaller light color wall quilt (it's 38" square vs. 54" square) and I'll share some pictures when it's further along! Feel free to visit the shop or look for these at your local quilt shop. The patterns will be shipping with the Blushing Peonies collection in November 2017. Also stay connected for "color play" when I do some computer experiments with other color ways of my quilts. Sew on! 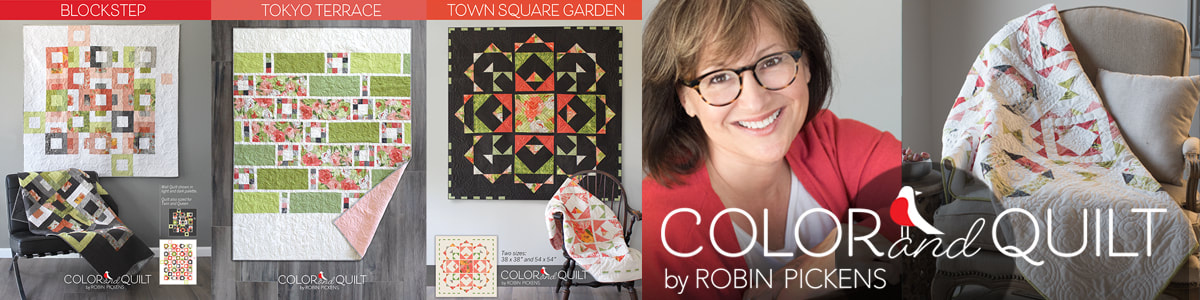 |

About ROBINDesigner of colorful florals for Moda fabrics. Modern to transitional quilt designer. Illustrator, sewist, crafter. I am proud to be a designer for Moda Fabrics!


Shop Robin's Designs
 I am an affiliate for Fat Quarter Shop and may earn a small commission through my links. Thank you for your support!

Check the March 6, 2017 Episode!
Categories
All
Archives
November 2023
© Robin Pickens Inc. All rights reserved. No images may be reproduced without permission.
|
 RSS Feed

